Showing posts with label semolina. Show all posts

Monday, March 11, 2019

Kalo Prama - Cypriot Semolina Cake #BakingBloggers

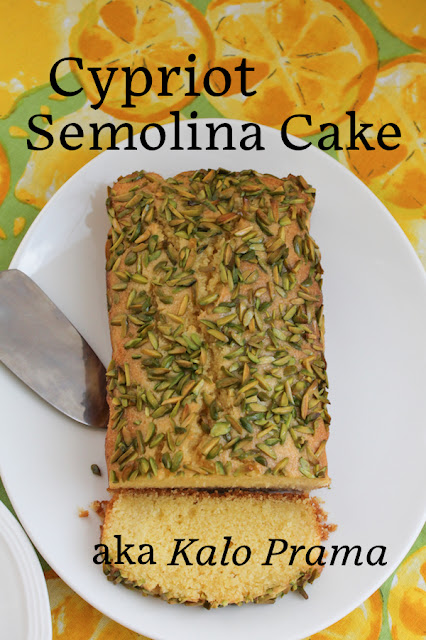
Kalo prama, καλό πράγμα in the original Greek, translates as “good stuff.” I can assure you that this Cypriot semolina cake is indeed very good stuff! The batter is easy and a lemon syrup adds even more flavor and a delightful stickiness that makes it hard to stop with just one slice.

Food Lust People Love: Kalo prama, καλό πράγμα in the original Greek, translates as “good stuff.” I can assure you that this Cypriot semolina cake is indeed very good stuff! The batter is easy and a lemon syrup adds even more flavor and a delightful stickiness that makes it hard to stop with just one slice.


Years and years ago, when I was in university, one of my best friends was a brilliant dark-haired girl with the widest smile and a wicked laugh. She was from Cyprus, a place I was completely unfamiliar with. Her small island nation was in still in upheaval after being invaded by Turkish forces in the mid-1970s, so she had been sent to study in the United States.

I’ve thought about her often over the years, especially just a couple of years ago when I planned a trip to Cyprus for a family holiday. I searched the student records at the University of Texas to see if I could find her whole name but without much luck. It is one of my deepest regrets that we lost touch.

While there is still a physical border between the Turkish held northeast and the Greek southwest, Cyprus is finally safe to visit. It is possible to cross over but we stayed on the Greek side in a gorgeous multilevel house built into a cliff, with a fabulous view of the sea. By day we explored the tourist sites, visited grocery stores and roadside stands (my favorite thing to do no matter where I go!) and in the evening we cooked tasty local ingredients for suppers at home and enjoyed the pool and view.

This special cake was on all the lunch menus, in all the local restaurants.

Kalo Prama or Cypriot Semolina Cake

I must confess: The pistachios are not traditional. Most recipes call for blanched almonds to decorate kalo prama. I’ve been trying to use the contents of my freezer and I could not resist adding the colorful pistachios instead of plain white almonds that I would have had to go out and buy. By all means use almonds if you have them. My recipe is adapted from one at SBS.au.

Ingredients
For the cake batter:
1/2 cup or 100g sugar
1/2 cup or 113g unsalted butter, softened
1 cup or 185g fine semolina
1 cup or 125g flour
1 teaspoon baking powder
1/2 teaspoon vanilla extract
1/4 teaspoon salt
3 eggs, lightly beaten

For the syrup:
1 cup or 200g sugar
1/3 cup or 90ml water
1/4 teaspoon vanilla extract
1 tablespoon fresh lemon juice

Optional to decorate: blanched almonds or pistachio slivers

Method
Preheat the oven to 350°F or 180°C. Line a loaf pan with baking parchment.

To make the cake batter, whisk the butter and sugar together until light and creamy.


Add in the semolina, flour, vanilla and salt. Mix well. Finally, beat in the eggs until completely combined.


Spoon the batter into your prepared baking pan and smooth out the top.

Top with almonds or slivered pistachios, if desired.

Food Lust People Love: Kalo prama, καλό πράγμα in the original Greek, translates as “good stuff.” I can assure you that this Cypriot semolina cake is indeed very good stuff! The batter is easy and a lemon syrup adds even more flavor and a delightful stickiness that makes it hard to stop with just one slice.


Bake for about 25 minutes, or until a skewer inserted into middle of cake comes out clean.

While the cake is baking, make the syrup by warming all of the ingredients in a small pot, stirring until the sugar has dissolved. Set aside to cool.


As I was researching recipes, I came across this piece of advice from the Greek Food Alchemist: “Another big tip when adding syrup to a Greek or Cypriot dessert is to always have one cold. So if your cake is hot your syrup should be cold and vice versa. If both are hot then the dessert will crumble before your eyes beyond salvation (based on personal experience!)”

When your cake is finished baking, pour a little cool syrup over the hot cake. Once it has soaked in, add a bit more and wait for it to soak in. Repeat until all of the syrup is absorbed.

Food Lust People Love: Kalo prama, καλό πράγμα in the original Greek, translates as “good stuff.” I can assure you that this Cypriot semolina cake is indeed very good stuff! The batter is easy and a lemon syrup adds even more flavor and a delightful stickiness that makes it hard to stop with just one slice.


Leave to cool completely, then slice to serve.

Food Lust People Love: Kalo prama, καλό πράγμα in the original Greek, translates as “good stuff.” I can assure you that this Cypriot semolina cake is indeed very good stuff! The batter is easy and a lemon syrup adds even more flavor and a delightful stickiness that makes it hard to stop with just one slice.


Enjoy!

Food Lust People Love: Kalo prama, καλό πράγμα in the original Greek, translates as “good stuff.” I can assure you that this Cypriot semolina cake is indeed very good stuff! The batter is easy and a lemon syrup adds even more flavor and a delightful stickiness that makes it hard to stop with just one slice.


This month my Baking Blogger friends are sharing Greek, Cypriot or Turkish recipes. Make sure you check them all out! Many thanks to our host, Wendy of A Day in the Life on the Farm.

Baking Bloggers is a friendly group of food bloggers who vote on a shared theme and then post recipes to fit that theme one the second Monday of each month. If you are a food blogger interested in joining in, inquire at our Baking Bloggers Facebook group. We'd be honored if you would join us in our baking adventures.

Pin this Kalo Prama - Cypriot Semolina Cake! 

Food Lust People Love: Kalo prama, καλό πράγμα in the original Greek, translates as “good stuff.” I can assure you that this Cypriot semolina cake is indeed very good stuff! The batter is easy and a lemon syrup adds even more flavor and a delightful stickiness that makes it hard to stop with just one slice.
 .

Tuesday, May 19, 2015

Camel Milk Caramel Basbousa #CreativeCookieExchange


Basbousa are little squares or diamonds made with semolina dough that are traditionally topped with almonds and then soaked with rose flavored syrup when hot. For a twist to the typical recipe, I’ve soaked mine in caramel syrup made out of camel milk. 

Sometimes for these Creative Cookie Exchange posts I have a recipe in mind – sometimes even baked - weeks ahead of time because our organizer, Laura from The Spiced Life reveals the theme several months in advance, to help us plan. But this month, with the delicious theme of caramel, I just wasn’t finding inspiration anywhere. Until my fellow CCE member, co-creator of Bread Bakers and friend, Renee from Magnolia Days asked the following question in the group: “Does dulce de leche count as caramel or is it strictly caramel for the May event?” This set off a flurry of comments where several of us defended dulce as absolutely a caramel and got me thinking about the camel milk cajeta or dulce de leche sitting in my refrigerator. It does keep for months, but why not use some of it in a cookie? So the wheels started turning.

Camel milk caramel can certainly be put in any cookie. But wouldn’t it be fun to find an Arabic one to use it in? Hence, the basbousa. With their traditional sugar syrup, I’ve always found basbousa too sweet – and I’m not a fan of rose water and rose essence, which taste like eating soap to me – but with the addition of the sweet and slightly salty camel milk caramel, they are perfect. Another treat entirely.

So, with my apologies to the Arabic world in general, and Egypt in particular, I've adapted from this recipe from SBS.com.au.  Do watch the video if you are making the original, because the instructions differ from the written recipe. I’ve written mine to include the half hour rest, for instance.

Ingredients
1 1/8 cups or 215g coarse semolina
3/4 cup or 50g freshly grated coconut
1/2 cup or 100g sugar
1/4 cup or 30g flour
1/2 teaspoon baking powder
1/4 teaspoon salt
2/3 cup or 100g thick yogurt or crème fraîche
7 tablespoons or 100g unsalted butter, melted and cooled
16-30 whole almonds, depending on how small you cut your basbousa.

For the caramel syrup:
1/2 cup or 120ml dulce de leche, cajeta or thick caramel. I used a camel milk version, instructions here.
1-2 teaspoons milk

Method
Grease an 8x8 in or 20x20cm baking pan and set it aside.

Mix the semolina, coconut, sugar, flour, baking powder and salt together in a large bowl.


Add in the yogurt and melted, cooled butter and mix well.


Your dough should be fairly stiff but pliable.


Spread the mixture with your hands into your greased baking pan. Make sure to get it right up to the sides and nice and even.


Cover with a towel and let rest for half an hour. When the time is almost up, preheat the oven to 350°F or 180°C.

Cut the dough into diamond shapes then press an almond into each one. I chose to cut mine pretty small, but you can certainly cut yours larger. You just won’t need as many almonds then.


Bake in your preheated oven for 20–25 minutes or until golden brown. While it's baking make the caramel syrup.

Put the stiff caramel in the microwave in a microwave safe bowl and warm it slightly, just to loosen it. Add a little milk to make it even more runny and stir well till the milk is completely incorporated. You are looking for the consistency of maple or chocolate syrup.

Right when the hot cake comes out of the oven, pour the caramel syrup over it.


It sits there for a few short minutes.

Then it sinks in, leaving the almonds with a lovely shine.

Cool to serve and use a sharp knife to cut through again and lift them out.


Enjoy! Basbousa is a term of endearment in Arabic meaning something like "little sweet," so make these for your basbousa.


Are you looking for more caramel cookie goodness? Here you go!


If you are a blogger and want to join in the fun, contact Laura at thespicedlife AT gmail DOT com and she will get you added to our Facebook group, where we discuss our cookies and share links.

You can also use us as a great resource for cookie recipes - be sure to check out our Pinterest Board and our monthly posts. You can find all of them on our home page at The Spiced Life. We post all together on the first Tuesday after the 15th of each month!


.

Tuesday, March 10, 2015

Khobz Mzaweq - Moroccan Decorated Bread #BreadBakers

Khobz Mzaweg or decorated yeast bread is a specialty loaf from Morocco, so called because of the pattern created with a sharp blade, the shiny egg yolk wash and the sprinkling of both sesame and nigella seeds before baking.


I had a friend ask me yesterday, wasn’t it kind of expensive, running this blog, buying the ingredients and then, often, giving the baked goods away? I explained that, aside from the dishes I do share, we eat everything that is baked or cooked in my kitchen, most of what you see written about here was breakfast or lunch or dinner. Also, I do make pocket change money from folks who use my Amazon affiliate links to make a purchase. But the most valuable part of this space for me is the way it stretches me to try new recipes, different ingredients and unusual methods

I belong to several food bloggers groups that post every month with themes which require me to do some research and, often, delve into other cultures or use ingredients that I may not have tried before. This is so much more than just cooking and eating and writing. It is the life-long adventure of learning.

This month our Bread Bakers host Karen from Karen’s Kitchen Stories chose seeds as our theme. Now for Bread Bakers, any bread will do, be it yeast or sourdough or even quick bread so the options for a bread with seeds were wide open. I did a quick search online and one of the first recipes that came up was the loaf made for today’s post, khobz mzaweg

I had never heard of it before but I couldn’t resist the golden crust with the diamond pattern, scattered with seeds! But here’s the funny thing, as soon as I took the first bite, I knew I had tasted a bread like this before. Nigella seeds aside, it reminded me of the great big wonderful sesame sprinkled Italian loaves that muffuletta sandwiches are served on in New Orleans. Turns out, khobz mzaweg are often used for sandwiches in Morocco as well. Small world.

Khobz Mzaweq - Moroccan Decorated Bread

The recipe for my khobz (meaning bread) and mzaweg (meaning decorated) was adapted from this one on About.com. Make sure you scroll on down to see the other lovely seeded breads my fellow Bread Bakers have created for you today!
 
Ingredients
2 1/2 cups or 315g white flour, plus extra for kneading
1 1/2 cups or 190g fine semolina
1 tablespoon sugar
2 teaspoons salt
2 teaspoons sesame seeds, plus extra for sprinkling on top
2 teaspoons nigella seeds, plus extra for sprinkling on top
1/4 oz or 7g yeast (I used one packet of Fleischmann’s Rapid Rise.)
2 tablespoons vegetable oil
1 whole egg
About 1 cup or 240ml warm water
1 egg yolk – for the egg wash

Method
Prepare a baking sheet by lining it with parchment paper or by oiling the center. Or you can dust it with a little fine semolina. I used a silicone mat to roll mine out, then I transferred the whole shebang to the baking tray, so I skipped this step.

In a small bowl, put your yeast, sugar and a couple of tablespoons of the flour. Add in about one third of the warm water and leave to proof for about 10 minutes. If it gets all foamy, proceed with the recipe. If you have no reaction, your yeast is dead. Buy some more yeast and start again.

Foamy and we are good to go!


In the mixing bowl of your stand mixer, put the balance of your flour, the semolina, the salt and the sesame and nigella seeds and mix well.


Add in the egg, the oil and the contents of your frothy yeast bowl.  Pour in the rest of the warm water.


Mix until all the ingredients are well combined and you have a soft dough.

Use the dough hook in your machine or turn the dough out onto a clean floured surface to knead until smooth and stretchy. This takes about 10 minutes. I did the kneading by hand because I sometimes find that I have to add too much extra flour to get my bread hook not to stick in the middle of a soft dough.


Shape the dough into a nice ball and place it on your prepared pan (or silicone mat.) Cover with a clean towel and leave to rest of 10-15 minutes.


After the dough has rested, press it out gently to flatten the dough into a large circle about 13 inches or 33cm across. Cover again with the towel and leave to rise about one hour in a warm place. I placed my silicone mat on the baking pan and balanced it over a sink filled with very hot water.


When your hour is almost up, preheat your oven to 400°F or 200°C.

Whisk the egg yolk with a little water to thin it enough to brush on the dough. A teaspoon or two will usually do the trick.

Lightly score the top of the bread with a very sharp knife or a lame, which is essentially a curved razorblade with a handle. I bought my first one from King Arthur Flour a thousand years ago when they were not yet online and would send out a physical catalog. I carved my order out on stone with a chisel. Or sent them a fax. Same difference now. Seems like it’s gotten some poor reviews but I love mine!


Use a pastry brush to paint the top of the dough with the egg yolk wash.


Sprinkle on some more sesame seeds and nigella seeds to decorate.


Bake the loaf in your preheated oven for about 20-25 minutes or until it is golden brown all over and sounds hollow when tapped.


Even the bottom has a lovely color, doesn't it?

Slide it off your pan onto a wire rack to cool.


Enjoy!


After enjoying a sliver or two warm with butter, I allowed the whole thing to cool completely and I probably don't even have to tell you, because I'm sure you know, I went straight out and got my ingredients and I made a muffuletta, right?


Seeds are the beginning of most plant life but they are also the impetus for some great breads this month! Again, thanks to Karen from Karen's Kitchen Stories for the great theme!


#BreadBakers is a group of bread loving bakers who get together once a month to bake bread with a common ingredient or theme. Follow our Pinterest board right here. Links are also updated each month on this home page.

We take turns hosting each month and choosing the theme/ingredient.

If you are a food blogger and would like to join us, just send me an email with your blog URL to foodlustpeoplelove@gmail.com.


Little hint: If you are going to take photos on the rug, keep a sharp eye out for your helper who might suddenly appear in the viewfinder.


.


Tuesday, April 17, 2012

Parmesan and Brie Topped Baby Zucchini in a Semolina Crust


Zucchini is caramelized on the stovetop then added to a golden baked semolina crust and topped with Parmesan and Brie for a lovely vegetarian main course, perfect for brunch, lunch or dinner. 

Moving to a new country is all about learning.  Learning the culture, learning the language, trying to find familiar in the unfamiliar and somehow easing into it to create a life where you can be comfortable.  It means readjusting expectations and acknowledging reality, no matter how uncomfortable that may be. 

We always thought we were doing the right thing, this moving around.  First of all, the wide world is where the job was.  Secondly, what an experience for our family, our daughters!  And, I think they both get that.  But what I am not sure they get is that the moves don’t stop when they leave home.  Lately I have been getting a little push back about coming to Cairo to visit.  It seems they are prepared not to like it.  It’s not home.  Yeah, I know that.  And for them it will most likely never be home.  (Heck, I’m still working on that feeling myself!)  I know they objected to every move we made as a family.  I was not prepared for resistance to a move that didn’t technically include their having to adjust to no friends and a new school. 

What I have learned from experience is that the last place is always my favorite because of friends and familiarity and all the little attachments we take for granted when we are there.  It takes a long time for the new place to get like that.   But you have to be willing to give it a chance.  When I had elder daughter, I could never imagine loving another human person as much as I loved her sweet little self.  And then precious younger daughter came along.  And my heart stretched to more love.  I think homes are that way.  You don’t have to love just one.  You can grow to love them all.  But you have to open your mind and heart and risk the hurt of someday leaving, to revel in and relish the place where you are.  So I am working on that.

Yesterday was a holiday in my new home.  I have learned about Sham el-Nessim,  which began as an ancient rite, to celebrate new life and creation.  Nessim means "zephyr," the spring breeze, and sham means "to breathe in."  The date is set to coincide with Easter Monday on the Eastern Orthodox Church calendar, but all Egyptians take part by getting into the great outdoors to picnic on the Nile, in parks or the zoo, and apparently eat salted, fermented fish, while breathing in the Spring air.  While I love a good picnic, this holiday was about faffing about in the kitchen for me, while dear husband got on with his outdoor projects of repairing his dartboard and small barbecue table, which had been damaged in the move.  I did open the windows wide and the zephyr blew through most refreshingly.  And, in honor of Spring, some of my seedlings are sprouting!


Ingredients
For the crust:
1 1/2 cups or 360ml vegetable stock
 3 oz or 85g semolina
3/4 oz 20g Parmesan cheese, finely grated
1 tablespoon fresh thyme leaves (if substituting dried thyme, use half that amount)
1 egg
Olive oil

For the filling:
1 1/2 lbs or 680g baby zucchini (if substituting bigger zucchini, cut out the soft, fluffy inside part where the seeds are)
Sea salt
Black pepper
3/4 oz 20g Parmesan cheese, finely grated
4 1/4 oz or 120g Brie or other soft full fat cheese
1/4 cup or 20g breadcrumbs

Method
Preheat your oven to 350°F or 180°C.

Place the stock in a large saucepan and bring to the boil.  Add the semolina in a steady trickle, stirring continuously.  Keep stirring for three to four minutes until the mixture is thick and fairly solid.  Set aside and leave to cool slightly.


Add the thyme, egg and half of all the Parmesan cheese to the semolina mixture.  This will require a few minutes of turning and pressing with the back of your stirring spoon to incorporate.  Just keep on mixing till it’s smooth again. 

That is a whole egg.  You just can't see the white.


Oil a normal pie plate with a drizzle of olive oil.  Spread your semolina dough on the bottom and up the sides of the pan.  Wet your hands slightly to stop the dough from sticking to you.  Drizzle on a little more olive oil and spread it around gently with a pastry brush.


Pop this in the oven for about 25-30 minutes or until you have some browning around the edges.


Meanwhile, wash your zucchini, cut the tops and tails off and cut them lengthwise into quarters and slice your garlic.


Heat a non-stick skillet up on the stove and when it is roasting hot, dump all the zucchini into the pan.  No oil yet!


Cook on high, stirring or tossing frequently, until the zucchini get lots of nice brown bits all over, which takes about 5-8 minutes.  


Sprinkle with salt and pepper and then add in the garlic.  Turn the heat down to medium.


Give the whole thing a liberal dose of olive oil and toss or stir the zucchini and garlic around in the pan for another minute or two.  Turn the fire off.


Chop your Brie or other melty cheese into little pieces.  Take off the outside rind if you want to.  Mine was hard and dried in a couple of places, so I removed that and left the rest. 


Add the breadcrumbs which will help the Brie pieces stop sticking all together. With your hands, gently mix the Brie with the Parmesan and the breadcrumbs.


When your pie crust is done, take it out of the oven, but leave the oven on.  Tip the zucchini and garlic into the crust and then try to arrange them somewhat neatly. 


Cover the top with your cheese and breadcrumb mixture and pop the pie back in the oven.


Bake for 20-25 minutes or until the cheese is melted and it is lightly browned.


Here’s where my husband wanders in, his projects finished, and says “Whatcha cooking?”  And when I answer "baby zucchini baked with Brie," his eyes light up and I laugh out loud with the man who loves my cooking.  And dotes on his daughters.  I know they will come around to see why visiting Cairo is a good idea.  Because we are here and we are trying to make it a home.  Just doing our best with open hearts. And, at least yesterday, open windows. 


Enjoy!