Showing posts with label yeast recipes. Show all posts

Tuesday, August 11, 2020

Pain de Mie aka Pullman Loaf #BreadBakers

Pain de Mie is the sandwich bread of my childhood dreams, soft inside with very little crust. It makes great toast, grilled cheese sandwiches and it’s perfect for those little finger sandwiches we love to eat at bridal showers and parties.


This is a loaf I’ve been wanting to make for the longest time but I struggled with spending the money for a pan I might not use that often. My fellow Bread Baker Karen came to the rescue by proposing a theme of sandwich bread for this month’s challenge. Now I had a good excuse! And also a forward plan for at least one further use.

When we lived in Brazil, one of my favorite brunch dishes was something they called torta salgada or savory pie. It started with a loaf of sandwich bread that was cut lengthwise instead of in the usual square slices. You could buy it like that in the grocery store, that’s how common torta salgada was!

The long bread slices were stacked one upon the other like a layer cake but filled in between with chicken salad, ham, cheese, tuna salad, salami or sometimes even a combination of fillings. Then the whole thing was topped or covered in softened cream cheese, just like a cake, and decorated with veggies or, my personal favorite, matchstick potatoes. It was chilled then cut slices to serve. Now with my Pullman loaf pan, I’ll be able to make my own torta salgada.

Why is it called a Pullman Loaf? 
According Wikipedia: "The name "Pullman" was derived from its use in the kitchens of the Pullman railway cars. Although the Pullman Company is credited with inventing the lidded baking pans used to create the square loaves, square tin pans existed long before the railroad company. European bread makers began using the pans in the early 18th century to minimize crust. However, George Pullman chose the loaf for use on his railcars for efficiency reasons. Three Pullman loaves occupied the same space as two standard round-topped loaves, thus maximizing the use of space in the small Pullman kitchen."

This type of bread is sold in France as pain (bread) de mie (the soft crumb inside.)

Pain de Mie aka Pullman Loaf 

This recipe is adapted from one on the King Arthur Flour website. I didn’t have potato flour, so I substituted cornstarch, a KAF recommended alternative that came with the caveat that some flavor in the bread would be lacking. To add that flavor back in, I used potato water (water in which washed, unpeeled, cubed potatoes had been boiled till tender) instead the plain lukewarm water in the KAF recipe. I have to tell you that this loaf is wonderful so I don't think I'd make it any other way.

Ingredients
1 cup or 240ml lukewarm potato water
2 teaspoons active dry yeast
3 tablespoons or 37g sugar
4 3/4 cups or 567g unbleached all-purpose flour
2/3 cup or 156ml milk, warmed slightly
6 tablespoons or 85g butter, softened at room temperature
1/4 cup or 28g non-fat dry milk
3 tablespoons or 20g cornstarch
2 1/4 teaspoons salt
2-3 teaspoons canola or other light oil for oiling the dough bowl and the baking pan

Method
Add the yeast and one tablespoon of the sugar to the lukewarm potato water. Set aside for five minutes. It should start to get foamy as the yeast is activated.


In a large mixing bowl or the bowl of your stand mixer, whisk together the flour, dry milk, cornstarch and salt. Make a well in the middle and add in the yeast mixture, milk and butter and mix well.


Knead — using your hands or the stand mixer - to form a smooth, soft dough. This dough is very sticky so if you do have one, I suggest at least starting with the stand mixer and the bread hook.

Transfer the dough to a lightly greased bowl. Cover the bowl with a damp cloth and set it somewhere warm to rise for about 1 1/2 hours.


Use a little oil to lightly grease a 13" pain de mie or Pullman pan, including the inside of the lid.

When the first rise time is up, sightly grease a clean work surface and tip the dough out, pressing it gently into a large rectangle.


Fold in one third from the back and then fold in one third from the front, giving you a long tube.


Now fold each side in to the middle to make a fat log.

Ease the log into your pan, seam sides down and press the dough down gently to fill your pan.


Cover the pan with lightly greased cling film, and allow the dough to rise until the top of the middle is just below the lip of the pan, 45 minutes to 1 hour, depending on the warmth of your kitchen.

Towards the end of the rising time, preheat the oven to 350°F or 180°C.

Remove the cling film.


Place the cover on the pan. Bake the bread for 25 minutes in your preheated oven. Remove the pan from the oven. Carefully remove the lid taking care not to burn yourself.

Return the bread to the oven and bake for an additional 20 minutes, or until it tests done; a digital thermometer inserted into the center will register 190°F.

Remove the bread from the oven, and turn it out of the pan onto a rack.


Cool completely before slicing to serve.

Food Lust People Love: Pain de Mie is the sandwich bread of my childhood dreams, soft inside with very little crust. It makes great toast, grilled cheese sandwiches and it’s perfect for those little finger sandwiches we love to eat at bridal showers and parties.

Enjoy!


This month our Bread Bakers theme is Sandwich Bread.  Many thanks to our host Karen of Karen's Kitchen Stories. Check out all the lovely recipes we are sharing today


#BreadBakers is a group of bread loving bakers who get together once a month to bake bread with a common ingredient or theme. You can see all our lovely bread by following our Pinterest board right here. Links are also updated after each event on the #BreadBakers home page. We take turns hosting each month and choosing the theme/ingredient.

Pin this Pain de Mie - Pullman Loaf!

Food Lust People Love: Pain de Mie is the sandwich bread of my childhood dreams, soft inside with very little crust. It makes great toast, grilled cheese sandwiches and it’s perfect for those little finger sandwiches we love to eat at bridal showers and parties.
 .

Tuesday, September 10, 2019

Cheddar Poppy Seed Bread Sticks #BreadBakers

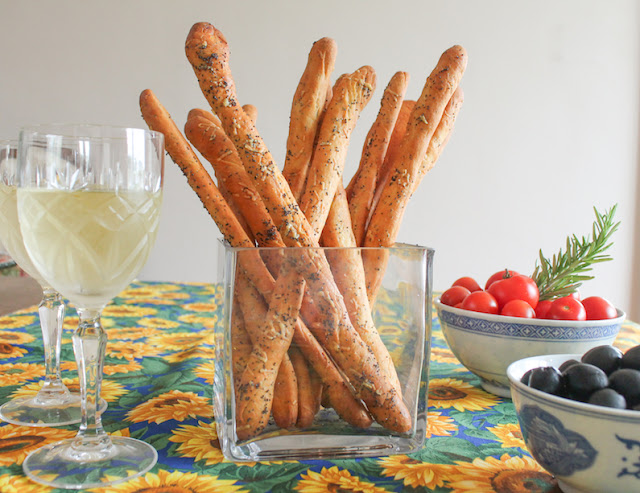
Crunchy and savory, these cheddar poppy seed bread sticks make the perfect munchable for snack time or even happy hour, with a cold glass of beer or wine of any color.

Food Lust People Love: Crunchy and savory, these cheddar poppy seed bread sticks make the perfect munchable for snack time or even happy hour, with a cold glass of beer or wine of any color.


Here in the Channel Islands, we are blessed to have several well-stocked grocery stores, as long as the weather is fine, that is. One really starts to realize the limitations of living perched on a rock in the middle of the English Channel when storms come through and ships with fresh supplies are canceled for a few days. That’s when my deep freezer really comes into its own.

Along with all of the frozen foods, I also keep a stockpile of spices, nuts, flours and seeds in there. When our original Bread Bakers host for this event, Archana of The Mad Scientist's Kitchen proposed bread with seeds as our theme, I was excited. In Dubai, my home for six years until this past April, it is illegal to own poppy seeds. My current freezer has not one but two bags of the crunchy black seeds.

Cheddar Poppy Seed Bread Sticks

To make these bread sticks, I use a stand mixer but you can certainly do it by hand if you have the muscles to knead bread dough.

Ingredients
2 cups or 250g all purpose plain flour
1 teaspoon dried instant yeast
2/3 cup or 156ml lukewarm water
Pinch sugar
2 1/2 oz or 71g extra mature cheddar
1/2 teaspoon salt
3 teaspoons poppy seeds
1 teaspoon canola or other light oil
2 tablespoons unsalted butter, melted and cooled

Method
Finely grate your cheese and set aside a few tablespoons or so for sprinkling on the bread sticks before baking.

In a large mixing bowl, or the bowl of your stand mixer, measure in the yeast and add the lukewarm water, the pinch of sugar and a tablespoon of the flour. Leave to proof for a few minutes.

When the mixture starts to foam up, sift in the rest of the flour and the salt, then add the bigger pile of cheese to the bowl. Mix well until a dough forms.


Knead in 2 tablespoons of the poppy seeds.

Keep kneading, either by hand or with your bread hook, until the dough is smooth and elastic.

Form a ball of the dough and lightly grease the bowl with the canola oil. Roll the dough ball in the oil to coat.

Cover the bowl and place it in a warm spot for about 45 minutes so the dough will rise.

When the dough has just about doubled, preheat your oven to 350°F or 180°C and prepare two baking pans by lining them with baking parchment or silicone liners.


Punch the dough down and tip it out onto a clean work surface lightly sprinkled with flour. Divide the dough into 16 equal pieces.


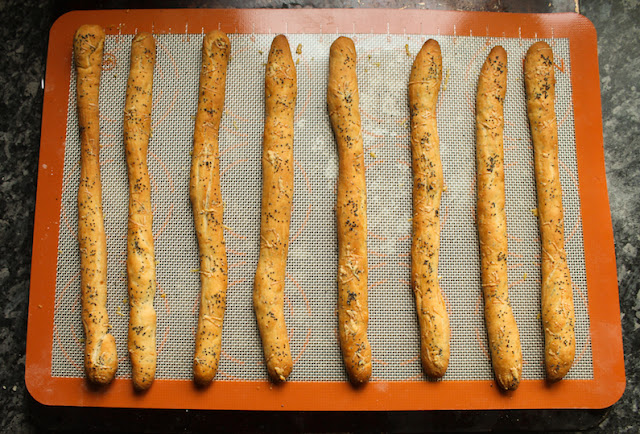
Roll each out into a long thin stick about 12 in or 30cm long, transferring the finished sticks to the baking pans as you go.

Brush the sticks with the melted butter and sprinkle them with the last teaspoon of poppy seeds and the reserved grated cheddar cheese.

Food Lust People Love: Crunchy and savory, these cheddar poppy seed bread sticks make the perfect munchable for snack time or even happy hour, with a cold glass of beer or wine of any color.


Bake in the preheated oven for about 20-25 minutes or until nicely golden and puffy. They turn really lovely and crunchy as they cool.

Food Lust People Love: Crunchy and savory, these cheddar poppy seed bread sticks make the perfect munchable for snack time or even happy hour, with a cold glass of beer or wine of any color.


If you have any melted butter leftover, give them another dab. No worries if you don’t. They don’t really need it but I hate to waste melted butter! I had enough to do maybe half of the sticks.

Remove to a wire rack to cool completely.

Food Lust People Love: Crunchy and savory, these cheddar poppy seed bread sticks make the perfect munchable for snack time or even happy hour, with a cold glass of beer or wine of any color.


Enjoy!

Food Lust People Love: Crunchy and savory, these cheddar poppy seed bread sticks make the perfect munchable for snack time or even happy hour, with a cold glass of beer or wine of any color.


Check out all the great seeded breads my fellow Bread Bakers are sharing today!


#BreadBakers is a group of bread loving bakers who get together once a month to bake bread with a common ingredient or theme. You can see all our of lovely bread by following our Pinterest board right here.  Links are also updated after each event on the BreadBakers home page. We take turns hosting each month and choosing the theme/ingredient.
BreadBakers

Pin these Cheddar Poppy Seed Bread Sticks!

Food Lust People Love: Crunchy and savory, these cheddar poppy seed bread sticks make the perfect munchable for snack time or even happy hour, with a cold glass of beer or wine of any color.

 .

Tuesday, July 9, 2019

Fried Jalapeño Corn Puffs #BreadBakers

Crunchy on the outside and fluffy on the inside, these fried jalapeño corn puffs are savory doughnuts of a most delicious kind.

Food Lust People Love: Crunchy on the outside and fluffy on the inside, these fried jalapeño corn puffs are savory doughnuts of a most delicious kind. These would be perfect appetizers for a summer cocktail party, made with fresh sweet corn.


If you’ve been reading along here for the past eight years, you’ll know that I seldom deep-fry anything. I know, I know. Odd for a cook raised in the southern tradition. My grandmother thought nothing of frying chicken, often more than once a week, if we were visiting. I think she could do it in her sleep. Her fried chicken was the best, a dish I still attempt occasionally. Despite watching and helping her many times, even taking notes, somehow mine is never quite as good.

In fact, there are only three fried recipes on this blog, if you don’t count pan-frying in very little or no oil, which I do not: Spicy fried chicken à la Maya Angelou; deep fried cod fritters, a Brazilian specialty; and tali machchi, a spicy fish dish from Goa on the west coast of India.

But when our host for this month’s Bread Bakers chose fried bread leavened with yeast as our theme, I couldn’t resist making a savory snack. These would be perfect appetizers for a summer cocktail party, made with fresh sweet corn.

Fried Jalapeño Corn Puffs
These crunchy outside, fluffy inside little corn puffs are well worth heating up the oil and throwing an apron on. When deep-frying, always be aware of the possibility of popping oil, keeping your face well away from the pot. I also suggest making sure pets and children are not underfoot.

Ingredients
For the puff dough:
1/2 cup or 120ml warm water
1 teaspoon active dry yeast
1 tablespoon sugar
1 large egg, lightly beaten
1 tablespoon shortening, at room temperature
1/2 teaspoon fine sea salt
1 1/2 cups or 190g strong white bread flour
1 cup or 145g sweet corn niblets, fresh cut off the cob or frozen
1-2 jalapeños, depending on your spiciness tolerance

To fry the puffs:
Canola or peanut oil – enough to allow 2 in or 5 cm of oil in your deep frying pot

Optional for serving:
Freshly grated Parmesan cheese

Method
If you are using frozen corn, thaw it and leave it to drain on a clean kitchen towel or paper towels, until you are ready to add it to the dough.

Measure the water into bowl. Add the yeast and sugar. Set aside for a few minutes to make sure your yeast is active. It should begin to bubbly and froth.

Meanwhile cut the stems off the jalapeños and mince them finely. If you have a low tolerance for spicy heat, use only one pepper and remove the seeds and membrane before mincing. We fall very much into the spicier the better camp.


Whisk the shortening, egg and salt into the bowl.

Sift in the flour and mix well. This creates a very thick batter or a very soft dough. Same same.


Fold in the corn and jalapeños. Cover and let rise overnight in the refrigerator or until doubled in a warm place.


Heat your oil in a wide deep pot to the ideal deep-frying temperature of 375°F or 190°C. I always use a thermometer because I am very bad at guessing how hot the oil is. (If you don't have a thermometer, here are some tips from E-How.)

Use a tablespoon or cookie scoop to gently drop the batter into the hot oil, being careful not to overcrowd the pot, which lowers the oil temperature. I have a two-tablespoon cookie scoop. Filling it about halfway made these perfect little puffs.


Fry the puffs until golden brown on one side, turning them over to lightly brown the other side.

Food Lust People Love: Crunchy on the outside and fluffy on the inside, these fried jalapeño corn puffs are savory doughnuts of a most delicious kind. These would be perfect appetizers for a summer cocktail party, made with fresh sweet corn.


Use a slotted spoon to scoop the puffs out of the oil and drain on a wire rack or on paper towels. Keep warm in a very slow oven until all the puffs are fried.

Food Lust People Love: Crunchy on the outside and fluffy on the inside, these fried jalapeño corn puffs are savory doughnuts of a most delicious kind. These would be perfect appetizers for a summer cocktail party, made with fresh sweet corn.


Once my fried jalapeño corn puffs were all ready, I pulled them out of the warm oven and grated a little Parmesan over the top. I suggest you do the same.

Enjoy!

Food Lust People Love: Crunchy on the outside and fluffy on the inside, these fried jalapeño corn puffs are savory doughnuts of a most delicious kind. These would be perfect appetizers for a summer cocktail party, made with fresh sweet corn.


Many thanks to Sneha of Sneha’s Recipe, our host for this month’s yeasty fried bread event. It was an excellent challenge! Check out the great recipes our members have created today.
#BreadBakers is a group of bread loving bakers who get together once a month to bake bread with a common ingredient or theme. You can see all our of lovely bread by following our Pinterest board right here. http://www.pinterest.com/flpl/bread-bakers/ Links are also updated after each event on the BreadBakers home page. http://www.foodlustpeoplelove.com/p/breadbakers.html We take turns hosting each month and choosing the theme/ingredient.
BreadBakers

Pin these Fried Jalapeño Corn Puffs! 

Food Lust People Love: Crunchy on the outside and fluffy on the inside, these fried jalapeño corn puffs are savory doughnuts of a most delicious kind. These would be perfect appetizers for a summer cocktail party, made with fresh sweet corn.
 .

Tuesday, May 14, 2019

Blossom Tea Honey Buns #BreadBakers

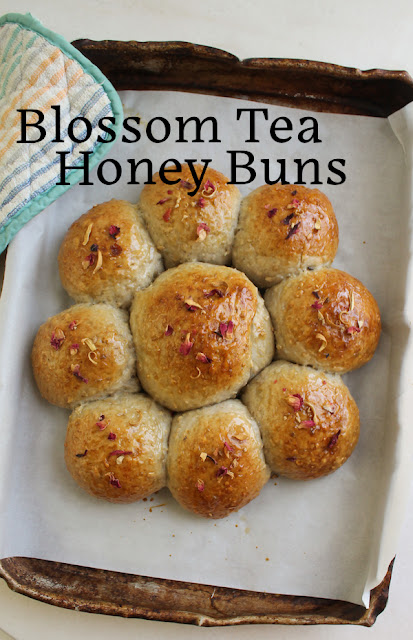
Made with a fragrant tea mix of hibiscus, rose and orange blossoms, paired with ginger and apple, these blossom tea honey buns have a subtle floral note that goes excellently with a hot cup of tea.

Food Lust People Love: Made with a fragrant tea mix of hibiscus, rose and orange blossoms, paired with ginger and apple, these blossom tea honey buns have a subtle floral note that goes excellently with a hot cup of tea.  For these blossom tea honey buns, I used a Tiesta tea  that my grocery store called Ginger Sweet Peach, despite the complete lack of peaches in the mix. You can use your favorite fruit infusion to make these buns.

Yesterday for Mother’s Day we hosted a backyard cookout. The menu included chicken, sausage and pork ribs, along with two substantial salads, garlic bread and my world-famous lentil burgers for the vegetarian contingent. My lentil burger recipe calls for 1 cup or 210g of uncooked lentils, which usually means buying a box or bag and dealing with leftovers.

Now that I’m back in the States, I am discovering the joys of the self-serve  bulk food department of my neighborhood stores. Not that we didn’t have bulk foods in Dubai, but I wasn’t allowed to help myself. It’s such fun to use the little scoop and measure out just how much I need for a recipe. I was able to buy exactly 210g of French lentils and now I don’t have a box in the cupboard with leftovers that are never enough for another recipe.

Another bonus of the bulk foods is the fabulous mix of teas and infusions available. They all sound and smell wonderful but I especially love the ones with ginger.

Blossom Tea Honey Buns

For these blossom tea honey buns, I used a Tiesta tea that my grocery store called Ginger Sweet Peach, despite the complete lack of peaches in the mix. You can use your favorite fruit infusion to make these buns.

Ingredients
2 tablespoons blossom tea or your favorite mix
2 tablespoons butter, melted and cooled
1/4 cup or 60ml honey
1/4 cup or 50g white sugar
1 teaspoon salt
1 envelope (1/4 oz or 7g) active dry yeast
2 3/4 cup or 350g bread flour
1 cup or 110g whole grain rolled oats

1 egg, beaten, for brushing on buns before baking
Optional for decoration: honey and extra tea leaves

Method
First, brew your tea by adding 1 1/4 cups of boiling water to the tea mix. Steep for 5 minutes then strain and discard the tea mix. Check out that gorgeous color!

Add in the honey and butter and stir till the honey is dissolved.

Mix white sugar and yeast in a large bowl. When the liquid has cooled to a lukewarm temperature, add it to bowl containing the sugar and yeast. Leave to prove for a few minutes.

When the yeast starts to foam, mix in the flour, oats and salt.


Knead until you have a smooth dough ball. This is a soft dough but don’t be tempted to add more flour. The rolled oats will need that moisture as the dough is kneaded and then rises.

Place the dough ball in an oiled bowl and cover with cling film. Put it in a warm place to rise until doubled, about 45 minutes.


Divide and form the dough into 10 balls and place them on a baking pan lined with baking parchment. Make sure to leave some space for rising. Since our theme is flowers, I made a last minute decision to make a larger bun out of two balls of dough so I could lay them out in a flower shape. So, as you can see in the photos, I only made nine buns out of mine.

Cover the bun pan with a proofing bag or clean garbage bag. Leave to the buns to rise for 30 more minutes.

When dough has almost finished rising, preheat your oven to 350°F or 180°C. Brush the tops of the buns with beaten egg.


Bake for 17-20 minutes or until tops are golden brown, turning your pan around halfway through so they will brown evenly. Remove the buns from the oven.

Food Lust People Love: Made with a fragrant tea mix of hibiscus, rose and orange blossoms, paired with ginger and apple, these blossom tea honey buns have a subtle floral note that goes excellently with a hot cup of tea.  For these blossom tea honey buns, I used a Tiesta tea  that my grocery store called Ginger Sweet Peach, despite the complete lack of peaches in the mix. You can use your favorite fruit infusion to make these buns.


Optional: While the buns are still warm, brush them with some honey and sprinkle with a few tea leaves for decoration.

Food Lust People Love: Made with a fragrant tea mix of hibiscus, rose and orange blossoms, paired with ginger and apple, these blossom tea honey buns have a subtle floral note that goes excellently with a hot cup of tea.  For these blossom tea honey buns, I used a Tiesta tea  that my grocery store called Ginger Sweet Peach, despite the complete lack of peaches in the mix. You can use your favorite fruit infusion to make these buns.


Enjoy!

Food Lust People Love: Made with a fragrant tea mix of hibiscus, rose and orange blossoms, paired with ginger and apple, these blossom tea honey buns have a subtle floral note that goes excellently with a hot cup of tea.  For these blossom tea honey buns, I used a Tiesta tea  that my grocery store called Ginger Sweet Peach, despite the complete lack of peaches in the mix. You can use your favorite fruit infusion to make these buns.


Many thanks to this month’s Bread Bakers host is Mireille of Schizo Chef. She challenged us to bake with flowers. Check out all the lovely recipes:


Pin these Blossom Tea Honey Buns!

Food Lust People Love: Made with a fragrant tea mix of hibiscus, rose and orange blossoms, paired with ginger and apple, these blossom tea honey buns have a subtle floral note that goes excellently with a hot cup of tea.  For these blossom tea honey buns, I used a Tiesta tea  that my grocery store called Ginger Sweet Peach, despite the complete lack of peaches in the mix. You can use your favorite fruit infusion to make these buns.
 .


Tuesday, January 8, 2019

Golden Pineapple Buns #BreadBakers

A bakery staple in Chinatowns worldwide, golden pineapple buns are a real treat. The soft sweet bread features a topping that bakes up crisp and light. As an added bonus, some contain sweet fillings, like these made with my easy pineapple jam.

Food Lust People Love: A bakery staple in Chinatowns worldwide, golden pineapple buns are a real treat. The soft sweet bread features a topping that bakes up crisp and light. As an added bonus, some contain sweet fillings, like these made with my easy pineapple jam.

This month’s Bread Bakers host, my friend Felice from All That’s Left Are the Crumbs set us a theme of “good luck breads” and I knew I would find a few choices in typical Chinese or Lunar New Year menus online. Indeed, since gold is a color of prosperity, golden pineapple buns showed up in many.

Also known as bolo bao or bo lo baau, pineapple buns appear to originate from Hong Kong but they are also very popular in Malaysia, Singapore and Indonesia as well. For all the many years we lived in those three places – a combined 12 years! – I never actually tried a pineapple bun. I loved the Chinese bakeries but would typically opt for a sausage bun or another savory option.

Historically, the pineapple is also a symbol of wealth and hospitality. What is more welcoming than a warm bun that is named because it looks like a pineapple? I’ll tell you.

It’s one that is also filled with pineapple jam.

Several recipes said these buns could authentically be filled with red bead paste or custard but most are not filled at all. I, on the other hand, thought they cried out for pineapple jam. Why should they be pineapple in name and looks only? Beauty is more than skin deep and their outer beauty should be echoed and enhanced by an inner pineapple-y sweetness, don’t you think?

And when I checked it out, I got a mention in Wikipedia. Non-native speaker. That's me.

Golden Pineapple Buns

Like all good yeast breads, these guys take a while to make because of rising time. Also, there are three parts: the dough, the topping and the filling, if you choose to fill them. I suggest making my easy pineapple jam but you can also use your favorite store-bought jam of any flavor. Or don’t fill them at all. Either way, they are totally worth the time. My bun recipe is adapted from these two: The Woks of Life and China Sichuan Food. The pineapple jam is all me. I love making quick jam.

Ingredients for 6 large buns
For the bread dough:
1/3 cup or 78ml heavy cream
1/2 cup or 120ml milk
1/4 cup or 50g sugar
1 1/2 teaspoons active dry yeast
1 large egg (at room temperature)
2 1/2 cups or 317g strong white bread flour
3/4 teaspoon salt

For the topping paste:
2/3 cup or 83g all-purpose flour
1/3 cup or 66g caster sugar
2 tablespoons dry milk powder
1/4 teaspoon baking soda
1/4 teaspoon baking powder
2 tablespoons vegetable shortening
1 small egg yolk
⅛ teaspoon vanilla extract
4-6 teaspoons milk

For the filling:
6 generous tablespoons thick pineapple jam, homemade or store-bought
(It’s super easy to make. For homemade my instructions are here.)

For the egg wash:
1 egg yolk
1 teaspoon water

Method
Warm your cream and milk to between 105-110°F or 40.5-43°C in a small pot over a low fire or in the microwave. Add in 1 tablespoon of the sugar for the dough and the yeast. Set aside for a few minutes to make sure your yeast is active.


Pour the foamy liquid into the bowl of your mixer and add the rest of the sugar, egg, flour and salt.

Using your bread hook, combine the ingredients and continue mixing for about 15 minutes, scraping the bowl down occasionally to make sure all of the flour is being incorporated.


This is a very soft dough.

After 15 minutes, cover the bowl with a damp towel and place in a warm place for 1 hour.

If your kitchen is cold, set the bowl in your sink and fill it part way up with warm water. Leave to prove for about 1 hour by which time the dough should double in size.


When the initial rise time for the bread dough is up, put it back in the mixer and use your bread hook to knead it for 5 minutes to beat it back down to original size and make it more manageable and less sticky.

Lightly flour a clean work surface and tip your dough out of the bowl. With floury hands, knead it briefly. Cut it into 6 equal pieces (mine were about 100g each) and roll them into small balls.


If you aren’t filling your pineapple buns, transfer them to your baking pan, sprinkle with some flour and cover with a clean dry towel. Set aside to rise for 1 hour.

If you are filling them, use a floured rolling pin to roll each ball out into a 6 in or 15cm circle. Brush with water. Add 1 tablespoon of pineapple jam to the middle. (By the way, that gorgeous yellow is all natural!)

Pull the sides in, pinching gently to close the dough, making a ball again. Place pinched side down on your baking pan.


Continue until all buns are filled. Sprinkle with flour and cover with a clean dry towel. Set aside to rise for 1 hour.


While the buns are rising, use a food processor to make the topping.

Add the dry milk powder, flour, baking soda, baking powder, and superfine sugar to the food processor. Pulse to combine. Add the shortening, egg yolk, and vanilla.


Pulse till it looks like big grains.

Add the milk starting with just 1 tablespoon. Pulse until it just comes together as a dough, adding a teaspoon or two more milk as needed.


Give the crumbs a squeeze to see if they’ll hang together. If they do, no more milk is needed.

Tip the topping crumbs out on to a piece of cling film and push them together to create a dough. Cover tightly with the cling film. Place in refrigerator for around 30 minutes until slightly chilled.


When the buns are done rising, preheat your oven to 350°F or 180°C.

Form the topping dough into a rectangle in the cling film so that it’s easier to cut into six equal pieces.

Roll them into balls. Lay a large sheet of cling film out and place the ball on one half. Fold the other half over. Use a rolling pin to roll a topping ball into a circle the size of the tops of your risen buns.


Unfold the cling film and place the topping circle on a bun. Carefully remove the cling film.


Use the tip of a sharp knife to gently score the topping in a diamond pattern. Continue until the buns have been covered and scored.


Whisk the egg yolk with the water and brush the egg wash onto each bun. Bake in your preheated oven for 14-16 minutes or until puffed and golden.

Food Lust People Love: A bakery staple in Chinatowns worldwide, golden pineapple buns are a real treat. The soft sweet bread features a topping that bakes up crisp and light. As an added bonus, some contain sweet fillings, like these made with my easy pineapple jam.


Remove from the oven and leave to cool on the baking pan for a few minutes. Place on a wire rack to cool completely.

Enjoy!

Food Lust People Love: A bakery staple in Chinatowns worldwide, golden pineapple buns are a real treat. The soft sweet bread features a topping that bakes up crisp and light. As an added bonus, some contain sweet fillings, like these made with my easy pineapple jam.


Check out all the other lucky breads we have for you today! Many thanks to our Bread Bakers host, Felice from All That’s Left Are the Crumbs.

#BreadBakers is a group of bread loving bakers who get together once a month to bake bread with a common ingredient or theme. Follow our Pinterest board right here. Links are also updated each month on this home page.

We take turns hosting each month and choosing the theme/ingredient.

Pin these Golden Pineapple Buns!

Food Lust People Love: A bakery staple in Chinatown’s worldwide, golden pineapple buns are a real treat. The soft sweet bread features a topping that bakes up crisp and light. As an added bonus, some contain sweet fillings, like these made with my easy pineapple jam.
 .