Monday, December 16, 2013

Dark Chocolate Gingerbread Muffins #MuffinMonday


Nothing says Christmas like the delightful aroma of gingerbread baking.  Nothing.  These muffins combine gingerbread batter with melted semi-sweet chocolate for an even richer muffin.  

These past couple of days have been hectic but I can happily report that I am back in the States for the holidays and both of my girls are with me.   I flew into New York, just as the storm hit and managed to get one of the last flights out to Boston on Saturday.  Then yesterday, my younger daughter and I drove back to New York to pick up my elder daughter and all of her worldly possessions.  I am thrilled to say that she has accepted a job offer in Boston and will be moving there in the new year.   1. Her dream job and 2. Only 50 minutes train ride from her sister in Providence.  Both things make this mother very happy!

I knew I’d be on the road so I actually baked these muffins before leaving  Dubai, but I was definitely channeling snow and cold and winter and Christmas.  Make you some!  The whole house smells cozy.

Ingredients
1/2 cup or 110g sugar
2 1/4 cups or 280g flour
1 teaspoon baking soda
1 teaspoon baking powder
1/2 teaspoon salt
1 teaspoon ground ginger
1 teaspoon ground cinnamon
3/4  cup or 150g semi-sweet chocolate chips, divided
1/2 cup or 120g butter
1/2 cup or 120ml molasses or treacle
1/4 cup or 60ml milk
2 large eggs

Method
Preheat your oven to 350°F or 180°C and prepare your 12-cup muffin pan by greasing with butter or non-stick spray or lining it with paper muffin cups.

In a large bowl, mix together the flour, baking soda, baking powder, salt, ginger and cinnamon and stir well.


Set aside a generous handful of chocolate chips to use for decoration later.  Put your butter and the rest of the chocolate chips into a microwaveable bowl and zap for 15 seconds at a time, stirring in between, until the chocolate and butter are completely melted.  Allow to cool slightly.


In another bowl, whisk together the milk, eggs and molasses.


Pour your melted chocolate/butter into the milk/egg mixture and stir well.


Pour your wet ingredients into the dry ingredients and fold them together until just mixed.


Divide the batter evenly among the muffin cups.  Top each with some of the reserved  chocolate chips.


Bake in your preheated oven about 20-25 minutes or until a toothpick inserted in the middle comes out clean.  Cool in the pan for a few minutes and then remove the muffins to a rack to cool completely.


Enjoy!


Saturday, December 14, 2013

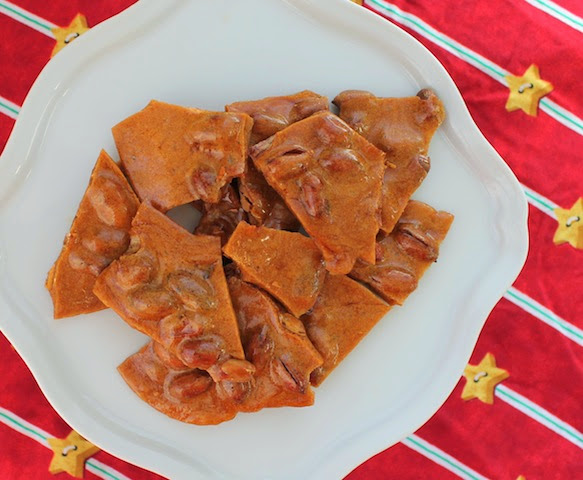
Gram's Favorite Peanut Brittle

Peanut brittle is a classic homemade gift for the Christmas season. It’s one of those recipes where the ingredients become way greater than the sum of their parts. Who would think that sugar, syrup and peanuts could be transformed into something so divine?

Food Lust People Love: Who doesn't like to get a small box of homemade peanut brittle for Christmas?! This easy recipe for Gram's Favorite Peanut Brittle makes one pound for giving away or eating by yourself. It can be easily doubled.


Earlier this year, in June to be exact, we drove from Houston to New Iberia, Louisiana to spend a couple of days with my grandmother. She was in a rehab center, working on getting strong enough to go home again, after surgery to repair her broken femur.

Just before we left, I called my Aunt Nonnie. What can we bring for Gram? Her answer was all candy:  Peanut brittle, licorice and orange slices.  Never mind that Gram had been diabetic for years, she loved her sweets. When you reach the ripe old age of 99, screw the diabetes!

So, off we went on a candy hunt.  My mother, an integral part of the search team, said that she always bought Gram a tin of peanut brittle from Costco, or maybe Sam’s, each Christmas because that’s the only time of the year it was available. I must admit I was shocked. I had no idea that peanut brittle was a Christmas-season-only thing!  I guess I’ve lived outside of the US for too long, in places where peanut brittle is never available. Sadly, she was right.

We brought Gram orange slices and licorice and substituted something else for the peanut brittle. But I always regretted that I couldn’t find any. As I said to Mom, if I had known ahead, I’d have made some. So, Gram, this batch is for you. I am imagining that your heaven includes a daily supply of peanut brittle but I still wanted to make you some.

Gram's Favorite Peanut Brittle


Ingredients to make 1 lb+ or 475g of peanut brittle
1 cup or 200g sugar
1/2 cup or 120ml light corn syrup
1/4 teaspoon salt
1/4 cup or 60ml water
1 cup or 150g shelled raw peanuts
2 tablespoons butter plus more for greasing foil.
1 teaspoon baking soda

Method
Line a baking pan with foil and then butter the foil liberally.  Set aside.

Put the sugar, corn syrup, water and salt in a heavy 2-quart pot, and stir until all the sugar is dissolved.  Add in the peanuts and stir again.


If you have a candy thermometer, attach it to the pot now.  Cook over a medium heat, stirring occasionally, until the thermometer reaches 300°F or 149°C or until a small amount dropped into a glass of very cold water turns into hard and brittle threads as it sinks.


Remove from heat and stir in the two tablespoons of butter and the baking soda.


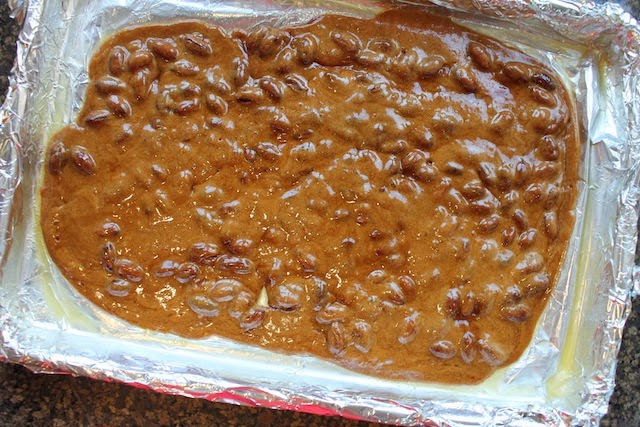
Pour the now frothy mixture immediate into your prepared pan.

Food Lust People Love: Who doesn't like to get a small box of homemade peanut brittle for Christmas?! This easy recipe for Gram's Favorite Peanut Brittle makes one pound for giving away or eating by yourself. It can be easily doubled.
My original instructions from Good Housekeeping suggested that I use two forks to stretch and spread the mixture in the pan but I found that jiggling the pan vigorously did the trick.

Food Lust People Love: Who doesn't like to get a small box of homemade peanut brittle for Christmas?! This easy recipe for Gram's Favorite Peanut Brittle makes one pound for giving away or eating by yourself. It can be easily doubled.
See how it has spread almost to the corners now.


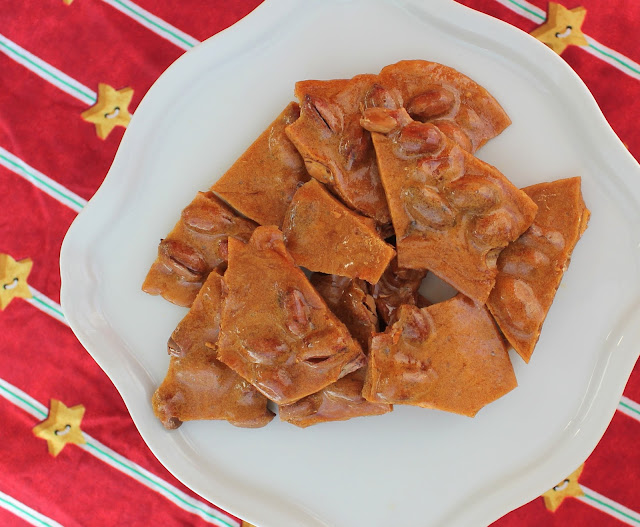
When the peanut brittle is cool enough to handle, use your hands to break the brittle into smaller pieces.  Share with someone you love.

Food Lust People Love: Who doesn't like to get a small box of homemade peanut brittle for Christmas?! This easy recipe for Gram's Favorite Peanut Brittle makes one pound for giving away or eating by yourself. It can be easily doubled.
Enjoy!


Visit all the other Christmas Week Peeps for more Holiday Baking Goodness:

Pin Gram's Favorite Peanut Brittle!

Food Lust People Love: Who doesn't like to get a small box of homemade peanut brittle for Christmas?! This easy recipe for Gram's Favorite Peanut Brittle makes one pound for giving away or eating by yourself. It can be easily doubled.
.

Wednesday, December 11, 2013

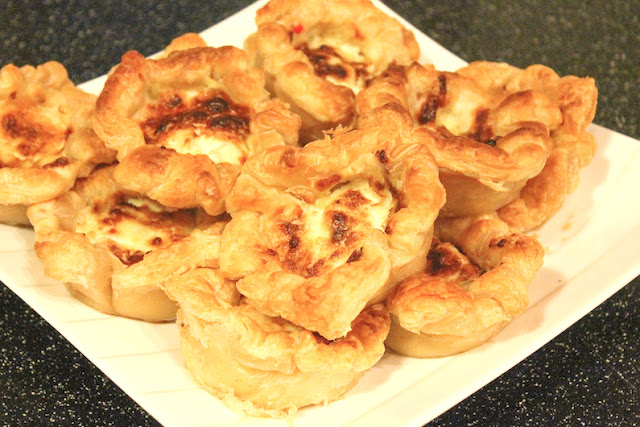
Artichoke Dip Puff Pastry Tarts

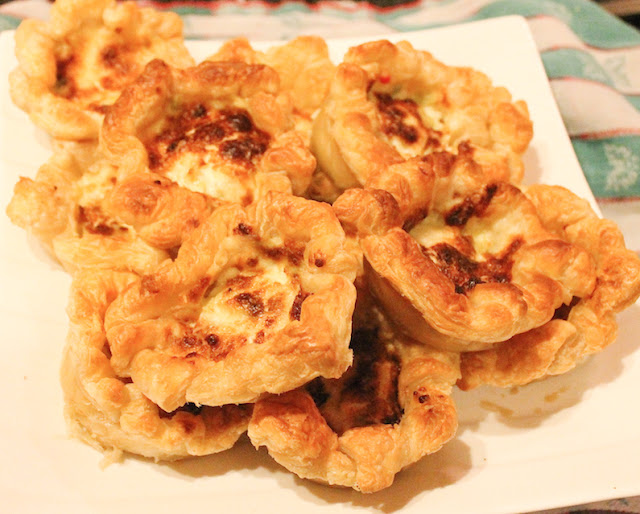
Bubbly cheesy artichoke dip makes a wonderful filling for a puff pastry tart. Artichoke Dip Puff Pastry Tarts are the perfect, easy appetizer for your Christmas party.

Food Lust People Love: Artichoke Dip Puff Pastry Tarts are a quick and easy way to transform artichoke dip into little handheld tarts, perfect for parties!


Artichoke dip is a staple at our house for Christmas Eve, when we eat only appetizers and drink Champagne. The tradition started many, many years ago when my older sister would come to visit and somehow we all got busy and many gifts remained unwrapped the night before Christmas. So preparing a big dinner was out of the question but nibbles would be perfect.

Early in the evening we sit around the heavily laden coffee table, sip Champagne and eat our appetizers while staking out a good position to wrap gifts with a little bit of privacy. Behind the bar is always a popular spot, which allows someone to be in front of the bar. Another person might be behind the couch and yet another behind the living room chair or over in the open plan dining room, when we have one. We can hear each other, if we talk loudly, but most importantly, everyone can hear the Christmas music. And everyone can take an extra little plate with them as well, for sustenance.

Artichoke Dip Puff Pastry Tarts

I have no idea where the classic artichoke dip recipe came from, although for us, it was always Tanya’s artichoke dip since my sister brought it with her originally. In the years since, I’ve also heard it referred to as Lizann’s dip, after another friend who introduced it to the school parents in Malaysia. I’d love to know who created it in the first place and thank them. Some years we add crabmeat, other years cooked shrimp or crispy bacon before baking the dip to bubbling richness. We usually serve it with crackers or sliced baguette. This year, making it for a completely different event, I had a brainstorm. And artichoke dip puff pastry tarts were born!

Ingredients
For the dip aka filling:
1 cup or 240g mayonnaise (NOT Miracle Whip or salad cream – they are too sweet.)
1 1/2 cups or about 190g finely grated Parmesan
1 can (14oz or 400g) artichoke hearts, drained weight 8 1/2oz or 240g
1 small hot red chili, optional but highly recommended (I think the original recipe called for a small can of mild green chilies.)

For the tart crust:
3 sheets already rolled puff pastry (about 8in x 8in or 20cm x 20cm each)

Method
Preheat your oven to 410°F or 210°C and cut the puff pastry into 12 reasonably even squares.


Tuck each piece into a muffin pan cup, folding in the edges to make them fit so the squares don’t touch between the muffin cups. Remember, they are going to puff up.


Chop the artichoke hearts roughly and the chili very finely and mix all the filling ingredients together thoroughly.


Spoon the filling into the prepared puff pastry crusts.


Bake in your preheated oven for 20-25 minutes or until the filling is golden and bubbling and the puff pastry is golden and puffy.

Food Lust People Love: Artichoke Dip Puff Pastry Tarts are a quick and easy way to transform artichoke dip into little handheld tarts, perfect for parties!


Allow the tarts to cool for about 10 minutes and then run a knife around the outside of the tarts to loosen them and then remove them to a serving plate.

Serve warm if possible but they are delicious even at room temperature.

Enjoy!

Food Lust People Love: Artichoke Dip Puff Pastry Tarts are a quick and easy way to transform artichoke dip into little handheld tarts, perfect for parties!


Visit all the other Christmas Week Peeps for more Holiday Baking Goodness:

Pin it!

Food Lust People Love: Artichoke Dip Puff Pastry Tarts are a quick and easy way to transform artichoke dip into little handheld tarts, perfect for parties!
 .

Tuesday, December 10, 2013

Mo's Easy Homemade Eggnog

It only takes four ingredients to make quick, easy, creamy, delicious homemade eggnog!  But bourbon is a highly recommended fifth.


Christmas at my grandmother’s meant a huge pot of her homemade eggnog at least one of the nights of our holiday.  The original called for one gallon of milk and 10 eggs!  I’d like to tell you how it kept and whether we rewarmed it successfully the next day but I honestly don’t remember having any leftovers!  It’s that good.  As a child, I drank it plain.  No nutmeg, and, of course, no bourbon.  Now I love adding both.

Ingredients
8 1/2 cups or 2 liters whole milk
5 eggs
1 1/2 cups or 300g sugar
1 heaped tablespoon cornstarch
Nutmeg and bourbon or rum (Optional for serving but highly recommended)

Method
Remove 1/2 cup or 120ml from your measured milk and set aside in a small bowl.

Heat the rest of the milk over a low fire.   Do be careful not to let it scorch.


While your milk is warming:  In a very large mixing bowl, beat the eggs until they are light yellow.  Add the sugar to the eggs and beat until creamy and almost fluffy.


Dissolve 1 heaping tablespoon cornstarch into your reserved cold milk.

Use a fork or small whisk to make sure there are not any lumps of cornstarch left.


When the pot of milk comes to the boil, slowly add the cornstarch/milk, stirring quickly.  (When I looked up the boiling point of milk, most references said it was close to the boiling point of water which is 212°F or 100°C but mine bubbled gently at about 190°F or 88°C.  In case you are the thermometer-using type.)  Cook for a few more minutes until it thickens slightly.

I need three hands!  I stirred like crazy before and then after I took the photo, as I kept pouring.

Add a couple of cups of the hot milk to the egg mixture by pouring it in very slowly and whisking quickly.

This is actually the second cup I am pouring in.  I was whisking like a mad woman when
the first hot cup drizzled in.  You should do the same!  In fact, don't stop to take photos at all. 
If you have a friend to help, one can whisk, while the other pours.  If you are alone, set your egg bowl on a towel so it won’t spin and whisk quickly with one hand while pouring slowly with the other.  If you rush this step, you risk cooking your eggs in the hot milk, which will make the eggnog eggy and lumpy.  It’s not a pretty sight.  It can be somewhat rescued by straining it through a fine mesh sieve but just don’t go there to start with.  And, yes, I know all this from sad experience.

Add all the now-warm egg/milk mixture back into the pot with the rest of milk.


Bring it to a gentle boil and let it thicken slightly.

Serve in mugs, topped with a sprinkle of nutmeg.

Go ahead and laugh but I wanted to show you my fake fireplace.  In Dubai.
 It looks like flames from an inside light but it does actually have an air blower that puts out heat too.
Bourbon or rum can also be added, if desired. If you are adding alcohol, give the mug a good stir before drinking and, of course, don't share with your kiddies.

My cup!  Get your own. 

Enjoy!


Visit all the other Christmas Week Peeps for more Holiday Baking Goodness:


Monday, December 9, 2013

Nanny's Pecan Pie

Louisiana pecan pie is chewy and gooey, full of pecans and sticky goodness, in a flakey short crust. Nanny's pecan pie recipe is the best of the best. Christmas is not Christmas without it!

Food Lust People Love: Louisiana pecan pie is chewy and gooey, full of pecans and sticky goodness, in a flakey short crust. Nanny's pecan pie recipe is the best of the best. Christmas is not Christmas without it!


We were there! After five hours of driving dark highways in the bitter cold, the whole family piled into the warmth of my grandmother’s yellow kitchen. As usual, everyone talking at once. Following shortly behind us, coming from the opposite direction on Interstate 10, my aunt’s family banged through the old screen door, arms laden with luggage and goodies.

Nanny had a stack of pecan pies, all baked in foil pie plates and wrapped in more foil, a tower of shiny as welcome as any star on the nearby Christmas tree. Pecan pie was one of her specialties and this year, she claimed, she had perfected the recipe. Baking pie after pie until the mixture was just right. We laughed when she said 7/8 cup of Karo, because how do you even measure that!

In southern Louisiana, your godparents are your nanan and parran, the Cajun French words for godmother and godfather. Aunt Karen was not my godmother but she was my older sister’s and since I was three years younger, I called her Nanny as well. That was just her name and it never occurred to me until I was much older that she wasn’t my godmother too.

On Christmas Day, 20 years ago, we lost Nanny to breast cancer, after a few years’ hard fight. She was only 49. She lives on through her children and grandchildren and in the cherished memories we have of the most generous and loving aunt, sister, mother, friend anyone has ever known. I eyeball that measuring cup each time I make this pie and channel her precision for 7/8 cup. Her recipe hasn’t failed me yet.

Nanny's Pecan Pie


Ingredients
For the filling:
1 large egg
1/2 cup or 100g sugar
7/8 cup or 207ml clear Karo corn syrup (Just do your best.)
Pinch salt
1 1/2 cups or 180g chopped pecans
4 small pats of butter (about 1 teaspoon each)

1 unbaked pie shell (I use this recipe. Stop when the crust has been pricked with a fork, and come on back here to make the filling.)

Method
Preheat your oven to 300°F or 149°C.

Put your pecans in a large baking pan and pop them in the oven as it preheats. Set a timer for five minutes and shake the pan every time it rings. Take the pecans out when they smell all toasty and nutty. Depending on your oven, this could take 10 minutes or even 20. Depends on how fast your oven preheats and the toasting can really start. Remove the pecans from the oven and set aside to cool.

Beat the egg and sugar until yellow and creamy looking.


Add the Karo and the pinch of salt and whisk again.


After thoroughly mixed, add your cooled pecans.


Pour into unbaked pie shell. Put pats of butter on top.


Bake in your preheated oven for 50/60 minutes. (I suggest putting a piece of foil under the pan, for easy clean up, in case it boils over a little.)

Remove from the oven when the pie is almost set. It might still be just a little bit wobbly in the middle.

Food Lust People Love: Louisiana pecan pie is chewy and gooey, full of pecans and sticky goodness, in a flakey short crust. Nanny's pecan pie recipe is the best of the best. Christmas is not Christmas without it!


Allow to cool completely before cutting.

Food Lust People Love: Louisiana pecan pie is chewy and gooey, full of pecans and sticky goodness, in a flakey short crust. Nanny's pecan pie recipe is the best of the best. Christmas is not Christmas without it!


Enjoy!

Visit all the other Christmas Week Peeps for more Holiday Baking Goodness:

Pin Nanny's Pecan Pie!

Food Lust People Love: Louisiana pecan pie is chewy and gooey, full of pecans and sticky goodness, in a flakey short crust. Nanny's pecan pie recipe is the best of the best. Christmas is not Christmas without it!
.

Sunday, December 8, 2013

Broccoli and Cheese Muffins #MuffinMonday

Cheesy muffins with broccoli make the perfect addition to a brunch menu.  They are equally welcome alongside a bowl of soup for a light lunch or dinner. 

Happy Sunday!  Your eyes are not deceiving you and don't bother to check your calendar thinking you have missed a day.  It is indeed a muffin recipe a day early.  Because this is a special week here at Food Lust People Love.  IT'S CHRISTMAS WEEK!  Which means that I have joined with a group of like-minded bloggers to bring you prizes to win from our generous sponsors and loads of great Christmasy recipes.  We'll have sweet and we'll have savory but we'll all have delicious!  It starts tomorrow so come on back and I hope to see you munching one of these wonderful cheesy broccoli muffins as you sign up for the giveaways!

Ingredients
3 1/2 oz or 100g fresh broccoli florets
Drizzle olive oil
2 cups or 250g flour
2 teaspoons baking powder
1 teaspoon salt
Few good grinds of fresh black pepper (about 1/4 teaspoon)
8 1/2 oz or 240g extra sharp cheddar
2 eggs
1/4 cup or 60ml sunflower or canola oil
3/4 cup or 180ml milk
1 tablespoon Worcestershire sauce (We prefer Lea & Perrins.)

Method
Cut your broccoli florets into tiny florets and chop the stem bits into small pieces.   Pan-fry them in a non-stick pan with a drizzle of olive oil for a just a few minutes.  Set aside to cool.


Preheat your oven to 350°F or 180°C and grease your 12-cup muffin pan liberally with canola, butter or non-stick spray.  I don’t recommend using muffin liners when baking with cheese because the muffins are hard to remove from the paper.

Grate your cheese.  Put aside a large handful of about one ounce or 25g for topping the muffins.  When the broccoli is cool enough to handle, count out 12 small florets for decorating the muffin tops and set aside with the handful of cheese.


Put your flour, baking powder, pepper and salt in a large bowl.  Add in the grated cheese and stir.


Now add the bulk of the cooled broccoli and stir to combine.


In another bowl, whisk together the oil, milk and eggs and Worcestershire sauce.


Pour your wet ingredients into the dry ingredients and fold them together until just mixed.  This is a really stiff batter, almost a dough.  But trust.  When the muffins bake, all that cheese is going to melt and you will end up with lovely tender muffins.


Divide the batter evenly among the muffin cups.


Top each with some reserved cheese and a tiny floret of broccoli.


Bake in your preheated oven about 20-25 minutes or until a toothpick inserted in the middle comes out clean.

All done!

Cool on a rack for a few minutes and then remove the muffins from the pan to cool completely.  If, despite liberal greasing, your muffins still stick to the pan, just run a knife around the outside of each muffin and they should pop free.


Enjoy!   See you back here tomorrow for the start of Christmas Week!


Friday, December 6, 2013

Dark Chocolate Orange Bundt with Dark Chocolate Orange Glaze #BundtaMonth

Orange and chocolate are a classic combination. Using dark chocolate and whole Mandarin oranges pureed in the batter brings a sweet, yet bitter tartness to this tender crumbed cake Dark Chocolate Orange Bundt with Dark Chocolate Orange Glaze.


For the British, especially, chocolate and orange are a treasured Christmas flavor combination and many would say that a Christmas stocking without a chocolate orange is half empty.  Even if it’s full.  But I must admit that it is not something that I grew up with.  Like all great relationships, it has taken a while to grow and mature.  Rather like my love of marmalade.  And Brussels sprouts, eggplant and cooked cabbage.  And other grownup things.  Such is the British influence here that the stores in Dubai are full of all kinds of candies in chocolate and orange so it was a natural choice for this month’s theme of Holiday December!

Where do you fall on the continuum of Love it (10) and Hate it (0)?  If you are somewhere in the lower half, perhaps this delicious cake will slide your opinion up the scale.

Ingredients
For the cake:
2 mandarin oranges (about  5 1/2 oz or 155g)
1/3 cup or 75g unsalted butter, softened, plus extra for greasing
1 1/2 cups or 300g sugar
3 large eggs
4 tablespoons milk
1 1/3 cups or 170g flour, plus extra for the coating the pan
2 teaspoons baking powder
1 teaspoon baking soda
3/4 cup or 75g dark cocoa powder

For the glaze:
5 1/4 oz or 150g dark chocolate
2 tablespoons Grand Marnier
3 tablespoons canola oil

To decorate:  chocolate orange candies  and zest of one Mandarin orange

Method
Put the Mandarin oranges in a small pot and cover with water.  Bring to a boil over a medium heat and then simmer for an hour.  Keep checking to make sure the oranges are always covered, adding more water if necessary, and turning them over occasionally.


Meanwhile, butter your Bundt pan and coat it well with flour.

In a medium sized mixing bowl, combine your flour, cocoa, sugar, salt, baking powder and baking soda.  Set aside.


When the hour is up, remove the pot from the heat and leave the oranges in it until they are cool enough to handle.

Remove the oranges to a cutting board and preheat your oven to 350°F or 180 °C.  Use a sharp pointy knife to cut the oranges in half and use the pointy end to dig out all of the seeds


Puree both oranges, peel and all, with a hand blender, add in the milk and set aside.


With electric beaters or in your stand mixer, cream the butter and sugar together until light and fluffy.  Add in the eggs, one at a time, beating well in between.


Mix in half of the flour/cocoa and beat until combined.


Pour in half of the orange/milk and beat until combined.

Look at the gorgeous color of that orange puree! 

Repeat with the rest of the flour/cocoa and then the orange/milk.

Pour your batter into the prepared Bundt pan and bake for 50-60 minutes or until a toothpick inserted comes out clean.


Let cool in the pan for about 10 minutes then turn out on a wire rack and allow to cool completely.


Meanwhile, to make the glaze, melt the chocolate in a microwaveable bowl and add in the Grand Marnier and canola oil and stir well.  The liqueur makes the chocolate thicken up and the oil helps it become pourable again.  If you would prefer not to add alcohol to the chocolate, you can skip the oil as well and drizzle on straight melted chocolate.


Once the cake is completely cool, use a piping bag to drizzle the glaze all over the cake.  Or put it in a plastic baggie and cut a small corner off to do the same.   Add the chocolate orange slices and orange zest, if desired.


Enjoy!


I hope you have all enjoyed the past year of Bundts from our BundtaMonth group.  Our fearless leaders, Anuradha from Baker Street and Lora from Cake Duchess have decided to disband.  I’d like to thank them for their support and hard work.

Meanwhile, I’ve got one last BundtaMonth list of cakes to share!