Showing posts with label #BakingBloggers. Show all posts

Monday, January 11, 2021

Sticky Jammy Hot Wings

Sticky jammy hot wings are sweet and savory and spicy, not to mention finger-licking good! And, even better for you, they are baked, not fried!

Food Lust People Love: Sticky jammy hot wings are sweet and savory and spicy, not to mention finger-licking good! And, even better for you, they are baked, not fried!

I absolutely love chicken wings. They are hands down my favorite part and possibly in my top five favorite things to cook and eat. For all the many years we lived in Dubai, I made my spicy sticky wings every single Friday when the weather was conducive to sailing. Sitting in the shallows of the bright blue Arabian Gulf, we ate wings to our hearts content, threw the bones farther out for the sea creatures and rinsed our sticky fingers in the salty sea. Idyllic. 

Now that we are back in the States, especially since we’ve been stuck home in a small family unit, we haven’t felt much like party wings. But I gotta tell ya, these wings helped lift my mood considerably. Something about the tangy, spicy, sweet glaze made me smile a little. Perhaps they’ll lift your spirits too. 

Sticky Jammy Hot Wings

I used homemade three-berry jam for these delicious wings but you can use your favorite fruit jam or even marmalade. If you warm the jam slightly, it is easier to mix into the glaze. This recipe is adapted from one on Love and Olive Oil.

Ingredients
2 1/2 lbs or 1142g chicken wings (weight without tips – about 12 wings)
1 tablespoon olive oil
1/2 teaspoon fine sea salt
1/2 teaspoon cayenne
freshly ground black pepper

For the glaze:
1 garlic clove
1 hot red chili pepper
1 tablespoon rice vinegar
2 teaspoons soy sauce (I used low sodium.)
1 tablespoon olive oil
1/3 cup or 110g jam of your choice

Optional for garnish: chopped cilantro 

Method
If your wings are still in one piece, use a sharp knife to divide them into three pieces. Put the wing tips in a bag and freeze them to use later when making chicken stock. I happened to buy mine in Costco where they were already separated and someone else somewhere kept the tips. I hope they did something useful with them.  

Preheat oven to 425°F or 218°C. For easier clean up, you might want to line your pan with aluminum foil or a silicone liner.

In a large bowl, put the wing pieces in a single layer. Drizzle on the olive oil, then sprinkle on the sea salt and cayenne. Give them all few generous grinds of black pepper. 


Use a wooden spoon or spatula to toss the wings to distribute the seasonings and oil to all sides of the chicken. 


Bake the pieces for 40 minutes on the middle rack of your preheated oven, turning them over once halfway through cooking, until the wings are golden brown.


Meanwhile to prepare glaze, mince the garlic and chili pepper. 


Put them both in a small bowl with the rice vinegar and set aside for about 10 minutes. This helps mellow the sharpness of the garlic somewhat. Next add in the soy sauce, olive oil and the jam. If the jam is fairly stiff, warm the whole bowl in the microwave for about 10-15 seconds then stir well to combine. 


Pour any chicken grease out of the baking pan and discard. Put the wings in a clean bowl, again single file. Spoon the glaze on to distribute it evenly.


Use a spatula or wooden spoon to toss the wings to coat them with the glaze. 

Put the chicken back in the baking pan and spoon any glaze left in the bowl on top of the pieces. 

Food Lust People Love: Sticky jammy hot wings are sweet and savory and spicy, not to mention finger-licking good! And, even better for you, they are baked, not fried!

Turn your oven to broil. Return the pan to the oven, still on the middle rack. 

Broil the wings for about 5 minutes or until the glaze has started to bubble and caramelize. Do not walk away from the oven as they can burn really quickly if you aren’t watchful. 

Food Lust People Love: Sticky jammy hot wings are sweet and savory and spicy, not to mention finger-licking good! And, even better for you, they are baked, not fried!

Garnish with some chopped cilantro, if desired. 

Food Lust People Love: Sticky jammy hot wings are sweet and savory and spicy, not to mention finger-licking good! And, even better for you, they are baked, not fried!

Enjoy! 

Food Lust People Love: Sticky jammy hot wings are sweet and savory and spicy, not to mention finger-licking good! And, even better for you, they are baked, not fried!

This month my Baking Blogger friends are sharing recipes using jam and preserves. Check them all out below. Many thanks to our leader and host, Sue of Palatable Pastime
Baking Bloggers is a friendly group of food bloggers who vote on a shared theme and then post recipes to fit that theme one the second Monday of each month. If you are a food blogger interested in joining in, inquire at our Baking Bloggers Facebook group. We'd be honored if you would join us in our baking adventures.

Pin these Sticky Jammy Hot Wings!

Food Lust People Love: Sticky jammy hot wings are sweet and savory and spicy, not to mention finger-licking good! And, even better for you, they are baked, not fried!
.
 

Monday, November 9, 2020

Overnight Yeasted Cheese Scones

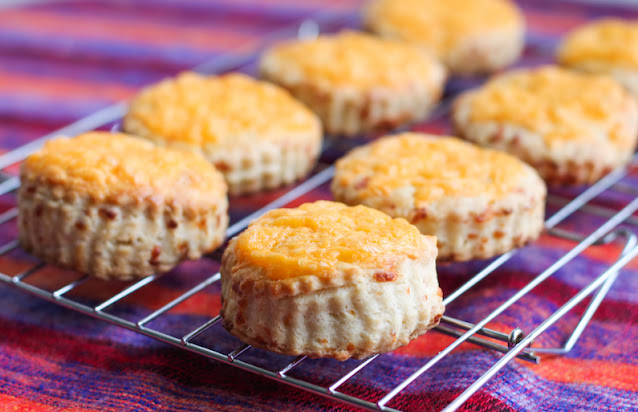
These overnight yeasted cheese scones have cheese inside and on top. They make a delightful breakfast or snack or use them as sandwich bread. 

Food Lust People Love: These overnight yeasted cheese scones have cheese inside and on top. They make a delightful breakfast or snack or use them as sandwich bread.

A couple of months ago in this very group, you might recall that we posted recipes from Poland. I made a very tasty potato pie called baba kartoflana in Polish. While I was researching for that recipe, I somehow came across these overnight, yeasted cheese scones from Hungary and made a note for later. 

According to the original author, these are called pogácsa in Hungarian and they are a popular bite-size snack served at the beginning of parties or get-togethers. Makes sense because they would be wonderful accompaniments to cocktails. Pogácsa are always made with a yeast dough. 

Since we aren’t really doing parties these days, I made mine normal scone/biscuit size. They are perfect on their own, especially warm. After eating one scone for breakfast plain, my husband also made sandwiches with a couple for lunch. He highly recommends salami and mustard on these. I think smoked ham would also be delightful. 

Overnight Yeasted Cheese Scones

In the original recipe, as mentioned above, a much smaller cookie cutter is used so that the scones are bite-sized. They also have half the cheese. In our house more cheese is always a good thing so I’ve doubled the cheese and put some in the dough and on top. 

Ingredients
2 tablespoons lukewarm milk
1 1/4 teaspoons active dry yeast
1/2 teaspoon sugar
2 cups or 250g flour
1/2 cup or 113g butter
3/4 teaspoon salt
1 egg, separated into yolk and white
1/3 cup or 75g sour cream
3 1/2 oz or 100g extra sharp cheddar cheese, grated and divided

Method
Dissolve the yeast and sugar in the lukewarm milk. Set aside. 


Whisk the flour and salt together into a large bowl. Add the cubed butter and use a pastry blender to cut it into the flour. 


Add in half of the grated cheese and mix well. 


Make a hollow in the flour and pour in milk/yeast mixture, followed by the egg yolk and sour cream. 


Use a wooden spoon (then a clean hand) to mix the ingredients together. At first it looks too dry but just keep at it and shortly, it comes together into a stiff dough. Knead until smooth. 


Press the dough into a fat disk and cover it with cling film. Chill overnight in the refrigerator. 

The next day, when you are ready to bake, remove the dough from the refrigerator so it can warm up slightly.


Line a baking sheet with parchment paper or a silicone liner and preheat your oven to 428°F or 220°C. Beat the egg white to loosen it, adding a 1/2 teaspoon of water.

On a lightly floured surface, roll out the dough until it is about 3/4 in or 2 cm thick. Use a 3 in or 7.5cm cm cookie cutter to cut out the scones.


Briefly knead together any leftover dough and roll it out again to cut more scones. 


Transfer all of the scones to the prepared baking sheet.


Brush the tops with the beaten egg white. 


Then top them with the other half of the grated cheese. 


Bake the scones in your preheated oven for about 20 minutes or until they are golden brown. Cool them on a wire rack for a few minutes before serving. 

Food Lust People Love: These overnight yeasted cheese scones have cheese inside and on top. They make a delightful breakfast or snack or use them as sandwich bread.

Enjoy! 

Food Lust People Love: These overnight yeasted cheese scones have cheese inside and on top. They make a delightful breakfast or snack or use them as sandwich bread.


Today's Baking Bloggers theme is yeast breads. Check out all the lovely recipes my blogger friends are sharing. Many thanks to our host, Sue of Palatable Pastime
Baking Bloggers is a friendly group of food bloggers who vote on a shared theme and then post recipes to fit that theme one the second Monday of each month. If you are a food blogger interested in joining in, inquire at our Baking Bloggers Facebook group. We'd be honored if you would join us in our baking adventures.

Pin these Overnight Yeasted Cheese Scones!

Food Lust People Love: These overnight yeasted cheese scones have cheese inside and on top. They make a delightful breakfast or snack or use them as sandwich bread.

 .
 

Monday, September 14, 2020

Baba Kartoflana - Polish Potato Pie

This baba kartoflana or Polish potato pie is a super rich comfort dish baked with grated potatoes, eggs and bacon. It makes a great main course or side dish.

Food Lust People Love: This baba kartoflana or Polish potato pie is a super rich comfort dish baked with grated potatoes, eggs and bacon. It makes a great main course or side dish.

I have to be honest, I didn’t know much about Poland or Polish cuisine but when Polish recipes was chosen as our theme for this month’s Baking Bloggers, I started my research close to home. I knew from the many festivals (pre-Corona, of course) that there is a vibrant Polish community in Houston and the broader state. 

Indeed, here in Texas, there are many towns that boast Polish ancestry but the oldest Polish settlement in the whole United States is a place called Panna Maria (Virgin Mary in Polish) which is not far from San Antonio, about a three-hour drive from my home.

The first Polish settlers arrived in December of 1854 and impressively, the original oak tree under which they celebrated the very first mass is still standing! In September of 1856 the very first permanent Polish Catholic Church in the United States - Immaculate Conception of the Blessed Virgin Mary Church - was consecrated there.

In another first, Panna Maria was also the location of the first private Catholic school in the United States. It’s a community that is still going strong. In fact, they are currently building a heritage center to safeguard their history for future generations. I’m looking forward to being able to visit there when we are able to take road trips again. 

Meanwhile, I will console myself with making baba kartoflana aka Polish potato pie, a comfort dish if there ever were one. Or perhaps I'll try one of the other recipes my Baking Blogger friends are sharing. Make sure to scroll down below my recipe to see the links.

Baba Kartoflana - Polish Potato Pie

This recipe is adapted from one on Cook in Polish. The author suggests you can reduce the calories in this dish by omitting the bacon – but don’t do it! Bacon makes everything better. 

Ingredients
2.2 lbs or 1 kg floury potatoes (baking potatoes, like Russets)
2 yellow onions (about 12 oz or 340g)
12 oz or 340g bacon
2 large eggs
1/4 cup or 61g whole milk Greek-style yogurt
1 teaspoon dried marjoram leaves, plus extra for garnish, if desired
1/2 teaspoon fine sea salt
1/4 teaspoon freshly grated nutmeg (or 1/2 teaspoon powdered nutmeg)
Freshly ground black pepper

Method
Peel and dice the onions. In a large pan, fry half of the bacon until crispy. Remove the bacon from the pan and drain on a paper towel. Once it has cooled, chop or crumble the bacon.


Remove all but about 2 tablespoons of bacon fat (reserving the balance for greasing your baking pan) and then add the onions to the bacon fat and cook until lightly golden. Put the onions on a plate to cool.


In a large bowl, beat your eggs and yogurt together, along with the marjoram, salt, nutmeg and a few generous grinds of black pepper.


Preheat your oven to 350°F or 180°C.

Use the leftover bacon fat to grease an 8x8 in or 23x23cm baking pan (or a 9 1/2 in or 24cm iron skillet.) Sprinkle in half of the bacon crumbles.


Peel then grate the potatoes on a fine grater. (I used my food processor for this step!) Squeeze out as much liquid as possible.

Immediately add the potatoes to the egg mixture, stirring to completely combine. This will help ensure the potatoes don’t turn brown.


Add in the cooked onions and the other half of the bacon crumbles and stir well.


Spoon the potato mixture into your prepared baking vessel.

Cover the top with the remaining uncooked bacon slices.


Bake the baba kartoflana in your preheated oven for 55-60 minutes or until the top is golden and the bacon is browned and crispy.

Food Lust People Love: This baba kartoflana or Polish potato pie is a super rich comfort dish baked with grated potatoes, eggs and bacon. It makes a great main course or side dish.


Sprinkle on a little extra marjoram for garnish, if desired. Leave to cool for about 10 minutes, then cut in slices to serve. The baba kartoflana is very rich, truly comfort food, but it's not stodgy at all. Lift the slices out carefully or they crumble a bit. I suggest serving them with a lightly dressed green salad.

Food Lust People Love: This baba kartoflana or Polish potato pie is a super rich comfort dish baked with grated potatoes, eggs and bacon. It makes a great main course or side dish.


Enjoy!

Food Lust People Love: This baba kartoflana or Polish potato pie is a super rich comfort dish baked with grated potatoes, eggs and bacon. It makes a great main course or side dish.

Check out all the wonderful Poland-inspired dishes my Baking Blogger friends are sharing today! Many thanks to our host and leader, Sue of Palatable Pastime!

Baking Bloggers is a friendly group of food bloggers who vote on a shared theme and then post recipes to fit that theme one the second Monday of each month. If you are a food blogger interested in joining in, inquire at our Baking Bloggers Facebook group. We'd be honored if you would join us in our baking adventures.

Pin this Baba Kartoflana - Polish Potato Pie!

Food Lust People Love: This baba kartoflana or Polish potato pie is a super rich comfort dish baked with grated potatoes, eggs and bacon. It makes a great main course or side dish.
 .

Monday, August 10, 2020

Pissaladière - Bacon Onion Anchovy Olive Tart

This pissaladière or, to give it a much more descriptive name in English, Bacon Onion Anchovy Olive Tart is baked with a non-traditional sourdough crust. The bacon, anchovies and olives are beautifully salty, perfect atop the sweet onions. A square or two of pissaladière makes a great appetizer or anytime snack. If you don’t have time for all the rising and resting time necessary, feel free to substitute your favorite pizza dough instead.

Food Lust People Love: This pissaladière or, to give it a much more descriptive name in English, Bacon Onion Anchovy Olive Tart is baked with a non-traditional sourdough crust. The bacon, anchovies and olives are beautifully salty, perfect atop the sweet onions. A square or two of pissaladière makes a great appetizer or anytime snack. If you don’t have time for all the rising and resting time necessary, feel free to substitute your favorite pizza dough instead.


Pissaladière is originally a traditional Liguria dish that made its way over to southeastern France and found a new home. Such a firm home that I was convinced that it was all French when we lived in Paris. Pissaladière was initially made with a spiced anchovy paste called pissalat but recipes commonly found on the web these days use whole anchovies instead and occasionally introduce another non-original topping, lardons, which are small pieces of smoked bacon.

The base can be made either a yeast dough or with a nod to the French influence, sometimes a pastry crust or even puff pastry. In the past, I’ve made round pissaladières for family dinners but in bakeries all across France it is sold as a popular snack cut into squares, so this time I decided to go rectangular.

I will tell you that it is excellent with a glass of something bright and sparkling or even a cold beer.

Pissaladière - Bacon Onion Anchovy Olive Tart

This recipe was adapted from one on Journal Des Femmes, for the toppings that is. The crust for the bottom was adapted from the recipe for focaccia integrale from James Morton’s new cookbook, Super Sourdough, which is AH-MAZING. < affiliate link. Take your sourdough starter out of the fridge at least 8–14 hours before you want to bake. If it hasn’t been fed recently, give it a feed when you take it out. As I mentioned above though, you can also substitute your favorite pizza dough if you aren’t into sourdough but it won’t be the same!

Ingredients
For the base:
5 1/3 oz (by weight, not fl oz) or 150g rye or wholemeal (wholewheat) sourdough starter
3 1/3 cups or 425g strong white (bread) flour
1 1/2 scant teaspoons or 8g table salt
1 1/2 cups or 350g tepid-warm water (about 77°F or 25°C)
1/2 cup or 100g good-quality extra virgin olive oil, plus extra for oiling and drizzling

For the toppings:
1/4 teaspoon salt
2.2 lbs or 1 kg onions
6 tablespoons olive oil
several sprigs fresh thyme
1 can (2 oz or 56g) anchovy fillets, salt cured, in olive oil
20 black oil cured olives (about 60g whole)
1/2 cup or 60g bacon crumbles

Method
James Morton’s sourdough focaccia requires a lot of rising time so you’ll either want to start super early in the day or take his recommendation to leave it overnight in the refrigerator for the second rise. That way you can bake whenever you are ready the next day, simply taking the dough out with enough time for it to come to room temperature again and finish rising before topping and baking.

Let’s get started. In a large bowl, weigh your flour and salt, mixing them both together well. Pour in your sourdough starter along with the tepid water. Mix everything until you have a very wet dough.


You can use a wooden spoon or stiff spatula but a friend recently gave me a Danish whisk and it is a great tool for this! (Am I the only one who had never heard of this fabulous tool?)


Cover the bowl with a damp cloth and let the dough rest for about 20–30 minutes.

Scrape the dough out onto a clean surface with NO FLOUR. We don’t want to add more flour to this very soft dough. A scraper comes in very handy here.


Knead your dough with the slap and fold method. This is a different focaccia recipe (and mine never got that firm) but you can watch James knead it here with the slap and fold method.

Slap and fold for about 5 minutes and as soon as it feels smooth, add your oil. Mix this until completely combined and you’ve got a very soft, shiny dough. Again the Danish whisk came in very handy here. I simply scooped the dough and oil and let it drop from the whisk repeatedly until the oil was mixed in.


Cover your bowl again with the damp cloth and leave in a relatively warm place for about 4 hours.

Peel the onions and cut them in half. Remove the hard core at the end and cut them into 1/4 in or 1/2 cm thick slices. Place them in a casserole dish with 5 tablespoons of olive oil, 3 tablespoons of water and the salt.


Cover and cook for 40 minutes over a low fire, stirring occasionally.

At the end of cooking, remove the cover and continue to cook until almost all of the liquid has evaporated, but without allowing the onions to brown. You will be amazed at how much they will cook down and how sweet the onions become, almost jammy.


Meanwhile, pit your olives by hitting them with the flat side of a large knife and pulling the pits out. Cut them into halves.


Drain the can of anchovy fillets and pop them on a saucer. This will make it easier to separate them. I like to use the point of a toothpick to ease them away from each other till they are single file on the plate. I also like to cut the thicker ones in half lengthwise to spread the saltiness more evenly around the pissaladière.


After the 4-hour rise, oil a 12 x 16in or 30 x 40cm baking pan and then add a little oil on top of your proven dough.

Scrape the dough with your well-oiled hands into the well-oiled pan, easing the dough out to the edges, trying very hard not to pop its lovely air bubbles.


Now fold your dough in half, and then fold your new, longer dough in half again. My dough was so soft that it just oozed back larger before I could take a photo of it looking a quarter of its original size.


Add more oil if it’s sticking, and gently push your dough out into the corners of the baking pan.

Stick your pan inside a plastic bag and leave to prove for 2–3 more hours at room temperature.

Alternatively, you can retard this prove overnight by putting the bag covered dough in the refrigerator overnight or for up to 24 hours until your bread is ready to bake. If you do prove overnight, like I do, make sure to take the dough out a good hour before you want to bake so it can come to room temperature again and reach its full rise.

Before topping!


Preheat your oven to 480ºF or 250ºC at least 30–40 minutes before you expect to bake your bread.  James is a big advocate of baking stones so if you have one, put it on the middle rack of your oven to heat up, along with an iron skillet on the bottom to which you’ll add water for steam.

Just before it’s ready to bake, remove the dough pan from the plastic bag and add the toppings gently so as not to deflate all of the bubbles, starting with the onions, then adding the bacon crumbles and finally the anchovies and olives.


Put your baking pan on the stone, if using, or middle shelf and add one cup or 240ml of water to the skillet on the bottom. Close the oven quickly and turn the temperature down to 430°F or 220°C. Bake for 20 minutes then open the oven door briefly to allow any steam to escape and continue baking for a further 15-20 minutes or until the edges are a lovely golden brown color.

Remove your pissaladière from the oven and leave to cool for about 15 minutes before adding the sprigs of thyme and another drizzle of olive oil, if desired.

Food Lust People Love: This pissaladière or, to give it a much more descriptive name in English, Bacon Onion Anchovy Olive Tart is baked with a non-traditional sourdough crust. The bacon, anchovies and olives are beautifully salty, perfect atop the sweet onions. A square or two of pissaladière makes a great appetizer or anytime snack. If you don’t have time for all the rising and resting time necessary, feel free to substitute your favorite pizza dough instead.


Cut into squares to serve.

Food Lust People Love: This pissaladière or, to give it a much more descriptive name in English, Bacon Onion Anchovy Olive Tart is baked with a non-traditional sourdough crust. The bacon, anchovies and olives are beautifully salty, perfect atop the sweet onions. A square or two of pissaladière makes a great appetizer or anytime snack. If you don’t have time for all the rising and resting time necessary, feel free to substitute your favorite pizza dough instead.


Enjoy!

This month my Baking Blogger friends are all sharing French recipes at the instigation of our fabulous host and organizer, Sue of Palatable Pastime. Check out all the great bakes below:

Baking Bloggers is a friendly group of food bloggers who vote on a shared theme and then post recipes to fit that theme one the second Monday of each month. If you are a food blogger interested in joining in, inquire at our Baking Bloggers Facebook group. We'd be honored if you would join us in our baking adventures.


Pin this Pissaladière!

Food Lust People Love: This pissaladière or, to give it a much more descriptive name in English, Bacon Onion Anchovy Olive Tart is baked with a non-traditional sourdough crust. The bacon, anchovies and olives are beautifully salty, perfect atop the sweet onions. A square or two of pissaladière makes a great appetizer or anytime snack. If you don’t have time for all the rising and resting time necessary, feel free to substitute your favorite pizza dough instead.
 .

Monday, July 13, 2020

Shortbread Peach Jam Squares

Make Shortbread Peach Jam Squares by surrounding bright sweet peach jam with crumbly buttery shortbread and baking it all to golden perfection!

Food Lust People Love: Make Shortbread Peach Jam Squares by surrounding bright sweet peach jam with crumbly buttery shortbread and baking it all to golden perfection!


When sweet peaches are in season, I can’t help myself; I have to make peach jam. While we also eat plenty and I freeze some, jam seems like the best way to make sure we can enjoy the flavorful juicy peaches for months to come.

Is it just me or does anyone else get an inordinate amount of satisfaction from seeing rows of homemade jams, chutneys and preserves in the pantry?

I get a little giddy as my stock grows although I also like to give some away. I have one rule though, if possible, wash my jars and give them back once they are empty! You’ll be much more likely to be a future recipient if you do.

Shortbread Peach Jam Squares

This recipe is adapted from one on Tasty for blackberry jam squares. As long as it’s nice and thick, you can use your favorite jam. I popped one cup of my homemade peach jam on the scale and it weighed 290g. I’ve added the correct measure below, for those of you who weigh ingredients.

Ingredients
2/3 cup or 158g butter, plus extra for greasing pan
1/8 cup or 25g sugar
1/8 cup or 25g dark brown sugar
1 large egg
1 teaspoon vanilla extract
2 1/2 cups or 312g plain flour
2 teaspoons baking powder
1/4 teaspoon salt
1 1/4 cups or 363g peach jam

Method
Preheat the oven to 350˚F or 180˚C and prepare an 9x9 in or 23x23cm pan by greasing it lightly and lining it with baking parchment.

Note: If you don’t mind cutting the squares in your pan, you can skip the baking parchment step but I find that I end up damaging my pan if I can’t remove the baked goods before cutting. The parchment makes lifting out easy.

Melt two tablespoons of the butter and set aside to cool.

In a bowl, beat together the rest of the butter and the two sugars until fluffy.

Add in the egg, melted butter, and vanilla extract and beat again.

Sift 2 cups or 250g of the flour, baking powder and salt into the bowl. Mix with a wooden spoon until combined.

Bring the mixture together using your clean hands to make a dough and divide it into two equal pieces.

Use your clean hands to spread out half of the dough in the baking pan. Prick the dough with a fork to prevent bubbles from forming while baking.

Spread the peach jam on top.


Mix in the remaining flour into the dough and use a fork to make a knobbly crumble.

Sprinkle the crumble on top of the jam.


Bake for 20 minutes, until golden brown on top.

Leave to cool completely then lift it out with the parchment paper. Cut into squares.

Food Lust People Love: Make Shortbread Peach Jam Squares by surrounding bright sweet peach jam with crumbly buttery shortbread and baking it all to golden perfection!


Enjoy!

Food Lust People Love: Make Shortbread Peach Jam Squares by surrounding bright sweet peach jam with crumbly buttery shortbread and baking it all to golden perfection!


This month my fellow Baking Bloggers are featuring peaches in all of our recipes, some savory, some sweet! Many thanks to our host, Sue of Palatable Pastime for all her behind-the-scenes work. Check out all the peachy deliciousness below:
Baking Bloggers is a friendly group of food bloggers who vote on a shared theme and then post recipes to fit that theme one the second Monday of each month. If you are a food blogger interested in joining in, inquire at our Baking Bloggers Facebook group. We'd be honored if you would join us in our baking adventures.

Pin these Shortbread Peach Jam Squares!

Food Lust People Love: Make Shortbread Peach Jam Squares by surrounding bright sweet peach jam with crumbly buttery shortbread and baking it all to golden perfection!
 .