Showing posts with label easy recipes. Show all posts

Monday, April 20, 2020

Easy Beef Stroganoff Pasta - Instant Pot

This easy beef stroganoff pasta is a tasty one-pot meal, beefy and creamy with lots of mushrooms. It’s cooked in an Instant Pot so it’s on the table quickly without even firing up your stove.

Food Lust People Love: This easy beef stroganoff pasta is a tasty one-pot meal, beefy and creamy with lots of mushrooms. It’s cooked in an Instant Pot so it’s on the table quickly without even firing up your stove.


I was craving beef stroganoff during my kitchen renovation so initially I planned to cook it on my one little electric burner in the laundry room, like many of our meals. Then it occurred to me that perhaps I could boil pasta in the Instant Pot. After all, one can use it to cook rice. Why not pasta?

I found various instructional posts online, especially one on Tidbits for Tasty Living. The challenge was on! I have to tell you, we could not have been more pleased with how it turned out.

Easy Beef Stroganoff Pasta

Since the pasta is going to be cooked in the Instant Pot, if you don’t have bowties, make sure to choose another small wide variety. Long thin noodles are not recommended in case they work their way out of the float valve. Feel free to substitute your favorite mushrooms or whichever ones you have on hand for the baby Portobellos.

Ingredients
4 lbs or 1820g lean beef, cut into thin pieces
2 tablespoons white vinegar
2 teaspoons salt
1 tablespoon Ajinomoto (MSG)- optional
1/3 cup or 41g flour
2 tablespoons or 30g butter
2 tablespoons olive oil
2 tablespoons beef drippings (or sub more olive oil)
3 medium onions
200g or 7 oz baby Portabella mushrooms
1 cup or 240ml dry white wine
4 cups or 946ml beef stock
1 lb or 450g small dried bowtie pasta or other small pasta
2 cups or 490g sour cream
1 tablespoon fresh lemon juice
Sea salt
Black pepper

Optional to garnish:
Parsley

Method
Sprinkle the beef with the white vinegar, salt and the Ajinomoto, if using. This helps to tenderize the meat. Refrigerate the beef for at least an hour but you can even do this step the night before.

When you are ready to cook the beef, drain any liquid that has collected and toss the pieces with the flour in a large bowl.


With the Instant pot on low sauté, melt the butter, adding a couple of tablespoons of olive oil to the skillet. While the butter is melting, chop your onions.

Sauté the onions for about five minutes or until they are softened and translucent. Remove them from the Instant Pot and put them in a bowl that is large enough to hold the meat after you’ve browned it as well.


Turn the sauté function up to high and brown the meat a handful or two at a time, adding a little more olive oil if necessary. As the beef browns, remove the browned pieces to a bowl and add more to the Instant Pot, until all the beef is browned and in the bowl.


Meanwhile, trim any hard stem ends off of the mushrooms and slice them.


Turn the sauté function to low once more and add the white wine to the pot and gently loosen any browned bits on the Instant Pot pan. Cook on the low heat until the wine is almost completely reduced.

Add the meat back in with the onions and set your Instant Pot to pressure cook for 20 minutes.


When the time is up, turn it off but leave it to depressurize naturally.

Add in the beef stock, pasta and sliced mushrooms. Stir well.


Cook for 5 minutes on high and release the steam manually when done. When releasing the pressure, cover the release valve with a kitchen towel and pulse it a few times to release the pressure a little at a time until fully releasing.


Stir in the sour cream and lemon juice. Check for salt, adding more if necessary, along with a generous amount of freshly ground black pepper to taste.


Garnish with a little parsley, if desired. Enjoy!

Food Lust People Love: This easy beef stroganoff pasta is a tasty one-pot meal, beefy and creamy with lots of mushrooms. It’s cooked in an Instant Pot so it’s on the table quickly without even firing up your stove.

It's Multicooker Monday again, friends! Check out all the great recipes we are sharing using various small appliances. Many thanks to the group creator and host, Sue of Palatable Pastime

Multicooker Monday is a blogger group created by Sue of Palatable Pastime for all of us who need encouragement to make better use of our small appliances like slow cookers, Instant Pots, Air Fryers, rice cookers and sous vide machines. We get together every third Monday of the month to share our recipes. If you are a food blogger who would like to post with us, please request to join our Facebook group.

Pin this Easy Beef Stroganoff Pasta! 

Food Lust People Love: This easy beef stroganoff pasta is a tasty one-pot meal, beefy and creamy with lots of mushrooms. It’s cooked in an Instant Pot so it’s on the table quickly without even firing up your stove.
 .

Friday, April 17, 2020

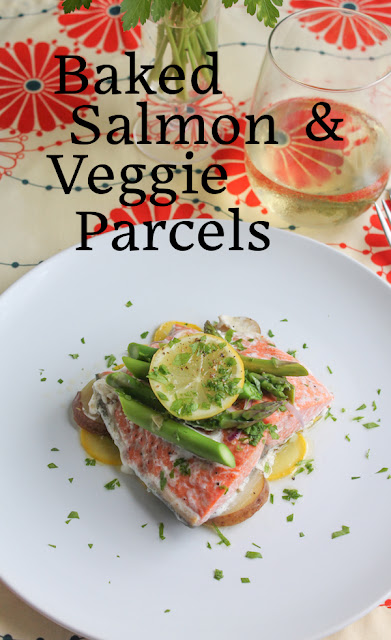
Baked Salmon and Veggie Parcels #FishFridayFoodies

Baked salmon and veggie parcels are an easy delicious meal that comes together quickly and, as a bonus, there are no pots or pans to wash up!

Food Lust People Love: Baked salmon and veggie parcels are an easy delicious meal that comes together quickly and, as a bonus, there’s no pots or pans to wash up! These little dinner packets are easily customizable to use whatever seafood and vegetables you have on hand. Just make sure than any raw vegetables are thin or thinly sliced. Vegetables that take longer to cook, like potatoes, should be cooked ahead.

This month my Fish Friday Foodie friends are sharing recipes inspired by our travels. For my contribution, I reached way back to my backpacking days when my fellow Girl Scouts and I would cook whole meals wrapped in foil over a campfire.

We never did anything as fancy as salmon with asparagus, of course! But we did enjoy some fabulous meals under the stars. There is no more delicious meal than one that follows an all-day hike in the piney woods of East Texas, or really, anywhere outdoors.

The salmon and asparagus idea came from a dish I ate many moons ago in a seaside restaurant in Sydney. They look so pretty on a plate together, don’t you think? Especially if you add a slice of lemon. For my rendition, I also love the way the yellow squash peeks out, adding a little extra pop of color to echo the yellow of the lemon slice.

Baked Salmon and Veggie Parcels

These little dinner packets are easily customizable to use whatever seafood and vegetables you have on hand. Just make sure than any raw vegetables are thin or thinly sliced so they can cook quickly. Vegetables that take longer to cook, like potatoes, should be cooked ahead.

Ingredients
For the parcels:
4 teaspoons olive oil
1 small yellow squash
4-5 small cooked red potatoes
1/4 purple onion, sliced very thinly
4 wild salmon fillets
4 teaspoons butter
12 fresh asparagus stalks
4 slices lemon
salt
freshly ground black pepper
ground cayenne pepper

To garnish:
chopped parsley

Method
Preheat the oven to 400°C or 200°F.

Cut the ends off of the yellow squash and slice it thinly. Cut the cooked potatoes in 1/4 in or 6mm slices. Trim the hard ends off of the asparagus and then cut them into lengths about the same size as your salmon fillets.


Salt and pepper the salmon fillets.


Lay your foil out and drizzle the middle of the sheet with one teaspoon of olive oil about the size of your salmon fillet. Top the olive oil with one quarter of the slices of yellow squash and then potato. Salt and pepper the potatoes.


Top the potatoes with one of the salmon fillets then add 1 teaspoon of butter in two pieces.


Press a few slices of onion into the butter along with one quarter of the asparagus pieces. The butter helps hold them all neatly on top.

Top the whole pile with a lemon slice.


Pull the foil edges together and fold them over to seal the parcel. Repeat the process to create the other three salmon and veggie parcels.

Place all four parcels onto a baking tray and bake in the hot oven for 15 to 20 minutes, or until the salmon is cooked through.

Wild salmon takes less time to cook since the fillets are generally thinner and less fatty than farmed salmon. I find that 15 minutes is enough time for wild salmon to be done to our liking. Farmed salmon may take that extra five minutes. If you are unsure, by all means, check for doneness by cutting into one of the fillets before plating.

When time’s up on the salmon, remove the baking pan from the oven and leave to stand for 1 minute.

Food Lust People Love: Baked salmon and veggie parcels are an easy delicious meal that comes together quickly and, as a bonus, there’s no pots or pans to wash up! These little dinner packets are easily customizable to use whatever seafood and vegetables you have on hand. Just make sure than any raw vegetables are thin or thinly sliced. Vegetables that take longer to cook, like potatoes, should be cooked ahead.


Carefully open each parcel so you don't burn yourself with the steam that will pour out. Use a wide spatula to slide the pile onto a plate. Sprinkle on a little chopped parsley, if desired.

Food Lust People Love: Baked salmon and veggie parcels are an easy delicious meal that comes together quickly and, as a bonus, there’s no pots or pans to wash up! These little dinner packets are easily customizable to use whatever seafood and vegetables you have on hand. Just make sure than any raw vegetables are thin or thinly sliced. Vegetables that take longer to cook, like potatoes, should be cooked ahead.


Enjoy!

Check out all the other great seafood recipes my Fish Friday Foodie friends are sharing today that have been inspired by their travels. Many thanks to our host, Camilla of Culinary Adventures with Camilla for this great theme!

Would you like to join Fish Friday Foodies? We post and share new seafood/fish recipes on the third Friday of the month. To join our group please email Wendy at wendyklik1517 (at) gmail.com. Visit our Facebook page and Pinterest page for more wonderful fish and seafood recipe ideas.

Pin these Baked Salmon and Veggie Parcels!

Food Lust People Love: Baked salmon and veggie parcels are an easy delicious meal that comes together quickly and, as a bonus, there’s no pots or pans to wash up! These little dinner packets are easily customizable to use whatever seafood and vegetables you have on hand. Just make sure than any raw vegetables are thin or thinly sliced. Vegetables that take longer to cook, like potatoes, should be cooked ahead.
.

Wednesday, February 5, 2020

Baked Duck Eggs #FoodieExtravaganza

Creamy and so dip-in-able, baked duck eggs are easy to make and a delight to eat. Pass the toast soldiers, please!

Food Lust People Love: Creamy and so dip-in-able, baked duck eggs are easy to make and a delight to eat. Pass the toast soldiers, please! This is a delicious way to prepare breakfast for a crowd! If you don’t have duck eggs, chicken eggs can be substituted. Just adjust the cooking time downwards by a couple of minutes because smaller eggs will take less time to cook.
I love duck eggs! First of all, their yolks are much bigger than a regular chicken egg and everyone knows that the best part of any egg is the yolk. It’s where most of the flavor resides, not to mention a lion’s share of the nutrients and protein. The white part of a duck egg, or albumen to give it its correct name, is clear and bright, without the slight yellow tinge found in chicken eggs.

Varying in color depending on the breed, duck eggshells are a bit thicker and sturdier than chicken eggs. I suggest cracking them into a small bowl rather than straight into the ramekins to make sure you don’t get any hard shell in your dish.

Duck eggs can be challenging to find in normal US grocery stores but if you are fortunate enough to have farmers’ markets in your area, I’ve found them to be a reliable source. My local Whole Foods also carries duck eggs so if you have one nearby, you might want to check there. They are more expensive than chicken eggs, but still affordable as a main course for breakfast.

When I do come across them, baking is my favorite way to serve them. With just a little cream and butter, the delicious duck egg shines, definitely the star of your breakfast or brunch.

Baked Duck Eggs

This is an easy and delicious way to prepare breakfast for a crowd! If you don’t have duck eggs, chicken eggs can be substituted. Just adjust the cooking time downwards by a couple of minutes because smaller eggs will take less time to cook.

Ingredients per person
1-2 teaspoons butter
2 tablespoons heavy cream
1 duck egg
salt
black pepper

For serving:
Hot buttered toast

Equipment: 4-5 in or 10-12cm shallow ramekins

Method
Set a rack in the middle of your oven. Preheat the oven to 375°F or 190°C. Boil a kettle or pot of water then turn it off.

Generously butter the inside of the ramekins. Add in the cream with a pinch of salt and a couple of grinds of black pepper.  Crack your eggs one at a time, into a small bowl, transferring each to a ramekin.

Food Lust People Love: Creamy and so dip-in-able, baked duck eggs are easy to make and a delight to eat. Pass the toast soldiers, please! This is a delicious way to prepare breakfast for a crowd! If you don’t have duck eggs, chicken eggs can be substituted. Just adjust the cooking time downwards by a couple of minutes because smaller eggs will take less time to cook.


My second egg surprised me by having double yolks of different colors. How does that even happen?!


Sprinkle the eggs with just a touch more salt and pepper.

Food Lust People Love: Creamy and so dip-in-able, baked duck eggs are easy to make and a delight to eat. Pass the toast soldiers, please! This is a delicious way to prepare breakfast for a crowd! If you don’t have duck eggs, chicken eggs can be substituted. Just adjust the cooking time downwards by a couple of minutes because smaller eggs will take less time to cook.


Place all the ramekins in a high-sided baking pan. Once the oven has preheated, put the pan in the oven and carefully pour in the hot water till it comes halfway up the ramekins.

Close the oven door and bake for 12-15 minutes or until the eggs are just set but the yolks are still runny. Start testing at 12 minutes by gently jiggling the pan. The whites should be firm but the yolks should wiggle slightly. If the yolks move too much, keep baking and testing.

This is a matter of preference and some may like their yolks softer or harder. For me, the joy is dipping my toast into a very soft yolk.

Carefully remove the pan from the oven and then remove the ramekins from the pan. Serve with toast for dipping.

Food Lust People Love: Creamy and so dip-in-able, baked duck eggs are easy to make and a delight to eat. Pass the toast soldiers, please! This is a delicious way to prepare breakfast for a crowd! If you don’t have duck eggs, chicken eggs can be substituted. Just adjust the cooking time downwards by a couple of minutes because smaller eggs will take less time to cook.


Enjoy!

This month my Foodie Extravaganza friends are sharing breakfast recipes in celebration of National Breakfast Month. Check them out below. Many thanks to our host, Sue of Palatable Pastime.
Foodie Extravaganza is where we celebrate obscure food holidays by cooking and baking together with the same ingredient or theme each month.

Posting day is always the first Wednesday of each month. If you are a blogger and would like to join our group and blog along with us, come join our Facebook page Foodie Extravaganza. We would love to have you! If you're a spectator looking for delicious tid-bits check out our Foodie Extravaganza Pinterest Board!

Pin these Baked Duck Eggs!

Food Lust People Love: Creamy and so dip-in-able, baked duck eggs are easy to make and a delight to eat. Pass the toast soldiers, please! This is a delicious way to prepare breakfast for a crowd! If you don’t have duck eggs, chicken eggs can be substituted. Just adjust the cooking time downwards by a couple of minutes because smaller eggs will take less time to cook.
 .

Thursday, January 16, 2020

Fudgy Flourless Chocolate Bundt #BundtBakers

This fudgy flourless chocolate Bundt is so tender and moist, it’s almost like a very rich, firm baked pudding. Fudgy in flavor, light in texture. Made with only five ingredients, it couldn’t be easier!

Food Lust People Love: This fudgy flourless chocolate Bundt is so tender and moist, it’s almost like a very rich, firm baked pudding. Fudgy in flavor, light in texture. Made with only five ingredients, it couldn’t be easier!


After all the baking and cooking that goes on during the holidays, our Bundt Bakers host, Patricia from Patty’s Cake chose to uncomplicate our lives by asking for Bundt recipes that need only five ingredients. Sounds simple, right? Piece of cake. This was a much harder challenge than I thought it would be!

I searched my archives and recipe files first to no avail when suddenly I remembered a Sunday Supper group event I had participated in almost six years ago. The theme was five ingredient (or less) recipes and I shared a beef bourguignon made with succulent short ribs, smoked bacon and dried mushrooms. OMG, it was so rich and delicious. (For that five ingredient or less challenge, salt and pepper didn’t count.)

Surely someone had made a cake I could bake in a Bundt pan! Turns out there was just one. Jane from Jane’s Adventures in Dinner shared a flourless chocolate cake. Score! Mine is adapted from hers. If you love little bakers in the kitchen, you'll appreciate Jane's helpers on that post. Adorable!

Fudgy Flourless Chocolate Bundt

If you’ve ever needed an easy dessert for gluten free friends and family who cannot do nuts, I can highly recommend this recipe. In Jane’s photos she added orange zest by accident and had to scoop it out as it was in violation of the five-ingredient rule. I couldn’t add it either for the same reason, but I think orange in this dark chocolate cake would be wonderful. As is, it is fabulous served alone or with vanilla or mint chocolate chip ice cream.

Ingredients
1 cup or 227g butter (plus more to liberally grease the Bundt pan)
1/4 cup or 22g cocoa powder (plus extra for dusting for the pan)
8 oz or 227g dark (semi-sweet) chocolate
5 eggs
1 cup or 200g sugar

Optional to serve: a sprinkling of icing sugar and/or ice cream

Method
Preheat your oven to 350°F or 180°C and prepare your 10-cup Bundt pan by liberally buttering it and then dusting it well with cocoa. Set aside.


Heat the dark chocolate and butter slowly in a double boiler or with short zaps in the microwave in a microwaveable bowl. Either way, stir frequently, until the chocolate is just melted.

Sift the cocoa into the sugar in a large bowl. Add the eggs and beat well.


Add the melted chocolate and butter to the egg mixture. Again beat well, until thoroughly combined.


Pour the batter into your prepared Bundt pan and bake for 30-35 minutes, or until it is just set.

It will fall a little as it cools, but don’t let that worry you. It just means a more dense, fudgy cake. All good!

Food Lust People Love: This fudgy flourless chocolate Bundt is so tender and moist, it’s almost like a very rich, firm baked pudding. Fudgy in flavor, light in texture. Made with only five ingredients, it couldn’t be easier!


Leave it to cool for about 10-15 minutes and then loosen the edges with a toothpick. Cover the top of the Bundt pan with the wire rack and invert the cake. If you've been trying to live your life right, it comes out intact. (Just kidding. :) It's actually dependent on how well you buttered and cocoa-ed the pan. But being a good human being can't hurt, right?)

Food Lust People Love: This fudgy flourless chocolate Bundt is so tender and moist, it’s almost like a very rich, firm baked pudding. Fudgy in flavor, light in texture. Made with only five ingredients, it couldn’t be easier!


Optional for serving, a light dusting of icing sugar. Or ice cream.

Food Lust People Love: This fudgy flourless chocolate Bundt is so tender and moist, it’s almost like a very rich, firm baked pudding. Fudgy in flavor, light in texture. Made with only five ingredients, it couldn’t be easier!


Enjoy!

Food Lust People Love: This fudgy flourless chocolate Bundt is so tender and moist, it’s almost like a very rich, firm baked pudding. Fudgy in flavor, light in texture. Made with only five ingredients, it couldn’t be easier!


Many thanks to Patricia of Patty’s Cake for hosting this month! Check out all the lovely five-ingredient Bundts we are sharing today.
BundtBakers

#BundtBakers is a group of Bundt loving bakers who get together once a month to bake Bundts with a common ingredient or theme. You can see all of our lovely Bundts by following our Pinterest board. We take turns hosting each month and choosing the theme/ingredient. Updated links for all of our past events and more information about BundtBakers, can be found on our home page.

Pin this Fudgy Flourless Chocolate Bundt! 

Food Lust People Love: This fudgy flourless chocolate Bundt is so tender and moist, it’s almost like a very rich, firm baked pudding. Fudgy in flavor, light in texture. Made with only five ingredients, it couldn’t be easier!
.

Monday, December 30, 2019

Rum Glazed Piña Colada Muffins #MuffinMonday

Made with sweet cream of coconut and canned pineapple chunks, then topped with boozy glaze, these rum glazed piña colada muffins are perfect for a nippy days when you need a tropical holiday from inclement weather.

Food Lust People Love: Made with sweet cream of coconut and canned pineapple chunks, then topped with boozy glaze, these rum glazed piña colada muffins are perfect for a nippy days when you need a tropical holiday from inclement weather.


Our climate in Houston is weird. Cold one day, warm the next. You are just as likely to spend Christmas in shorts as bundled up in an overcoat. And then the reverse on Boxing Day. And don’t even get me started about the rain.

Sometimes we need to add a little sunshine and a vacation vibe to our wet winter days. May I suggest you bake some muffins?

For the last several years, I have been baking muffins regularly, at first every week, then once a month, with a marvelous group of bakers. They live in various places so it’s always fun to see the creative recipes they share, often including special local ingredients. One thing we all have in common is a love of the ease of muffin baking.

No creaming of sugar, no whisking of eggs, the muffin method requires dirtying only two bowls and produces wonderful baked beauties in under 30 minutes. Best of all, they are so portable, unlike big cakes.

Rum Glazed Piña Colada Muffins

About six years ago, I shared piña colada muffins made with coconut oil. They were tender and delicious with a subtle coconut flavor. This time I decided to go bigger on the coconut element, using the sweetened cream of coconut generally called for in piña colada cocktail recipes and finishing the muffins off with a rum glaze. Because, what was I thinking? Piña coladas need rum!

Ingredients
For the muffin batter:
3/4 cup or 140g (drained weight) pineapple, canned in juice
2 cups or 250g all purpose flour
1/2 cup or 100g dark brown sugar
1 tablespoon baking powder
1/2 teaspoon salt
3/4 cup or 180ml cream of coconut
1/4 cup or 63g canola or other light oil
1/4 cup or 60ml pineapple juice (from canned pineapple)
2 eggs

For the rum glaze:
1/2 cup or 63g powdered sugar
3-4 teaspoons dark rum

Method
Preheat oven to 350°F or 180°C and prepare a 12-cup muffin pan by greasing it or lining with paper muffin cups.

Drain your small can of pineapple and reserve the juice.  Chop the pineapple up with a sharp knife. Set aside a small pile of pineapple for adding to the muffin tops before baking.


Mix flour, sugar, baking powder and salt together.  Add the larger pile of pineapple bits to the flour and stir to coat.

In another bowl, whisk together cream of coconut, canola, pineapple juice and eggs. Add the wet mixture to the flour mixture.


Gently fold just until dry ingredients are moistened. Divide your batter relatively evenly between the 12 muffin cups. Top each cup of batter with a piece or two of the reserved pineapple.


Bake 20-25 minutes in your preheated oven or until muffins are golden.

Remove the muffins from oven and let cool for a few minutes before removing them from the pan.


To make the glaze, sift the powdered sugar into a small bowl. Add the rum by teaspoonful and stir well with each addition, until the glaze is a good drizzling consistency. You may not need it all.

Cool the muffins completely, then drizzle on the rum glaze. I like to use a piping bag or a Ziplock baggies with a corner cut off because that’s less messy but you do you.

Enjoy!

Food Lust People Love: Made with sweet cream of coconut and canned pineapple chunks, then topped with boozy glaze, these rum glazed piña colada muffins are perfect for a nippy days when you need a tropical holiday from inclement weather.


Happy New Year to you all! Check out all the other lovely muffins my Muffin Monday friends are sharing today! 

Muffin Monday
#MuffinMonday is a group of muffin loving bakers who get together once a month to bake muffins. You can see all of our lovely muffins by following our Pinterest board. Updated links for all of our past events and more information about Muffin Monday can be found on our home page.

Pin these Rum Glazed Piña Colada Muffins! 

Food Lust People Love: Made with sweet cream of coconut and canned pineapple chunks, then topped with boozy glaze, these rum glazed piña colada muffins are perfect for a nippy days when you need a tropical holiday from inclement weather.
 .

Monday, December 10, 2018

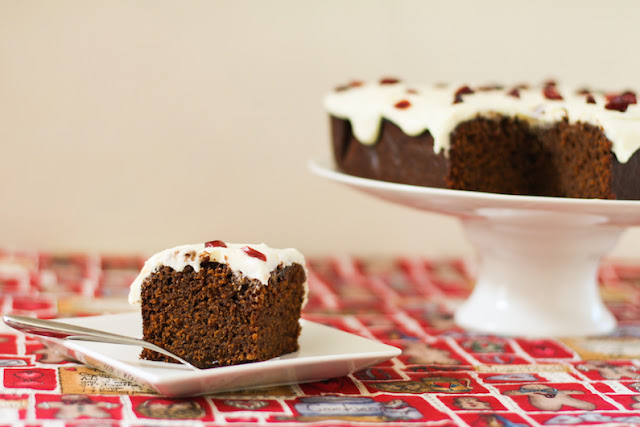
Orange Cranberry Gingerbread #BakingBloggers

Satisfy your gingerbread cravings this year with my pumped up orange cranberry gingerbread. Cover it with orange cream cheese icing or just a sprinkle of powdered sugar. Gorgeous, either way.

Food Lust People Love: Satisfy your gingerbread cravings this year with my pumped up orange cranberry gingerbread. Cover it with orange cream cheese icing or just a sprinkle of powdered sugar. Gorgeous, either way.


When my girls were little, we loved baking gingerbread as an afterschool snack, especially in the weeks leading up to the Christmas holidays. It wasn’t just that we liked eating gingerbread, well, maybe that’s why the girls liked baking it, but my favorite part, not being much of a sweet eater, was the delightful aroma that filled the house.

Ginger, cinnamon and deep rich molasses baking smell absolutely fabulous in the oven. If you’ve never baked gingerbread, you don’t know what you are missing.

Orange Cranberry Gingerbread

I’ve adapted this recipe from one on the lovely blog Indigo Scones, but if you read Ellen’s post, she got the original recipe from Joy the Baker so I must give both credit for the inspiration.

Ingredients
For the cake:
2 1/4 cups or 280g all-purpose flour
2 teaspoons ground ginger
1 teaspoon ground cinnamon
1 1/2 teaspoons baking soda
1/2 teaspoon salt
3/4 cup or 180ml canola or other light oil
3/4 cup or 150g granulated sugar
3 medium (or 2 large) eggs
3/4 cup or 180ml fresh orange juice
1/2 cup or 65g dried cranberries
3/4 cup or 180ml unsulphured molasses
1/4 cup or 60ml honey
zest from 1 large orange (mine weighed about 10.5 oz or 300g - big guy, lots of zest!)

To serve: powdered sugar or orange cream cheese icing

Optional but highly recommended – For cream cheese icing
8 oz or 227g cream cheese
1 lb or 450g powdered sugar
Zest 1/2 large orange
Pinch sea salt
3-4 teaspoons fresh orange juice

Method
Preheat your oven to 350°F or 180°C and prepare your 9×9-inch or 23cm baking pan by lining it with baking parchment paper. As you’ll see from the photos, mine turned out quite thick so if you couldn’t probably use an even wider pan.

In a medium bowl, whisk together flour, spices, baking soda, and salt.  Set aside.


In a large bowl whisk together the oil, sugar, and eggs until they turn thick and pale. I used my stand mixer because I already did my upper body exercises for the day swimming laps but you can certainly use a handheld whisk.

Heat your orange juice up in a small pot on the stove or in a microwaveable vessel until it is quite hot but not quite boiling. Add in the dried cranberries and set aside to soften.


Stir the molasses, honey, and orange zest in the bowl with the sugar, oil and eggs.


Now add the dry ingredients, all at once, to the wet ingredients. Stir together until entirely incorporated.


Remove a tablespoon or so of the cranberries from the orange juice (to use for decoration) and put them between two paper towels to dry.

Add the warm orange juice and the balance of the cranberries to the mixing bowl and gently stir until the batter is smooth, not counting the cranberries. Those will all sink to the bottom so keep that in mind as you pour the batter into your pan.


Pour the batter into your prepared pan. Try to distribute those cranberries at the bottom as evenly as you can.

Bake in the preheated oven for 35-45 minutes, or until a cake tester inserted into the center of the cake comes out clean. I made the mistake of trying to turn my pan halfway though and the middle sunk a little bit. Just leave it alone and yours should be fine.


Cool completely on a wire rack. Sprinkle with the reserved cranberries and powdered sugar to serve or if you want to push the boat out, make the orange cream cheese icing.

In the bowl of your stand mixer or with electric beaters in another mixing bowl, beat the cream cheese, sugar and salt, along with the orange zest, until it is all well combined and lump-free.

Add just enough fresh orange juice, beating well in between additions, until you reach spreading consistency. Mine took about 3 teaspoons.

Spoon the icing on top of the gingerbread and spread it to the edges, letting just a little bit hang down the sides. Sprinkle on the reserved cranberries.

Food Lust People Love: Satisfy your gingerbread cravings this year with my pumped up orange cranberry gingerbread. Cover it with orange cream cheese icing or just a sprinkle of powdered sugar. Gorgeous, either way.
Cut into squares to serve.

Food Lust People Love: Satisfy your gingerbread cravings this year with my pumped up orange cranberry gingerbread. Cover it with orange cream cheese icing or just a sprinkle of powdered sugar. Gorgeous, either way.


Enjoy!

This month's Baking Bloggers theme is, I'm sure can guess by the list below: Gingerbread! Many thanks to our host Sue from Palatable Pastime and her able co-manager, Wendy of A Day in the Life on the Farm.


Baking Bloggers is a friendly group of food bloggers who vote on a shared theme and then post recipes to fit that theme one the second Monday of each month. If you are a food blogger interesting in joining in, inquire at our Baking Bloggers Facebook group. We'd be honored if you would join us in our baking adventures.


Pin Orange Cranberry Gingerbread!

Food Lust People Love: Satisfy your gingerbread cravings this year with my pumped up orange cranberry gingerbread. Cover it with orange cream cheese icing or just a sprinkle of powdered sugar. Gorgeous, either way.
 .

Saturday, October 27, 2018

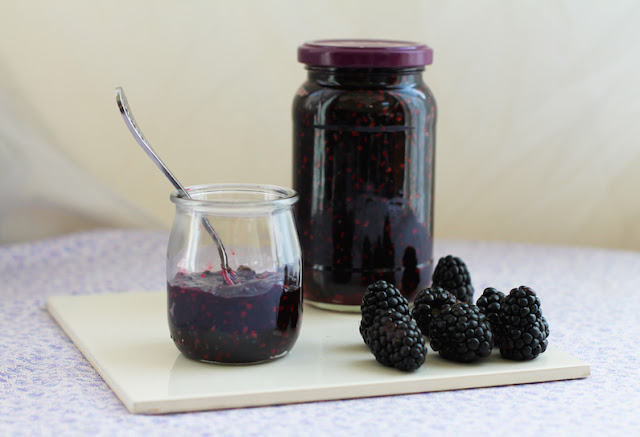
Quick Blackberry Jam

Quick blackberry jam is so easy that you can have homemade jam in less than 25 minutes. Seriously. That doesn’t count cooling time but those extra minutes will teach you patience, young grasshopper. Good things do come to those wait!

Food Lust People Love: Quick blackberry jam is so easy that you can have homemade jam in less than 25 minutes. Seriously. That doesn’t count cooling time but those extra minutes will teach you patience, young grasshopper. Good things do come to those wait!


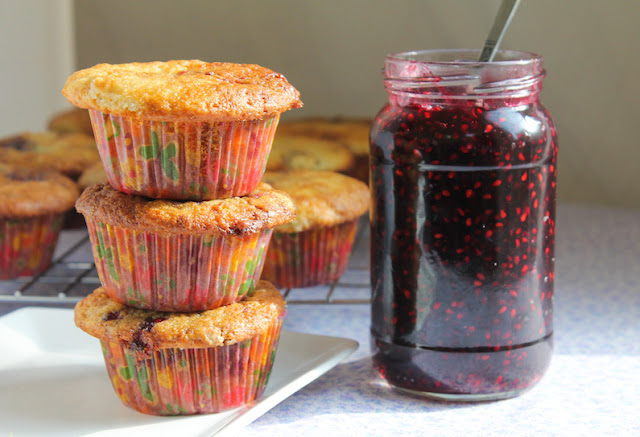
If you’ve ever let jam making scare you, this is the recipe you’ll want to try. First, it only makes one jar, so no huge commitment. Second, it only has three ingredients. And finally, but probably most importantly, it’s quick, easy and delicious. And P.S. It's also great in muffins. Get the muffin recipe here.

Food Lust People Love: Quick blackberry jam is so easy that you can have homemade jam in less than 25 minutes. Seriously. That doesn’t count cooling time but those extra minutes will teach you patience, young grasshopper. Good things do come to those wait!


Quick Blackberry Jam

As I mention in my blackberry jam muffin post, I cannot resist berries on sale. This quick blackberry jam extends their shelf life in a most wonderful, easy way.

Ingredients - for one jar - 1 3/4 cups or 414ml
3 (6 oz or 170g) punnets large blackberries (mine were Driscoll's from Mexico)
2 cups or 400g granulated sugar
2 teaspoons fresh lemon juice
zest 1/2 lemon
1 1/2 teaspoons or 7g unsalted butter - optional

Method
In your kitchen sink, sterilize one 2-cup or 480ml jar by putting a teaspoon in it and then filling it with just boiled water. Fill its lid as well. Leave to cool while you get on with the jam. I pour the boiling water over my ladle and jar funnel too, just to make sure it’s all sterilized. Once it’s cooled enough to handle, pour the water out of the jar and lid and leave to dry.

Put the clean blackberries in a heavy bottomed pot along with the lemon zest. Mash them with a potato masher until completely pulverized, occasionally using a sharp knife to cut them off of the masher grid.


Add the sugar and lemon juice. Stir well.


Put the pot on the stove over a high heat, stirring frequently, until it comes to a rolling boil. Boil for five minutes, skimming off and discarding any scum that appears with a spoon. Do not walk away from the jam at any time.


Reduce the heat to medium high and cook at a slow boil for an additional 12-14 minutes or until the jam reduces by about one-third in volume, continuing to skim scum if it keeps coming out.


You really don’t need a thermometer for this quick jam but I like to watch the temperature rise. Supposedly for jam to set, it has to reach 220°F or 104°C. This quick jam did not but it set just fine.

Remove the pot from the stove and add the butter. Stir well till the butter has melted completely.


Using a clean ladle and funnel, transfer the quick jam to your jar. Screw the lid on tightly and turn the jar upside down. Leave to cool completely. Once cool, turn the jar upright and store in the refrigerator.


Enjoy!


Pin it! 

Food Lust People Love: Quick blackberry jam is so easy that you can have homemade jam in less than 25 minutes. Seriously. That doesn’t count cooling time but those extra minutes will teach you patience, young grasshopper. Good things do come to those wait!
 .