Showing posts sorted by date for query bacon. Sort by relevance Show all posts

Wednesday, April 10, 2024

Crispy Bacon-wrapped Chicken Hearts

Marinated chicken hearts are tender, meaty morsels but added bacon kicks them up a notch to make crispy bacon-wrapped chicken hearts! These are so good. 

Food Lust People Love: Marinated chicken hearts are tender, meaty morsels but added bacon kicks them up a notch to make crispy bacon-wrapped chicken hearts! These are so good.

At least a couple of times a year, we celebrate what we call Brazil Night, usually for our daughters’ birthdays. The meal starts with caipirinhas to drink and includes grilled chicken hearts and picanha (the cap of the rump, a popular cut in Brazil that has finally made its way stateside, much to our delight), black beans, rice, farofa (toasted manioc flour) and molha, which is very similar to pico de gallo. 

While I wouldn’t mess with the simple marinated chicken hearts we grill on skewers for a Brazil Night, I’ve long wanted to try wrapping them in bacon, similar to one of our favorite Christmas Eve appetizers: Angels on horseback aka smoked oysters wrapped in bacon. 

I am here to report that they were wonderful! Tender inside with crispy bacon on the outside. Definitely going on the “would make again” list!

Crispy Bacon-wrapped Chicken Hearts

This makes a bunch of chicken hearts, about 50. My husband and I munched on these for a couple of days since we weren’t throwing a party needing appetizers and it’s just the two of us at home. Still, no regrets. They are that tasty.

Ingredients
1.15 lb or 500g chicken hearts
2 tablespoons fresh lime juice
1 tablespoon olive oil
1 teaspoon fine sea salt
Freshly ground black pepper
1 lb or 450g thin cut smoked bacon

Method
Use a sharp knife to trim the fatty ends off of the hearts. This first step is optional and I totally skip it for the skewered chicken hearts we will grill over hot coals because the fatty ends get crispy. 


However, when wrapped with bacon and roasted in the oven, those fatty ends can’t crisp up as much, so I did trim mine somewhat. You don't have to get every last piece of fat off, just the majority, if you choose to trim. 

In a mixing bowl, stir the hearts in the lime juice, olive oil, salt with a few generous grinds of black pepper. 


Cover and refrigerate for one hour. When the hour is up, preheat your oven to 400°F or 200°C. 

Cut the bacon slices in three and wrap one piece around each chicken heart, securing it with a toothpick. A little tip: If one end of the bacon piece is fattier than the other, roll up from the meatier side so the fat is on the outside and can crispy up more. 


Place them on a large lined baking pan. I hate cleaning baked on grease so I line mine first with foil, then a silicone liner. 


Bake in your preheated oven for about 20-25 minutes or until the bacon is crispy and golden.


Drain on paper towels.


Transfer the hearts to a plate to serve. A glass of chilled rosé goes beautifully with them.

Food Lust People Love: Marinated chicken hearts are tender, meaty morsels but added bacon kicks them up a notch to make crispy bacon-wrapped chicken hearts! These are so good.

Enjoy! 

Welcome to the 9th edition of our 2024 Alphabet Challenge being brought to you by the letter H. Many thanks to Wendy from A Day in the Life on the Farm for organizing and creating the challenge. Check out all the H sponsored recipes below:


Pin these Crispy Bacon-wrapped Chicken Hearts!

Food Lust People Love: Marinated chicken hearts are tender, meaty morsels but added bacon kicks them up a notch to make crispy bacon-wrapped chicken hearts! These are so good.

 .

Wednesday, March 27, 2024

Grape Juice Jigglers

Grape juice jigglers are a healthy treat your children will love, made with vegetarian gelatin and naturally sweet grape juice. Maybe make some for Easter? 

Food Lust People Love: Grape juice jigglers are a healthy treat your children will love, made with vegetarian gelatin and naturally sweet grape juice.

When my girls were growing up, I was a bake-from-scratch-type mom, but the two exceptions to that were boxed chewy brownie mix and Jello®. I guess I have to include Jello® pudding in that category as well. I had to help with brownies and Jello® because of the hot oven and the boiling water but instant pudding was sooo easy that my girls could make it by themselves from when they were very little. Cold milk, whisk in the powder. Done! How did it thicken? It was like a creamy sweet miracle. 

I don’t know who the genius behind jigglers was but I put him or her right up there with the marketing person who first thought of “lather, rinse, repeat” on shampoo bottle labels. After all, jigglers get you to use two boxes of that powdered, sweetened gelatin to make the same size pan and it’s probably eaten just as quickly. Or maybe even more quickly since jigglers of all flavors are kid favorites. A cold jiggly treat you can eat with your hands? Yes, please! 

A little research reveals that jigglers were first touted in a cookbook given away by the makers of Jello® in the 1930s. The recipe was rediscovered in the ’70s when, as sales declined, the company looked for ways to reinvigorate the market for their jiggly product, thumbing through their old cookbooks for inspiration. And another generation of jiggler lovers was born. Count me and my girls in that number.

I know a lot of moms try to limit their children’s intake of sugar with no nutritional value and I did too. So drinks and sugar-full Jell-O® were a special treat on weekends. I was not a fan of sugar-free versions because sugar seemed less harmful than the chemicals that made up the unnatural sweeteners. And what about all the coloring additives? Let’s not even go there. So what’s a mom to do?
 
Make grape juice jigglers from pure, naturally colored, naturally sweetened grape juice! Or frankly, any juice of your choice, as long as it is not very acidic, which inhibits the gelatin from firming up.
 

Grape Juice Jigglers

Most gelatin powders are still made from animal products, but vegan/vegetarian friendly gelatin is now widely available as well. Just read the labels if that is a concern for you. I will tell you that if you use the non-animal gelatin, you need just a bit more than usual to get your juice to set. 

Ingredients
4 1/4 cups cups or 1 liter no-sugar added grape juice
4 1/2 teaspoons unflavored vegetarian gelatin powder 

Method
Sprinkle the vegetarian gelatin powder over the grape juice in medium-sized pot.  Stir thoroughly until the powder is completely dissolved and the liquid appears to thicken just a little.
 

Put the pot on the stove and, over a medium flame, heat till just boiling. (About 200°F or 93°C by my candy thermometer.) Tiny bubbles will start appearing. 

Pour the hot liquid into a heatproof rectangular casserole dish about 9x13 in or 23x33cm. 


Leave to cool, then cover with cling film and chill for at least 2 hours or until firm. 

Cut into squares to serve.


Enjoy! 

Welcome to the 8th edition of our 2024 Alphabet Challenge being brought to you by the letter G. Many thanks to Wendy from A Day in the Life on the Farm for organizing and creating the challenge. Check out all the G sponsored recipes below:


Pin these Grape Juice Jigglers!

Food Lust People Love: Grape juice jigglers are a healthy treat your children will love, made with vegetarian gelatin and naturally sweet grape juice.

 .

Wednesday, February 28, 2024

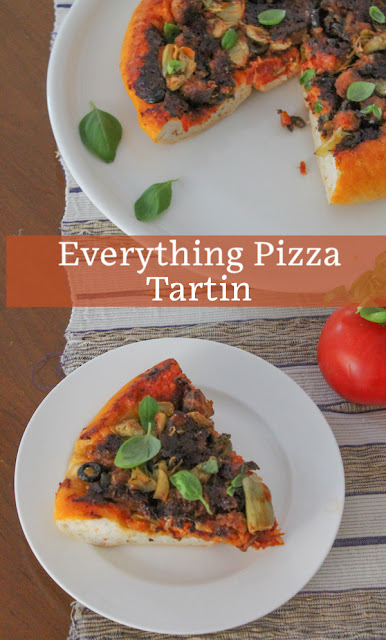
Everything Pizza Tartin

This Everything Pizza Tartin aka Upside Down Pizza is baked with the crust on top, so you can load up on "toppings" like Italian sausage, onion, artichokes, jalapeños and olives and still have a crunchy crust. 

Food Lust People Love: This Everything Pizza Tartin aka Upside Down Pizza is baked with the crust on top, so you can load up on "toppings" like Italian sausage, onion, artichokes, jalapeños and olives and still have a crunchy crust.

Back when I had an oven heated by bottled gas, I struggled to get it hot enough to bake a loaded pizza crust crunchy on the bottom. Putting too many toppings – a particular problem I have – meant my crust was often soggy. Sure, I could put fewer toppings but no one wants a skimpily topped pizza, do they? 

Then suddenly a solution occurred to me. Everything Pizza Tartin is baked upside down, French apple pie style, with ALL of my favorite ingredients, so the thick crust is still extra crunchy. Just flip to serve!
 
Here it is, straight out of the oven, before flipping. 


I use this particular pan because it can go from stovetop to oven. I brown the Italian sausage, then I take it off the heat to layer on the rest of the ingredients, finally tucking the dough in on top.

But you can cook the sausage then bake your everything pizza tartin in a large pie plate or a well-seasoned cast iron skillet. You do not want a pan that sticks. And don’t forget to cut some slits in your crust to let the steam escape. No soggy tops, or rather, bottoms!

I cannot tell you how pleased with myself I was when I figured this out!

Everything Pizza Tartin – Upside Down Everything Pizza 

You do have to be careful to cook it just long enough so the crust is golden brown but the bottom doesn’t burn. When it’s starting to get just a little bit dark in places, it’s absolutely perfect. I figure about 25-30 minutes, depending on how many toppings you’ve added.

Ingredients

For the 10in or 26cm round thick crust:
2 1⁄4 cups or 280g flour

1 rounded teaspoon active yeast – about 4g 
3⁄4 cup or 180ml warm water

1⁄2 teaspoon salt

1 teaspoon olive oil 

For the topping: 
2 links Italian sausage, approximate weight 4 3⁄4 oz or 135g 
Olive oil

Generous handful sliced pepperoni – say 10 or 12 slices

1 cup or 110g grated mozzarella cheese 
1⁄2 cup or 120ml pizza sauce


Other possible toppings:

Small artichoke hearts, well drained and halved

Sliced jalapeños, pickled or fresh

Finely sliced onion

Black olives

Your favorite pizza topping -­ no need to limit your toppings! 

Recommended: Fresh basil leaves for serving 

Method
To make the crust, mix 1 cup or 125g flour with the yeast and add in the warm water. Leave to prove for about 5 minutes. You should see some bubbling. 


Add the salt then the rest of the flour, a little at a time, mixing continuously until you have a soft dough. You might not use quite all of the flour. Knead for about five minutes or until the ball of dough is smooth and elastic. 


Leave to prove in a warm place, covered with cling film or a damp towel, for about 45 minutes or until doubled in size. (Pizza dough can be prepared one day ahead. Leave to rise, covered, in the refrigerator. Allow to come to room temperature before rolling out and baking. You can also substitute store-­bought pizza dough.)

Preheat your oven to 400°F or 200°C when the dough has about 15 minutes rising time left. 


Meanwhile, prepare your toppings. In the bottom of your ovenproof skillet, brown the sausage in small balls, adding a drizzle of olive oil. 


Remove from the heat once browned and spoon off some of the excess fat cooking the sausages might have created. 


Sprinkle in the finely sliced onion, the artichokes, jalapeños, olives and other toppings, distributing them evenly. Top these with the pepperoni slices. 


Sprinkle on the mozzarella cheese. Spoon on the pizza sauce, spreading it around gently with the back of the spoon.


Roll or press your crust out so that it’s just a bit larger than the
diameter of your fillings in the pan. Cut three slits to allow steam to escape while it’s baking. 


Fit the crust over the fillings and tuck it in all around the sides. Use a pastry brush to brush olive oil over the top of the crust and down the tucked sides. 

Bake the pizza tartin in your preheated oven for about 25­-30 minutes or until the crust is a lovely golden color and quite crisp on the outside. When you tap it, it should sound hollow. 


Leave the pizza tartin to cool for about 5­-7 minutes then invert it carefully onto a serving plate. 


If any of the bits do stick, just scoop them off the pan and replace on the pizza tartin. 

Sprinkle with fresh basil leaves and cut in wedges and serve hot. 


Food Lust People Love: This Everything Pizza Tartin aka Upside Down Pizza is baked with the crust on top, so you can load up on "toppings" like Italian sausage, onion, artichokes, jalapeños and olives and still have a crunchy crust.

Enjoy!

Welcome to the fifth installment of our Alphabet Challenge for 2024. Today’s recipes are brought to you by the letter E. Many thanks to our challenge creator, Wendy of A Day in the Life on a Farm

Check out all the recipes brought to you by the letter E. 

Here are my posts for the alphabet challenge, thus far: 
E: today's post! Everything Pizza Tartin

Pin this Everything Pizza Tartin! 

Food Lust People Love: This Everything Pizza Tartin aka Upside Down Pizza is baked with the crust on top, so you can load up on "toppings" like Italian sausage, onion, artichokes, jalapeños and olives and still have a crunchy crust.

.

Wednesday, January 3, 2024

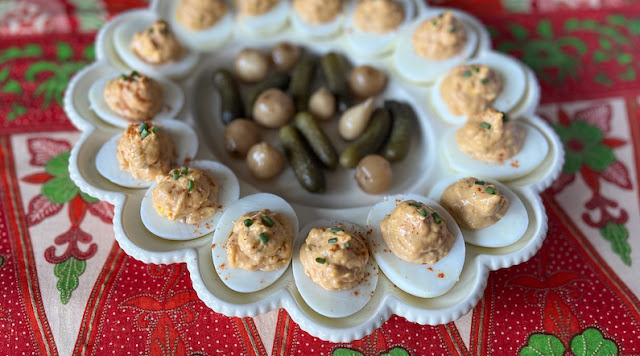
Anchovy Deviled Eggs

Filled with salty minced anchovies, lemon zest, mayo and Dijon mustard, these tasty anchovy deviled eggs will disappear quickly from your party table.

Food Lust People Love: Filled with salty minced anchovies, lemon zest, mayo and Dijon mustard, these tasty anchovy deviled eggs will disappear quickly from your party table.

Every Christmas Eve our menu is all appetizers, a throwback to the days when we had plenty of presents to wrap and so no one had time for a sit down dinner. 

We pop open a bottle of Champagne and fill our small plates with artichoke dip, smoked or cured salmon with avocado, caviar with its necessary accompaniments of chopped egg and onion, bacon wrapped smoked oysters and, of course, deviled eggs. The cheeseboard also boasts a variety of cheeses and duck liver pâté.  

On Christmas morning, we usually make something special for breakfast but my favorite part is the leftover deviled eggs. They make a perfect Christmas morning meal! 

Anchovy Deviled Eggs

This recipe is adapted from one I read in The Guardian newspaper and saved almost three years ago. I can’t say that they’ll replace my classic deviled eggs which I adore but the anchovies and lemon zest add a lot of flavor. In short, we liked them a lot!

Ingredients for 14 deviled eggs
7 eggs, hard-boiled
7 anchovy fillets, packed in olive oil
1 tablespoon olive oil from anchovy jar
Finely grated zest of 1 lemon
1 tablespoon Dijon mustard
3/4 teaspoon smoked paprika, plus an extra sprinkle for garnish
7 tablespoons mayonnaise

Green onions, finely chopped, for garnish
Cornichons or small pickled onions, optional to serve

Method
Using a sharp knife, mince the anchovies very finely. 


Put the anchovies in a bowl with the oil then add the lemon zest, mustard, paprika and mayonnaise and mix until smooth. 


Peel your hard-boiled eggs and cut them in half lengthways. Scoop out the yolks and add them to the anchovy mixture.


Mash them into the rest of the filling with the tines of a fork. Mix well. 


Spoon the filling into each egg white or use a piping bag with a large tip to fill them. If your filling is quite chunky, it might keep getting stuck if the tip hole isn’t large enough. 

Decorate with a light sprinkle of paprika and a few bits of green onion.

Food Lust People Love: Filled with salty minced anchovies, lemon zest, mayo and Dijon mustard, these tasty anchovy deviled eggs will disappear quickly from your party table.

Serve chilled or at room temperature with a few cornichons and/or pickled onions, if desired.

Food Lust People Love: Filled with salty minced anchovies, lemon zest, mayo and Dijon mustard, these tasty anchovy deviled eggs will disappear quickly from your party table.

Pour your favorite tipple to accompany this excellent appetizer and enjoy! 

Happy New Year!

Last year was extra busy (and frankly a bit fraught) so my blog was fairly neglected. This is a creative outlet that gives me a lot of pleasure, from recipe development, baking and cooking, and then finally writing about the process. I hope to find more time for this hobby I enjoy in 2024. To that end, I am joining my fellow bloggers every other week, to create recipes and work our way through the alphabet, starting with, of course, A. 

Many thanks to the group creator and lead, Wendy from A Day in the Life on the Farm. Check out all the A links below. 


Pin these Anchovy Deviled Eggs! 

Food Lust People Love: Filled with salty minced anchovies, lemon zest, mayo and Dijon mustard, these tasty anchovy deviled eggs will disappear quickly from your party table.

 .

Sunday, August 6, 2023

Smoked Salmon Smørrebrød

This smoked salmon smørrebrød is the perfect open-faced sandwich made with lemony cream cheese flavored and flecked with green chives, on sourdough toast. Topped to finish with watercress, it’s the perfect light lunch or snack. 

Food Lust People Love: This smoked salmon smørrebrød is the perfect open-faced sandwich made with lemony cream cheese flavored and flecked with green chives, on sourdough toast. Topped to finish with watercress, it’s the perfect light lunch or snack.

When our host decided on Sandwich Recipes for today’s Sunday FunDay theme, I knew immediately what I wanted to make. Some rendition of the “Dutch sandwiches” I made for a post in the very first year I started this blog. (So please forgive the ugly photos. I keep those up to remind myself how far I’ve come.)

I tell the story of working at the Inter-Continental Hotel in Abu Dhabi and how I first learned about open-faced sandwiches. Despite spending some of my formative years as an expat child, clearly, I still had a lot to learn about other cultures. 

For this post I did a bit more research to discover that many other countries also enjoy open-face sandwiches so my Dutch title was a bit misplaced. In fact, according to Wikipedia, “In countries like Denmark, where smørrebrød is common, smørrebrød is not considered a form of sandwich; rather, a sandwich is considered a form of smørrebrød with an extra piece of bread on top.” 

To-may-to, to-mah-to. Whatever we call it, the research was fun and we loved the sandwiches. 

Smoked Salmon Smørrebrød

The cream cheese can be made a day ahead and, in fact, tastes better when it is because the flavors have time to meld. If you can’t get your hands on chives, use green onion tops and mince finely. The cream cheese will make more than two large open-faced sandwiches but if you are as generous with the salmon as I am, you’ll need to buy more. 

Ingredients
7 oz or 200g block cream cheese (not whipped spread) at room temperature
Zest 1 lemon
Small bunch fine chives, plus extra for garnish
Freshly ground black pepper
3 1/2 oz or 100g smoked salmon, finely slices
2 large slices sourdough bread

Baby watercress for garnish

Method
Finely slice the chives.


Mix them into the softened cream cheese, along with the lemon zest and a few good grinds of black pepper. 


Refrigerate in a covered container until about 30 minutes before you are really to assemble the open-faced sandwiches. 


Spread the bread, toasted or untoasted – your choice – with the chive lemon cream cheese. 


Top with smoked salmon. 


Add on some watercress and more chives, if desired, along with a couple of grinds of black pepper. 


As my sourdough slices are so large, I cut them in four pieces each to serve. 

Food Lust People Love: This smoked salmon smørrebrød is the perfect open-faced sandwich made with lemony cream cheese flavored and flecked with green chives, on sourdough toast. Topped to finish with watercress, it’s the perfect light lunch or snack.

Enjoy! 

It’s Sunday FunDay! Hope the weather is nice where you live. The sun has finally come out over here and we are beyond delighted. In honor of National Sandwich Month, my fellow bloggers and I are sharing sandwich recipes. Check out the links below. Many thanks to our host Wendy of A Day in the Life on the Farm. 


We are a group of food bloggers who believe that Sunday should be a family fun day, so every Sunday we share recipes that will help you to enjoy your day. If you're a blogger interested in joining us, just visit our Facebook group and request to join.


Pin this Smoked Salmon Smørrebrød!

Food Lust People Love: This smoked salmon smørrebrød is the perfect open-faced sandwich made with lemony cream cheese flavored and flecked with green chives, on sourdough toast. Topped to finish with watercress, it’s the perfect light lunch or snack.

 .

Sunday, July 30, 2023

Lentil Mushroom Feta Calzones

These lentil mushroom feta calzones are the perfect picnic food, easy to transport and even easier to eat. The filling is tasty and the crust divine. 

Food Lust People Love: These lentil mushroom feta calzones are the perfect picnic food, easy to transport and even easier to eat. The filling is tasty and the crust divine. The combination of lentils, mushrooms and feta creates a hearty filling that even the carnivores in your family will enjoy.

I made these into four large calzones to feed four hungry people but the dough and filling could be easily divided into small portions to make more smaller calzones. The combination of lentils, mushrooms and feta creates a hearty filling that even the carnivores in your family will enjoy. 

Lentil Mushroom Feta Calzones

The folding technique for the edges of the calzones is one that is employed by the bakers of the traditional Cornish pasty. Except I like to leave the little tail out rather than tucking in under. Check out how here: Cousin Jack's Pasty Co.

Ingredients
For the dough:
3/4 cup or 180ml lukewarm water (not hot)
1 teaspoon active-dry yeast
1/4 teaspoon sugar
2 cups or 250g strong bread flour, plus more if needed
1 teaspoon salt
Drizzle olive oil for the dough bowl

For the filling:
1/2 cup or 110g uncooked or 1 1/8 cups or 220g cooked/rinsed Puy (French) lentils (If you are cooking them, boil with 1/2 teaspoon baking soda till tender. Drain and rinse.)
6 1/3 oz or 180g baby portabella mushrooms
2-3 medium cloves garlic
Drizzle of oil for the cooking pan
1 medium tomato – about 4 2/3 oz or 130g, cut into small pieces
1 fresh jalapeño, optional but recommended, chopped 

Method
Put the yeast and sugar in a bowl. Pour in the warm water and give it a stir. Set aside for a few minutes. It should start to get foamy on top. 

In a large bowl or the bowl of your stand mixer, whisk the flour and salt together. Pour in the yeast mixture and mix well to form a soft dough.

Using the dough hook on the stand mixer, or kneading by hand against the counter, knead the dough until it forms a smooth, slightly tacky ball that springs back when you poke it, 5 to 8 minutes. If the dough sticks to the bowl or your hands, add a tablespoon of flour at a time until it’s easier to work with.


Avoid adding too much flour if possible. I didn’t add any this time whereas the last time, I added two tablespoons. This is the sort of thing that can change with your flour and the humidity in the air. 

If you're planning to make the calzones today, then give the dough a rise. Clean out the mixing bowl, coat it with a little oil, and transfer the dough back inside. Cover the bowl with plastic wrap or a damp kitchen towel and let the dough rise until doubled in size, 1 to 1 1/2 hours.

Alternatively, you can store the dough in the fridge and make the calzones the next day. Cover the bowl with plastic wrap and refrigerate. 

Either way, make the filling which can also be stored in the refrigerator overnight or cooled and used the same day. 

Put the cooked, rinsed lentils in a mixing bowl that is large enough to hold all of the filling ingredients, with room to stir. 

Clean and chop the mushrooms and mince the garlic. 


Drizzle a little oil into a big the pot and add the garlic. 


Cook it briefly, making sure it doesn’t burn, then add the mushrooms. 


Cook them until golden. Add them to the lentil bowl. 


Add the tomato and jalapeño, if using, to the now empty pot along with another drizzle of oil. 


Cook for 8-10 minutes, until the tomato and jalapeño are well cooked and slump into a paste. Add the paste to the lentil/mushroom bowl and stir well. Leave to cool. 


Once the rest of the filling is cool, crumble the feta and gently fold it in. 


Take the dough out of the refrigerator about half an hour before you are ready to bake. Preheat your oven to 350°F or 180°C.

Divide the dough into four balls.


Roll one ball of dough out into a thin circle about 7 in or 17.75cm across. 


Put about 1/4 of the cooled filling (about 5 1/3 oz or 150g) on one side of the circle.


Gently lift the other side up and over, pressing the air out as you stick the edges of the two halves together.


Starting on one side of the semi circle, crimp the edges to seal the calzones. (See note above the ingredient list for a link to an instructional video.) Repeat until all of the calzones have been filled and formed.


Transfer the calzones to your baking tray, leaving enough room between them so that they can rise while baking. Brush the tops lightly with olive oil.


Bake in your preheated oven for 25-30 minutes, or until golden brown and puffed.

Food Lust People Love: These lentil mushroom feta calzones are the perfect picnic food, easy to transport and even easier to eat. The filling is tasty and the crust divine. The combination of lentils, mushrooms and feta creates a hearty filling that even the carnivores in your family will enjoy.

These can be eaten hot or at room temperature. 

Food Lust People Love: These lentil mushroom feta calzones are the perfect picnic food, easy to transport and even easier to eat. The filling is tasty and the crust divine. The combination of lentils, mushrooms and feta creates a hearty filling that even the carnivores in your family will enjoy.

Enjoy! 

Food Lust People Love: These lentil mushroom feta calzones are the perfect picnic food, easy to transport and even easier to eat. The filling is tasty and the crust divine. The combination of lentils, mushrooms and feta creates a hearty filling that even the carnivores in your family will enjoy.

It’s Sunday FunDay and since it’s National Picnic Month, we are going on a picnic! Hope the weather is fine where you live. Check out all the great recipe links below. Many thanks to our host, Camilla at Culinary Cam!

 
We are a group of food bloggers who believe that Sunday should be a family fun day, so every Sunday we share recipes that will help you to enjoy your day. If you're a blogger interested in joining us, just visit our Facebook group and request to join.


Pin these lentil mushroom feta calzones!

Food Lust People Love: These lentil mushroom feta calzones are the perfect picnic food, easy to transport and even easier to eat. The filling is tasty and the crust divine. The combination of lentils, mushrooms and feta creates a hearty filling that even the carnivores in your family will enjoy.

 .