Monday, November 15, 2021

Chicken Chili Verde – Instant Pot

Cooked completely in an Instant Pot, this Chicken Chili Verde is flavorful, delicious and easy! Serve yourself a warming bowl of this chili tonight.

Food Lust People Love: Cooked completely in an Instant Pot, this Chicken Chili Verde is flavorful, delicious and easy! Serve yourself a warming bowl of this chili tonight.

My family knows that my favorite kind of book will contain both recipes and stories. I call them cookbook memoirs and have just discovered via a quick Google search that cookbook memoir is a legit genre. Amazon calls them food memoirs, culinary biographies or culinary memoirs. 

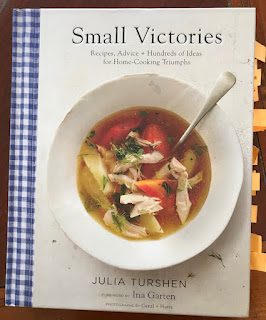
A few years ago my elder daughter gave me Julia Turshen’s book Small Victories for Christmas and within just a few hours, I had bookmarked 23 recipes I wanted to try! I haven’t actually made them all yet but every one I have cooked has been delicious.

Julia Turshen's book, Small Victories: Recipes, Advice + Hundreds of Ideas for Home Cooking Triumphs
Twenty-three bookmarks!

Her quick chicken chili verde instructions weren’t even strictly a recipe. They were just a small paragraph on a page headed Seven Things to do with Leftover Chicken but when I searched my Eat Your Books  bookshelf for tomatillos, it popped up. As you can see from my adaptation, I didn’t start with leftover chicken but using an Instant Pot made it pretty quick to cook anyway.

Chicken Chili Verde – Instant Pot

Adapted from Julia Turshen's Small Victories: Recipes, Advice + Hundreds of Ideas for Home Cooking Triumphs <Amazon affiliate link. My two boneless, skinless chicken breasts weighed about 1 1/2 lbs or 680g. If your chicken weighs a bit more or less, it’s all good. I used some special little tomatillos from Melissa's Produce called tomatillos milperos, which are smaller with a more concentrated flavor and less acidity than the normal variety. I highly recommend them but use whichever fresh, firm tomatillos you can find if you can't put your hands on some.

Ingredients
2 boneless, skinless chicken breasts (about 1 1/2 lb or 680g)
Fine sea salt
Freshly ground black pepper
1 medium onion
1 bell pepper
1 fresh jalapeño
2 cloves garlic
2 tablespoons olive oil 
1 teaspoon ground cumin
1 teaspoon chili powder
1 lb or 450g tomatillos
1 1/2 cup or ml chicken stock, plus more as needed
1 can (15.5 oz or 439g) white beans

To serve:
sour cream
grated cheese
green onions

Optional: sliced fresh jalapeños

Bell pepper, onion, garlic and tomatillos milperos
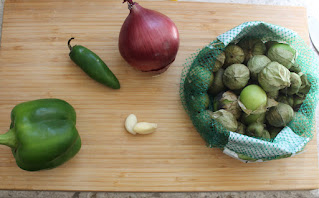
The little tomatillos

Method
Season the chicken breasts with fine sea salt and freshly ground black pepper. Set aside.

Remove any peels and stems then, finely mince or use a food processor to chop the onion, bell pepper, jalapeño and garlic finely. I used my little food processor. 

On the sauté low setting, cook the onion, bell pepper, jalapeño and garlic in the olive oil in the Instant Pot until they are softened, about 10 minutes, stirring frequently.


Remove the husks from the tomatillos and cut them in pieces. Since I was using the small ones, I just cut most of them in half.

Chopping the tomatillos

Add the spices, tomatillos and chicken stock to the sauteed vegetables. 

Adding the spices, tomatillos and chicken stock to the sauteed vegetables.

Turn sauté to high and bring the mixture to a quick boil then turn the Instant Pot off. 

Nestle the chicken breasts in the pot and pressure cook for 10 minutes. 

Putting the chicken into the Instant Pot.

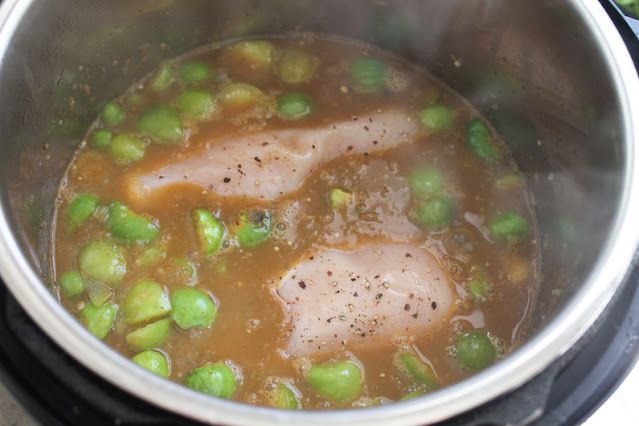
Natural release the steam for 10 minutes then manually release completely. 

Chicken cooked in the pot

Remove the chicken from the pot and, as soon as it’s cool enough to handle, shred it. 

Shredding the chicken.

Drain and rinse the cannellini beans. 

Add the shredded chicken back to the pot along with the rinsed beans. 

Adding the chicken and beans to the pot

Sauté on low for about 10-15 minutes, stirring frequently and adding a little more stock (or water) if it gets too dry. 

Taste for salt and add a bit more if necessary, keeping in mind that the grated cheese will also add salt when you serve.  

Food Lust People Love: Cooked completely in an Instant Pot, this Chicken Chili Verde is flavorful, delicious and easy! Serve yourself a warming bowl of this chili tonight.

Serve with sour cream, grated cheese and green onions. I also like to include some fresh jalapeño slices.

Serve with sour cream, grated cheese and green onions. I also like to include some sliced fresh jalapeños.

Enjoy! 

It’s MultiCooker Monday so my blogger friends and I are sharing recipes made with our small appliances. Check out the links below. Many thanks to our host and organizer, Sue of Palatable Pastime


Multicooker Monday is a blogger group created by Sue of Palatable Pastime for all of us who need encouragement to make better use of our small appliances like slow cookers, Instant Pots, Air Fryers, rice cookers and sous vide machines. We get together every third Monday of the month to share our recipes. If you are a food blogger who would like to post with us, please request to join our Facebook group. 


Pin this Chicken Chili Verde – Instant Pot!

Food Lust People Love: Cooked completely in an Instant Pot, this Chicken Chili Verde is flavorful, delicious and easy! Serve yourself a warming bowl of this chili tonight.

 .


Tuesday, November 9, 2021

Buttery Sourdough Dinner Rolls #BreadBakers

Soft, fluffy and tender, these buttery sourdough dinner rolls are perfect to accompany your holiday meal and for making leftover turkey or ham sandwiches. 

Soft, fluffy and tender, these buttery sourdough dinner rolls are perfect to accompany your holiday meal and for making leftover turkey or ham sandwiches.

The holidays are approaching quickly and my Bread Baker friends and I know that for many, a festive table is not complete without some dinner rolls. So we are here to help, sharing several wonderful recipes we hope you’ll love. Make sure to scroll down to find the links. 

My buttery sourdough dinner rolls remind me of the brown-n-serve rolls my grandmother used to buy and finish baking at home, but with a little more flavor. They are a little bit bigger than your average dinner roll which makes them great for turkey or ham sandwiches as well. 
 

Buttery Sourdough Dinner Rolls

We want lots of springy fluffiness for these soft dinner rolls so while the sourdough starter is there for flavor, I use active dry yeast as well to make sure these puff right up.

Ingredients
1 1/2 cups or 360ml milk
1/3 cup or 80g butter
1/4 oz or 7g (2 1/4 teaspoons) active dry yeast
1/2 cup or 113g sourdough fed starter 
1 egg, at room temperature
1/4 cup or 50g sugar
2 teaspoons fine sea salt
5 cups or 625g flour, plus extra for kneading and sprinkling on before baking

1/8 cup or 30g melted butter for brushing on after the rolls are baked

Method
Put the milk in a large microwaveable vessel and add in the butter. Microwave until the butter is mostly melted, about 3-4 minutes. Let cool for a few minutes.

Put the yeast in your mixing bowl and pour in about a cup or 240ml (no need to measure exactly) of the warm milk/butter mixture and set aside for about 10 minutes. You are hoping that the yeast activates and gets all bubbly. If it doesn’t, you need to buy some new yeast and start over.

Now add the rest of the milk/butter, the sourdough starter, the egg and the salt along with 3 cups or 375g of flour to your mixing bowl and mix on medium speed until all of the flour is incorporated.  


Scrape down the sides of the bowl with a spatula to mix in any flour left there. It’s a very runny batter at this point.


Continue mixing and add the remaining flour by spoonfuls until all is incorporated. Now it should be wet and soft sticky dough but that’s what is needed for soft and tender rolls.

Now mix for 3-4 minutes, changing to the dough hook, if necessary, to help develop the gluten.


Cover the bowl with cling film and allow the dough to rise in a warm place for about an hour or until it doubles in size. If it's cold in your kitchen, you can partially fill the sink with hot tap water and put the bowl in it for warmth.


Meanwhile, line your baking pan with parchment paper, a silicone mat or grease it liberally with oil or butter.

Once the first rise is done, punch the dough down and knead it briefly on a floured surface. Cut the dough ball into halves, then cut the halves into half again. Cut each piece into four to make large bread rolls or six to make more reasonably sized ones. Hint: the bigger ones are better for sandwiches.


Roll the dough pieces into balls, pinching them from underneath to stretch the tops so they are nice and round. 


Put the balls, side by side, pinched side down, in your prepared baking pan. Sprinkle the tops of the rolls with flour.


Put the whole baking pan in a clean, new garbage bag, capturing some air before you clip it shut, so that the bag doesn’t touch the top of the bread rolls. Allow the rolls to rise in a warm place for about an hour.

About 15 minutes (or however long your oven takes) before the second rise is completed, preheat your oven to 350°F or 180°C.


Bake the dinner rolls in your preheated oven for 25-30 minutes or until they are golden brown all over.


Brush with the melted butter and serve warm, if possible. 

Brushing rolls with butter

They are still great cooled but I think we can all agree that warm rolls are the best!

Enjoy!

Soft, fluffy and tender, these buttery sourdough dinner rolls are perfect to accompany your holiday meal and for making leftover turkey or ham sandwiches.

Check out all the delicious roll recipes my Bread Baker friends are sharing today! Many thanks to our host, Swathi of Zesty South Indian Kitchen.

BreadBakers
#BreadBakers is a group of bread loving bakers who get together once a month to bake bread with a common ingredient or theme. Follow our Pinterest board right here. Links are also updated each month on this home page. We take turns hosting each month and choosing the theme/ingredient.

Pin these Buttery Sourdough Dinner Rolls!

Soft, fluffy and tender, these buttery sourdough dinner rolls are perfect to accompany your holiday meal and for making leftover turkey or ham sandwiches.
 .

Sunday, November 7, 2021

Stuffed Gem Squash

Roasted Stuffed Gem Squash filled with herby, tomato-ey bulgur wheat is a thing of beauty and deliciousness but you can also kick it up a notch with the addition of Italian sausage. 

Food Lust People Love: Roasted Stuffed Gem Squash filled with herby, tomato-ey bulgur wheat is a thing of beauty and deliciousness but you can also kick it up a notch with the addition of Italian sausage.

Gem squash is a South African heirloom squash that has gained popularity in many other countries. In its native land, it is considered a summer squash but in the United States, it falls into the winter squash category. It’s a descendant of a Central American squash that made its way across the sea and is a must-have in South Africa. 

If you’d like to learn more about them and where to find gem squash, this post on Cook Sister is very informative: https://www.cooksister.com/2010/10/gem-squash-central-finding-them-growing-them-and-eating-them.html

Stuffed Gem Squash  - Two Ways

In the following recipe, we will make a base stuffing with onions, tomatoes, bulgur and herbs, which is delicious on its own for half the gem squash. The other half, we’ll fill with a mixture of the base stuffing with added Italian sausage. By adjusting your filling amounts, you can make all vegetarian, leaving out the sausage altogether or add another link or two of sausage to stuff all the gem squash with a meaty mixture. If you can't find gem squash, substitute small acorn squash which are of a similar size. 
 
Ingredients
4 gem (or acorn) squash 

For the stuffing:
1/4 cup or 60ml olive oil, plus more for sautéing the onion and drizzling on the squash before roasting
1 large or 2 medium onions, minced (Mine weighed 7 oz or almost 200g)
1 cup or 210g medium coarse bulgur wheat
1.1 lbs or 500g tomato passata aka tomato puree
1 teaspoon fine sea salt or to taste
1 vegetable stock cube 
1/4 teaspoon freshly ground black pepper
1 teaspoon crushed red pepper
Small bunch fresh parsley
Large bunch fresh cilantro

4 spicy Italian sausages – approx. weight 11 1/3 oz or 320g

Method
Sauté the onion in a drizzle of olive oil until softened and translucent. Tip in the bulgur wheat and give the whole thing a good stir so the bulgur is coated with the oil and onions. 

Tip in the bulgur wheat and give the whole thing a good stir so the bulgur is coated with the oil and onions.

Add in the tomato passata or puree, the stock cube and the black pepper. 

Add in the tomato passata or puree, the stock cube and the black pepper.

Add 1 cup or 240ml water and the crushed red pepper to the mixture and, over a medium heat, bring it up to a slow simmer. 

Add 1 cup or 240ml water and the crushed red pepper to the mixture and, over a medium heat, bring it up to a slow simmer.

Put a lid on the pan and leave to simmer for about 10-15 minutes or until the bulgur wheat is al dente.  Test it occasionally, as you don’t want it to overcook and turn to mush. 

While the stuffing simmers, remove the sausage from its skin and pan-fry it in a skillet, breaking it apart into crumbles. You want it well-browned and crispy in places. Remove from the heat and drain. 

While the stuffing simmers, remove the sausage from its skin and pan-fry it in a skillet, breaking it apart into crumbles. You want it well-browned and crispy in places

When the bulgur wheat is done, stir in the 1/4 cup or 60ml olive oil and taste for salt. Add salt as needed. I rarely do as the stock cubes has enough salt for us.  

Mince the stems of your parsley and cilantro and chop the leaves. Add both to the stuffing and stir well.  

Mince the stems of your parsley and cilantro and chop the leaves. Add both to the stuffing and stir well.

Cut the gem squash in halves and scoop the seeds out. 

Cut the gem squash in halves and scoop the seeds out.

Preheat your oven to 350°F or 180°C. (Or at this point, the filled squash can be kept in the refrigerator until you are ready to roast them.)

Put the gem squash in a tight fitting pan. Fill four of the gem squash halves with the bulgur wheat stuffing.
 
Put the gem squash in a tight fitting pan. Fill four of the gem squash halves with the bulgur wheat stuffing.

Mix the balance of the stuffing with the browned Italian sausage crumbles. 

Mix the balance of the stuffing with the browned Italian sausage crumbles.

Fill the other four squash halves with the mixture. 

Fill the other four squash halves with the mixture.

Drizzle on a little olive oil and roast the stuffed squash in your preheated oven for about one hour or until the squash are softened enough for your liking. Check part way through and cover the tops with foil if they are browning too much.

Depending on how old your gem squash are, you might be able to eat the skin. If not, serve each with a spoon so your diners can scoop the flesh out with bites of the stuffing. Delicious! 

Food Lust People Love: Roasted Stuffed Gem Squash filled with herby, tomato-ey bulgur wheat is a thing of beauty and deliciousness but you can also kick it up a notch with the addition of Italian sausage.

Enjoy!

It’s Sunday FunDay and today, as I’m sure you can guess from the list below, we are all sharing winter squash recipes. Many thanks to our host, Wendy from A Day in the Life on the Farm


We are a group of food bloggers who believe that Sunday should be a family fun day, so every Sunday we share recipes that will help you to enjoy your day. If you're a blogger interested in joining us, just visit our Facebook group and request to join.

Pin these Stuffed Gem Squash! 

Food Lust People Love: Roasted Stuffed Gem Squash filled with herby, tomato-ey bulgur wheat is a thing of beauty and deliciousness but you can also kick it up a notch with the addition of Italian sausage.
 
.