Sunday, March 24, 2024

Crab Rangoon Ravioli

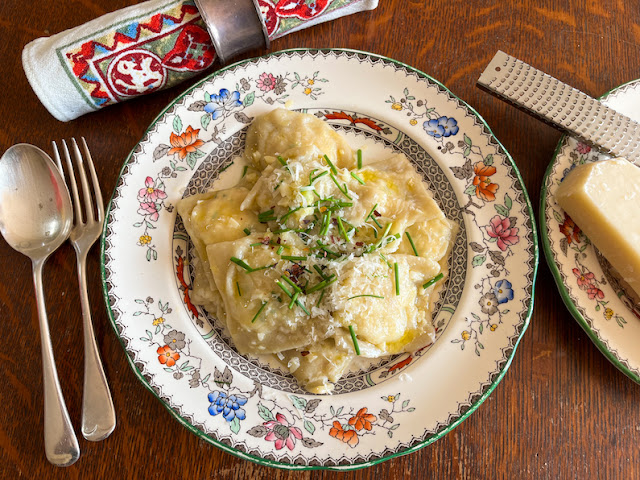
Fresh sheets of egg pasta filled with crabmeat, cream cheese, chives and garlic make the most succulent crab Rangoon ravioli! Serve simply buttered or with the sauce of your choice.  

Food Lust People Love: Fresh sheets of egg pasta filled with crabmeat, cream cheese, chives and garlic make the most succulent crab Rangoon ravioli! Serve simply buttered or with the sauce of your choice.

We don’t eat out very often since I love to cook and my husband has gotten pretty good at it himself, since he started taking turns during the recent pandemic. One place we do like to go is a Chinese buffet that has wonderful sticky ribs and crispy shell on shrimp. It also serves my late sister's favorite, crab Rangoon, crunchy deep-fried wonton wrappers filled with cream cheese and crab. 

Crab and cream cheese are a delightful mixture but I'm not big on deep frying at home so when I had leftover crab a while back filling ravioli to boil seemed like much a better idea.

This is a dish that takes time to make but homemade ravioli dough is so worth it. And the filling is super easy to make! It’s special enough for either the main course at an intimate dinner party, or like fancy Italian restaurants do, you can serve just three or four per person in shallow bowls, as your starter. 

Crab Rangoon Ravioli

This recipe makes about 24 ravioli but is easily doubled. After making and filling the ravioli, any scraps of pasta can be cut into noodles and refrigerated to be boiled for another dish, another day. I used my leftovers in a stir-fry. This recipe was adapted from one on Thailand 1 Dollar Meals.

Ingredients  
For the egg pasta dough:
1 1/2 - 1 2/3 cups or 187.5- 208g tipo 00 flour (plus extra for rolling out the pasta)
1 egg 
1 egg yolk (save white for filling)
2 teaspoons olive oil 
1/2 teaspoon fine sea salt

For the filling:
Small bunch chives
1 clove garlic
4 3/4 oz or 135g cream cheese
3/4 cup, lightly packed, or 130g crabmeat
1 egg white (saved from making the egg dough)
1 teaspoon Worcestershire sauce


For serving:
Pasta sauce of your choice or simply melted butter and garlic
Parmesan cheese, grated
Extra chives for garnish
Crushed red pepper (optional)

Method
In large bowl, combine 3/4 cup or 94g flour, 1/4 cup or 60ml water and remaining dough ingredients. With mixer at slow speed, beat for two minutes, occasionally scraping the bowl with a rubber spatula.


Using a wooden spoon or a Danish dough whisk, stir in enough of the remaining flour to make a soft dough. I start with half and go from there. You may not use it all. 


Turn out onto floured surface and knead until smooth and elastic, about 10 minutes. Wrap in cling film and let stand at least 30 minutes. (After the 30 minutes, refrigerate the dough if you aren’t ready to assemble your ravioli yet.) 


While the dough rests, we can get on to the ravioli filling. It couldn’t be simpler. 

Finely chop the chives and mince the garlic. 


Mix all the ingredients together well in a mixing bowl. Set aside.


Once the dough has rested, cut it in four equal pieces and remove one. Wrap the rest of the dough again with the cling film.


Flour the dough ball well and use a rolling pin or a pasta roller to roll it out quite thinly to the size of your ravioli plaque. Check out my original ravioli post to see my roller in action.

Flour your ravioli plaque liberally and lay the sheet of pasta on top. Fill each hole with about a teaspoon of the filling.


Using the second quarter of the dough and, following the same instructions, roll it out to the size of your ravioli plaque.

Use a pastry brush to wet the pasta on the plaque between the spoons of filling.

Carefully, starting at one end, lay the second sheet of pasta on top of the filled one, sticking the two sheets together and pressing out the air as you go along.


Turn the ravioli plaque over and let the filled pasta drop out onto your countertop. If it sticks, just gently pry it off.


Trim the ravioli around the edges and cut them apart.


Set them aside on a plate lined with cling film that has been well floured.


Continue the process until all the ravioli are rolled out, filled and cut apart. I put another layer of cling film and flour again with each layer of ravioli.

The ravioli should be stored in the refrigerator, covered with cling film until you are ready to boil them.

When you are ready to cook the ravioli, warm your sauce of choice or serve simply with some melted butter, perhaps with a little chopped garlic. 

When your sauce is simmering, if using, heat a pot of salted water to boiling. 

Add several ravioli at a time, using a slotted spoon being careful not to over-crowd the pot. Cook for 4 to 5 minutes, or until tender.


Remove with a slotted spoon to the pan with the warmed sauce. As you can see, I added mine to a pan with just butter and garlic. 


Stir gently to coat then spoon into plates or bowls to serve. Top with grated Parmesan, crushed red chili pepper and some chopped chives for garnish, if desired.

Food Lust People Love: Fresh sheets of egg pasta filled with crabmeat, cream cheese, chives and garlic make the most succulent crab Rangoon ravioli! Serve simply buttered or with the sauce of your choice.

Enjoy!

It’s Sunday FunDay and today we are sharing dinner party dishes! Check out the links below. 

We are a group of food bloggers who believe that Sunday should be a family fun day, so every Sunday we share recipes that will help you to enjoy your day. If you're a blogger interested in joining us, just visit our Facebook group and request to join.


Pin these Crab Rangoon Ravioli!

Food Lust People Love: Fresh sheets of egg pasta filled with crabmeat, cream cheese, chives and garlic make the most succulent crab Rangoon ravioli! Serve simply buttered or with the sauce of your choice.

 .

Sunday, March 17, 2024

Prosciutto-wrapped Asparagus with Garlicky Baked Brie

This Prosciutto-wrapped Asparagus with Garlicky Baked Brie is a quick appetizer that is more than the sum of its parts! It looks fancy but is so easy.

Food Lust People Love: This Prosciutto-wrapped Asparagus with Garlicky Baked Brie is a quick appetizer that is more than the sum of its parts! It looks fancy but is so easy.

When my husband and I first got married, there were three things he absolutely would not eat. Asparagus was one of them. As I questioned his aversion more closely, it turned out that the only asparagus he’d ever tried was from a can. Tinned, as he and the rest of his British contingent would say. 

Well, I had to agree with him on that front. My mom LOVED canned asparagus – could, in fact, make a quick meal of it when she’d get home from work, just opening a can, eating the asparagus and, I’m stifling a gag here, drinking the salty juice. 

So we always had canned asparagus in the pantry. Occasionally it would turn up on the dinner table, slimy and soft. Ugh. Definitely NOT my favorite thing.

But when I got older, I discovered fresh asparagus. What a revelation! Pan-fried, roasted or steamed till just done, still a bit crunchy, fresh asparagus was nothing like its canned/tinned relative. A third cousin, twice removed, if you will. Removed to far, far away, please. 

I introduced my husband to fresh asparagus and suddenly, we were down to two things he would not eat. Score! (In case anyone is wondering, the other two were olives and beets. He loves olives now too. After almost 38 years of wedded bliss, I’ve given up on ever getting him to like beets. He will tolerate the golden ones roasted but it's okay. The more for me.)

Prosciutto-wrapped Asparagus with Garlicky Baked Brie 

As you can see from the photos, I have a small round baking dish that is expressly for the purpose of baking Brie or Camembert. If your dish is a bit larger, no worries. The Brie will still be delicious albeit a bit more spread out when it bakes. This recipe is inspired by one on deliciousmagazine.co.uk

N.B. This dish needs to be served right out of the oven. It can be assembled earlier in the day and kept refrigerated until ready for baking. Remove both pans from the fridge as you preheat your oven as not all oven-safe pans can go straight from chilled to a hot oven. 

Ingredients
1 round (8.8 oz or 250g) Brie 
1 clove garlic, thinly sliced
Black pepper
2-3 sprigs fresh thyme, stems discarded
12 slices prosciutto or parma ham
12 asparagus spears, hard ends trimmed
Olive oil to drizzle

Optional to serve: Some crusty bread

Method
Preheat your oven to 400°F or 200°C.

Carefully slice the top rind off of the Brie and put it in a small baking dish. (Discard the rind.) Spread the garlic and thyme leaves around then give the whole thing a couple of generous grinds of black pepper and a drizzle of olive oil.


Wrap a prosciutto slice around each asparagus spear and put them in a baking pan. Do not crowd them. We want them to crisp up so they can’t be jammed in close together. Drizzle with a little olive oil.


Put both the asparagus pan and the Brie baking dish in your hot oven for 10-15 minutes or until the prosciutto is crisp and the Brie is golden and melted.


Serve immediately while the melted Brie is still hot so you can dip the asparagus in it! The Brie is also fabulous spread on crusty bread, if you are serving some alongside it. 

Food Lust People Love: This Prosciutto-wrapped Asparagus with Garlicky Baked Brie is a quick appetizer that is more than the sum of its parts! It looks fancy but is so easy.

Enjoy! 

It's Sunday FunDay and have we got some great recipes for you! Many thanks to our host, Sue from Palatable Pastime and her chosen seasonal ingredient, asparagus! 

We are a group of food bloggers who believe that Sunday should be a family fun day, so every Sunday we share recipes that will help you to enjoy your day. If you're a blogger interested in joining us, just visit our Facebook group and request to join.

Pin this Prosciutto-wrapped Asparagus with Garlicky Baked Brie!

Food Lust People Love: This Prosciutto-wrapped Asparagus with Garlicky Baked Brie is a quick appetizer that is more than the sum of its parts! It looks fancy but is so easy.

.


Wednesday, March 13, 2024

Baked Chicken and Feta Meatballs

Tasty and delicious, these baked chicken and feta meatballs are made with fresh cilantro and chili peppers and are finished with a squeeze of lemon juice, more feta and cilantro.

Food Lust People Lust: Tasty and delicious, these baked chicken and feta meatballs are made with fresh cilantro and chili peppers and are finished with a squeeze of lemon juice, more feta and cilantro.

If you are looking for a great meatball recipe bursting with flavor that works equally as well as an appetizer or stirred into a fresh tomato sauce, this is it! 

Our star ingredient, the feta, adds salt, sure, but also creaminess and a little tang, along with the yogurt. For a while there, these meatballs were on regular rotation at our house. It’s been a while though so I’ll be making them again soon. We love them!

Baked Chicken and Feta Meatballs

This recipe makes about 45 bite-size meatballs. I use a small 2 tablespoon scoop which makes them so easy to portion and roll. This recipe is adapted from one on New York Times Cooking

Ingredients
7 oz or 200g feta
Small bunch fresh cilantro (mine weighed about 3 1/2 oz or 100g)
¼ cup or 50g old-fashioned rolled oats
1 tablespoon plain Greek yogurt
2 small hot chili peppers
1 clove garlic
1 teaspoon fine sea salt
1 pound ground chicken (or sub ground turkey or pork)
2 tablespoons olive oil
1 lemon

Method
Wash the cilantro thoroughly and spin dry. Pinch off the hard stems and discard. Set aside 1/2 for sprinkling on when serving.

Chop your chili peppers and garlic and put them in a food processor with the other half of the cilantro. Process until finely chopped. 


Crumble your feta and set aside about 1/4 to sprinkle on for serving. Put the rest in a large mixing bowl and stir in the chopped cilantro mixture.


Mix in the oats along with the yogurt and salt.


Add the ground chicken, gently combining until you have a homogenous mixture.


Preheat your oven to 425°F or 218°C and prepare a baking pan by greasing it with the olive oil. For easy clean up, I like to line my pan first with heavy duty foil.

Use a scoop or a tablespoon to separate the chicken mixture in bite-sized pieces and place them on the prepared baking pan. Use damp (or oiled) hands to roll them into little balls. 


Bake the meatballs in your preheated oven until the bottoms are browned and the centers are no longer pink, 15 to 18 minutes.


Squeeze one half of the lemon over the pan, then use a wooden spoon to move the meatballs around, turning the browned side up, and scraping up any browned bits on the pan. 


Transfer to a serving plate and top with the reserved feta and cilantro. Cut the remaining lemon half into wedges and serve at the table for squeezing on top.

Food Lust People Lust: Tasty and delicious, these baked chicken and feta meatballs are made with fresh cilantro and chili peppers and are finished with a squeeze of lemon juice, more feta and cilantro.

Enjoy! 

Welcome to the sixth installment of our Alphabet Challenge for 2024. Today’s recipes are brought to you by the letter F. Many thanks to our challenge creator, Wendy of A Day in the Life on a Farm

Check out all the recipes brought to you by the letter F:


Here are my posts for the alphabet challenge, thus far: 
F: Baked Chicken and Feta Meatballs - Today's post!


Pin these Baked Chicken and Feta Meatballs!

Food Lust People Lust: Tasty and delicious, these baked chicken and feta meatballs are made with fresh cilantro and chili peppers and are finished with a squeeze of lemon juice, more feta and cilantro.

 .