Monday, January 28, 2019

Cheddar Ham Chive Muffins #MuffinMonday

Loads of extra mature sharp cheddar cheese, smoked ham and chives make these cheddar ham chive muffins the perfect accompaniment to your favorite soup, or as a stand alone treat for breakfast and snack time.

Food Lust People Love: Loads of extra mature sharp cheddar cheese, smoked ham and chives make these cheddar ham chive muffins the perfect accompaniment to your favorite soup, or as a stand alone treat for breakfast and snack time.


This past week I had the absolute pleasure of visiting a dear friend in Northern Wales. The weather flip-flopped from cold and clear to cold and snowy and back again with just a little rain and tiny hail from time to time to make things interesting. It was an ideal time to turn the oven on and bake!

Since Jane and I have similar tastes - salty over sweet every time - I decided that savory muffins were the way to go. As a bonus, Jane's parents were kind enough to let me use their back garden to take the muffin photos since it was rather dark inside. Check out the gorgeous sea view they enjoy! I could have looked at it all day if the temperatures hadn't been so cold! Yes, that is still SNOW on the ground.

The Irish Sea


Of course, I shared the muffins with them as well. They said they'd never had a savory muffin so I was pleased to be the baker and bearer of a first for them.

I had a similar experience when I baked Brie and Bacon Muffins for Scottish friends we were visiting in Paris. Despite my saying that the muffins were made with Brie and bacon, there were surprised faces at the breakfast table when they bit into (what??!!) savory muffins. What part of Brie and bacon made you think they would be sweet muffins! I exclaimed.

Cheddar Ham Chive Muffins

Use whatever cheese you have on hand for these wonderful muffins. I prefer an extra mature sharp cheddar but seriously, any semi-hard or hard cheese would do.

Ingredients
5 1/3 oz or 150g thick cut smoked ham
7 oz or 200g extra sharp mature cheddar cheese
2 chives or green onions (about 20g)
2 cups or 250g flour
2 teaspoons baking powder
1 teaspoon sugar
1/2 teaspoon salt
1/2 teaspoon cayenne (optional but highly recommended)
1 cup or 240ml milk
1/4 cup or 60ml vegetable oil
2 eggs

Method
Preheat your oven to 375°F or 190°C and generously grease your muffin pan or use silicone muffin cups.  If you don't have silicone liners, I would suggest putting the batter into a greased pan rather than paper muffin cups because the cheese in these makes them bake up lovely and browned and crunchy all over. It would stick to a paper liner.

Cut your ham into small squares. Grate half of the cheese with a large hole grater and cut the other half into small cubes. Finely chop the chives.


Separate out just a little of each to top the muffins before baking.

In a large bowl, whisk the flour, sugar, baking powder, salt and cayenne, if using. Stir in the grated cheddar cheese and the ham.

In a separate bowl, whisk the eggs, milk, and oil together. Pour milk mixture into dry ingredients and stir with a spoon or rubber spatula until  they are just combined.


Gently fold in the cheddar cubes. 


Spoon the batter into your very well greased muffin pan or silicone liners. Top each filled cup of batter with the reserved ham, grated cheese and chopped chives.

Food Lust People Love: Loads of extra mature sharp cheddar cheese, smoked ham and chives make these cheddar ham chive muffins the perfect accompaniment to your favorite soup, or as a stand alone treat for breakfast and snack time.


Bake in your preheated oven for 20-25 minutes or until they are looking browned and crispy and delicious and you can't wait another second to eat them.

Food Lust People Love: Loads of extra mature sharp cheddar cheese, smoked ham and chives make these cheddar ham chive muffins the perfect accompaniment to your favorite soup, or as a stand alone treat for breakfast and snack time.

Allow the muffins to cool for a few minutes then use a non-pointy knife to loosen/remove them and the melted cheese from the muffin pan. You don't want to scratch your pan!

Enjoy!

Food Lust People Love: Loads of extra mature sharp cheddar cheese, smoked ham and chives make these cheddar ham chive muffins the perfect accompaniment to your favorite soup, or as a stand alone treat for breakfast and snack time.


Check out all the other lovely muffins my Muffin Monday bakers are sharing today:

Muffin Monday
#MuffinMonday is a group of muffin loving bakers who get together once a month to bake muffins. You can see all our of lovely muffins by following our Pinterest board. Updated links for all of our past events and more information about Muffin Monday can be found on our home page.


Pin these Cheddar Ham Chive Muffins!

Food Lust People Love: Loads of extra mature sharp cheddar cheese, smoked ham and chives make these cheddar ham chive muffins the perfect accompaniment to your favorite soup, or as a stand alone treat for breakfast and snack time.
 .

Tuesday, January 22, 2019

Chocolate Chip Orange Oatmeal Cookies #CreativeCookieExchange

These chocolate chip orange oatmeal cookies are my favorite chocolate chip cookies, bumped up a few notches with the simple but effect addition of fresh orange zest.


When the Creative Cookie Exchange group first started baking together several years ago, the first theme was “back to school” cookies. I didn’t even hesitate because there was only one cookie recipe that I made over and over and over again when my girls were still living at home.

Originally shared with me by a good friend almost 30 years ago, those Joy of Cooking chocolate chip oatmeal cookies were my go-to for after school snack time, weekends, sleepovers and anytime chewy cookies were needed. (Pretty much always.)

Just a few weeks ago, a reader named Cindy C. left a comment on that post telling me that the Joy of Cooking recipe was her family’s favorite as well. She said it was because they always added the suggested optional orange zest; that’s what made the cookies special. Well. That gave me pause. I had never added the orange zest. I responded that I certainly would next time.

So here we are. Creative Cookie Exchange doyenne Laura from The Spiced Life is hosting today’s event with a theme of “favorite cookies” or for those of us who have already shared our favorite, add a twist. I've added the orange zest.

Chocolate Chip Orange Oatmeal Cookies

A classic from Joy of Cooking, this oatmeal chocolate chip cookie recipe makes the best chewy cookies around, with an added flavor hit of orange. I'm not sure if they are better than the original but they are certainly delicious. The orange zest and semi-sweet chocolate make a great combination.

Ingredients
1/2 cup (firmly packed) or 100g brown sugar
1/2 cup or 115g caster sugar
1/2 cup or 115g butter, softened
1 egg
1 teaspoon vanilla essence
1 tablespoon milk
1 cup or 125g all purpose flour
1/2 teaspoon baking soda (bicarbonate of soda)
1/2 teaspoon double-acting baking powder
1/2 teaspoon salt
1 cup or 95g uncooked quick rolled oats
3/4 cup or 125g semi-sweet chocolate chips
1 teaspoon freshly grated orange zest

Method
Preheat oven to 350°F or 180°C and grease a cookie sheet or line it with a silicone mat. Cream your butter with the two sugars. Add in the egg, vanilla and milk. Beat till smooth.


Add in the flour, baking powder, baking soda and salt and beat again until smooth.


Add in the oats, chocolate chips and orange zest. Beat until well mixed.


Drop spoonfuls 2 inches apart on well-greased cookie sheet. I like to use my 2-tablespoon cookie scoop so every cookie is even.

The little flecks of orange aren't as obvious in the baked cookies. 

Bake 8-10 minutes, or until light brown. For chewy cookies, do not over bake!


Leave to cool for a few minutes on the baking pan then remove them to a wire rack to cool completely before storing in an airtight container. 

This batch will make about 2 1/2 - 3 dozen two-inch cookies though I highly recommend making a double batch of dough and freezing the balance. Find complete instructions for freezing then baking here.


Enjoy!


Check out all the favorite cookies we are sharing today! Many thanks to our host Laura from The Spice Life.


You can also use us as a great resource for cookie recipes. Be sure to check out our Pinterest Board and our monthly posts (you can find all of them here at The Spiced Life). You will be able to find them the first Tuesday after the 15th of each month! If you are a blogger and want to join in the fun, contact Laura at thespicedlife AT gmail DOT com and she will get you added to our Facebook group, where we discuss our cookies and share links.


Pin these Chocolate Chip Orange Oatmeal Cookies! 

.

Friday, January 18, 2019

Parmesan Grouper Potato Casserole #FishFridayFoodies

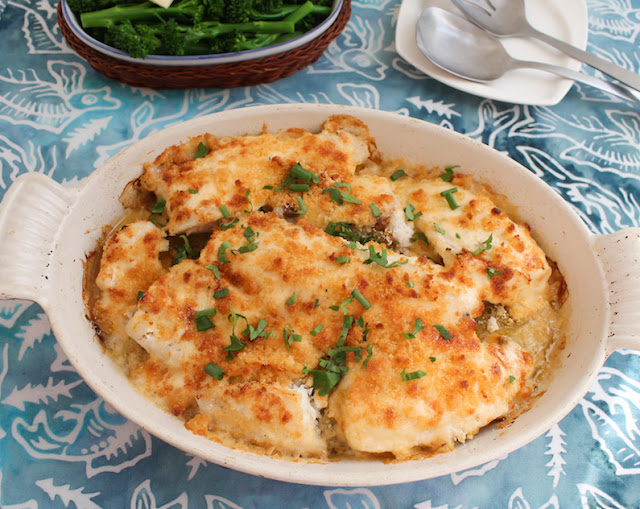
A sort of upside down fish pie, this Parmesan Grouper Potato Casserole starts with sliced potatoes on the bottom.  It is topped with tasty grouper then with a cheesy, creamy sauce that sort of melts down to the potatoes while simultaneously clinging in golden crunchiness to the top of the fish. Divine!

Food Lust People Love: A sort of upside down fish pie, this Parmesan Grouper Potato Casserole starts with sliced potatoes on the bottom.  It is topped with tasty grouper then with a cheesy, creamy sauce that sort of melts down to the potatoes while simultaneously clinging in golden crunchiness to the top of the fish. Divine!
One of our favorite dishes, real comfort food for a cold night, is fish pie. That is, fish and often other seafood cooked in a béchamel or white sauce, sometimes with a little cheese, then baked with mashed potatoes on top. I don’t make it very often though because it is time consuming.

This casserole, on the other hand, gives us all the same sort of tastes and textures without 1. making white sauce, 2. cooking mashed potatoes and 3. having three pots/pans to wash up afterwards. Honestly, I think I like it even more than fish pie.

Parmesan Grouper Potato Casserole

This recipe was adapted from one on Sea Eagle Market.com. I made it several times before it occurred to me to add potatoes below the fish instead of as a side dish. The fish and sauce add so much flavor to the potatoes. Now I can't imagine why I was so slow. We live, we learn.

Ingredients  - serves 4
3 medium potatoes (approximately 550g before peeling)
1 tablespoon olive oil, plus extra to grease casserole dish
1 1/2 lbs or 575g fresh boneless, skinless grouper
3 tablespoons lemon juice
1/3 cup or 37g butter, softened
4 tablespoons mayonnaise
1/4-1/2 teaspoon hot pepper sauce
2/3 cup or 66g grated Parmesan cheese
1/4 cup, packed, or 30g fresh bread crumbs

Optional for garnish:
chopped parsley and/or green onion tops

Method
Preheat your oven to 350°F or 180°C and brush a medium-sized casserole dish with olive oil.

Peel the potatoes and sliced them. Fan them out to cover the bottom of your greased casserole dish and drizzle with the tablespoon olive oil. Season lightly with salt and freshly ground black pepper.


Cover the casserole with foil and make the potatoes in the preheated oven until fork tender, about 20-25 minutes. (You can also do this step in the microwave, if you prefer, assuming your casserole dish is both microwave and oven ready. Mine is not.)

In a small bowl, stir together the softened butter, mayonnaise and hot pepper sauce. Add the Parmesan in by good handfuls.


Mix well. Keep going until all the cheese is mixed in. Set aside.


Meanwhile, brush the grouper with the lemon juice.


When the potatoes are done, remove the pan and turn the oven off. Turn your broiler or grill on high.


Place the grouper pieces on top of the potatoes. Season lightly with salt and pepper.

Broil them for about 8 to 14 minutes or until they can be flaked with a fork. Thick pieces will naturally take longer.  I can’t even tell you how many times I’ve made this and the time does vary wildly from 8 minutes for thin fillets to 14 when the fish is really thick.

Remove the casserole dish from the oven and spread the cheese mixture on top of the fish.

Sprinkle on the fresh breadcrumbs, patting them down gently so they stick.


Return the dish to under the broiler for an additional 2-3 minutes, or until the topping is browned and bubbly. Keep a close eye on it! When it starts to brown, it darkens quickly.

Food Lust People Love: A sort of upside down fish pie, this Parmesan Grouper Potato Casserole starts with sliced potatoes on the bottom.  It is topped with tasty grouper then with a cheesy, creamy sauce that sort of melts down to the potatoes while simultaneously clinging in golden crunchiness to the top of the fish. Divine!


Sprinkle on some chopped parsley or green onion tops, if desired. Enjoy!

Food Lust People Love: A sort of upside down fish pie, this Parmesan Grouper Potato Casserole starts with sliced potatoes on the bottom.  It is topped with tasty grouper then with a cheesy, creamy sauce that sort of melts down to the potatoes while simultaneously clinging in golden crunchiness to the top of the fish. Divine!


This month my Fish Friday Foodie friends are all sharing dishes that can be made in the oven. Many thanks to our host Caroline from Caroline’s Cooking! Check out the list of tasty recipes below.


Pin this  Parmesan Grouper Potato Casserole!

Food Lust People Love: A sort of upside down fish pie, this Parmesan Grouper Potato Casserole starts with sliced potatoes on the bottom.  It is topped with tasty grouper then with a cheesy, creamy sauce that sort of melts down to the potatoes while simultaneously clinging in golden crunchiness to the top of the fish. Divine!
 .

Thursday, January 17, 2019

Gateau de Noix – French Nut Cake #BundtBakers

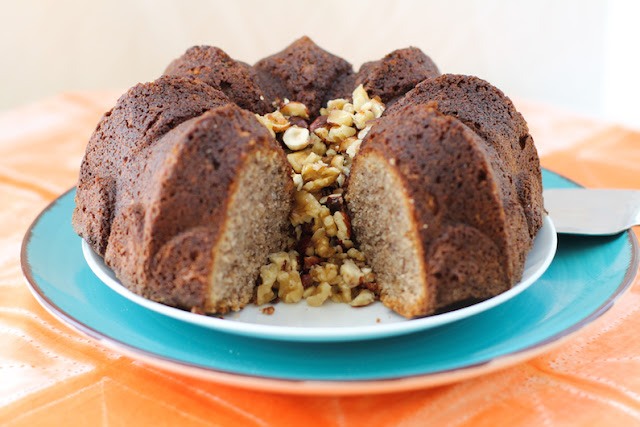
Based on traditional recipes from Périgord, this gateau de noix or French nut cake is made lighter than the original with flour and baking powder in addition to beaten egg whites. It is still dense and rich with a wonderful buttery nutty flavor.

Food Lust People Love: Based on traditional recipes from Périgord, this gateau de noix or French nut cake is made lighter than the original with flour and baking powder in addition to beaten egg whites. It is still dense and rich with a wonderful buttery nutty flavor.


This month my Bundt Bakers and I are celebrating a milestone: five years of baking Bundts together! Our members live all over the world but we get together virtually on the third Thursday of each month, sharing treats both sweet and savory which have been baked in Bundt pans. We take turns hosting as well as choosing the theme of each month’s online event.

It was my pleasure to host the inaugural Bundt Bakers event in January 2014, choosing “nuts” as our must-use ingredient so it only seemed fitting to reprise that theme for the fifth anniversary. After all, we are not only nuts about this small band of Bundt loving friends, we are also nuts about Bundt baking itself.

Gateau de Noix – French Nut Cake


This simple French-inspired gateau de noix or nut cake could not be easier. The batter is made almost completely in a food processor, aside from the egg whites, which are beaten then folded in. It is mix, fold and bake; easy but oh, so rich! Since this is a French inspired recipe, it seemed only fitting to bake it in my Nordic Ware, Fleur de Lis 10-cup Bundt pan.

Ingredients
7 oz or 200g shelled hazelnuts
3 1/2 oz or 100g shelled walnuts
1 cup or 200g sugar
1 cup or 125g flour
3/4 cup or 170g unsalted butter, melted and cooled, plus extra for pan
1 1/2 teaspoons baking powder
1/2 teaspoon salt
5 large eggs at room temperature
Pinch cream of tartar
Optional: 1/3 cup or 80ml Frangelico (or other hazelnut liqueur) for brushing on the cake after baking
Extra chopped nuts for garnish

Method
Preheat your oven to 350°F or 180°C and prepare your 10-cup Bundt pan by buttering and flouring it.

Pulse the nuts in the bowl of your food processor to make a fine powder. There may be some small pieces left and that is okay. Be careful just to pulse in short bursts and give the processor a shake in between. We don’t want to end up with nut butter!

Separate your egg whites from the yolks, adding the whites to a clean, grease-free mixing bowl and the yolks to the food processor.


Add in the sugar, butter, flour, baking powder and salt.


Pulse to combine. Scrape down the sides of the processor with a rubber spatula. This makes a thick dough.

Whisk the egg whites with a pinch of cream of tartar until they form stiff peaks.

Spoon the thick dough into a large mixing bowl. Gently fold about 1/4 of the egg whites into the batter.

The dough is soft but a bit dry so this first batch is a challenge. Just keep folding slowly, coming up from the sides and bottom of the bowl with your spatula to gently turn it over the egg whites.

Add another 1/4 of the egg whites into the bowl and fold again. It should start getting easier. Gently does it.


Now spoon your batter into the bowl with the balance of the egg whites and fold them together.

Again, gently does it. Try to keep as much of the air in the whites as possible.

Spoon the batter into your prepared Bundt pan.

Bake in the preheated oven for 45-50 minutes or until the edges are golden brown and a wooden skewer comes out clean.

Food Lust People Love: Based on traditional recipes from Périgord, this gateau de noix or French nut cake is made lighter than the original with flour and baking powder in addition to beaten egg whites. It is still dense and rich with a wonderful buttery nutty flavor.


Leave to cool for 5 minutes in the pan, then carefully turn the nut cake out onto a wire rack to cool completely. If desired, brush the Bundt with hazelnut liqueur and fill the hole with some chopped hazelnuts and walnuts.

Food Lust People Love: Based on traditional recipes from Périgord, this gateau de noix or French nut cake is made lighter than the original with flour and baking powder in addition to beaten egg whites. It is still dense and rich with a wonderful buttery nutty flavor.

You could even serve it along with little glasses of liqueur, if you’d like. This is a celebration after all!

Food Lust People Love: Based on traditional recipes from Périgord, this gateau de noix or French nut cake is made lighter than the original with flour and baking powder in addition to beaten egg whites. It is still dense and rich with a wonderful buttery nutty flavor.

Enjoy!

Food Lust People Love: Based on traditional recipes from Périgord, this gateau de noix or French nut cake is made lighter than the original with flour and baking powder in addition to beaten egg whites. It is still dense and rich with a wonderful buttery nutty flavor.


I’d like to thank all of my fellow Bundt Bakers for their support these last five years. It’s been a labor of love for sure and I cherish the friendship we share. Check out all of our nutty 5-year-anniversary Bundts!


BundtBakers

#BundtBakers is a group of Bundt loving bakers who get together once a month to bake Bundts with a common ingredient or theme. You can see all our of lovely Bundts by following our Pinterest board. We take turns hosting each month and choosing the theme/ingredient. Updated links for all of our past events and more information about BundtBakers, can be found on our home page.

Pin this Gateau de Noix - French Nut Cake!

Food Lust People Love: Based on traditional recipes from Périgord, this gateau de noix or French nut cake is made lighter than the original with flour and baking powder in addition to beaten egg whites. It is still dense and rich with a wonderful buttery nutty flavor.
 .

Monday, January 14, 2019

Cheesy Artichoke Ravioli Casserole #BakingBloggers

This cheesy artichoke ravioli casserole is made from store-bought fresh ravioli, with a super cheesy homemade artichoke sauce, baked up till hot and bubbly with extra cheese on top.

Food Lust People Love: This cheesy artichoke ravioli casserole is made from store-bought fresh ravioli with a super cheesy homemade artichoke sauce, baked up till hot and bubbly with extra cheese on top.


Every so often I go through my deep freezer and take stock of the oddly assorted frozen ingredients therein. I hate to waste food but sometimes it just gets to be such a jumble that it’s easier to go buy another chicken then to find the one lost somewhere in the frozen depths. Just me?

Also, because we live in a mostly warm climate, I keep things in my freezer that many people would keep in a pantry or cupboard, like dried beans, nuts and flour. That freezer, as my younger daughter would say, is a bit of a ‘mare.

So, in an effort to cook more from the freezer, I take it all out and sort it from time to time. Pork gets put in one area, poultry and seafood in their own separate places, and beef in another. Then there’s all the frozen sauces and stock, vegetables and fruit!

Recently I came across a green bag that simply said “Artichokes” but the photo was of artichoke bottoms. Who knows why I bought it originally. I probably had some plan but for this week, it’s perfect for a cheesy baked pasta dish. All my Baking Blogger friends are also making baked pasta, cozy dishes for cold nights. Make sure to scroll down to the bottom to see the link list of recipes.

Cheesy Artichoke Ravioli Casserole

My local grocery store carries a couple of brands of fresh ravioli stuffed with various fillings and they are all pretty nice, whether with a sauce or just boiled and buttered. When I saw the artichoke-filled ones after finding my artichoke bottoms, this dish seemed like destiny. If you can't find artichoke ravioli, by all means, use your favorite fresh ravioli.

Ingredients
14 oz or 400g frozen artichoke bottoms – Or use 2 cans instead. Drain well!
1 tablespoon lemon juice or white vinegar
9 oz or 250g fresh artichoke-filled ravioli (or your favorite kind)
1/4 cup or 60ml olive oil
3 cloves garlic, chopped
Optional: 1/2 teaspoon crush red pepper
1/4 cup or 60g butter
1/3 cup or  41g flour
34 cup or 180ml milk
3 1/2 oz or 100g sharp cheddar cheese
3 oz or 85g cream cheese
3 1/2 oz or 100g mozzarella
3 oz or 85g Parmesan
8-10 baby plum tomatoes
10-12 black olives (either already pitted or remove the stones yourself)
Parsley to garnish, if desired

Method
Thaw the artichokes in cool water with a little vinegar or lemon juice to stop them turning brown. Cut the artichokes into thin slices, removing and discarding any hard bits as you go. Quickly return the slices to the cool water.


Cook the ravioli according to package instructions, removing them from the boiling water when they are al dente, usually the shortest recommended cooking time. Reserve a cup of the pasta water and set aside.

Preheat your oven to 350°F or 180°C. Drain the artichoke slices and dry them off in a clean kitchen towel.


In a cooking pan that can go from stovetop to oven, sauté the artichokes in the olive oil until they begin to turn golden in places. Add in the chopped garlic and crushed red pepper, if using. Sauté for a few more minutes till the garlic has softened.


Transfer the artichokes and garlic to a bowl with a slotted spoon.

Add the butter and flour to the pan, making a paste (roux) as the butter melts. Cook over a medium low heat for 2-3 minutes.


Turn the fire off and whisk in the milk.

Turn the heat back on low and cook for a couple of minutes still whisking, till the mixture starts to thicken. Add 1/2-3/4 cup pasta water and whisk till combined.

Add the cream cheese.


Cook for a few minutes, until the cream cheese melts, then stir the cheddar into the sauce.


Add the artichokes and garlic into the cheese sauce.


If the combo looks a bit dry, you can add some more of the reserved pasta water. Add the cooked ravioli to the pan and stir gently to combine.


Mix the Parmesan and mozzarella together. Sprinkle them on the pasta. Tuck the tomatoes and olives around.

Food Lust People Love: This cheesy artichoke ravioli casserole is made from store-bought fresh ravioli with a super cheesy homemade artichoke sauce, baked up till hot and bubbly with extra cheese on top.


Bake your casserole in the preheated oven for 20-25 minutes, uncovered, until it is bubbling and the top is golden brown. Sprinkle with some chopped parsley to garnish, if desired.

Food Lust People Love: This cheesy artichoke ravioli casserole is made from store-bought fresh ravioli with a super cheesy homemade artichoke sauce, baked up till hot and bubbly with extra cheese on top.


Extra Parmesan on the side is always welcome at our house. When it comes to cheese more is more.

Food Lust People Love: This cheesy artichoke ravioli casserole is made from store-bought fresh ravioli with a super cheesy homemade artichoke sauce, baked up till hot and bubbly with extra cheese on top.


Enjoy!

Check out all the lovely baked pasta dishes my Baking Blogger friends are sharing today, perfect warming dishes for cozy nights. Many thanks to our host Sue from Palatable Pastime.


Pin this Cheesy Artichoke Ravioli Casserole!


Food Lust People Love: This cheesy artichoke ravioli casserole is made from store-bought fresh ravioli with a super cheesy homemade artichoke sauce, baked up till hot and bubbly with extra cheese on top.
 .

Tuesday, January 8, 2019

Golden Pineapple Buns #BreadBakers

A bakery staple in Chinatowns worldwide, golden pineapple buns are a real treat. The soft sweet bread features a topping that bakes up crisp and light. As an added bonus, some contain sweet fillings, like these made with my easy pineapple jam.

Food Lust People Love: A bakery staple in Chinatowns worldwide, golden pineapple buns are a real treat. The soft sweet bread features a topping that bakes up crisp and light. As an added bonus, some contain sweet fillings, like these made with my easy pineapple jam.

This month’s Bread Bakers host, my friend Felice from All That’s Left Are the Crumbs set us a theme of “good luck breads” and I knew I would find a few choices in typical Chinese or Lunar New Year menus online. Indeed, since gold is a color of prosperity, golden pineapple buns showed up in many.

Also known as bolo bao or bo lo baau, pineapple buns appear to originate from Hong Kong but they are also very popular in Malaysia, Singapore and Indonesia as well. For all the many years we lived in those three places – a combined 12 years! – I never actually tried a pineapple bun. I loved the Chinese bakeries but would typically opt for a sausage bun or another savory option.

Historically, the pineapple is also a symbol of wealth and hospitality. What is more welcoming than a warm bun that is named because it looks like a pineapple? I’ll tell you.

It’s one that is also filled with pineapple jam.

Several recipes said these buns could authentically be filled with red bead paste or custard but most are not filled at all. I, on the other hand, thought they cried out for pineapple jam. Why should they be pineapple in name and looks only? Beauty is more than skin deep and their outer beauty should be echoed and enhanced by an inner pineapple-y sweetness, don’t you think?

And when I checked it out, I got a mention in Wikipedia. Non-native speaker. That's me.

Golden Pineapple Buns

Like all good yeast breads, these guys take a while to make because of rising time. Also, there are three parts: the dough, the topping and the filling, if you choose to fill them. I suggest making my easy pineapple jam but you can also use your favorite store-bought jam of any flavor. Or don’t fill them at all. Either way, they are totally worth the time. My bun recipe is adapted from these two: The Woks of Life and China Sichuan Food. The pineapple jam is all me. I love making quick jam.

Ingredients for 6 large buns
For the bread dough:
1/3 cup or 78ml heavy cream
1/2 cup or 120ml milk
1/4 cup or 50g sugar
1 1/2 teaspoons active dry yeast
1 large egg (at room temperature)
2 1/2 cups or 317g strong white bread flour
3/4 teaspoon salt

For the topping paste:
2/3 cup or 83g all-purpose flour
1/3 cup or 66g caster sugar
2 tablespoons dry milk powder
1/4 teaspoon baking soda
1/4 teaspoon baking powder
2 tablespoons vegetable shortening
1 small egg yolk
⅛ teaspoon vanilla extract
4-6 teaspoons milk

For the filling:
6 generous tablespoons thick pineapple jam, homemade or store-bought
(It’s super easy to make. For homemade my instructions are here.)

For the egg wash:
1 egg yolk
1 teaspoon water

Method
Warm your cream and milk to between 105-110°F or 40.5-43°C in a small pot over a low fire or in the microwave. Add in 1 tablespoon of the sugar for the dough and the yeast. Set aside for a few minutes to make sure your yeast is active.


Pour the foamy liquid into the bowl of your mixer and add the rest of the sugar, egg, flour and salt.

Using your bread hook, combine the ingredients and continue mixing for about 15 minutes, scraping the bowl down occasionally to make sure all of the flour is being incorporated.


This is a very soft dough.

After 15 minutes, cover the bowl with a damp towel and place in a warm place for 1 hour.

If your kitchen is cold, set the bowl in your sink and fill it part way up with warm water. Leave to prove for about 1 hour by which time the dough should double in size.


When the initial rise time for the bread dough is up, put it back in the mixer and use your bread hook to knead it for 5 minutes to beat it back down to original size and make it more manageable and less sticky.

Lightly flour a clean work surface and tip your dough out of the bowl. With floury hands, knead it briefly. Cut it into 6 equal pieces (mine were about 100g each) and roll them into small balls.


If you aren’t filling your pineapple buns, transfer them to your baking pan, sprinkle with some flour and cover with a clean dry towel. Set aside to rise for 1 hour.

If you are filling them, use a floured rolling pin to roll each ball out into a 6 in or 15cm circle. Brush with water. Add 1 tablespoon of pineapple jam to the middle. (By the way, that gorgeous yellow is all natural!)

Pull the sides in, pinching gently to close the dough, making a ball again. Place pinched side down on your baking pan.


Continue until all buns are filled. Sprinkle with flour and cover with a clean dry towel. Set aside to rise for 1 hour.


While the buns are rising, use a food processor to make the topping.

Add the dry milk powder, flour, baking soda, baking powder, and superfine sugar to the food processor. Pulse to combine. Add the shortening, egg yolk, and vanilla.


Pulse till it looks like big grains.

Add the milk starting with just 1 tablespoon. Pulse until it just comes together as a dough, adding a teaspoon or two more milk as needed.


Give the crumbs a squeeze to see if they’ll hang together. If they do, no more milk is needed.

Tip the topping crumbs out on to a piece of cling film and push them together to create a dough. Cover tightly with the cling film. Place in refrigerator for around 30 minutes until slightly chilled.


When the buns are done rising, preheat your oven to 350°F or 180°C.

Form the topping dough into a rectangle in the cling film so that it’s easier to cut into six equal pieces.

Roll them into balls. Lay a large sheet of cling film out and place the ball on one half. Fold the other half over. Use a rolling pin to roll a topping ball into a circle the size of the tops of your risen buns.


Unfold the cling film and place the topping circle on a bun. Carefully remove the cling film.


Use the tip of a sharp knife to gently score the topping in a diamond pattern. Continue until the buns have been covered and scored.


Whisk the egg yolk with the water and brush the egg wash onto each bun. Bake in your preheated oven for 14-16 minutes or until puffed and golden.

Food Lust People Love: A bakery staple in Chinatowns worldwide, golden pineapple buns are a real treat. The soft sweet bread features a topping that bakes up crisp and light. As an added bonus, some contain sweet fillings, like these made with my easy pineapple jam.


Remove from the oven and leave to cool on the baking pan for a few minutes. Place on a wire rack to cool completely.

Enjoy!

Food Lust People Love: A bakery staple in Chinatowns worldwide, golden pineapple buns are a real treat. The soft sweet bread features a topping that bakes up crisp and light. As an added bonus, some contain sweet fillings, like these made with my easy pineapple jam.


Check out all the other lucky breads we have for you today! Many thanks to our Bread Bakers host, Felice from All That’s Left Are the Crumbs.

#BreadBakers is a group of bread loving bakers who get together once a month to bake bread with a common ingredient or theme. Follow our Pinterest board right here. Links are also updated each month on this home page.

We take turns hosting each month and choosing the theme/ingredient.

Pin these Golden Pineapple Buns!

Food Lust People Love: A bakery staple in Chinatown’s worldwide, golden pineapple buns are a real treat. The soft sweet bread features a topping that bakes up crisp and light. As an added bonus, some contain sweet fillings, like these made with my easy pineapple jam.
 .