Monday, October 26, 2020

Cinnamon Brown Butter Sourdough Muffins #MuffinMonday

These cinnamon brown butter sourdough muffins are fluffy and tender, lightly sweetened and flavorful, perfect for breakfast or snack time. 

Food Lust People Love: These cinnamon brown butter sourdough muffins are fluffy and tender, lightly sweetened and flavorful, perfect for breakfast or snack time.

I’m trying to learn how to downsize. Even with giving baked goods away, we still seem to have more than we can eat since none of my immediate family is a big sweet eater. To that end, I now own a six-cup muffin pan. 

Or I should say, I again own a six-cup muffin pan. The two I had in Dubai went in the shipment to the Channel Islands and I was planning to pick one of them up this summer and bring it back to Houston. 

As we all know, that trip was canceled, along with everyone else’s summer holidays. Best laid plans, and all that. 

This recipe makes six large muffins. Since my new muffin pan is for normal sized muffins, I used oversized muffin pan liners, which work great for this purpose. If you don’t happen to have deep liners, you can easily make some out of baking parchment.

Cinnamon Brown Butter Sourdough Muffins

The brown butter lends such a lovely background flavor to these muffins but if you can’t be bothered (do bother, it takes mere minutes!) use about 1 tablespoon less than the full half cup of butter and just melt it and leave it to cool before proceeding with the recipe. The sourdough starter can be discard or fed. 

Ingredients
For the muffins:
1/2 cup or 120g butter
1 cup or 125g all-purpose flour
1/2 cup or 100g light brown sugar
2 teaspoons baking powder
1 teaspoon cinnamon
1/2 teaspoon baking soda
1/4 teaspoon salt
1/2 cup or 130g sourdough starter - stir down the bubbles before measuring
1/4 cup or 60ml milk
1 large egg, at room temperature
1/2 teaspoon vanilla extract

For the topping:
1 tablespoon sugar
1/2 teaspoon cinnamon

Method
Heat the butter in a small saucepan over a medium heat. It will melt and then white foam will form on top. Continue cooking until milk solids start turning brown and the butter is a lovely caramel color. Remove from the heat and leave to cool. In lieu of process photos, I offer you this link to see The Cooking Actress make brown butter. Kayle is my brown butter guru and her recipes are legend. 

Preheat the oven to 350°F or 180°C. Line a six-cup muffin pan with tall muffin liners. In a small bowl, mix together the topping of cinnamon and sugar. Set aside. 

In a large mixing bowl, whisk together the all-purpose flour, granulated sugar, baking powder, salt and cinnamon.


In a separate bowl, whisk together the egg, milk, vanilla, brown butter, and sourdough starter until well combined.


Pour the wet ingredients into the dry ingredients and fold until just combined. This will be a fluffy dough rather than a batter. 


Divide the dough evenly between the six muffin cups. Sprinkle the tops with the cinnamon sugar. 

Food Lust People Love: These cinnamon brown butter sourdough muffins are fluffy and tender, lightly sweetened and flavorful, perfect for breakfast or snack time.

Bake in your preheated oven for about 20-25 minutes or until the muffins are nicely browned and a toothpick comes out clean. Remove to a wire rack to cool. 

Food Lust People Love: These cinnamon brown butter sourdough muffins are fluffy and tender, lightly sweetened and flavorful, perfect for breakfast or snack time.

Enjoy! 

Food Lust People Love: These cinnamon brown butter sourdough muffins are fluffy and tender, lightly sweetened and flavorful, perfect for breakfast or snack time.

It’s the last Monday in October, which means it’s Muffin Monday again. Check out all the tasty muffins my friends are sharing!

Muffin Monday

#MuffinMonday is a group of muffin loving bakers who get together once a month to bake muffins. You can see all of our lovely muffins by following our Pinterest board. Updated links for all of our past events and more information about Muffin Monday can be found on our home page. 


Pin these Brown Butter Cinnamon Muffins!

Food Lust People Love: These cinnamon brown butter sourdough muffins are fluffy and tender, lightly sweetened and flavorful, perfect for breakfast or snack time.

 .

Monday, October 19, 2020

Slow Cooker Shiitake Congee

Slow cooker shiitake congee is a warming bowl of comfort, made with lots of savory, flavorful mushrooms and your favorite rice. Top it with your favorite add ons.

Food Lust People Love: Slow cooker shiitake congee is a warming bowl of comfort, made with lots of savory, flavorful mushrooms and your favorite rice. Top it with your favorite add ons.

One of my favorite breakfast buffet dishes when we lived in southeast Asia was the big pot of congee or rice porridge with lots of toppings from crunchy little dried fish and sliced chili peppers to crispy shallots and sambal. Such a bowl of comfort! 

It’s super easy to make in a slow cooker as well. Simply slice up your mushrooms, throw everything in together and walk away. You can eat it plain or dress it up with toppings. 

Slow Cooker Shiitake Congee

I’m publishing this recipe – looooong overdue – with permission from my lovely friend, author Kathy Hester. It’s from her wonderful revised and updated cookbook, The Vegan Slow Cooker. <affiliate link Like all of Kathy’s great cookbooks, the instructions are clear and helpful adaptations are included. Everything I’ve made from ALL of Kathy’s cookbooks has been excellent! Highly recommend. This recipe makes 4-6 servings.

Ingredients
For the congee:
8 cups or 1880ml water or broth (IMHO: Broth adds more flavor.)
4 cups or 280g thinly sliced fresh shiitake mushrooms
4 cups or 280g thinly sliced button, baby bella, shiitake mushrooms or combination
1 cup or 185g rice (I used long grain. Kathy’s recipe says brown rice. Use your favorite rice.)
3 tablespoons or 24g grated ginger

Optional suggestions for serving:
Soy sauce
Scallions
Cilantro
Chopped chili peppers
Extra grated ginger
Leftover cooked veggies
Tofu cubes

Method
If you are pressed for time in the morning, you can prepare the mushrooms and ginger the night before and keep them in the refrigerator overnight. 

Otherwise, cut the hard stem ends off of the mushrooms then use a sharp knife to cut them into thin slices. If desired, set a few slices aside for topping. 


Then grate your ginger. 


Add them both to your slow cooker, along with the rice and the liquid of your choice, either broth or water. Normally I would use chicken broth but in deference to Kathy’s vegan recipe, I used a rich vegetarian stock. 


Cook on low for 7 to 9 hours. When time is up, give the pot a good stir. 


Kathy suggests (be still my heart that LOVES congee in a buffet!) to place your chosen toppings on the table and let everyone add what they like best. 

In our house, sliced chili peppers are an absolute necessity but we also enjoyed the suggested tofu cubes and scallions aka green onion tops. 


You do you but do make this comfort dish. You won’t regret it. And check out Kathy’s blog Healthy Slow Cooking (and her other books.) You won't regret that either. We are not a vegan family but we always love her creative and delicious recipes. 

Enjoy!

Food Lust People Love: Slow cooker shiitake congee is a warming bowl of comfort, made with lots of savory, flavorful mushrooms and your favorite rice. Top it with your favorite add ons.


It's Multicooker Monday! Check out all the other Multicooker recipes my friends are sharing this month! Many thanks to Sue of Palatable Pastime, our group leader. 


Multicooker Monday is a blogger group created by Sue of Palatable Pastime for all of us who need encouragement to make better use of our small appliances like slow cookers, Instant Pots, Air Fryers, rice cookers and sous vide machines. We get together every third Monday of the month to share our recipes. If you are a food blogger who would like to post with us, please request to join our Facebook group.

Pin this Slow Cooker Shiitake Congee! 

Food Lust People Love: Slow cooker shiitake congee is a warming bowl of comfort, made with lots of savory, flavorful mushrooms and your favorite rice. Top it with your favorite add ons.

 .


Friday, October 16, 2020

Cheesy Mixed Seafood Gratin #FishFridayFoodies

This cheesy mixed seafood gratin is a comforting dish your whole family will love. Serve it with grilled baguette slices as an appetizer, as a stand alone main course or to top a baked potato or pasta. 

Food Lust People Love: This cheesy mixed seafood gratin is a comforting dish your whole family will love. Serve it with grilled baguette slices as an appetizer, as a stand alone main course or to top a baked potato or pasta.

I tend to buy seafood, at least when I don’t buy it fresh, in bags where it’s been flash frozen in individual pieces because that makes it easy to thaw and cook exactly what you need. 

The problem with this system, if it can even be called a system, is that sometimes I have one fish fillet or a handful of shrimp - or whatever - at the end of the bag. That’s when this tasty recipe comes in handy. 

Use whatever seafood you have! Crab meat, shrimp, any sort of boneless fish – smoked or not, scallops, mussels, even lobster meat, if you are so lucky. I’d probably draw the line at octopus or squid since they can be chewy when overcooked. 

Cheesy Mixed Seafood Gratin 

One more suggestion for serving this cheesy mixed seafood gratin: Add some frozen peas or even diced carrots, bake it topped with mashed potatoes instead of the breadcrumbs and call it fish pie, another warm and comforting dish. I love the versatility of this dish!

Ingredients
1/2 cup or 113g butter 
2 small stalks celery
1/2 medium onion
1/2 green bellpepper
1 red chili pepper (optional)
2 large cloves garlic
1/2 cup or 63g flour 
2 cups or 473ml milk 
8 oz or 226g cream cheese, at room temperature
2 fillets fish (about 3 1/2  – 4 1/4 oz or 100-120g each – I used one tilapia, one salmon
1 lb 1 2/3 oz or 500g shrimps, already peeled and deveined
3 1/2 oz or 100g smoked salmon
1 tablespoon sherry
Fine sea salt
Freshly ground black pepper

For topping:
1/2 cup, packed, or 60g fresh breadcrumbs
3 oz or 85g Parmesan, grated
3 oz or 85g mozzarella, grated
drizzle olive oil

Optional to garnish:
Chopped flat leaf parsley

Method
Remove the hard strings and cut the celery into small cubes. Peel and dice the onion. Dice the green pepper, red pepper and mince the garlic.


Heat half of the butter over a low to medium flame, preferably in a pan that can go into the oven later. No one wants more washing up. 

Sauté the vegetables in the butter until they’ve softened, about 5-7 minutes. 


Add in the rest of the butter and let it melt. 


Add in the flour and stir until it’s well combined with the butter and veg with no flour showing. I like to add my flour with a sifter or sieve a little at a time, just sprinkling the top.


Once it’s all added, cook for a minute or two to get rid of the floury flavor. 


Preheat your oven to 350°F or 180°C. 

Turn off the heat under the pan and stir the milk in a little at a time stirring well so you don’t create any lumps. 


Once it’s completely incorporated, add in the cream cheese cut into cubes and turn the heat back on low. 


Meanwhile, cut your seafood into bite-sized pieces. I chopped the smoked salmon pretty fine because it is quite salty and it's best dispersed evenly throughout the gratin. 


When the sauce has thickened, add the seafood to the pan and cook for several minutes over a medium flame until the sauce begins to bubble a little and seafood is just cooked through. 


Add in the sherry and season to taste with sea salt (if you are using salty smoked fish you might not need any) and few good grinds of black pepper. Stir well. 


If your pan is not oven-friendly now is the time to transfer the mixture to a baking dish that is. Toss together the breadcrumbs, Parmesan and mozzarella. Sprinkle the mixture on the seafood. 


Drizzle the top with olive oil. Bake in the preheated oven for about 30 minutes or until the top is golden and the gratin is bubbling nicely around the edges. 

Food Lust People Love: This cheesy mixed seafood gratin is a comforting dish your whole family will love. Serve it with grilled baguette slices as an appetizer, as a stand alone main course or to top a baked potato or pasta.

Remove from the oven and sprinkle with a little chopped parsley for garnish. 

Food Lust People Love: This cheesy mixed seafood gratin is a comforting dish your whole family will love. Serve it with grilled baguette slices as an appetizer, as a stand alone main course or to top a baked potato or pasta.

Serve on grilled bread, as topping for a baked potato or cooked pasta, or even on its own - with fresh veggies or a green salad to complete the meal. 

Enjoy!

Food Lust People Love: This cheesy mixed seafood gratin is a comforting dish your whole family will love. Serve it with grilled baguette slices as an appetizer, as a stand alone main course or to top a baked potato or pasta.

This month my Friday Fish Foodie friends are sharing comfort food recipes made with seafood. Many thanks to our host, Sue of Palatable Pastime and our chief organizer Wendy of A Day in the Life on the Farm. Check out all the wonderful dishes!


Are you a food blogger who would you like to join Fish Friday Foodies? We post and share new seafood/fish recipes on the third Friday of the month. To join our group please email Wendy at wendyklik1517 (at) gmail.com. Visit our Facebook page and Pinterest page for more wonderful fish and seafood recipe ideas.


     Pin this Cheesy Mixed Seafood Gratin! 

Food Lust People Love: This cheesy mixed seafood gratin is a comforting dish your whole family will love. Serve it with grilled baguette slices as an appetizer, as a stand alone main course or to top a baked potato or pasta.

.


Thursday, October 15, 2020

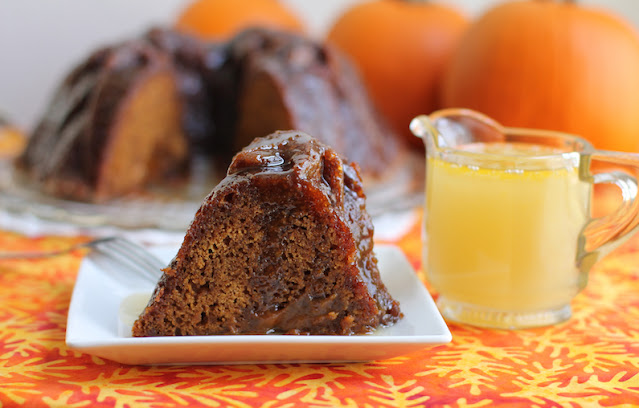
Spiked Pumpkin Gingerbread Bundt #BundtBakers

This spiked pumpkin gingerbread Bundt combines your favorite pumpkin cake with your favorite gingerbread, brushed with a rum butter glaze, a fabulous treat for autumn. 

Food Lust People Love: This spiked pumpkin gingerbread Bundt combines your favorite pumpkin cake with your favorite gingerbread, brushed with a rum butter glaze, a fabulous treat for autumn.

This month I’m hosting our Bundt Bakers event and I chose the ingredient/theme pumpkin because as much as I object to pumpkin flavored things while it’s still summer, come October, I’m ready! 

As I mentioned many moons ago, when I shared my gingerbread muffins with honey ginger glaze (topped with crystallized ginger because why do things halfway?) gingerbread is a seasonal favorite at our house. It is the harbinger of fall, even as the air is still way too hot and the orange- and red-hued leaves are yet to make an appearance.

Spiked Pumpkin Gingerbread Bundt

This recipe is adapted from a spice cake on the NordicWare website to fit a 9-cup Bundt pan. You can certainly use a 10-cup Bundt pan also. 

Ingredients
For the batter:
2 cups or 250g flour, plus extra for the pan
2 teaspoons ground ginger
1 1/2 teaspoons baking powder
1 teaspoon baking soda
1 teaspoon cinnamon
1/2 teaspoon salt
1 cup or 200g brown sugar
1 cup or 200g sugar
1 (15 oz or 425g) can pumpkin puree (not pumpkin pie filling!)
1/2 cup or 120ml molasses
3 eggs
1/2 cup or 113g butter, melted and cooled, plus extra for the pan

For the rum butter glaze:
1/2 cup or 113g butter
1 cup or 200g sugar
1/4 cup or 60ml dark rum
1/4 cup or 60ml water
1/4 teaspoon fine sea salt

Method
Preheat oven to 350°F or 180°C. Prepare your 9-cup Bundt pan by greasing it liberally with butter and then coating it with flour. In case you are curious, mine is the NordicWare pan Harvest Leaves. <affiliate link.

In a large bowl, whisk together the flour, ginger, baking powder, baking soda, cinnamon and salt. Set aside.


In another large bowl, whisk together the sugars, pumpkin puree, molasses, butter and eggs.


Using a spatula, fold the flour mixture into the wet mixture until the mixture is nearly combined. Do not overmix!


Pour the batter into your prepared Bundt pan and smooth out the top. 


Bake the Bundt for 50-55 minutes or until a toothpick placed in the center comes out clean. 


Meanwhile, make the rum butter glaze. In a small saucepan combine butter, sugar, rum and water over medium heat. Bring to a boil and cook for 5-7 minutes stirring constantly. 


Remove from heat and cool slightly.

When the Bundt is done, remove it from the oven and leave in the pan to cool for about 5-7 minutes. Loosen the edges with a toothpick and turn the cake out onto a serving platter. 

Food Lust People Love: This spiked pumpkin gingerbread Bundt combines your favorite pumpkin cake with your favorite gingerbread, brushed with a rum butter glaze, a fabulous treat for autumn.

Generously brush cake with the rum butter glaze. 

Food Lust People Love: This spiked pumpkin gingerbread Bundt combines your favorite pumpkin cake with your favorite gingerbread, brushed with a rum butter glaze, a fabulous treat for autumn.

Put the rest of the glaze in a tiny pitcher so people can add more to their slices as desired. 

Food Lust People Love: This spiked pumpkin gingerbread Bundt combines your favorite pumpkin cake with your favorite gingerbread, brushed with a rum butter glaze, a fabulous treat for autumn.

Enjoy! 

Food Lust People Love: This spiked pumpkin gingerbread Bundt combines your favorite pumpkin cake with your favorite gingerbread, brushed with a rum butter glaze, a fabulous treat for autumn.


Check out all the other pumpkin Bundts my fellow Bundt Bakers are sharing today! 

BundtBakers

#BundtBakers is a group of Bundt loving bakers who get together once a month to bake Bundts with a common ingredient or theme. You can see all of our lovely Bundts by following our Pinterest board. We take turns hosting each month and choosing the theme/ingredient. Updated links for all of our past events and more information about BundtBakers can be found on our home page.


Pin this Spiked Pumpkin Gingerbread Bundt!

Food Lust People Love: This spiked pumpkin gingerbread Bundt combines your favorite pumpkin cake with your favorite gingerbread, brushed with a rum butter glaze, a fabulous treat for autumn.

 .

Tuesday, October 13, 2020

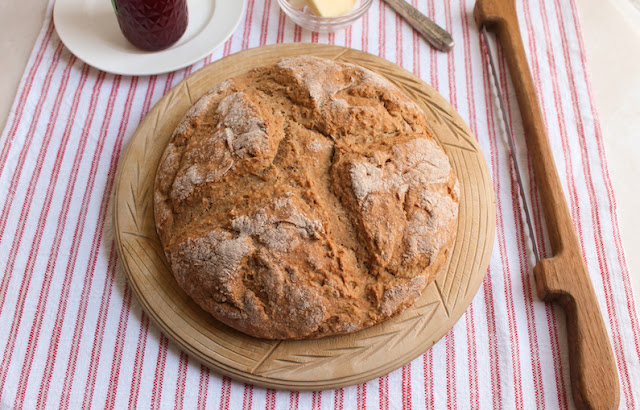
Wholemeal Soda Bread #BreadBakers

Wholemeal soda bread is simple to make, quick to bake and toasts up like a dream. It’s perfect for sandwiches or just smeared with butter and jam. 

Food Lust People Love: Wholemeal soda bread is simple to make, quick to bake and toasts up like a dream. It’s perfect for sandwiches or just smeared with butter and jam.

This recipe is adapted from one by Irish chef and founder of Ballymaloe Cookery School Darina Allen. She calls it Mummy’s Brown Soda Bread. I found it in several places on the internet, one with a note that at 82 years old (published in 2007) her mother Elizabeth O’Connell still made this loaf every day. 

Of course, that meant I had to find out if the ole gal was still baking now at a possible 95 years old, which led me to the most wonderful tribute to Mrs. O’Connell who sadly passed away on April 17, 2008. Chef Allen speaks of making this very bread as a young child in a mom-sewn apron, forming her own little loaf from a piece of her mother’s larger ball of dough. 

By all accounts, Mrs. O’Connell was a remarkable woman. Widowed at 36, she gave birth to her ninth and last child a month after losing her husband. She cooked them wholesome, healthy food, using produce from her kitchen garden, milk from the family cow and chickens she raised. Chef Allen recounts that her mother was still baking this soda bread, even after suffering a stroke, with her “good hand.” What a woman! I wish I could have met her. 

Wholemeal Soda Bread

I called this bread wholemeal soda bread since that is what whole wheat flour is called in the UK and the Republic of Ireland. Here in the US, it’s known as whole wheat flour, of course. 

Ingredients
1 tablespoon white vinegar
About 1 2/3 cups milk
1 3/4 cups or 210g wholemeal (whole wheat in the US) flour
1 3/4 cups (218g) unbleached all-purpose flour
1 teaspoon salt
1 teaspoon baking soda 
2 tablespoons butter, cut in cubes 
1 egg

Method
Preheat the oven to 425°F or 220°C and line a baking pan with baking parchment or a silicone liner. 

Put the tablespoon of white vinegar in your measuring cup then fill it to the 1 2/3 cup or 393ml milk. Set aside to sour. 

In a large bowl, whisk together the flours, salt, and baking soda. 


Add the butter in small cubes and rub it into the flour mixture with your fingertips until it resembles bread crumbs. 


Make a well in the center.

In another bowl, whisk the egg with the sour milk and pour most of the liquid into the flour mixture. 


Using one hand like a claw, bring the flour and liquid together gradually. I used my Swedish whisk and I recommend you do too, if you have one. They sure make mixing dough less messy. 


Add more of the sour milk mixture, if necessary. The dough should be quite soft, but not too sticky.


Turn the dough out onto a floured work surface and gently bring it together into a round about 2 inches or 5cm thick. I used a floured scraper for the shaping. Transfer it to your prepared baking pan.


 Use a sharp knife or a lame to  cut a deep cross on top. Chef Allen calls this blessing the bread. Next poke a small hole in each quarter. These are to allow the fairies to escape. 


Bake for  in the preheated oven 15 minutes then turn down the heat to 400°F or 200°C and bake for about 30 minutes more. 

When it is done, the loaf will sound slightly hollow when tapped on the bottom.


Remove from the baking pan and place on a wire rack to cool.


Enjoy! 


Check out all the other lovely brown breads my Bread Baker friends are sharing today. Many thanks to our host Wendy of A Day in the Life on the Farm

#BreadBakers is a group of bread loving bakers who get together once a month to bake bread with a common ingredient or theme. You can see all our lovely bread by following our Pinterest board right here. Links are also updated after each event on the #BreadBakers home page. We take turns hosting each month and choosing the theme/ingredient.

Pin this Wholemeal Soda Bread! 

Food Lust People Love: Wholemeal soda bread is simple to make, quick to bake and toasts up like a dream. It’s perfect for sandwiches or just smeared with butter and jam.

 .

Monday, October 12, 2020

Roasted Butternut Bacon Feta Risotto

Any risotto is a bowl of comfort food, but this roasted butternut bacon feta risotto takes a simple rice dish up several notches. You can stir the bacon through the dish or simply use it as a generous topping. 

Food Lust People Love: Any risotto is a bowl of comfort food, but this roasted butternut bacon feta risotto takes a simple rice dish up several notches. You can stir the bacon through the dish or simply use it as a generous topping.


Many years ago when our younger daughter was at university, she and her roommates went through a phase where butternut squash was on regular rotation in their menu because of its cheap price and ease of roasting/refrigerating for future meals. 

What ended up happening is that said lovely daughter was completely off of eating butternut squash after that. There are just so many times a person can eat the same thing without being put off indefinitely. The problem is that her father and I still like it! 

So … the search was on for a recipe where butternut didn’t taste so fully of butternut. I am delighted to tell you that this one cracked the code. 


Roasted Butternut Bacon Feta Risotto

This recipe is adapted from a way more fancy one from Jamie Oliver. I love Jamie Oliver but sometimes he does get cheffy. This recipe is easy and tasty. It got a “would have again” rating from my taste tasters, even our younger daughter! And that’s saying something! 

Ingredients
2 small butternut squash, whole (about 2.2 lbs or 1kg)
Olive oil 
1 teaspoon ground coriander 
Fine sea salt
Fresh ground black pepper 
12 oz or 340g thick sliced smoked bacon 
6 cups or 1420ml chicken stock
2 shallots
2 short stalks celery
1 1/2 cups or 300g arborio rice 
1/2 cup or 120ml dry white wine 
4 tablespoons butter 
5 fresh sprigs oregano
8 oz or 226g feta cheese 

For topping: 
1/4 cup or 35g toasted, lightly salted pumpkin seeds

Method
Preheat oven to 400°F or 200°C.

Trim the ends off of your butternut squash and then cut them in half. Small squash don’t need to be peeled because the peel gets tender when cooked and is completely edible and delicious. 


Remove the seeds and discard. Cut squash into chunks and pile them in a baking pan. Drizzle with olive oil, sprinkle with ground coriander, fine sea salt and a few good grinds of black pepper. 


Shake the pan to separate the squash chunks. Bake in the preheated oven until soft, about 40 minutes.

Peel the shallots and dice them and the celery. 


Remove the squash from oven and set aside.


Break feta into small uneven chunks. I like using the tines of a fork for this job. Remove the oregano leaves from the sprigs and set aside a tiny pile for topping. 

In a large saucepan, fry bacon until crispy. Drain on paper towels then cut them into pieces.


Remove all but two tablespoons of the bacon grease from the pan then add the shallots, celery and a pinch of salt. Cook over medium heat for a few minutes, until softened. 


Meanwhile, place chicken stock in a small pan over medium-low heat. Bring to a simmer, then reduce heat to very low to keep warm. 

Add the rice to the shallots and celery. Stir constantly until rice is translucent, 2 to 3 minutes.


Pour in the white wine and stir until it is absorbed, 1 to 2 minutes.


Begin adding the broth to the rice, a ladleful at a time, stirring frequently. Allow each ladleful to be absorbed before adding next; process will take about 20-25 minutes.


When ready, rice will be soft and plump with a slight bite. 


Remove rice from heat. Fold in the pumpkin chunks, butter and the larger pile of oregano leaves. Place a lid over the saucepan, and let it sit for 2 minutes so the butter can melt.

Food Lust People Love: Any risotto is a bowl of comfort food, but this roasted butternut bacon feta risotto takes a simply rice dish up several notches. You can stir the bacon through the dish or simply use it as a generous topping.

Fold in the feta pieces, reserving some crumbles for the top. 

Top with bacon and toasted pumpkin seeds. Add the reserved feta crumbles. 

Food Lust People Love: Any risotto is a bowl of comfort food, but this roasted butternut bacon feta risotto takes a simple rice dish up several notches. You can stir the bacon through the dish or simply use it as a generous topping.

Enjoy!

Check out this month's Baking Blogger pumpkin and squash recipes. Many thanks to our organizer and host, Sue of Palatable Pastime
Baking Bloggers is a friendly group of food bloggers who vote on a shared theme and then post recipes to fit that theme one the second Monday of each month. If you are a food blogger interested in joining in, inquire at our Baking Bloggers Facebook group. We'd be honored if you would join us in our baking adventures.

Pin this Roasted Butternut Bacon Feta Risotto!

Food Lust People Love: Any risotto is a bowl of comfort food, but this roasted butternut bacon feta risotto takes a simple rice dish up several notches. You can stir the bacon through the dish or simply use it as a generous topping.

  .