Showing posts sorted by relevance for query "cooked in translation". Sort by date Show all posts

Tuesday, November 20, 2012

Pecan Pie Baklava with Dried Cranberries for #CookedinTranslation

Sticky, crunchy pecan pie baklava is made in the traditional manner but with the unusual ingredients of pecans, cranberries and pecan pie syrup for a delicious cross cultural treat.


A couple of years back, I had the good fortune to attend a class at the Asian Food Channel kitchen in Singapore.  I wrote all about it here.  One of the recipes we made was traditional Middle Eastern baklava with honey syrup and pistachios.  The chef demonstrated how to roll the first tube of filo pastry with nuts and then squish it off into the baking tray and then asked for a volunteer for the next one.  I held back a minute or two, in case someone else would step forward, but since no one did, I raised my hand. The chef looked much relieved and complimented me nicely on my baklava roll.

I was amazed at how easy baklava really is because it always looked so complicated on the plate, with all those layers! After that, my fellow students got into it and several took a turn. Sometimes you just have to start the ball rolling, you know. They turned out to be nice folks and we had a great time learning, cooking and eating together.

When my fellow Cooked in Translation members were discussing the theme for this month, we decided that we would each “translate” a different Thanksgiving favorite, rather than working on the same dish.  I remembered my baklava class and thought that pecan pie would translate quite well.  And while I was playing free and easy with pecan pie, I also decided to throw in some dried cranberries.  Just because I could.  If this were real pecan pie, no variations are allowed.  Whatsoever.  Because we use my aunt’s recipe and it is engraved in stone.

As you might remember from past months, Cooked in Translation is where we take a recipe from one culture or ethnicity and interpret it from another culture or ethnicity.  It makes me put my thinking cap on and I thoroughly enjoyed the challenge.

Ingredients
For the baklava:
1 cup or 225g butter, melted
About 14 oz or 400g pecans, separated (1/4 cup chopped will be reserved for topping)
16oz or 500g package filo pastry (You will probably have a few sheets leftover if you buy the 500g package.)
1/2 cup or 60g dried cranberries, separated (two tablespoons reserved for topping after chopping)

For the pie filling:
1 egg
3/4 cup or 180ml light Karo
1/2 cup or 115g sugar

For the topping:
Reserved chopped pecans and cranberries

N.B.  You will also need a wooden dowel, which can be purchased at a craft or hardware store, or one long chopstick that is used for cooking, like this or this.  This also bakes best in a non-stick pan.  It will get lovely and sticky and you want to be able to remove it easily.


Method
Preheat oven to 350°F or 180°C.

Chop your nuts finely in a food processor.  Take out 1/4 cup and set aside for topping later.  Chop your dried cranberries in the food processor.  Reserve about two tablespoons for topping.


Mix the remaining pecans and cranberries together in one bowl.

Using a pastry brush, brush the top layer of filo pastry with melted butter.  Sprinkle with a thin layer of the chopped pecans and cranberries.


Roll up from the long side with your dowel or chopstick and roll it all the way off the stack of filo pastry.


Brush the next layer of filo with butter.  Place your roll back on the near edge of the filo and roll up once more.


Using a hand on either side, compress the stuffed filo roll.

This was a hard step to photograph with only one hand.  You will use both hands to push the filled roll to the middle. 
 Now push it down to one end of the dowel and slide it into the pan.


Make as many rolls as will fill your pan.  My pan is 21cm x 21cm or about 8 1/4 in x 8 1/4 in and, as you will see, it took six rolls.  Which also just finished my pecans, so that worked out. :)

No problem if you didn't compress the roll enough. 

Just push it in and make it fit. 
Brush the tops liberally with butter.


Using a sharp knife, cut the rolls into short lengths - about an inch and a half or four centimeters. Be careful not to mar your non-stick pan though!


Bake for about 25-30 minutes in the preheated oven.

Meanwhile, put your egg, Karo and sugar into a medium bowl.  Whisk until the sugar is dissolved.  This should turn a pale yellow color but, as you can see, my lovely egg yolk was vivid orange so mine just turned yellow.


When the timer rings or your baklava is slightly golden and crunchy, remove it from the oven but leave the oven on. (Sorry about this but the baklava needs to go back in.)  Let it cool for about 10 minutes.


When cooling time is up, give your sugar/Karo mixture another good whisk.  You just thought the sugar was dissolved.  But a little always seems to settle out again.

Pour the mixture over your baklava.  Give it a few minutes to soak in, pushing the pieces apart gently with a spatula, if necessary.


Pop the pan back into the oven for about 20-25 minutes or until it is a nice medium gold and completely sticky around the edges.

You can see that it was still bubbling a little but that subsided when it cooled. 

Mix your reserved pecans and cranberries together and sprinkle them all over the top of the rolls.


Allow to cool just a few minutes before removing from the pan to serve.  The sticky, chewy edges are the best part but it is all delicious.


Enjoy!


And just a quick picture of something I am thankful for today.  The pooch has arrived in good form!


Thursday, September 26, 2013

Apple Brown Betty Bread Pudding


If you’ve been reading along for a while, you might recall when I belonged to a group called Cooked in Translation.  The idea was to take a recipe and give it a twist into another culture.  I enjoyed the monthly challenge and was disappointed when the group fell apart.  This recipe is one I made for Cooked in Translation but never posted, a fusion of the American classic apple brown Betty and the English classic bread pudding.  As it’s apple season in the northern hemisphere, I thought this might be a good time to share it.  This is a comfort dessert, if there ever was one.  On both sides of the big pond.

Ingredients
1 cup or 200g dark brown sugar
1/2 cup or 115g sugar
1/2 teaspoon salt
4 eggs
1 cup or 240ml heavy whipping cream
1/2 cup or 120ml milk
2 teaspoons vanilla extract
7 slices or about 9-10 oz or 255-280g strong white or wheat bread
3 whole apples, preferably Granny Smith or similar
1/4 cup or about 55g butter plus extra for greasing the baking dish

Recommended for serving:  more heavy whipping cream

Method
Preheat your oven to 375°F or 190°C and prepare your baking dish by buttering it liberally and completely.   Don’t be shy with the butter here.

Mix the sugars together thoroughly with the salt.


Whisk your eggs with the whipping cream, milk and vanilla.


Slice bread into a small dice, or tear into very small pieces.


Peel, core and thinly slice your three apples.


Sprinkle a little less than one-third of the brown sugar in the buttered baking dish.


Then add about one-third of the apple slices then one-third of the bread cubes.


Repeat these layers twice more, finishing the last time with small chunks of butter rather than bread and the balance of the sugar mixture.

So it goes: Sugar, apples, bread - sugar, apples, bread - sugar, apples, sugar, butter.  Got it?  Easy peasy.


Pour on the whisked egg mixture and top with a bit of cling film.  Press down gently on the whole thing and leave to sit for a few minutes so that the bread absorbs the liquid.


Remove the cling film and cover the baking pan with foil.  Bake in a 375-degree oven for about 45 minutes.

Remove the foil in last five to 10 minutes of baking to brown the top.  This is most delicious served warm.


Bread pudding is one of my husband’s all-time favorite desserts and he insists that it is incomplete without a generous pour of whipping cream on top.  This now applies to Apple Brown Betty Bread Pudding.  Pour it on!

See the sticky syrup that was created?  YUM. 


Enjoy!


Friday, April 20, 2018

Bolinhos de Bacalhau or Deep-fried Cod Fritters #FishFridayFoodies

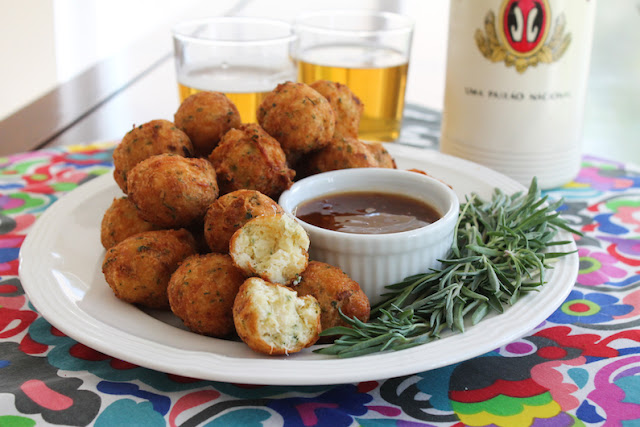
These tasty little morsels are called bolinhos de bacalhau in Brazil, where they are a traditional dish and a favorite party food. In English, a literal translation is little cod balls, but deep-fried cod fritters gets the idea across much better.

Food Lust People Love: Bolinhos de bacalhau are crispy deep-fried cod fritters made with mashed potato. They are crunchy on the outside and tender on the inside, the perfect appetizer or main dish.


My first memory of salt cod, that is, cod that has been liberally salted then dried to preserve it, was on a holiday in Portugal. The grocery stores had stacks of salt cod, in bins like we might find a pile of lemons or a display of corn on the cob. I had no idea what to do with such a salty dry ingredient.

It took moving to Brazil to learn several recipes. Since it doesn’t need refrigeration and maintains its nutrients and flavor for several years, salt cod is a staple in many countries. In Brazil, it is often rehydrated and cooked in rich stews or pan-fried with potatoes and served with hard-boiled eggs and olives.

But my favorite recipe is definitely bolinhos de bacalhau, crispy cod fritters made with mashed potato that are deep-fried till crunchy on the outside and tender on the inside.

Bolinhos de Bacalhau or Deep-fried Cod Fritters

Start the preparations for this recipe at least one day before you want to fry your fritters. The salt cod needs to be soaked for a minimum of 24 hours to get rid of the salt and rehydrate the fish.

Ingredients - makes 2 dozen
8 oz or 225g salt cod
1 tablespoon olive oil
1 small onion, minced
2 cloves garlic, minced
Small bunch parsley, thick stalks discarded, finely chopped
2 large eggs
1/2 teaspoon freshly ground black pepper
1/4 teaspoon cayenne
(1-2 tablespoons flour)

Canola or other light oil for deep-frying

Method
Put the salt cod in a bowl and cover with fresh cool water. If you live in a warm climate, you can put this bowl in the refrigerator. Very important: Change the water at least four times in the next 24 hours.


Meanwhile, you can prepare the rest of the ingredients and refrigerate them until the cod is ready or start the cooking process when the 24 hours is up.

Peel and quarter the potatoes.

Boil in unsalted water until just tender, then mash them with a potato masher or a fork, until there are no lumps. Set aside to cool.

Cut the bones and skin off of the cod and discard. Use the tines of a fork to shred the cod, making sure that you pick out any bones you missed the first time. Use a sharp knife to chop the shredded cod finely.


Sauté the minced onion and garlic until they have softened, in the olive oil over a medium fire. Remove the pan from the stove and mix in the chopped parsley.

Mix the mashed potato and shredded cod with the sautéed onion mixture, the ground peppers and the eggs.


This should be fairly stiff. If need be, add some flour to help it bind. I don’t usually need to add any, but many of the Brazilian recipes suggest that flour may be necessary.

Lay paper towels on top of a wire rack, nearby the stove.

Heat enough oil to cover a 2-tablespoon ball of the mixture (about 2 1/2 in or 6.3cm deep should do it) in a deep fryer or a deep pot on the stove, to about 375°F or 190°C.

Use a tablespoon or a cookie scoop to make small balls and drop them carefully into the hot oil, just a few at a time. Do not crowd the pot.  Traditionally, these should be oval or American-football shaped, but I have a cookie scoop and it’s so much easier!


Fry the bolinhos for several minutes or until they are a lovely golden brown and crunchy on the outside. Use a slotted spoon to carefully remove them from the hot oil and put them on the paper towels to drain. Continue until all of the fritters are cooked.

Food Lust People Love: Bolinhos de bacalhau are crispy deep-fried cod fritters made with mashed potato. They are crunchy on the outside and tender on the inside, the perfect appetizer or main dish.


Serve hot and fresh with some spicy hot sauce or your favorite tartar sauce, if desired.

Food Lust People Love: Bolinhos de bacalhau are crispy deep-fried cod fritters made with mashed potato. They are crunchy on the outside and tender on the inside, the perfect appetizer or main dish.


Enjoy!

Food Lust People Love: Bolinhos de bacalhau are crispy deep-fried cod fritters made with mashed potato. They are crunchy on the outside and tender on the inside, the perfect appetizer or main dish.


This month my Fish Friday Foodies are sharing Latin American seafood dishes so make sure you check out the list below. Many thanks to our host, Karen of Karen’s Kitchen Stories.


Pin it! 

Food Lust People Love: Bolinhos de bacalhau are crispy deep-fried cod fritters made with mashed potato. They are crunchy on the outside and tender on the inside, the perfect appetizer or main dish.
 .

Thursday, January 19, 2012

Crispy Roasted Fishcakes Wrapped in Bacon


Whenever we move houses, there are two books that come with me, in the suitcase, because I wouldn’t trust them to the shipment and I might need them right away.  This was especially true before the days of internet.  (And often the first weeks in a new home are like the days before internet.  We were fortunate here to have internet within a couple of days of moving in.  That doesn’t happen very often, believe me!)  My two essential books are the Good Housekeeping Illustrated Cookbook, 1980 edition and my own binder full of personal, many irreplaceable, family recipes, collected over the last 30-something years.

This move, a couple of extra books joined that treasured literary pantheon:  Fried Chicken and Champagne and Jamie’s Great Britain, because they were much salivated over Christmas gifts and I couldn’t bear to put them in the shipment and not see them again for six weeks.  They have both been well-thumbed this last week and a half and now are duly bookmarked with sticky tabs. 

So many recipes I want to try!
Here, then, is the first attempt from my two wonderful gift books, a recipe adapted from Jamie.

Ingredients
100g or 3.5 oz smoked salmon
60g or 2 oz smoked herring fillets
(or 160g or 5.5 oz smoked fish of your choice – Jamie recommends just salmon or salmon and trout.  The herring fillets were a bit strong so I will probably try this again with just salmon.)
2 green onions (or more if yours are skinny)
Knob of butter 
Sea salt
Black pepper
340g or 12 oz potatoes
2 large eggs
1 small lemon
Handful celery leaves or flat leafed parsley
Handful plain flour
2 oz or 60g of breadcrumbs or 4 slices dry sandwich bread
1/2 teaspoon crushed red pepper
Olive oil
4 slices of bacon

Method
Cut the root end off of the green onions and slice them finely.  Sauté with a knob of butter, a drizzle of olive oil to stop the butter from burning and a sprinkle of salt and pepper.


Peel the potatoes and cut them in cubes.  Boil them in salted water until tender and mash-able.


Meanwhile, chop the smoked fish with a big knife.  Sure, you can do it with a small knife but it is not as satisfying as rocking a big knife under two hands. 


When the potatoes are cooked, drain them and mash them and leave them to cool a bit.


Chop your celery leaves or parsley.


Put your breadcrumbs (or four slices of sandwich bread) into the food processor with 1/2 teaspoon of crushed red pepper.   Drizzle in a little olive oil while the thing is whizzing around until you have rough, ever so slightly moist breadcrumbs.


Break one egg into a shallow bowl.  Break the other egg and let the white fall into the same bowl.   Add the yolk to the cooled potato and mix thoroughly.


To the potatoes, add the fish, the green onions, the zest of your lemon, juice of half of your lemon and the celery or parsley.  Mix thoroughly.


Now divide your potato/fish mixture into four equal balls and shape them into patties.  Whisk your egg.


Now for my favorite part.  When I can add bacon to a recipe, I’m happy.  Spread a piece of cling film on your cabinet.  Add your bacon slices and top with another piece of cling film.  Using a rolling pin or wine bottle, roll your bacon to stretch it into longer pieces.   This really works!


Using your hands, lightly flour the patties and then put them into the egg.  Both sides.  This is going to get messy so don’t even try to keep clean.


Next pop them into the breadcrumbs and coat both sides well.  Return the patties to plate.


After all four are coated in breadcrumbs, wrap each one with a slice of bacon and secure with as many toothpicks as it takes.


Put them in the refrigerator until you are ready to cook them.

To cook:  preheat the oven to 425°F or 220°C.  Put the baking pan in to heat up.   When the oven reaches temperature, drizzle the pan with olive oil then put the fishcakes in the pan and drizzle a little more olive oil on their tops and bake for about 15 minutes. 


Remove from the oven and turn the patties over.  Cook for five or 10 more minutes or until they are crispy and browned all over.  


Serve with wedges of lemon.


Enjoy!

Addendum:  I am adding this post to the #Cooked in Translation blog hop, so just a little information about that. The concept is simple:  Once a month on the third Wednesday we interpret a classic international dish through the lens of our own or another culinary tradition.  See who else has taken the challenge and add your own fishcake link below.  You can find the rules here.