Monday, November 29, 2021

Blueberry Orange Buttermilk Muffins #MuffinMonday

These wonderful blueberry orange buttermilk muffins bake up golden and fluffy with lots of flavor from orange zest, juice and sweet blueberries! 

Food Lust People Love: These wonderful blueberry orange buttermilk muffins bake up golden and fluffy with lots of flavor from orange zest, juice and sweet blueberries!

Blueberries muffins always remind me of abstract art because of the way they burst and drip in unpredictable ways. What is predictable is the lovely flavor they add to baked goods, especially muffins. 

The inspiration for the blueberry orange combination came from the immense bag of clementines my husband came home from Costco with the other day. We’ve been eating and eating them but still have too many. 

I have mulled wine mulling on the stove right now with a couple and I am going to add some to mince pie filling shortly, but meanwhile these muffins used up two more! Hallelujah.

Blueberry Orange Buttermilk Muffins

With only a 1/2 cup or 100g of sugar, these muffins are just the right amount of sweet. These are the perfect breakfast or snack with a cup of coffee, hot tea or cold milk. 

Ingredients
2 cups or 250g flour
1/2 cup or 100g sugar
2 teaspoons baking powder
1 teaspoon baking soda
1/2 teaspoon fine sea salt
2 clementines or 1 normal orange (for zest and 1/4 cup or 60ml juice)
2 eggs
3/4 cup or 180ml buttermilk
1/3 cup or 75ml vegetable oil
1 cup or 150g blueberries 

Method
Preheat your oven to 375°F or 190°C.  Butter your 12-cup muffin tin or line it with paper liners.

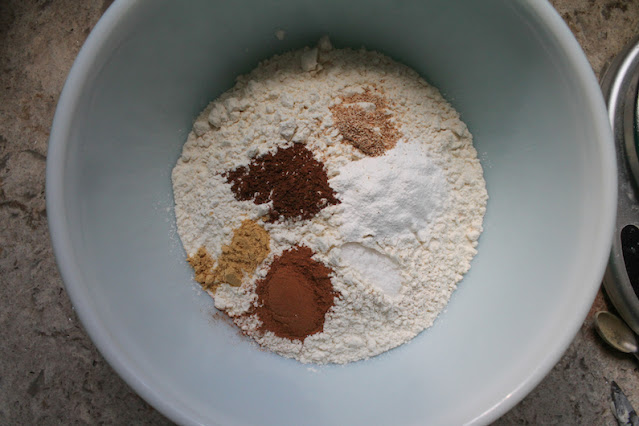
Add the flour, sugar, baking powder, baking soda and salt into a large mixing bowl. Grate in the orange zest and mix.  

Zesting oranges into the dry ingredients

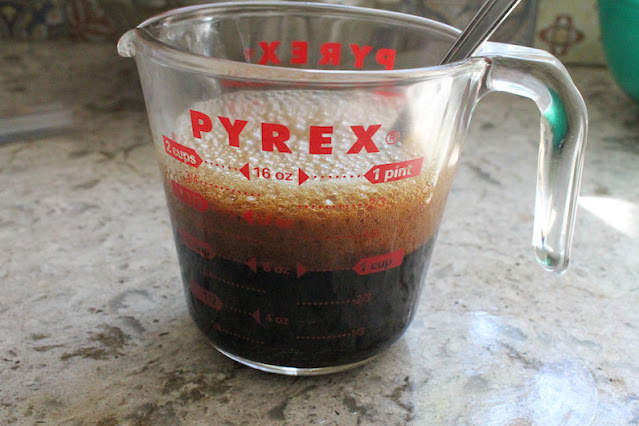
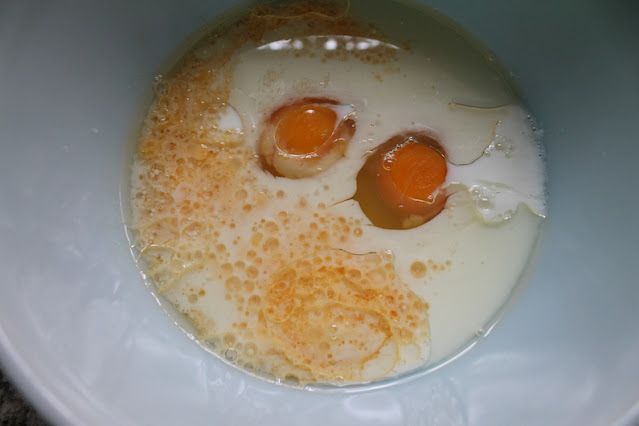
Juice your orange. In another smaller bowl, whisk together the eggs,  buttermilk, juice and oil.

The wet ingredients in a bowl

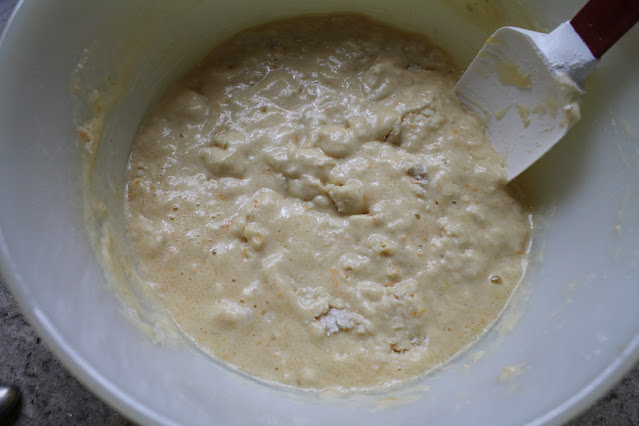
Pour the wet ingredients into the dry ones and stir until just mixed through. Some flour may still be showing and that's more than okay.

The batter just mixed with a little flour showing

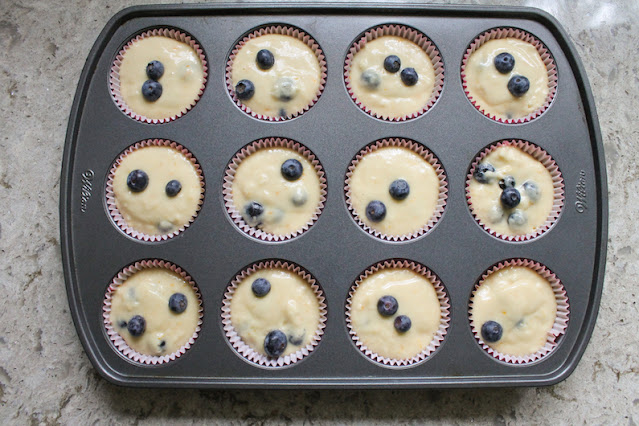
Set aside at least 12 blueberries for popping on the top of the muffins before baking, if desired. 

Fold in the rest of the blueberries.

Adding in the blueberries

Divide the mixture between the muffin cups in pan.

If you saved berries for the top, now is the time to pop one or two on the top of each cup.

Muffin cups filled with battered and topped with a few extra blueberries

Bake the muffins in your preheated oven for about 18-23 minutes or until an inserted toothpick comes out clean and the muffins are lovely and golden. Leave them to cool for a few minutes then remove the muffins to a wire rack to cool completely.

Golden muffins just out of the oven!

Enjoy!

Food Lust People Love: These wonderful blueberry orange buttermilk muffins bake up golden and fluffy with lots of flavor from orange zest, juice and sweet blueberries!

It’s Muffin Monday, a day we celebrate the last Monday of every month. Check out the list of wonderful muffins my blogger friends are sharing!


#MuffinMonday is a group of muffin loving bakers who get together once a month to bake muffins. You can see all of our lovely muffins by following our Pinterest board. Updated links for all of our past events and more information about Muffin Monday can be found on our home page. 


Pin these Blueberry Orange Buttermilk Muffins!

Food Lust People Love: These wonderful blueberry orange buttermilk muffins bake up golden and fluffy with lots of flavor from orange zest, juice and sweet blueberries!

 .

Sunday, November 28, 2021

Bacon-wrapped Loaded Baked Potatoes

Bacon-wrapped Loaded Baked Potatoes give bacon almost equal billing with the wonderful fluffy potato inside. Bacon-wrapped and bacon-filled, they're a bacon lovers perfect baked potato. (Seriously good.)

Food Lust People Love: Bacon-wrapped Loaded Baked Potatoes give bacon almost equal billing with the wonderful fluffy potato inside. Bacon-wrapped and bacon filled, they're a bacon lovers perfect baked potato. (Seriously good.)

I have probably mentioned this before, but in my family we have a game we play called Last Meal. And it goes like this: We go around the room (or car, as this game is often initiated on a long road trip, where stops are infrequent and the passengers are getting fractious, hungry and tired of snack foods) and each person regales us with what their final meal would be. You know, if they were somehow scheduled for execution. (Wrongly convicted, natch.) The only rule is that you have to name specific, finite dishes. You can’t just say "a buffet," for instance. 

When it gets to my mother’s turn, she goes all Forrest Gump's Bubba on us and names just about every kind of potato dish every created with the exception of fries, which are somehow not her favorite. (I know, right? Who doesn't love fries!) Boiled baby new red potatoes with butter and chives, hasselback potatoes, loaded baked potatoes, smothered potatoes with pork chops, potatoes au gratin, creamed potatoes, spicy potato curry, Jersey Royals with fresh mint, potato salad. She does go on but I think you get the picture. 

The point of this story is that I grew up with a woman in charge of my daily meals who adores potatoes. This can affect a child one of two ways: you drink the Kool-Aid or you develop an aversion. I drank the Kool-Aid. 

While my love of potatoes is not as well documented as my love of bacon, I feel the two often go hand-in-hand. What potato au gratin or hash brown is not improved by the addition of some crispy bacon? Bacon-wrapped smashed potatoes, yes, please! And that goes double for baked potatoes with the works! 

Bacon-wrapped Loaded Baked Potatoes

My inspiration for this recipe came from a menu item served at Lambeau Field during Green Bay Packer games called The Pigskin. I read about it online when it was introduced back in 2016 and I couldn’t resist attempting my own. Theirs also includes chili inside the potato, as if the bacon and cheese inside and bacon outside weren’t heart-stopping enough! I think these potatoes are perfect as I make them though because the bacon "crust" is my favorite part. This recipe is easily scaled up or down, depending on how many people you are serving. 

Ingredients
For baking the potatoes: 
4 medium-sized russet potatoes (about 11 1/3 oz or 320g each)
1 lb or 450g bacon (not thick cut) - about 4 slices per potato
toothpicks

For loading the potatoes:
1 lb or 450g bacon, crisp fried, drained and chopped
8 oz or 225g extra sharp cheddar cheese, grated
1 cup or 245g sour cream
Large bunch chives or green onion tops, chopped
Butter - we like lots. You do you. 

Method
Preheat your oven to 350°F or 180°C.  Scrub and rinse the potatoes. Dry thoroughly. 

Wrap the potatoes with bacon. Overlap the slices and use four per potato. I used three here but next time, I’ll do four so that's what I put in the ingredients list. More bacon = better. Remember that the bacon will shrink as the potatoes bake. Poke a few toothpicks in to hold the bacon in place and pierce the baked potato. 

Wrap the potatoes with bacon. Overlap them and use three or four slices per potato.

I remember being told that baked potatoes need to be poked so they don’t blow up in the oven. Perhaps that’s just an old wives’ tale but why take chances? Anecdotal evidence says it can happen. These toothpicks take care of that, just in case. 

Bake the bacon-wrapped potatoes in your preheated oven for 55 – 60 minutes or until the bacon is lovely and crispy and your potatoes are tender and fluffy inside. 

When baking time is up, remove the bacon-wrapped potatoes from the oven and carefully remove the toothpicks.

Allow to cool for about 10 minutes or until they are cool enough to handle. Cut a slit in the top of each potato and push on the ends to open them. The insides will still be very hot so be careful! Add a generous pat of butter.

Adding butter to the potatoe and don't be stingy!

Let each person add the other toppings they love. I want it all, baby! Who's with me? 

Food Lust People Love: Bacon-wrapped Loaded Baked Potatoes give bacon almost equal billing with the wonderful fluffy potato inside. Bacon-wrapped and bacon filled, they're a bacon lovers perfect baked potato. (Seriously good.)

This is a full meal deal. Serve with a side salad or some veggies, if you want to feel more virtuous. But, fair warning: you may not be able to eat the whole thing if you do. (Hot tip: Warm your leftover half potato in the microwave the next morning. It's a fabulous breakfast.)

Enjoy! 

It's Sunday FunDay and I am pleased to share the following links with you! I love this group and all my baked potato-loving fellow bloggers! If you are a fan of baked potatoes like I am, you are gonna LOVE this list. 


We are a group of food bloggers who believe that Sunday should be a family fun day, so every Sunday we share recipes that will help you to enjoy your day. If you're a blogger interested in joining us, just visit our Facebook group and request to join.

Pin these Bacon-wrapped Loaded Baked Potatoes!

Food Lust People Love: Bacon-wrapped Loaded Baked Potatoes give bacon almost equal billing with the wonderful fluffy potato inside. Bacon-wrapped and bacon filled, they're a bacon lovers perfect baked potato. (Seriously good.)

 .

Sunday, November 21, 2021

Roasted Brace of Guinea Fowl (Sous Vide)

Roasted Brace of Guinea Fowl means two guinea fowl, well spiced and stuffed with clementines, cooked by sous vide then blasted to crispy skin in a very hot oven. The perfect lip-smacking, finger-licking main course for any holiday meal!

Food Lust People Love: Roasted Brace of Guinea Fowl means two guinea fowl, well spiced and stuffed with clementines, cooked by sous vide then blasted to crispy skin in a very hot oven. The perfect lip-smacking, finger-licking main course for any holiday meal!

N.B. This recipe must be started one day ahead of when you want to roast and serve your guinea fowl. 

One of the things I love about the holiday season is that unusual game birds sometimes turn up in the neighborhood grocery stores or butchers. I’ve found pheasant, guinea fowl, goose and even partridge on occasion and always leap at the opportunity to try something different. If you follow me on Instagram, you know that duck has been on our Christmas menu a couple of years as well. 

Guinea fowl are considered a game bird but, in fact, there has been a great increase in the number of farms that raise them. According the USDA, there are more than 14,500 guinea fowl farms in the Unites States. They are the fourth best selling poultry after chicken, turkey and duck. 

They are relatively small birds, weighing roughly 2-3 lbs or 900-1.4kg, with slightly darker meat than chicken and way more flavor. If you can't find guinea fowl, ask our local butcher to order some for you. Most will oblige.

Roasted Brace of Guinea Fowl (Sous Vide)

Some essential items for this recipe are 1. a sous vide machine aka immersion circulator 2. A vessel large enough to hold the two birds and water to circulate around them and 3. Two heavy bricks or tiles to hold the birds underwater in said vessel. Don’t worry, I provide a photo of the set up below.

Ingredients
2 whole guinea fowl (approx weight each 3 lbs or 1.4kg)
2 tablespoons dry salted spice rub (I used my dry java concoction
1/2 teaspoon same spice rub
1/2 teaspoon baking powder
4 small clementines

Method
Clean the guinea fowl, removing the top part of the tail and any stray feathers inspector 12 might have missed. (One of mine had what appeared to be one side of the bird’s head skin as well, connected to the neck skin, top feathers and all. Cooking meat is not for the faint-hearted and this is a reminder to me at least, to appreciate the living beast that I am cooking and eating.)

Spoon the dry rub inside the birds and all over the outside skin, making sure to get some between the legs and body, wings and body, and in the top cavity by the neck as well. If the guinea fowl arrive already trussed, just work your fingers between these bits. If your fowl are not already tied up, do this after seasoning. 


Mix that extra 1/2 teaspoon of dry rub with the 1/2 teaspoon of baking soda and sprinkle it on the top of the bird from a great height, so you get an even layer. According to Serious Eats, this helps the skin dry so it will super crispy when roasted. It does get moist again in the sous vide bag but I like to think that if the skin is really dry when we start, it will dry out again quickly with the application of intense heat.

Place your birds in a casserole dish, breast up, uncovered in the refrigerator for 24 hours. 


The following morning, stuff two whole clementines in each bird cavity.  This helps displace air and conduct heat through the birds as well as adding flavor. 


Place each guinea fowl in a gallon bag. Submerge them carefully in water to remove as much of the air inside as possible and seal tightly.


Because there is still some air inside of the birds, they tend to want to float. Cover a couple of bricks or tiles with plastic bags and lean them against the guinea fowl to keep them submerged but make sure water can still circulate around them. I also clothespin the guinea fowl bags to my cooking chopsticks to help center them in the water.


Sous vide at 150°F or 65°C for four hours.

When the timer goes off, remove the bags from the water bath. Carefully remove the guinea fowl from the bags, holding them legs down so liquid can drain out of them and back into the bags. Reserve any juice left behind to add to gravy later. 

Heat your oven to as high as it will go. Pat the birds dry with paper towels, being careful not to break the skin. 

Heat a large iron skillet on the stovetop and place both birds in it. Turn the oven temperature down to 450°F or 232°C convection, if it was higher than that to preheat. Roast the guinea fowl in your very hot oven for about 10 minutes to brown the skin, turning the pan around midway through to ensure even browning. 

Food Lust People Love: Roasted Brace of Guinea Fowl means two guinea fowl, well spiced and stuffed with clementines, cooked by sous vide then blasted to crispy skin in a very hot oven. The perfect lip-smacking, finger-licking main course for any holiday meal!

Let rest for 10 minutes, cut into joints and serve.

Food Lust People Love: Roasted Brace of Guinea Fowl means two guinea fowl, well spiced and stuffed with clementines, cooked by sous vide then blasted to crispy skin in a very hot oven. The perfect lip-smacking, finger-licking main course for any holiday meal!

Enjoy! 

Anybody tired of turkey and ham every holiday? It’s Sunday FunDay again and this week we are sharing main course recipes that are anything but ham and turkey! Check out the links below. Many thanks to our host, Sue of Palatable Pastime


We are a group of food bloggers who believe that Sunday should be a family fun day, so every Sunday we share recipes that will help you to enjoy your day. If you're a blogger interested in joining us, just visit our Facebook group and request to join.


Pin this Roasted Brace of Guinea Fowl (Sous Vide)!

Food Lust People Love: Roasted Brace of Guinea Fowl means two guinea fowl, well spiced and stuffed with clementines, cooked by sous vide then blasted to crispy skin in a very hot oven. The perfect lip-smacking, finger-licking main course for any holiday meal!
 .

Thursday, November 18, 2021

Cider Spice Bundt Cake #BundtBakers

This cider spice Bundt cake will fill your house with the most wonderful aroma as it bakes. The tender crumb lives up to that promise. Delicious!

Food Lust People Love: This cider spice Bundt cake will fill your house with the most wonderful aroma as it bakes. The tender crumb lives up to that promise. Delicious!

If you’ve ever perused New York Times Cooking, you know that one of the most useful features of having a subscription is access to the notes people leave when they’ve made a recipe. “Did it work as written?” being the most important. 

In the case of this cake, many agreed it did not! The most frequent comment said that the batter was thick, not thin as described in the instructions. Also, the cake didn’t rise and was very dense. Well, most people would step away quickly and scroll on to another recipe. But I am not most people! I decided that the “bones” were good and those were problems I could fix. 

I’m pleased to tell you that I did. By adding extra liquid in the form of orange juice and another egg, along with baking powder and more baking soda, this cake turns out light yet moist. It’s the kind of cake you keep on the countertop in the kitchen and it just disappears because your family keeps cutting themselves a small slice as they pass by. So good! It would be perfect for the holidays.

Cider Spice Bundt Cake

For this recipe, I used Strongbow Original, a traditional dry English cider, which contains alcohol. Substitute another dry alcoholic or non-alcoholic cider if you can’t get Strongbow in your neck of the woods. Here in Houston, we buy it at Total Wine. This recipe was adapted from one in New York Times Cooking

Ingredients
2 1/4 cups or 281g all-purpose flour, plus extra for the pan
1 teaspoon baking powder
1 teaspoon ground cinnamon, plus extra for the pan, if desired
1/2 teaspoon fine sea salt
1/2 teaspoon ground cloves
1/4 teaspoon ground nutmeg
1/4 teaspoon ground ginger
1 cup or 227g unsalted butter, softened, plus extra for the pan
1 cup, packed, or 200g light brown sugar
3 large eggs, at room temperature
2 teaspoons freshly grated orange zest
1/4 cup or 60ml orange juice
1/2 cup or 120ml unsulfured molasses (not blackstrap)
1 teaspoon baking soda
3/4 cup or 180ml dry apple cider (I used Strongbow Original.)

Optional: icing sugar to dust

Method
Preheat your oven to 350°F or 180°C and prepare a 9- or 10-cup Bundt by brushing it generously with melted butter and flouring it liberally. Sometimes I dust with a little extra ground cinnamon as well after the flour, putting it in a tiny strainer to distribute it evenly. I did that for this cake because more cinnamon is a good thing.

In a medium bowl, whisk together the flour, baking powder, salt and spices. Set aside.


Working in the bowl of a stand mixer fitted with a paddle attachment (or using an electric mixer), cream together the butter and brown sugar on medium until smooth. 

Add eggs, orange zest and juice, and beat on medium-high speed, about 1 minute.

Adding eggs, orange zest and juice.

In a separate large bowl or liquid measuring cup, add the molasses and baking soda. 

In a small saucepan, bring the apple cider to a boil over high; pour it very slowly over the molasses and baking soda and whisk until combined. The mixture will froth up a lot so make sure you use a big enough vessel to contain it! 

The molasses bubbling up when the cider is added.

Beat in half of the flour half the cider mixture to the butter mixture on low until combined. When it’s blended, scrape down the bowl with a rubber spatula, then add the rest of the flour and cider, beating again till it's well combined. 

Carefully pour the batter into your prepared pan. Bake for 35-40 minutes or until a toothpick inserted into the center of the cake comes out clean.

Let cake cool in pan for about 10 minutes, then turn the cake out onto a wire rack to cool fully.

Once cool, dust with some icing sugar, if desired. 
 
Dusting the icing sugar.

Enjoy! (With a glass of cider, if you'd like. Someone's got to drink the rest of that can, after all.)

Food Lust People Love: This cider spice Bundt cake will fill your house with the most wonderful aroma as it bakes. The tender crumb lives up to that promise. Delicious!

It's time for Bundt Bakers and this month we are sharing recipes with spice! Check out all the links below!

#BundtBakers badge

#BundtBakers is a group of Bundt loving bakers who get together once a month to bake Bundts with a common ingredient or theme. You can see all of our lovely Bundts by following our Pinterest board. We take turns hosting each month and choosing the theme/ingredient. Updated links for all of our past events and more information about BundtBakers, can be found on our home page.

Pin this Cider Spice Bundt Cake!

Food Lust People Love: This cider spice Bundt cake will fill your house with the most wonderful aroma as it bakes. The tender crumb lives up to that promise. Delicious!
 .

Monday, November 15, 2021

Chicken Chili Verde – Instant Pot

Cooked completely in an Instant Pot, this Chicken Chili Verde is flavorful, delicious and easy! Serve yourself a warming bowl of this chili tonight.

Food Lust People Love: Cooked completely in an Instant Pot, this Chicken Chili Verde is flavorful, delicious and easy! Serve yourself a warming bowl of this chili tonight.

My family knows that my favorite kind of book will contain both recipes and stories. I call them cookbook memoirs and have just discovered via a quick Google search that cookbook memoir is a legit genre. Amazon calls them food memoirs, culinary biographies or culinary memoirs. 

A few years ago my elder daughter gave me Julia Turshen’s book Small Victories for Christmas and within just a few hours, I had bookmarked 23 recipes I wanted to try! I haven’t actually made them all yet but every one I have cooked has been delicious.

Julia Turshen's book, Small Victories: Recipes, Advice + Hundreds of Ideas for Home Cooking Triumphs
Twenty-three bookmarks!

Her quick chicken chili verde instructions weren’t even strictly a recipe. They were just a small paragraph on a page headed Seven Things to do with Leftover Chicken but when I searched my Eat Your Books  bookshelf for tomatillos, it popped up. As you can see from my adaptation, I didn’t start with leftover chicken but using an Instant Pot made it pretty quick to cook anyway.

Chicken Chili Verde – Instant Pot

Adapted from Julia Turshen's Small Victories: Recipes, Advice + Hundreds of Ideas for Home Cooking Triumphs <Amazon affiliate link. My two boneless, skinless chicken breasts weighed about 1 1/2 lbs or 680g. If your chicken weighs a bit more or less, it’s all good. I used some special little tomatillos from Melissa's Produce called tomatillos milperos, which are smaller with a more concentrated flavor and less acidity than the normal variety. I highly recommend them but use whichever fresh, firm tomatillos you can find if you can't put your hands on some.

Ingredients
2 boneless, skinless chicken breasts (about 1 1/2 lb or 680g)
Fine sea salt
Freshly ground black pepper
1 medium onion
1 bell pepper
1 fresh jalapeño
2 cloves garlic
2 tablespoons olive oil 
1 teaspoon ground cumin
1 teaspoon chili powder
1 lb or 450g tomatillos
1 1/2 cup or ml chicken stock, plus more as needed
1 can (15.5 oz or 439g) white beans

To serve:
sour cream
grated cheese
green onions

Optional: sliced fresh jalapeños

Bell pepper, onion, garlic and tomatillos milperos
The little tomatillos

Method
Season the chicken breasts with fine sea salt and freshly ground black pepper. Set aside.

Remove any peels and stems then, finely mince or use a food processor to chop the onion, bell pepper, jalapeño and garlic finely. I used my little food processor. 

On the sauté low setting, cook the onion, bell pepper, jalapeño and garlic in the olive oil in the Instant Pot until they are softened, about 10 minutes, stirring frequently.


Remove the husks from the tomatillos and cut them in pieces. Since I was using the small ones, I just cut most of them in half.

Chopping the tomatillos

Add the spices, tomatillos and chicken stock to the sauteed vegetables. 

Adding the spices, tomatillos and chicken stock to the sauteed vegetables.

Turn sauté to high and bring the mixture to a quick boil then turn the Instant Pot off. 

Nestle the chicken breasts in the pot and pressure cook for 10 minutes. 

Putting the chicken into the Instant Pot.

Natural release the steam for 10 minutes then manually release completely. 

Chicken cooked in the pot

Remove the chicken from the pot and, as soon as it’s cool enough to handle, shred it. 

Shredding the chicken.

Drain and rinse the cannellini beans. 

Add the shredded chicken back to the pot along with the rinsed beans. 

Adding the chicken and beans to the pot

Sauté on low for about 10-15 minutes, stirring frequently and adding a little more stock (or water) if it gets too dry. 

Taste for salt and add a bit more if necessary, keeping in mind that the grated cheese will also add salt when you serve.  

Food Lust People Love: Cooked completely in an Instant Pot, this Chicken Chili Verde is flavorful, delicious and easy! Serve yourself a warming bowl of this chili tonight.

Serve with sour cream, grated cheese and green onions. I also like to include some fresh jalapeño slices.

Serve with sour cream, grated cheese and green onions. I also like to include some sliced fresh jalapeños.

Enjoy! 

It’s MultiCooker Monday so my blogger friends and I are sharing recipes made with our small appliances. Check out the links below. Many thanks to our host and organizer, Sue of Palatable Pastime


Multicooker Monday is a blogger group created by Sue of Palatable Pastime for all of us who need encouragement to make better use of our small appliances like slow cookers, Instant Pots, Air Fryers, rice cookers and sous vide machines. We get together every third Monday of the month to share our recipes. If you are a food blogger who would like to post with us, please request to join our Facebook group. 


Pin this Chicken Chili Verde – Instant Pot!

Food Lust People Love: Cooked completely in an Instant Pot, this Chicken Chili Verde is flavorful, delicious and easy! Serve yourself a warming bowl of this chili tonight.

 .


Tuesday, November 9, 2021

Buttery Sourdough Dinner Rolls #BreadBakers

Soft, fluffy and tender, these buttery sourdough dinner rolls are perfect to accompany your holiday meal and for making leftover turkey or ham sandwiches. 

Soft, fluffy and tender, these buttery sourdough dinner rolls are perfect to accompany your holiday meal and for making leftover turkey or ham sandwiches.

The holidays are approaching quickly and my Bread Baker friends and I know that for many, a festive table is not complete without some dinner rolls. So we are here to help, sharing several wonderful recipes we hope you’ll love. Make sure to scroll down to find the links. 

My buttery sourdough dinner rolls remind me of the brown-n-serve rolls my grandmother used to buy and finish baking at home, but with a little more flavor. They are a little bit bigger than your average dinner roll which makes them great for turkey or ham sandwiches as well. 
 

Buttery Sourdough Dinner Rolls

We want lots of springy fluffiness for these soft dinner rolls so while the sourdough starter is there for flavor, I use active dry yeast as well to make sure these puff right up.

Ingredients
1 1/2 cups or 360ml milk
1/3 cup or 80g butter
1/4 oz or 7g (2 1/4 teaspoons) active dry yeast
1/2 cup or 113g sourdough fed starter 
1 egg, at room temperature
1/4 cup or 50g sugar
2 teaspoons fine sea salt
5 cups or 625g flour, plus extra for kneading and sprinkling on before baking

1/8 cup or 30g melted butter for brushing on after the rolls are baked

Method
Put the milk in a large microwaveable vessel and add in the butter. Microwave until the butter is mostly melted, about 3-4 minutes. Let cool for a few minutes.

Put the yeast in your mixing bowl and pour in about a cup or 240ml (no need to measure exactly) of the warm milk/butter mixture and set aside for about 10 minutes. You are hoping that the yeast activates and gets all bubbly. If it doesn’t, you need to buy some new yeast and start over.

Now add the rest of the milk/butter, the sourdough starter, the egg and the salt along with 3 cups or 375g of flour to your mixing bowl and mix on medium speed until all of the flour is incorporated.  


Scrape down the sides of the bowl with a spatula to mix in any flour left there. It’s a very runny batter at this point.


Continue mixing and add the remaining flour by spoonfuls until all is incorporated. Now it should be wet and soft sticky dough but that’s what is needed for soft and tender rolls.

Now mix for 3-4 minutes, changing to the dough hook, if necessary, to help develop the gluten.


Cover the bowl with cling film and allow the dough to rise in a warm place for about an hour or until it doubles in size. If it's cold in your kitchen, you can partially fill the sink with hot tap water and put the bowl in it for warmth.


Meanwhile, line your baking pan with parchment paper, a silicone mat or grease it liberally with oil or butter.

Once the first rise is done, punch the dough down and knead it briefly on a floured surface. Cut the dough ball into halves, then cut the halves into half again. Cut each piece into four to make large bread rolls or six to make more reasonably sized ones. Hint: the bigger ones are better for sandwiches.


Roll the dough pieces into balls, pinching them from underneath to stretch the tops so they are nice and round. 


Put the balls, side by side, pinched side down, in your prepared baking pan. Sprinkle the tops of the rolls with flour.


Put the whole baking pan in a clean, new garbage bag, capturing some air before you clip it shut, so that the bag doesn’t touch the top of the bread rolls. Allow the rolls to rise in a warm place for about an hour.

About 15 minutes (or however long your oven takes) before the second rise is completed, preheat your oven to 350°F or 180°C.


Bake the dinner rolls in your preheated oven for 25-30 minutes or until they are golden brown all over.


Brush with the melted butter and serve warm, if possible. 

Brushing rolls with butter

They are still great cooled but I think we can all agree that warm rolls are the best!

Enjoy!

Soft, fluffy and tender, these buttery sourdough dinner rolls are perfect to accompany your holiday meal and for making leftover turkey or ham sandwiches.

Check out all the delicious roll recipes my Bread Baker friends are sharing today! Many thanks to our host, Swathi of Zesty South Indian Kitchen.

BreadBakers
#BreadBakers is a group of bread loving bakers who get together once a month to bake bread with a common ingredient or theme. Follow our Pinterest board right here. Links are also updated each month on this home page. We take turns hosting each month and choosing the theme/ingredient.

Pin these Buttery Sourdough Dinner Rolls!

Soft, fluffy and tender, these buttery sourdough dinner rolls are perfect to accompany your holiday meal and for making leftover turkey or ham sandwiches.
 .

Sunday, November 7, 2021

Stuffed Gem Squash

Roasted Stuffed Gem Squash filled with herby, tomato-ey bulgur wheat is a thing of beauty and deliciousness but you can also kick it up a notch with the addition of Italian sausage. 

Food Lust People Love: Roasted Stuffed Gem Squash filled with herby, tomato-ey bulgur wheat is a thing of beauty and deliciousness but you can also kick it up a notch with the addition of Italian sausage.

Gem squash is a South African heirloom squash that has gained popularity in many other countries. In its native land, it is considered a summer squash but in the United States, it falls into the winter squash category. It’s a descendant of a Central American squash that made its way across the sea and is a must-have in South Africa. 

If you’d like to learn more about them and where to find gem squash, this post on Cook Sister is very informative: https://www.cooksister.com/2010/10/gem-squash-central-finding-them-growing-them-and-eating-them.html

Stuffed Gem Squash  - Two Ways

In the following recipe, we will make a base stuffing with onions, tomatoes, bulgur and herbs, which is delicious on its own for half the gem squash. The other half, we’ll fill with a mixture of the base stuffing with added Italian sausage. By adjusting your filling amounts, you can make all vegetarian, leaving out the sausage altogether or add another link or two of sausage to stuff all the gem squash with a meaty mixture. If you can't find gem squash, substitute small acorn squash which are of a similar size. 
 
Ingredients
4 gem (or acorn) squash 

For the stuffing:
1/4 cup or 60ml olive oil, plus more for sautéing the onion and drizzling on the squash before roasting
1 large or 2 medium onions, minced (Mine weighed 7 oz or almost 200g)
1 cup or 210g medium coarse bulgur wheat
1.1 lbs or 500g tomato passata aka tomato puree
1 teaspoon fine sea salt or to taste
1 vegetable stock cube 
1/4 teaspoon freshly ground black pepper
1 teaspoon crushed red pepper
Small bunch fresh parsley
Large bunch fresh cilantro

4 spicy Italian sausages – approx. weight 11 1/3 oz or 320g

Method
Sauté the onion in a drizzle of olive oil until softened and translucent. Tip in the bulgur wheat and give the whole thing a good stir so the bulgur is coated with the oil and onions. 

Tip in the bulgur wheat and give the whole thing a good stir so the bulgur is coated with the oil and onions.

Add in the tomato passata or puree, the stock cube and the black pepper. 

Add in the tomato passata or puree, the stock cube and the black pepper.

Add 1 cup or 240ml water and the crushed red pepper to the mixture and, over a medium heat, bring it up to a slow simmer. 

Add 1 cup or 240ml water and the crushed red pepper to the mixture and, over a medium heat, bring it up to a slow simmer.

Put a lid on the pan and leave to simmer for about 10-15 minutes or until the bulgur wheat is al dente.  Test it occasionally, as you don’t want it to overcook and turn to mush. 

While the stuffing simmers, remove the sausage from its skin and pan-fry it in a skillet, breaking it apart into crumbles. You want it well-browned and crispy in places. Remove from the heat and drain. 

While the stuffing simmers, remove the sausage from its skin and pan-fry it in a skillet, breaking it apart into crumbles. You want it well-browned and crispy in places

When the bulgur wheat is done, stir in the 1/4 cup or 60ml olive oil and taste for salt. Add salt as needed. I rarely do as the stock cubes has enough salt for us.  

Mince the stems of your parsley and cilantro and chop the leaves. Add both to the stuffing and stir well.  

Mince the stems of your parsley and cilantro and chop the leaves. Add both to the stuffing and stir well.

Cut the gem squash in halves and scoop the seeds out. 

Cut the gem squash in halves and scoop the seeds out.

Preheat your oven to 350°F or 180°C. (Or at this point, the filled squash can be kept in the refrigerator until you are ready to roast them.)

Put the gem squash in a tight fitting pan. Fill four of the gem squash halves with the bulgur wheat stuffing.
 
Put the gem squash in a tight fitting pan. Fill four of the gem squash halves with the bulgur wheat stuffing.

Mix the balance of the stuffing with the browned Italian sausage crumbles. 

Mix the balance of the stuffing with the browned Italian sausage crumbles.

Fill the other four squash halves with the mixture. 

Fill the other four squash halves with the mixture.

Drizzle on a little olive oil and roast the stuffed squash in your preheated oven for about one hour or until the squash are softened enough for your liking. Check part way through and cover the tops with foil if they are browning too much.

Depending on how old your gem squash are, you might be able to eat the skin. If not, serve each with a spoon so your diners can scoop the flesh out with bites of the stuffing. Delicious! 

Food Lust People Love: Roasted Stuffed Gem Squash filled with herby, tomato-ey bulgur wheat is a thing of beauty and deliciousness but you can also kick it up a notch with the addition of Italian sausage.

Enjoy!

It’s Sunday FunDay and today, as I’m sure you can guess from the list below, we are all sharing winter squash recipes. Many thanks to our host, Wendy from A Day in the Life on the Farm


We are a group of food bloggers who believe that Sunday should be a family fun day, so every Sunday we share recipes that will help you to enjoy your day. If you're a blogger interested in joining us, just visit our Facebook group and request to join.

Pin these Stuffed Gem Squash! 

Food Lust People Love: Roasted Stuffed Gem Squash filled with herby, tomato-ey bulgur wheat is a thing of beauty and deliciousness but you can also kick it up a notch with the addition of Italian sausage.
 
.