Monday, May 29, 2017

Crawfish Pie Muffins #MuffinMonday


Crawfish pie muffins are not for the faint of heart. They have a half cup of melted butter, a full cup of peeled crawfish with fat included, and a little cayenne for zip. On the other hand, I've also included one cup of iron-fortified quick grits and some fresh green onions.


Every year when I come home for a visit in the spring, boiled crawfish are at the top of my list of Things I Want to Eat. We like to buy them live and cook them ourselves because we can season them to our taste but most importantly, because they are substantially cheaper that way. They are sold by the sack and you have to buy the whole thing (usually between 30-40 pounds) because stores won't divide them. This year the price is $1.97/lb, which is pretty darn good. Deliveries are only made on Friday, Saturday and sometimes Sunday so I plan my trips accordingly. I need at least one weekend here to take advantage.

Last Friday, I bought a 35 lb sack and boiled them in three batches. It was just my elder daughter, my mother and me so we ate till we couldn’t eat any more and, of course, there were plenty, I mean PLENTY, of leftovers. I ate cold boiled crawfish (delicious!) on Saturday. And on Sunday my mom came over and we both ate lots more. Then I peeled a bunch and made these tasty crawfish pie muffins. And there are still crawfish in my refrigerator! I don’t think I could ever get tired of eating boiled crawfish but this is going to be the test.

Meanwhile, the muffins turned out perfectly. The cooked grits add great flavor and texture, kind of a little like cornbread but with a much softer crumb.

Ingredients 
2 cups or 250g all-purpose flour
1 cup or 170g cooked, peeled crawfish, with fat
Small bunch green onions, just the green parts, chopped
1 1/2 teaspoons baking powder
1 teaspoon fine sea salt
1/4 teaspoon cayenne
2 large eggs
3/4 cup or 360ml milk
1/2 cup or 113g butter, melted and cooled, plus extra for greasing pan
1 cup or 242g cooked grits, cooled

Method
Preheat your oven to 350°F or 180°C. Lightly grease 12-cup muffin pan with butter.

Measure your flour, baking powder, salt and cayenne into a large mixing bowl, along with the green onions and peeled crawfish. Mix well to combine and coat the crawfish with the seasoned flour.


Whisk the eggs together with the cooled grits. Add in the butter and milk and whisk again.


Pour the liquid ingredients into the dry ones and stir until just mixed together.


Spoon the batter into the prepared muffin pan and bake for 25-30 minutes or until the muffins are baked through and golden on the outside.

Enjoy!


Check out all the lovely muffins my Muffin Monday bakers have for you today!


#MuffinMonday is a group of muffin loving bakers who get together once a month to bake muffins. You can see all our of lovely muffins by following our Pinterest board.

Updated links for all of our past events and more information about Muffin Monday, can be found on our home page.

.

Sunday, May 28, 2017

Grilled Red Snapper with Cilantro and Onion Stuffing or حمراء مشوية مع حشوة

Grilled red snapper is a deliciously easy dish, cooked over a charcoal fire. The snapper stays moist of you grill with the scales on - and flavor is added - when you fill it with cilantro and onion stuffing, a traditional recipe from my current home, the United Arab Emirates.


I grew up with a father that fished and hunted so I am not unfamiliar with guts and eyeballs on foodstuff. But honestly, the first time I remember seeing a whole fish on a plate was probably when I was 10 or 11 years old, visiting Daddy in Venezuela or Peru and my stepmother not only ordered a whole fish but she popped out the eyeball and ate it with relish saying it was a delicacy.  Needless to say, as a child, I was repulsed. It didn’t stop me from enjoying the rest of the fish though!

Then when we lived in Abu Dhabi back in late Eighties and I was the editor at a small publishing house, my boss was an Omani gentleman who taught me that the sweetest part of the fish was the cheek, which is found behind the eye in a little pocket.  I always go for that little piece first because he was so right. (Thanks, Saleh!) If you’ve never cooked a whole fish, I’d like to encourage you to try it.  There is no way a fish filet can be as tasty as a whole fish cooked on the bones.  If the eyes really offend you, get your fish guy to cut off the head, but leave the rest of the fish intact.

Our theme is grilling this week but I wanted especially to make something from the United Arab Emirates, since this is home right now.  This recipe comes to me from a fellow Texan who married an Emirati and moved to the UAE.  Her blog is filled with delicious local fare, with complete explanations and photos, and is a treasure trove of ideas for anyone interested in Emirati cooking.  MaryAnn is a sweetheart and I am grateful to her for her advice and expertise.  You can find her blog at Emiratican Kitchen. She hasn't updated in a while because she is a beautiful seamstress and that has become her focus. but the recipes are all still there. If you leave her a comment, please tell her Stacy sent you.

In Arabic, red snapper is hamra, grilled is meshwiya and stuffing is hashwa, so this is hashwa meshwiyah m’a hashwa or as MaryAnn put it more simply, grilled hamra with hashwa.  Whatever you call it, it is delicious!  For her recipe, I was supposed to use a large red snapper of one kilo or about 2.2 pounds, but sometimes those are hard to come by.  I substituted two smaller snappers so the cooking time was much shorter.  And since we were just two eating that night, I ended up freezing the second one. It made a beautiful dinner another night.

Grilled Red Snapper with Cilantro and Onion Stuffing


Grilling a whole fish with scales on keeps it from sticking to the hot grill.  Stuffing it with onions, cilantro and spices infuses the whole fish with lovely flavors and keeps it from drying out on the grill.

Ingredients
Hamra (Red Snapper) 2 lbs plus or 1 kg - or larger (Whole – do not scale or trim fins)

For the stuffing:
1 medium-sized onion
1 medium-sized green bell pepper
2-3 cloves of garlic
1 thumb-sized knob fresh ginger
1 bunch cilantro or fresh coriander
1/4 cup or 60ml extra virgin olive oil
1 heaped teaspoon turmeric
1 teaspoon sea salt flakes
1/4 teaspoon ground black pepper
1 teaspoon cumin powder

Method
Gut the fish from the belly to leave a space for the stuffing.  (I let the fish guy at my local market do this job for me.)  Make sure to leave the scales on so the fish won’t stick to the grill.

Chop your onion and bell pepper finely.  Peel and mince your garlic and ginger.  Wash your cilantro thoroughly and trim off the end hard woody ends of the stems.  Chop the stems of the cilantro very finely and then chop the leaves roughly.


In a medium-sized bowl, thoroughly mix the onion, bell pepper, cilantro, garlic and ginger with all of the spices and the olive oil.


Fill the cavity in the fish with the stuffing.


Using a large needle and some kitchen string (I used poultry string, normally used for trussing a chicken for roasting) sew sides of the fish belly back together.  (I could not find my large needles, so I used an ice pick to poke the holes.  Then I put the stuffing in and tied the knots.)

Tie knots as you go to make sure the sewing is secure.


Meanwhile, light your fire in the barbecue pit.  When the coals are light grey all around the edges, they are ready.

Place the fish on the grill and put the cover on the pit with a little opening to make sure there is enough air getting in so you don’t smother the coals.

Cook for about 10-12 minutes on each side, ideally turning only once so your fish doesn’t fall apart.   If you are fortunate to find a larger fish, MaryAnn says to cook it for 30 minutes on each side.


Put a knife in at the thickest part and look at the bones to make sure the fish is cooked all the way down.  When the fish meat is completely white and opaque, the fish is done.


To serve, peel the charred skin and scales off with a knife and lift the meat off the bones.


Lift the meat off the bones with a knife or spatula. 
Lift the bones off to get to the other side. 
Traditionally, MaryAnn says this is served with white rice and fresh greens.  I didn’t take a photo of it, but we topped the fish with a little of the stuffing and it was delicious.


Enjoy!

 Easy BBQ Recipes

Best Burgers and Sandwiches

Grill Master Mains

Mop Worthy Sauces

Searing Starters and Sides

Sizzling Sweets


Sunday, May 21, 2017

Chorizo and Date Skewers - Brochetas de Chorizo y Datiles

Chorizo and date skewers or brochetas de chorizo y datiles are a fabulous combination of sweet and salty, rich and chewy. Best of all, they are simple and quick to put together.


A couple of months back we were in Atlanta for our nephew’s wedding. We arrived a couple of days early, thinking it would give us time to recover from the trip and also to spend some time with the relatives.

That first night we dropped our bags off at our hotel before heading to dinner at Eclipse de Luna, a tapas restaurant and one of their favorite places. My sister-in-law insisted upon ordering two plates of these little beauties because she wanted a whole skewer to herself. They are that good. The best part is that they are so simple to make at home.

This weekend I am in Orlando attending the fifth annual Food Wine Conference. I’m looking forward to all of the delicious food and the informative sessions but the best part is always the company of my colleagues at the Sunday Supper Movement and my fellow bloggers.

Just like last year, on Sunday evening we will gather for the last time at Tapa Toro, a lovely Spanish tapas restaurant for our live Twitter chat. For those of you who won’t be joining us, we thought it would be a good idea to share some tapas recipes, like these chorizo and date skewers. Scroll down to the bottom for more details.

Chorizo and Date Skewers or Brochetas de Chorizo y Datiles

Ingredients
9 3/4 oz or 275g Spanish chorizo, skin removed -  I like the extra picante.
12 Medjool dates, pitted
6 slices smoked bacon
1 3/4 oz or 50g blue cheese

Also needed:
6 wooden or metal skewers
6 toothpicks

Method
Preheat your oven to 375°F or 190°C.

Cut the chorizo into 18 pieces and line them up chorizo/date/chorizo/date/chorizo.


Poke the pointy end of the skewer through one end of the bacon and through one group of dates and chorizo.

Wrap the bacon around the end and secure it with a toothpick. Lay the chorizo and date skewers in a baking pan.


Bake in your preheated hot oven for about 10-12 minutes or until the bacon is cooked.


Remove from the oven and arrange two per plate on small saucers. Sprinkle with blue cheese crumbles.


Enjoy!

Many thanks to our event manager, Em, and this week's host, Christie of A Kitchen Hoor's Adventures for all of their hard work behind the scenes.

Small Starters

Pint-sized Protein

Demi-Desserts


Pin these chorizo date skewers! 


Sunday, May 14, 2017

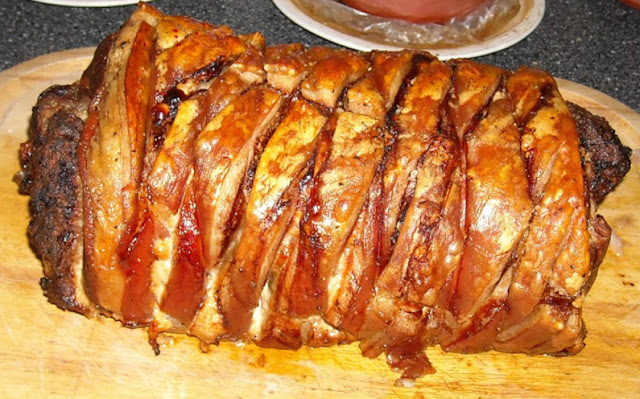
Double Pork Stuffed Pork Roast

Double Pork Stuffed Pork Roast is pork belly with crackling, stuffed with two pork tenderloins and sausage stuffing made with ground pork and Italian sausage. It's a feast of a beast, perfect for a huge family meal. Best of all, the leftovers make fabulous sandwiches.

Food Lust People Love: Double Pork Stuffed Pork Roast is pork belly with crackling, stuffed with two pork tenderloins and sausage stuffing made with ground pork and Italian sausage. #SundaySupper

This week our Sunday Supper tastemakers are sharing their favorite meal ideas for Mother's Day. I made this double pork stuffed pork roast for my mom a while back and she actually took these photos. I can promise you that this was one of her favorite meals, especially the leftovers, which she used to make pork roast sandwiches, slathered in mayo. Another of her favorite things.

I'm not going to give specific weight amounts for his double pork stuffed pork roast since the size of your half pork belly and fillets will vary by the size of the pig. Likewise, if you have a favorite stuffing recipe, you can certainly use it instead. I will tell you that the total weight of all the meat for my double pork stuffed pork roast was about 10 pounds or 4.5kg.

Ready to make this double pork stuffed pork roast? Let's go!


Ingredients
1 half pork belly, skin intact
2 pork fillets
About 2 lbs or 1kg pork stuffing
Sea salt flakes (like Maldon)
Fresh ground black pepper

For the stuffing:
1 medium onion, chopped
1 small green bell pepper, chopped
5-6 cloves garlic, minced
1 tablespoon olive oil
1 lb or 450g fresh hot Italian sausage
1 lb or 450g ground pork
Fine sea salt
Black pepper
Cayenne
1 cup or 60g fresh bread crumbs

Method
Sauté the onion, bell pepper and garlic in the olive oil, until they are just softened. Set aside to cool.

Remove the Italian sausage from the casing and mix it together with the ground pork. Add in the cooled vegetables and bread crumbs and mix thoroughly. Add a sprinkle of salt, (keeping in the mind that there is already salt in the Italian sausage) a good couple of grinds of black pepper and a 1/4 to 1/2 teaspoon of cayenne, depending on how much spice your family likes. Mix well and fry a teaspoon of the mixture till cooked through, to taste. Add more salt and pepper, if necessary.

Preheat your oven to 400°F or 200°C.

Start with the pork belly laying it flat on a cutting board and score the skin diagonally both ways so the pieces can crisp in the oven. The crackling is divine!

Turn the belly over and spread it with the stuffing mixture. Lay the two fillets of pork in the middle, fat ends alternating, top to tail. Sprinkle each with some salt, black pepper and cayenne.

Food Lust People Love: Double Pork Stuffed Pork Roast is pork belly with crackling, stuffed with two pork tenderloins and sausage stuffing made with ground pork and Italian sausage.

Food Lust People Love: Double Pork Stuffed Pork Roast is pork belly with crackling, stuffed with two pork tenderloins and sausage stuffing made with ground pork and Italian sausage.


Then tie the whole thing in a roast-like shape, using baking twine or silicone bands. 


Food Lust People Love: Double Pork Stuffed Pork Roast is pork belly with crackling, stuffed with two pork tenderloins and sausage stuffing made with ground pork and Italian sausage.

Rub it liberally with sea salt and a good couple of grinds of black pepper.

Pop it in the preheated oven, lowering the temperature after 30 minutes to 300°F or 150°C. Cook for around three hours or until your thermometer registers 150°F or 65°C. (The safe internal temperature when ground pork is included in a recipe vs. a solid pork roast is 160°F or 72°C. The temperature will continue to rise as you let the roast rest.)

Let it rest, covered with a tent of foil for 10 minutes while you make the gravy from the pan drippings. (You may have to spoon off a lot of the grease first.)

Enjoy!


What are you Mother's Day plans? How about making something special for your mom? Check out this great list of dishes from our Sunday Supper tastemakers. Many thanks to our event manager, Cricket of Cricket's Confections and our event host, Amy from My World Simplified.

Sunday Supper Mother's Day Food Ideas

Chocolate Treats

Entrees

Sides and Salads

Sweets

Tuesday, May 9, 2017

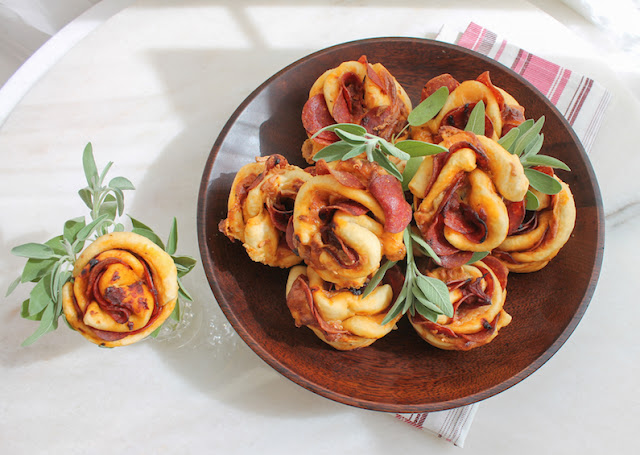
Cheesy Pizza Roses #BreadBakers

Cheesy pizza roses are the perfect Mother’s Day breakfast (or gift!) for moms who are fans of savory pepperoni pizza. After all, who doesn’t love fresh baked bread rolls?

Food Lust People Love: Cheesy pizza roses are the perfect Mother’s Day breakfast (or gift!) for moms who are fans of savory pepperoni pizza. After all, who doesn’t love fresh baked bread rolls? #BreadBakers

This month my Bread Bakers group is baking up breads inspired by flowers or Mother’s Day. A Google image search revealed all sorts of rose-shaped buns filled with jams but since my mom isn’t with me right now, I am going to have to eat these rolls myself. And I much prefer savory fillings.

Plus, doesn’t the pepperoni make them look even more like roses? I think so!

Ingredients for 12 cheesy pizza roses
1 package (¼ oz.) active dry yeast (I use Fleishmann’s Rapid Rise.)
About 4½ cups or 560g all-purpose flour
1 teaspoon salt
1 1/2 cups or 355ml warm water
Olive oil
3/4 cup or 180ml pizza sauce
8 oz or 226g mozzarella cheese, grated
7 oz or 200g sliced pepperoni

Method
In a large bowl, combine yeast, 2 cups or 250g of flour and 1 teaspoon salt. In a microwaveable measuring pitcher or a saucepan, heat water until warm but not hot. With mixer at low speed, just blend water into dry ingredients.

At medium speed, beat two minutes, occasionally scraping bowl with rubber spatula. Beat in 1/2 cup or 60g of flour to make a thick batter.  Beat two minutes more.

Stir in about 1 1/2 cups or 190g of flour to make a soft dough.  Knead dough by hand or with a bread hook for a few minutes.

Pour a little olive oil in the bowl and put the dough in to rest for 15 minutes (if using Rapid Rise yeast) or to rise for 30-45 minutes (if using regular yeast) covered with a damp cloth.

Note: If you want to bake these fresh in the morning, you can punch the dough down and rest it overnight in the refrigerator at this point. Cover the bowl in cling film so it doesn't dry out.

Punch the dough down and shape it into a round disk. Use a sharp knife to cut it into 12 equal pieces.


Shape each piece into a round dough ball.


Preheat your oven to 350ºF or 180ºC and lightly grease a 12-cup muffin pan with olive oil.

Use a rolling pin to flatten each ball out into a circle and cut it as shown (pic 1) with the tip of your sharp knife. Spread a couple of teaspoons of pizza sauce on the dough and sprinkle on some grated mozzarella. Add two pepperoni slices to one side of the cross and fold the dough up and around the pepperoni. (pic 2) Do the same to the opposite side, this time wrapping the corners of the dough around the first side. (pic 3) Repeat with the third side. (pic 4)


Finally, add two slices of pepperoni to the fourth side and bring it up and around the others. Pinch the edges to get it to stick.


Tuck the pizza rose into your greased muffin pan. Repeat the process until all the pizza roses are made. Top each with an extra teaspoon of the pizza sauce in the middle.


Bake in the preheated oven for about 25-30 minutes or until the rolls are golden brown and puffy. Remove from the oven and allow to cool for 10-15 minutes. Complete cooling on a wire rack.


Enjoy!

Food Lust People Love: Cheesy pizza roses are the perfect Mother’s Day breakfast (or gift!) for moms who are fans of savory pepperoni pizza. After all, who doesn’t love fresh baked bread rolls? #BreadBakers

Many thanks to our host this month, Julie at Hostess At Heart. Check out the rest of the lovely flower or Mother’s Day inspired breads we have for you today!
BreadBakers
#BreadBakers is a group of bread loving bakers who get together once a month to bake bread with a common ingredient or theme. You can see all our of lovely bread by following our Pinterest board right here. Links are also updated after each event on the #BreadBakers home page.
We take turns hosting each month and choosing the theme/ingredient.

Pin it! 


Food Lust People Love: Cheesy pizza roses are the perfect Mother’s Day breakfast (or gift!) for moms who are fans of savory pepperoni pizza. After all, who doesn’t love fresh baked bread rolls? #BreadBakers
.

Sunday, May 7, 2017

Red Camargue and Wild Rice Salad with Tuna

This easy, healthy Red Camargue and wild rice salad is made with red Camargue and wild rice, yellow peppers and avocado. Serve it on your favorite mixed greens, topped with well-seasoned seared fresh tuna. It's light and refreshing but makes a satisfyingly filling meal.

All too often when I think of rice and dinner, it’s usually basmati or risotto that springs to mind. But occasionally, when my protein is unusual, like spice-encrusted tuna, something with more verve and bite is needed.

Always on the lookout for new and unusual starches, I brought home a bag of red Camargue and wild rice mix from my local Spinney’s grocery store the other day. Wild rice, I’m familiar with but I had never heard of red Camargue. Turns out that it is a new breed (type? species? variety?) of rice that is being cultivated in the south of France in an area called, not surprisingly, Camargue.

A little quick research reveals that the Camargue region of Provence grows a wide variety of rice, of which the red is only one, and it produces 75 percent of all the rice grown in France. Who knew? What I do know is that its nutty flavor and chewy texture make a beautiful rice salad. Add some greens and spice-encrusted seared tuna to make it into a meal.

This week my Sunday Supper friends are sharing summer dinner salads, salads that make a full meal. Since it's so hot in Dubai during the summer, we eat dinner salads a lot. We call them fancy salads and, in addition to the vegetables and greens, they must contain three more things: cheese, nuts and fruit. Occasionally meat is added, usually something off the grill like chicken or beef. This red Camargue and Wild Rice Salad with Tuna doesn't fulfill those standards of fancy salad, but it sure is pretty and delicious.

NOTE on cooking red Camargue and wild rice: I’ve learned from experience that colored rice, in general, needs a much longer cooking time than white rice, so I cooked this stuff in a big pot of salted boiling water, much as you would pasta, checking a grain or two periodically after 20 minutes, until the rice reached an acceptable cooked, yet still chewy, texture, which took closer to 30 or 35 minutes. Then I turned the fire off, strained off the water and put the rice back in the hot pot with the lid tightly closed for another 10-15 minutes.

Ingredients
For the salad:
1 1/2 cups cooked rice mix (about 4 1/2 oz or 125g before cooking)
2 tablespoons white balsamic vinegar
2 tablespoons olive oil
Small handful green onion tops
Small handful cilantro or fresh coriander
1/2 small yellow bell pepper or capsicum
Sea salt
Black pepper
Mixed greens of your choice
1 ripe avocado, plus extra to serve, if desired

For the tuna:
2 tuna steaks – about 9 oz or 255g each
1 teaspoon cumin
1 teaspoon brown mustard seeds
1 teaspoon fennel
1 teaspoon coriander
1 teaspoon sea salt
1/2 teaspoon mixed peppercorns
1/2 teaspoon crushed red pepper
2 tablespoons whole grain mustard
2 tablespoons olive oil – plus more for the frying pan

Method
Cook your rice mix as described above or according to your package instructions. Set aside to cool.

Roughly chop your green onion tops and cilantro. Cut your bell pepper into small, skinny strips.

Put your balsamic vinegar and olive oil in a bowl big enough to hold the whole salad. Add in the bell pepper slices and a good pinch of sea salt and a good couple of grinds of fresh black pepper.  Mix well.


Once the cooked rice is cool, add it to the bowl.


Add in the onion tops and cilantro and give the whole thing a good stir. Set aside and get on with the tuna.


Lay your tuna steaks out between paper towels to dry.


Use a mortar and pestle to grind the spices finely.

The pink is Himalayan sea salt.  Use any sea salt you have. 


Mix the whole grain mustard thoroughly with the olive oil.


Spread half of the mustard mixture on one side of the tuna steaks and then sprinkle with half of the spice mix.


Put the tuna on a piece of cling film, which will make it easier for you to flip it over into the frying pan.  Repeat the seasoning on the other side, first mustard, then spices.


Heat a non-stick frying pan until it is very hot and then drizzle in a little olive oil.  Cook one side of the tuna for just a couple of minutes before turning it to the other side.


Watch the side of the tuna and you can see the cooked part coming up.  You want to leave a good amount of pink still in the middle.

Sear the other side for just a minute or two and then remove from the pan and allow to rest for a few minutes.


Slice into thin pieces with a serrated knife, using a sawing motion so you don't mash the tuna.


Right before serving, peel and chop your avocado and fold it into the salad.


This tasty rice salad makes a full meal, heaped on some leafy greens with extra avocado, if desired, and topped with the fresh spice-encrusted tuna steak.


Do you love serving dinner salads when it's hot outside too? You are going to want to pin each of these Sunday Supper Summer Dinner Salad recipes. Summer is nigh!

Many thanks to our event manager, Em, and our event host Christie from A Kitchen Hoor’s Adventures for all of their behind-the-scenes work!

Sunday Supper Summer Dinner Salad Recipes

Brilliant Beef Salads

Choice Chicken Salads

Superb Seafood Salads

Vibrant Veggie Salads


Pin it!  

.