Monday, April 29, 2024

Strawberry Jam Muffins #MuffinMonday

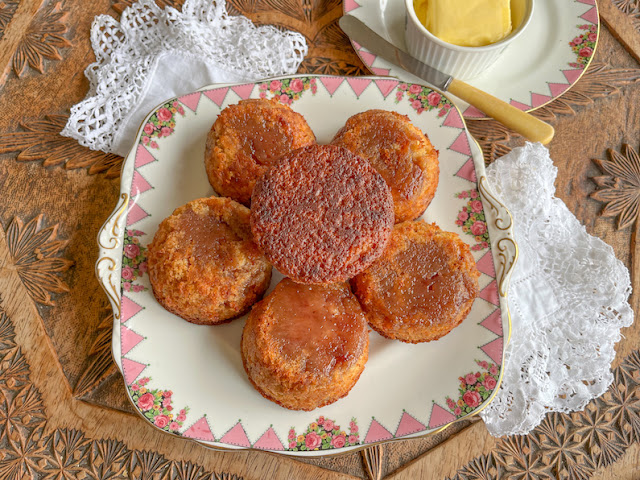
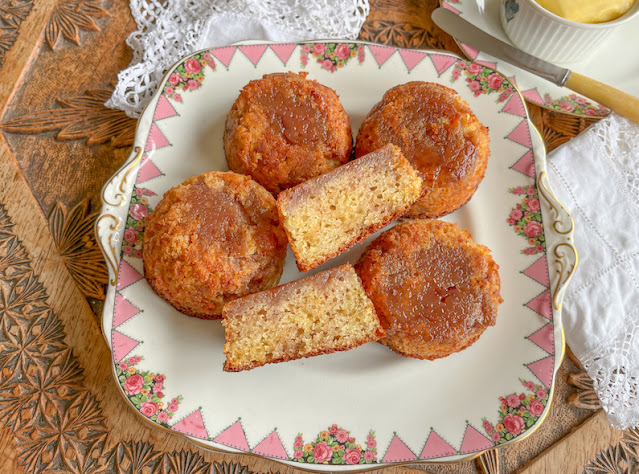
Sticky jam turns these strawberry jam muffins into the most delightful treat you’ll want to serve upside down, since the jam bakes on the bottom! 

Food Lust People Love: Sticky jam turns these strawberry jam muffins into the most delightful treat you’ll want to serve upside down, since the jam bakes on the bottom!

This upside down muffin recipe happened purely by accident but OMG, it was a happy accident, perhaps not quite as important as the discovery of penicillin, post-it notes or Teflon, but definitely more delicious. 

I have to admit that at first I was horrified thinking that the muffin was raw on the bottom. Nope, it was just stuck to the pan a little because of the jam falling to the bottom of the muffin batter. A small jiggle all around with a spatula soon loosened it and that’s when I discovered how lovely they were. 

A good friend came by just after I’d baked them so I sent him on his way with one. He came back today to ask exactly what it was that I had given him because it was SO GOOD. "An upside down muffin!" I exclaimed. Personally, I ate two back-to-back. No kidding. 

Strawberry Jam Muffins (Small Batch)

This recipe makes six regular sized muffins but it is easily doubled to make 12. Make sure to grease your muffin pan well with some canola oil. I pour a little in one or two of the muffin cups then use a pastry brush to make sure the bottom and sides are coated.

Ingredients for six muffins
1 cup or 125g flour
2/3 cup or 132g golden caster sugar (sub regular sugar if you can't find the golden)
1/2 teaspoon baking powder
1/4 teaspoon baking soda
1/4 teaspoon fine sea salt
1/2 cup or 120ml minus 1 tablespoon milk (*instructions below)
1 tablespoon lemon juice
3 tablespoons or 45ml canola or other light oil, plus extra for oiling the pan
1 large egg
1/4 cup or 70g strawberry jam, plus a little extra for topping, if desired

*Put your lemon juice in a measuring vessel and then add milk up to the 1/2 cup or 120ml mark. Set aside.

Method
Preheat oven to 350°F or 180°C. Generously grease cups and top of a 6-cup muffin pan or just 6 cups of a bigger muffin pan.

Whisk your flour, sugar, baking powder, baking soda and salt together in a large bowl.


In another bowl, whisk together your soured milk, oil and egg.


All at once, add the wet ingredients to the dry. 


Gently fold just until dry ingredients are moistened. There may be little bits of flour showing and that's just fine. Spoon the strawberry jam on to the batter.


Gently swirl it in. You want ribbons of jam, not a homogenous batter. Unless you personally want a homogeneous batter. I am not here to tell you how to live your life.


Divide your batter relatively evenly between the 6 greased muffin cups. Top with a little more jam on each one.


Bake the muffins for 22-27 minutes in your preheated oven, or until they are golden on top and a toothpick comes out clean.

Remove the pan from the oven and let the muffins cool for a few minutes on a wire rack. 


Run a spatula around the sides and loosen the bottom to remove the muffins from the pan and put them onto the wire rack. I put mine top down so they flattened a bit. Still light and fluffy inside. And, oh, that glorious sticky bottom. 

Food Lust People Love: Sticky jam turns these strawberry jam muffins into the most delightful treat you’ll want to serve upside down, since the jam bakes on the bottom!

Enjoy!

It's the last Monday of the month so that means it's time to celebrate Muffin Monday once again. Check out the lovely recipe links below:

#MuffinMonday is a group of muffin loving bakers who get together once a month to bake muffins. You can see all of our lovely muffins by following our Pinterest board. Updated links for all of our past events and more information about Muffin Monday can be found on our home page.


Pin these Strawberry Jam Muffins!

Food Lust People Love: Sticky jam turns these strawberry jam muffins into the most delightful treat you’ll want to serve upside down, since the jam bakes on the bottom!

 .

Sunday, April 28, 2024

Quiche Lorraine Filled Portabella Mushrooms

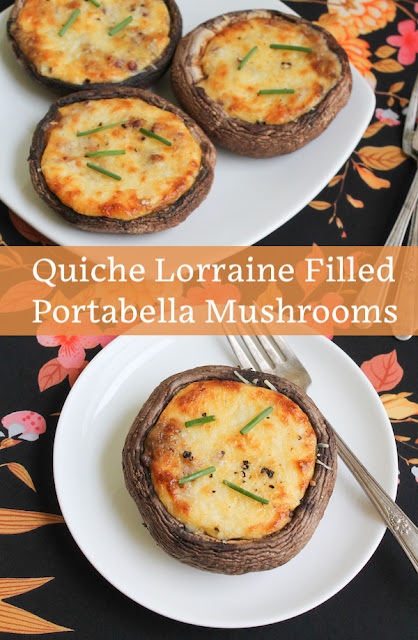
Who needs a crust when garlicky mushrooms fulfill that role gorgeously in these Quiche Lorraine filled Portabella Mushrooms with Gruyère cheese and bacon! 

Food Lust People Love: Who needs a crust when garlicky mushrooms fulfill that role gorgeously in these Quiche Lorraine filled Portabella Mushrooms with Gruyère cheese and bacon?!

It’s not often that I find four reasonably equal large portabella mushrooms so when I do, I like to make a recipe that puts them center stage. I can’t bear to cut up such beautiful specimens and destroy their perfect shape and size. 

While I’ve made quiche Lorraine, that typical French recipe with bacon and Gruyère cheese, feel free to substitute your favorite cheese and perhaps ham, chicken or a cooked vegetable for the bacon.

Quiche Lorraine filled Portabella Mushrooms

I use store-bought already cooked bacon crumbles here but you can certainly fry up two or three strips of bacon then chop them with a sharp knife. These make a special first course or side for any meal. We actually ate them this time as a main course with salad and steamed baby broccoli on the side. A lovely meal!

Ingredients
4 large portabella mushrooms
2 cloves garlic
Olive oil
Fine sea salt
Freshly ground black pepper
1 egg
1/4 cup or 60ml cream
1/2 cup or 50g Gruyère cheese, grated, plus extra for topping
1/4 cup or 30g crispy bacon crumbles
Optional garnish: chopped chives

Method
Preheat your oven to 410°F or 210°C. 

Cut the stems off of the mushrooms, discarding any hard ends. If you have a vegetable stock bag in the freezer, pop the rest of the stems in there. 


Mince the garlic. Put the mushrooms cap side up in a baking pan.  Add the garlic and a drizzle of olive oil. Sprinkle lightly with salt and pepper. 


Roast in the hot oven for about 10-12 minutes. 

Meanwhile, in a mixing bowl, whisk the egg and add the cream. 


Stir in the grated cheese and bacon crumbles. 


Remove the filled mushrooms from the oven and leave to cool for about five minutes. 


Divide the quiche filling between the mushroom and sprinkle with a little extra grated cheese and some black pepper. 


Bake for 8-10 minutes or until the filling is just setting. Turn your oven on to broil for a few minutes to brown the tops. Keep a very close eye on the filling to make sure it doesn’t burn. 


Leave to set for a few minutes then garnish with a few chopped chives, if desired. Serve warm or at room temperature. 

Food Lust People Love: Who needs a crust when garlicky mushrooms fulfill that role gorgeously in these Quiche Lorraine filled Portabella Mushrooms with Gruyère cheese and bacon?!

Enjoy! 

It’s Sunday FunDay and today my blogger friends and I are sharing mushroom recipes! Check out the links below:


We are a group of food bloggers who believe that Sunday should be a family fun day, so every Sunday we share recipes that will help you to enjoy your day. If you're a blogger interested in joining us, just visit our Facebook group and request to join.


Pin these Quiche Lorraine Filled
Portabella Mushrooms!

Food Lust People Love: Who needs a crust when garlicky mushrooms fulfill that role gorgeously in these Quiche Lorraine filled Portabella Mushrooms with Gruyère cheese and bacon?!

 .

Tuesday, April 23, 2024

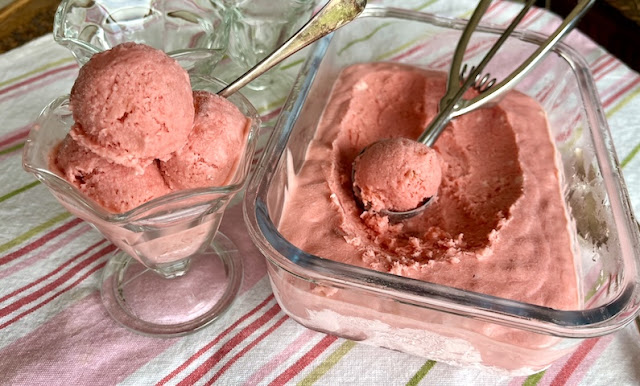
Raspberry Rhubarb Ice Cream

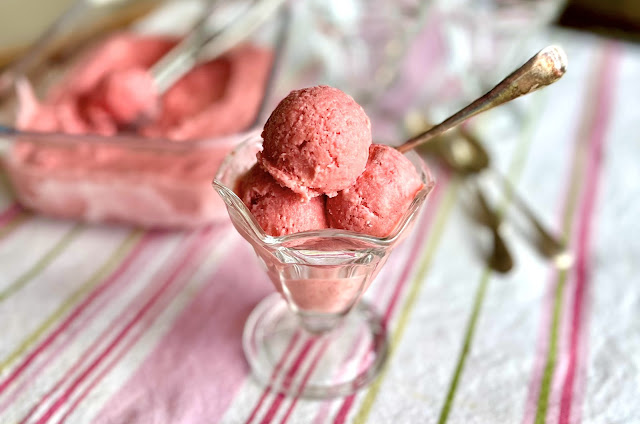
This Raspberry Rhubarb Ice Cream is so easy to make, rich and creamy, tangy and full of flavor. It’s the perfect taste of summer. No churning required! 

Food Lust People Love: This Raspberry Rhubarb Ice Cream is so easy to make, rich and creamy, tangy and full of flavor. It’s the perfect taste of summer. No churning required!

I’ve mentioned here before about the delicious. magazine group I belong to, a disparate group of women, brought together on What’s App by one of the delicious. team, who have now become firm friends. 

And like many friends, we lead each other into temptation! Cookbooks are a particular weakness many of us share and when one of our number mentioned that she makes ice cream all the time from a vintage book she owns, we all scurried to find a copy online to order. 

Of course, this then required the creation of yet another What’s App group called Ice Maidens where we share photos of our ice cream. I fully expect that group to ramp up production as the weather heats up! Watch this space if you love no-churn ice cream.

Raspberry Rhubarb Ice Cream

This is mash up of two recipes from the vintage cookbook Ices Galore by Helge Rubinstein and Sheila Bush. If you love easy ice creams, sorbets, etc. that do not need an ice cream maker to create, look for a copy of this book online. It’s a small paperback packed with great frozen treats.

Ingredients
312g or 11 oz rhubarb, trimmed
1 cup or 225g sugar
5 1/2 oz or 156g raspberries
1 cup or 240ml double or whipping cream
1/4 teaspoon cream of tartar
Optional: 2 tablespoons gin infused with strawberry

Method
Cut the trimmed rhubarb into 1 in or 2 cm pieces.


In a pot with a lid, cook the rhubarb down with the sugar until it is soft, stirring occasionally. Do not add any water. Depending on your rhubarb, this should take about 20-25 minutes.


Remove the lid and set the rhubarb aside to cool. 


Puree the raspberries and push them through a mesh sieve. Discard the seeds.


Add the raspberries to the rhubarb. Stir well. 


Once the rhubarb and raspberry are cool, stir in the strawberry infused gin, if using, 


Whip the cream to soft peaks, sprinkling in the cream of tartar as you go. The cream of tartar helps stabilize the cream.


Gently fold the fruit through the whipped cream. 


Put it in the freezer for 3-4 hours or until it’s beginning to set. 


When the mixture is beginning to set, beat well. 


Transfer to a freezer safe container with a lid and replace in freezer.
 

Freeze till completely set. 

Remove from the freezer shortly before serving. 


Scoop to serve.

Food Lust People Love: This Raspberry Rhubarb Ice Cream is so easy to make, rich and creamy, tangy and full of flavor. It’s the perfect taste of summer. No churning required!

Enjoy! 

I'm a little late joining the group but this is the10th edition of the 2024 Alphabet Challenge, brought to you by the letter I. Many thanks to Wendy from A Day in the Life on the Farm for organizing and creating the challenge. Check out all the I recipes below:


I: Raspberry Rhubarb Ice Cream - today's post! 


Pin this Raspberry Rhubarb Ice Cream! 

Food Lust People Love: This Raspberry Rhubarb Ice Cream is so easy to make, rich and creamy, tangy and full of flavor. It’s the perfect taste of summer. No churning required!

.


Sunday, April 14, 2024

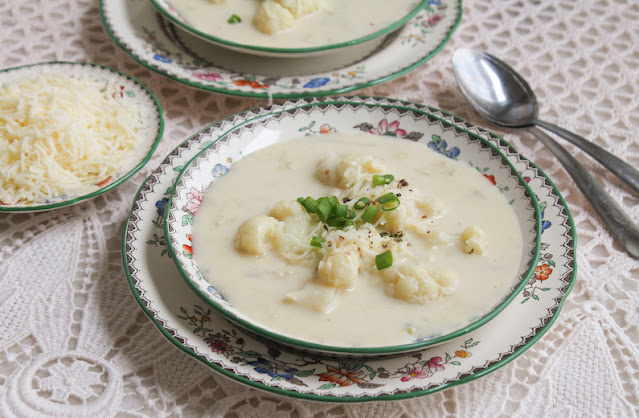
Creamy Cheddar Cauliflower Soup (Instant Pot)

This Creamy Cheddar Cauliflower Soup is the perfect savory bowl, made with extra sharp cheddar and chicken broth. And it’s quick to cook in an Instant Pot! 

Food Lust People Love: This Creamy Cheddar Cauliflower Soup is the perfect savory bowl, made with extra sharp cheddar and chicken broth. And it’s quick to cook in an Instant Pot!

One of my husband’s all-time favorite dishes is baked cauliflower cheese so I knew this soup would be an instant hit. I was not wrong. The best part is that it is simple and, cooked in an Instant Pot, it takes hardly any time at all. 

I like to serve it with extra extra sharp cheddar on top, which endears it even more to my cauliflower cheese loving spouse. 

Creamy Cheddar Cauliflower Soup

This easy Instant Pot recipe is super flexible. If your cauliflower is a bit bigger or smaller, no worries. I give the weight of mine below, just as a guide. This recipe is adapted from one on Faith Hope Love and Luck Survive Despite a Whiskered Accomplice.

Ingredients
1 head cauliflower (about 2 lbs 7oz or 1100g, whole)
2 tablespoons unsalted butter
1 tablespoon olive oil
1/2 large onion, peeled
2 small stalks celery
1/2 cup or 63g all-purpose flour
5 cups or 1185ml chicken stock, divided
1 teaspoon Colman’s mustard powder
1/2 teaspoon fine sea salt
1/2 teaspoon freshly ground black pepper
1/2 teaspoon cayenne
1 1/2 cups or 360ml milk
1/2 cup or 120ml heavy cream
6 oz or 170g extra sharp cheddar, grated, plus extra for serving, if desired
1 tablespoon cornstarch

Optional for garnish: chopped green onions

Method
Trim all the green leaves off of the cauliflower and cut the head into small florettes. Finely chop the stalks. 


Finely dice the onion and celery. 


Place the butter and olive oil in your Instant Pot on the sauté normal setting. 

When the butter is melted, add the onion, celery and chopped cauliflower stalks to the pot and sauté for about 5 minutes, stirring often.


Add the flour to the pot and stir well to mix it into the softened vegetables. Cook for about 3 minutes, stirring constantly.


Slowly pour in half of the chicken stock, whisking constantly to avoid creating lumps. Whisk in the mustard, salt and both peppers. 


Add the cauliflower florettes to the Instant Pot and stir to coat with the stock and seasonings. 


Add in the rest of the stock.


Set the Instant Pot on for manual for 15 minutes. Immediately release the pressure by covering the valve with a towel and opening it carefully so you don’t get burned by the steam. 

Add the milk and cream into the pot, stirring well. 


Turn the Instant Pot on the sauté low setting and toss the grated cheese for the soup with the cornstarch to coat. 


Add the grated cheese a handful at a time, stirring well in between. Cook until the soup is warmed through and slightly thicker.


Serve with extra grated cheese for topping, if desired, and chopped green onions for garnish. 

Food Lust People Love: This Creamy Cheddar Cauliflower Soup is the perfect savory bowl, made with extra sharp cheddar and chicken broth. And it’s quick to cook in an Instant Pot!

Enjoy! 

It's Sunday FunDay and today we are sharing recipes made with cauliflower and broccoli, two of my favorite vegetables. Many thanks to our host, Sneha of Sneha's Recipe. Check out the links below:


We are a group of food bloggers who believe that Sunday should be a family fun day, so every Sunday we share recipes that will help you to enjoy your day. If you're a blogger interested in joining us, just visit our Facebook group and request to join.


Pin this Creamy Cheddar Cauliflower Soup!

Food Lust People Love: This Creamy Cheddar Cauliflower Soup is the perfect savory bowl, made with extra sharp cheddar and chicken broth. And it’s quick to cook in an Instant Pot!

 .

Wednesday, April 10, 2024

Crispy Bacon-wrapped Chicken Hearts

Marinated chicken hearts are tender, meaty morsels but added bacon kicks them up a notch to make crispy bacon-wrapped chicken hearts! These are so good. 

Food Lust People Love: Marinated chicken hearts are tender, meaty morsels but added bacon kicks them up a notch to make crispy bacon-wrapped chicken hearts! These are so good.

At least a couple of times a year, we celebrate what we call Brazil Night, usually for our daughters’ birthdays. The meal starts with caipirinhas to drink and includes grilled chicken hearts and picanha (the cap of the rump, a popular cut in Brazil that has finally made its way stateside, much to our delight), black beans, rice, farofa (toasted manioc flour) and molha, which is very similar to pico de gallo. 

While I wouldn’t mess with the simple marinated chicken hearts we grill on skewers for a Brazil Night, I’ve long wanted to try wrapping them in bacon, similar to one of our favorite Christmas Eve appetizers: Angels on horseback aka smoked oysters wrapped in bacon. 

I am here to report that they were wonderful! Tender inside with crispy bacon on the outside. Definitely going on the “would make again” list!

Crispy Bacon-wrapped Chicken Hearts

This makes a bunch of chicken hearts, about 50. My husband and I munched on these for a couple of days since we weren’t throwing a party needing appetizers and it’s just the two of us at home. Still, no regrets. They are that tasty.

Ingredients
1.15 lb or 500g chicken hearts
2 tablespoons fresh lime juice
1 tablespoon olive oil
1 teaspoon fine sea salt
Freshly ground black pepper
1 lb or 450g thin cut smoked bacon

Method
Use a sharp knife to trim the fatty ends off of the hearts. This first step is optional and I totally skip it for the skewered chicken hearts we will grill over hot coals because the fatty ends get crispy. 


However, when wrapped with bacon and roasted in the oven, those fatty ends can’t crisp up as much, so I did trim mine somewhat. You don't have to get every last piece of fat off, just the majority, if you choose to trim. 

In a mixing bowl, stir the hearts in the lime juice, olive oil, salt with a few generous grinds of black pepper. 


Cover and refrigerate for one hour. When the hour is up, preheat your oven to 400°F or 200°C. 

Cut the bacon slices in three and wrap one piece around each chicken heart, securing it with a toothpick. A little tip: If one end of the bacon piece is fattier than the other, roll up from the meatier side so the fat is on the outside and can crispy up more. 


Place them on a large lined baking pan. I hate cleaning baked on grease so I line mine first with foil, then a silicone liner. 


Bake in your preheated oven for about 20-25 minutes or until the bacon is crispy and golden.


Drain on paper towels.


Transfer the hearts to a plate to serve. A glass of chilled rosé goes beautifully with them.

Food Lust People Love: Marinated chicken hearts are tender, meaty morsels but added bacon kicks them up a notch to make crispy bacon-wrapped chicken hearts! These are so good.

Enjoy! 

Welcome to the 9th edition of our 2024 Alphabet Challenge being brought to you by the letter H. Many thanks to Wendy from A Day in the Life on the Farm for organizing and creating the challenge. Check out all the H sponsored recipes below:


H: Crispy Bacon-wrapped Chicken Hearts - today's post!


Pin these Crispy Bacon-wrapped Chicken Hearts!

Food Lust People Love: Marinated chicken hearts are tender, meaty morsels but added bacon kicks them up a notch to make crispy bacon-wrapped chicken hearts! These are so good.

 .

Tuesday, April 9, 2024

Fluffy Multigrain Pancakes #BreadBakers

Made with whole wheat flour, cornmeal and rolled oats, these fluffy multigrain pancakes are nutty and nutritious, as well as delicious.

Food Lust People Love: Made with whole wheat flour, cornmeal and rolled oats, these fluffy multigrain pancakes are nutty and nutritious, as well as delicious.

A few months ago my doctor told me that my bloodwork numbers weren’t great, in fact, she diagnosed pre-diabetes. Which frankly didn’t sound so much like a diagnosis as a warning. Shape up or pay the consequences later! 

Recipes like these fluffy multigrain pancakes are my small attempt to do better but the amazing thing is that I actually like them more than normal all white flour pancakes. They have so much more flavor! Not surprising, really, since I’ve always loved whole grain bread more than white. 


Fluffy Multigrain Pancakes

This recipe made 16 (4 in or 10cm) pancakes. Any leftovers can be reheated in a normal toaster which makes them a great option for busy weekday mornings. This recipe is adapted one from New York Times Cooking.

Ingredients
1 cup or 120g whole wheat/ wholemeal flour
¾ cup or 94g all-purpose flour
½ cup or 85g cornmeal
¼ cup or 30g rolled oats
1 tablespoon sugar
2 teaspoons baking powder
1/2 teaspoon baking soda
1/2 teaspoon fine sea salt
1 3/4 cups Greek yogurt 
1/2 cup or 120ml milk
3 large eggs
¼ cup or 60ml canola oil 

For greasing the pancake griddle: butter

For serving:
Butter
Your favorite syrup

Method
In a large bowl, mix together whole wheat flour, all-purpose flour, cornmeal, oats, sugar, baking powder, baking soda and salt. 


In a medium bowl, whisk together the yogurt and milk. Whisk in the eggs and canola oil. 


Pour the yogurt/egg mixture into the flour mixture and fold well until fully incorporated.


Heat a griddle or large cast-iron skillet over medium heat. You can check to see if it’s hot by sprinkling a few drops of water on the surface. They should sizzle and evaporate immediately.

You'll notice that the batter starts to get fluffy in the bowl as the yogurt reacts with the baking powder and baking soda. When you scoop it out to make the pancakes, try not to knock the air out by stirring. This ensures that the pancakes are lovely and light. 


Add a little butter to the griddle and let it melt. Use a 1/3 cup measure to make pancakes with the batter, leaving enough room between them so you can turn the pancakes easily.  The batter is very thick so you may need to use the edge of the measuring cup to pat it out gently into a circle. 


Cook until about 2-3 minutes or until the last pancake added to the pan is browned on the bottom. Flip the first one first and so on, then cook the pancakes until they are golden on the other side, 2 to 3 minutes. 


Either transfer to a plate as they finish and serve immediately with syrup and more butter on top, if you like. Or, if everyone wants to eat together, fashion a large pouch out of foil and pop the pancakes in as they are done. Fold it closed to keep them warm until the next batch is ready. 


Repeat with the remaining batter, adding more butter to the griddle or pan as needed. 

We are syrup heathens from the south so we use the Pearl Milling (used to be Aunt Jemima) butter light syrup instead of real maple syrup. You can use your favorite syrup and I won’t judge. 

Food Lust People Love: Made with whole wheat flour, cornmeal and rolled oats, these fluffy multigrain pancakes are nutty and nutritious, as well as delicious.

Enjoy! 

It’s the second Tuesday of the month so that means it’s time for my fellow Bread Bakers to share their creations. Our theme today is mixed grains bread! Many thanks to our host Karen of Karen’s Kitchen Stories. Check out the links below: 

#BreadBakers is a group of bread loving bakers who get together once a month to bake bread with a common ingredient or theme. Follow our Pinterest board right here. Links are also updated each month on this home page. We take turns hosting each month and choosing the theme/ingredient.


Pin these Fluffy Multigrain Pancakes!

Food Lust People Love: Made with whole wheat flour, cornmeal and rolled oats, these fluffy multigrain pancakes are nutty and nutritious, as well as delicious.

 .