Monday, September 30, 2013

Grand Marnier Orange Muffins #MuffinMonday


I am going to hazard a guess that most of my readers can walk into a grocery store or a liquor store and pick up a bottle of anything that suits their fancy, given the budget and an ID that says they are of age.  Here in Dubai, it’s not that simple.  When we arrived last November, my husband handed in his passport to the relevant authorities and waited almost three months for a resident’s visa.  Then the application process began to get a permit to buy alcohol.

I am not sure what the hold up was, but that was finally approved in June and handed over to him in August.  And it's only good for one year, expiring next June, of course.  He has a monthly spending limit and there are only a couple of businesses that are allowed to import and sell alcohol so you have to go to one of their outlets to shop.  And make sure you bring the permit card or alcohol license, as it is called here!

Up until this summer, we were stocking the bar with duty free purchases from when he traveled.  Now we are like real people who can go to the store and buy another bottle of wine when the urge hits.  Or when the weekend comes.  I’m sharing this little window into my world just to tell you that I used Grand Marnier in this recipe because, with a little skip and a jump, I can go into our bar now and find almost whatever I need for any recipe. Or go buy it.  Yay!

Since this week’s muffin ingredient is oranges, the orange liqueur intensified the flavor and made these muffins wonderful.  As they baked the whole house smelled like I was sitting in a citrus grove, basking in the warm sunshine.

Do you ever bake with liqueurs?  Please share your favorite additions by leaving a comment.

Ingredients
1 3/4 cups or 220g all-purpose flour
1/2 cup or 115g sugar
1 tablespoon baking powder
1/4 teaspoon salt
1/4 cup or 60ml Grand Marnier or other orange liqueur
1/2 cup or 120ml freshly squeezed orange juice
1/4 cup or 60ml sour cream
1 large egg
1/4 cup or 55g unsalted butter, melted and cooled
Zest of 1 orange

Optional but recommended – sugar to sprinkle on before baking.  (I used several tablespoons full.  Don’t be shy. When it bakes, the sugar makes a nice crunchy crust.)

Method
Preheat your oven to 350°F or 180°C and prepare your muffin pan by greasing it or lining it paper muffin cups.

In a large bowl, mix together the flour, the sugar, baking powder and salt.  Grate in the orange zest and stir well.


In another bowl, whisk together the Grand Marnier, sour cream, egg, melted butter and orange juice.


Pour your wet ingredients into the dry ingredients and fold them together until just mixed.


Divide the batter evenly among the muffin cups.


Top each muffin cup with a generous sprinkle of sugar.


Bake in the preheated oven about 20-25 minutes or until a toothpick inserted in the middle comes out clean.


Cool on a rack for a few minutes and then remove the muffins to cool completely.


Enjoy!


Sunday, September 29, 2013

Honeycomb Crunch Candy


When the theme for this week’s Sunday Supper was announced as Crunchy Goodness, I was in the midst of trying to decide on a flavor for my upcoming BundtaMonth cake where the theme is candy.  I was browsing the candy aisle of one of my local grocery store chains, the British import, Waitrose and nothing jumped out at me.  If you’ve been reading along for a while, or if you know me personally, you know that I don’t have much of a sweet tooth.  There are a couple of exceptions to this rule and they include all things caramel, especially if there is salt involved.  And suddenly, the solution came to me!  I could combine these two challenges by making crunchy honeycomb candy and then using it in a honey Bundt cake.  Win-win, right?  And to celebrate my personal triumph of ideas, I headed over to Tavola and bought myself a new Bundt pan.  Hey, any excuse for a new Bundt pan!  (Come back on 4 October when the cake will be unveiled!)

I researched my cookbooks using Eat Your Books and trawled through deep internet waters, looking for the perfect honeycomb recipe.   I finally settled on this one from Joy the Baker
but since it didn’t have honey, I substituted that for the corn syrup and changed the apple cider vinegar to white balsamic.  I decided to double the recipe – unnecessarily, as it turned out – to make sure we’d have enough to munch on and still have plenty for the cake.  One batch would have been sufficient.  But, working on the theory that one can never have too much honeycomb crunch candy, I have no regrets.  Store anything that is not consumed immediately in the freezer or refrigerator, well-sealed, with the layers of candy separated by parchment paper or waxed paper.  Unless you live somewhere cold and dry, it gets sticky very quickly at room temperature.

Ingredients
1 tablespoon baking soda or bicarbonate of soda
2 2/3 cups or 600g sugar
1 cup or 240ml runny honey
3/4 cup or 180ml water
1/4 teaspoon cream of tartar
2 teaspoons white balsamic vinegar
Butter for preparing the pan

Necessary equipment – candy thermometer and large, deep pot with heavy bottom, aluminum foil

Method
Sift your baking soda into a small bowl and set aside close to the stove.

Prepare a large baking pan by lining it with aluminum foil and buttering the foil liberally.  Set aside near the baking soda bowl.  If you can’t put a hot pot on your counter top, add a trivet or hot pad nearby (for the candy pot) and another underneath the baking pan.


Mix your sugar, honey, water, cream of tartar and balsamic vinegar in your deep, thick-bottomed pot.  Set it on the stove over a medium flame and whisk until all the sugar is dissolved.


Put the candy thermometer in and make sure the tip is in the liquid.  Gently swirl the pot every so often as it heats.  At one point, mine bubbled up a bit so I stirred with the whisk to settle it down.


You are looking for the thermometer to hit 300°F or 149°C.   When it reaches the correct temperature, remove the pot from the stove and set it on the counter or on the trivet or hot pad you have ready.

Remove the thermometer and pour in the baking soda and whisk quickly.  This will expand like crazy and suddenly the need for a deep pot becomes violently apparent.


Carefully pour the molten bubbles into your buttered, foil-lined baking pan and leave it to cool and harden.


After mine had cooled somewhat, I transferred it to the deep freezer to speed up the process but that’s just because I am impatient.

When it’s completely cooled and hardened, lift the foil out of the pan and turn the slab of candy over onto a cutting board.  Peel back the foil and gently break the honeycomb crunch with a small hammer you have borrowed from your daughter’s toolbox.  Just kidding.  Any hammer will do.


As previously mentioned, this turns soft and sticky when exposed to air so line a plastic container with parchment or waxed paper and store the candy in the refrigerator or freezer.  Many recipes also suggested that dipping the candy in melted chocolate would keep the moisture out as well.   If you try that, let me know how it goes.

Save the little crunchy shards too!  They will be great to sprinkle on a honey cake! 

Enjoy!


Do you love crunchy things?  Then this week’s Sunday Supper round up, hosted by Susan of The Girl in the Little Red Kitchen, will be your favorite week.   I know it’s one of mine.

Crispy Appetizers
Crunchy Entrees and Sides
Munch on Snacks
Crisp Desserts


Thursday, September 26, 2013

Apple Brown Betty Bread Pudding


If you’ve been reading along for a while, you might recall when I belonged to a group called Cooked in Translation.  The idea was to take a recipe and give it a twist into another culture.  I enjoyed the monthly challenge and was disappointed when the group fell apart.  This recipe is one I made for Cooked in Translation but never posted, a fusion of the American classic apple brown Betty and the English classic bread pudding.  As it’s apple season in the northern hemisphere, I thought this might be a good time to share it.  This is a comfort dessert, if there ever was one.  On both sides of the big pond.

Ingredients
1 cup or 200g dark brown sugar
1/2 cup or 115g sugar
1/2 teaspoon salt
4 eggs
1 cup or 240ml heavy whipping cream
1/2 cup or 120ml milk
2 teaspoons vanilla extract
7 slices or about 9-10 oz or 255-280g strong white or wheat bread
3 whole apples, preferably Granny Smith or similar
1/4 cup or about 55g butter plus extra for greasing the baking dish

Recommended for serving:  more heavy whipping cream

Method
Preheat your oven to 375°F or 190°C and prepare your baking dish by buttering it liberally and completely.   Don’t be shy with the butter here.

Mix the sugars together thoroughly with the salt.


Whisk your eggs with the whipping cream, milk and vanilla.


Slice bread into a small dice, or tear into very small pieces.


Peel, core and thinly slice your three apples.


Sprinkle a little less than one-third of the brown sugar in the buttered baking dish.


Then add about one-third of the apple slices then one-third of the bread cubes.


Repeat these layers twice more, finishing the last time with small chunks of butter rather than bread and the balance of the sugar mixture.

So it goes: Sugar, apples, bread - sugar, apples, bread - sugar, apples, sugar, butter.  Got it?  Easy peasy.


Pour on the whisked egg mixture and top with a bit of cling film.  Press down gently on the whole thing and leave to sit for a few minutes so that the bread absorbs the liquid.


Remove the cling film and cover the baking pan with foil.  Bake in a 375-degree oven for about 45 minutes.

Remove the foil in last five to 10 minutes of baking to brown the top.  This is most delicious served warm.


Bread pudding is one of my husband’s all-time favorite desserts and he insists that it is incomplete without a generous pour of whipping cream on top.  This now applies to Apple Brown Betty Bread Pudding.  Pour it on!

See the sticky syrup that was created?  YUM. 


Enjoy!


Monday, September 23, 2013

Peanut Butter Chocolate Chip Muffins #MuffinMonday


What makes an American American?  Is it the color of your passport, the way you were raised or to be a true American do you have to grow up in the United States?  Can an immigrant arriving in the US become as American as someone who grew up there?  Or can an American living overseas lose their essential American-ness?   When you are raising third-culture kids,  these are the questions you ask yourself.  You want to take advantage of learning about foreign cultures and countries and expand your worldview – and we certainly did that – but you also want your child to have a feeling of belonging somewhere.  From the very minute our first daughter was born, we knew that in all likelihood, she would go off to university in the United States.  After all, we were living in a place where English was not even spoken.   So we started to save for out-of-state tuition – way out of state.

I also began to prepare her in other ways.  I didn’t want her, or her sister when she came along, to be a complete outsider to US customs and culture.  I wanted them to know what a peanut butter and jelly sandwich was so I hauled jars of Jif in my suitcase, along with Nestle Quik and Aunt Jemima syrup, and chocolate chips and marshmallows and many other “essentials” of an American childhood.   Barney and Sesame Street videos, every Disney movie every made, cassette tapes of Raffi’s wonderfully silly songs and Tom Chapin singing This Pretty Planet.


 I loved that one – This whole planet is our home, a holy place. 

Our ever-increasing home library of children’s books introduced them to my favorite classics and we made some new favorites together.  When they got old enough, I organized Trick-or-Treat in our little Brazilian neighborhood, culminating in a party with apple-bobbing and cupcakes and sweet punch at our decorated house.  I’ve been known to bring frozen turkey and yams and Karo and pecans on an airplane, to make sure Thanksgiving was right.  We had a potted Norfolk pine as a Christmas tree in a couple of different places, because that was as close as I could get to a real tree, and we hung our stockings from a bookcase (Indonesia) or the staircase (Brazil) or the radiator (Paris) or the piano (KL and Singapore.) 

When it came time for the rite of passage called drivers’ ed, I made sure they were able to take the classes and get their licenses during the summers in the States.  Because I didn’t want them to be the only ones who couldn’t drive when they went off to college.

They are both living in the US now and while I know they feel “outsider” sometimes, because that can’t be helped, it is part and parcel of being a third culture kid.  Despite my best efforts, I know that other third culture kids and expats will always be their true tribe, but I like to think that I eased the transition at least a little bit by passing on some of the traditions I grew up with.  Like baking with peanut butter and chocolate chips.

What traditions are you passing on to your children?  Please leave me a comment.  I’d love to hear.

Ingredients
2 cups or 250g flour
1/4 cup or 60g sugar
1/4 cup or 50g dark brown sugar
2 teaspoons baking powder
2/3 cup or 200g creamy peanut butter
2 tablespoons butter, softened
2 eggs
1 cup or 240ml milk
1/2 cup or 75g roasted peanuts
1/2 cup or 100g semi-sweet chocolate chips

Method
Preheat your oven to 350°F or 180°C and prepare your muffin pan by greasing it or lining it paper muffin cups.

Chop your peanuts roughly and mix them together with your semi-sweet chocolate chips.


Separate about one quarter of the mixture to sprinkle on the muffins before baking.


In a large bowl, mix together the flour, two sugars and baking powder.  Make sure to break up the brown sugar.


In another bowl, whisk together the peanut butter, butter, eggs and milk.


Pour your wet ingredients into the dry ingredients and fold them together until just mixed.


Fold in the bigger pile of chopped peanuts and chocolate chips.


Divide the batter evenly among the muffin cups.


Top each muffin cup with a sprinkle of nuts and chips.


Bake in the preheated oven about 20-25 minutes or until a toothpick inserted in the middle comes out clean.


Cool on a rack for a few minutes and then remove the muffins from the pan to cool completely.


Enjoy!


Sunday, September 22, 2013

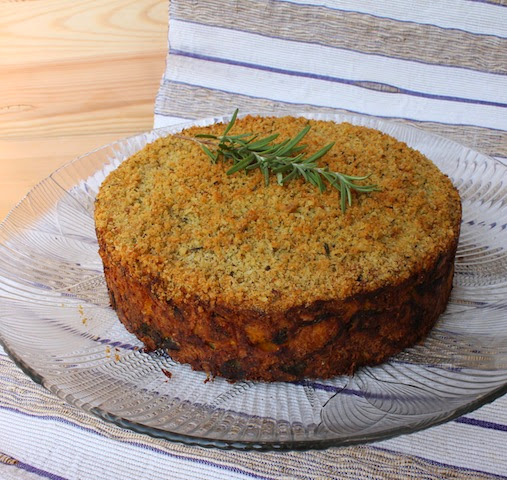
Butternut Squash Tian with Herb Topping

Roasted butternut squash and garlicky kale mixed with cheese and eggs are topped with herby breadcrumbs and baked for a great vegetarian main course or side dish I'm calling Butternut Squash Tian.

Food Lust People Love: Roasted butternut squash and garlicky kale mixed with cheese and eggs are topped with herby breadcrumbs and baked for a great vegetarian main course or side dish I'm calling Butternut Squash Tian.

I am always on the lookout for vegetarian recipes that make a great side but are also hearty enough to be eaten as a main dish. This recipe, adapted from Faith Durand’s post on TheKitchn can do both quite admirably. I decided to pretty it up from the usual casserole by baking it in a spring-form pan and serving it in slices. And before a load of angry French folk wielding Opinels arrive to object to my use of the word “tian,” (Bienvenue!) may I just say that I had never heard of the word before I saved the recipe almost a year ago, despite living for three years in France.

After a little research, I do now understand that the tian itself is the vessel AND the vegetable gratin that is cooked in it, so my pan choice probably means that this no longer qualifies as a tian. What can I say? It’s still delicious! And pretty! How many casseroles can say that?

This week on Sunday Supper, we are celebrating the arrival of Fall with comforting dishes using seasonal ingredients. Butternut squash is one of my favorites. And so is kale. Make sure you scroll to the bottom of this recipe to see all the other seasonal dishes on offer.

Ingredients
For the tian:
About 4lb or 1.9kg whole butternut squash
Olive oil for roasting
1/2 cup or 100g short-grain or arborio rice
1 3/4 oz or 50g freshly grated Grana Padano or Parmesan cheese
7 oz or 200g smoked cheese
2 large cloves garlic
5-6 large stems curly kale
3 large eggs
Sea salt and freshly ground black pepper

For the herb topping:
1 cup or 80g dried bread crumbs
1 big handful flat leaf parsley, leaves only
Leaves from 3 to 4 sprigs of thyme and/or rosemary (I used some of each.)
1 3/4 oz or 50g freshly grated Grana Padano or Parmesan cheese
2 tablespoons olive oil

Method
Preheat your oven to 400°F or 200°C and prepare your eventual baking pan or casserole dish by greasing it liberally. If you have an actual earthenware tian , more power to you! (My spring-form pan was 8 in or 20cm in diameter and about 3 in or 7 1/2cm deep.)

Peel the butternut squash, scrape the seeds out, and cut it into chunks.


Pile the squash up in a large roasting pan (not the one you’ve already prepared for baking the finished dish!) and drizzle liberally with olive oil. Toss the squash around a little so that it is well coated with the oil and then spread the chunks out into one layer. Sprinkle with flakey sea salt.


Roast for about one hour in your hot oven or until the butternut squash is fork tender and the edges have gone golden. You'll want to stir it around about half way through.


While the squash is roasting, boil your rice in salted water with a drizzle of olive oil, just as you would pasta. Keep a close eye on it. Since Arborio rice has such a high starch content, it tends to want to boil up and over. When the rice is just cooked - test a grain or two occasionally – drain the water out and set the rice aside to cool.


Grate all of your cheeses and make sure to divide the Grana Padano pile in half, some for the tian, some for the herb topping.


Meanwhile, remove the stems from your kale and chop it into small bits.


Mince your garlic then sauté it in a little olive oil being careful not to let it color. Add in the chopped kale and a sprinkle of sea salt. Cook, covered, until the kale is completely wilted. Set aside to cool.


To make your breadcrumb topping, add all of the dry ingredients to your food processor and process until it is completely uniform.

Add in the two tablespoons of olive oil and process again. Depending on the type of baking dish you use, you may have leftover topping. Store this in a bag in the freezer. It can be used for topping baked fish, much like in this delicious Bill Granger recipe .


When the squash is roasted, remove it from the oven and turn the oven down to 350°F or 180°C. Mash the squash with a potato masher and set it aside to cool slightly.


In a large bowl, whisk your eggs and then add in the butternut squash. Mix well.

Now add in the rest all of your tian ingredients: The wilted, garlicky kale, the cooked rice, all of the smoked cheese and the other half of the Grana Padano cheese that wasn’t used in the topping. Give the whole lot a good couple of grinds of fresh black pepper and then mix well.


Spoon the mixture into your prepared baking pan and smooth it out.

Top liberally with the herby breadcrumbs. As mentioned before, you can bake this in a larger casserole, in which case, you’ll probably use all of the breadcrumbs. For my smaller, deeper pan, I ended up using just about half. Pat the herb topping down so it doesn’t fall off later when serving.


Bake for one-hour, covering the top with foil part way through if the breadcrumb topping is getting too browned. Check that it is cooked through by putting a knife in and leaving it there for about 30 seconds. The knife should be very hot to the touch when it is removed. If you are using a shallower casserole dish, this may not take the full hour.

To remove from the spring-form pan, allow the tian to cool for a few minutes and then run a knife around the sides before releasing the catch.


Run a knife under the tian to loosen it from the base.


Slide to a serving plate, cut into slices and serve warm.

Food Lust People Love: Roasted butternut squash and garlicky kale mixed with cheese and eggs are topped with herby breadcrumbs and baked for a great vegetarian main course or side dish I'm calling Butternut Squash Tian.
Enjoy!


Many thanks to our Sunday Supper host this week, Soni from Soni's Food. We got news just yesterday that her family has suffered a major loss with the unexpected passing of her father. If you are so inclined, please keep them in your prayers.

Amazing Breakfasts, Brunches, and Breads
Outstanding Soups, Starters and Sides
Comforting Main Dishes
Decadent Desserts:
Tasty Drinks:

Pin this Butternut Squash Tian! 

Food Lust People Love: Roasted butternut squash and garlicky kale mixed with cheese and eggs are topped with herby breadcrumbs and baked for a great vegetarian main course or side dish I'm calling Butternut Squash Tian.