Monday, April 25, 2022

Jalapeño Hush Puppy Mini Muffins #MuffinMonday

These jalapeño hush puppy mini muffins have the hush puppy vibe down pat from the crunchy exterior to the fluffy interior, full of cornbread flavor!

Food Lust People Love: These jalapeño hush puppy mini muffins have the hush puppy vibe down pat from the crunchy exterior to the fluffy interior, full of cornbread flavor!

It’s live crawfish season in Louisiana and Texas (and probably Mississippi for all I know) right now so a week ago Saturday, I drove north about half an hour to Crawfish Nick Seafood to pick up a sack. 

I was fourth or fifth in line to place my order when I heard the lady behind the desk ask the next buyer if she had a reservation and, if so, for how many sacks. My heart dropped because I didn’t have a reservation! What if they run out before it’s my turn? 

Thankfully, they did not but next time I know that it may not be enough to call and ask if they have live crawfish before getting in the car. I whistled all the way home with 33 pounds of live crawfish, inordinately pleased with myself, superior hunter/gather that I am. 

That afternoon, after a few fresh water purges, my husband steamed those delicious guys and we ate them with relish. Not literally. There was garlic butter though and lots of Cajun spices. We ate and ate and ate. Then the next morning we ate more cold. Even with four people eating, 33 pounds is a lot crawfish! 

At that point I stopped eating crawfish and just started peeling them to use the tails in another dish. My search for a recipe to use the leftover seven ounces of tails led me to a recipe for hush puppies, but who wants to deep-fry anything? I pivoted and made these muffins instead. And saved the crawfish for another dish: baked crawfish Rangoon

Jalapeño Hush Puppy Mini Muffins

These little guys would be great served with fried fish, a seafood platter, a bowl of chili or, dare I say it, your next crawfish boil; in fact, anywhere you might serve hush puppies or cornbread. We added a small pat of butter to each as we ate them but they are also good plain. This recipe makes about 20 mini muffins. 

Ingredients
1 green onion
1 fresh jalapeño
2/3 cup or 120g yellow cornmeal
1/2 cup or 63g all-purpose flour
1 teaspoon baking powder
1/2 teaspoon baking soda
1/2 teaspoon salt
1/2 teaspoon sugar
1/4 teaspoon cayenne pepper (or 1/2 teaspoon if you like things spicy)
1 egg
1/3 cup or 80ml buttermilk
2 tablespoons canola oil, plus extra for greasing the mini muffin pan.

Method
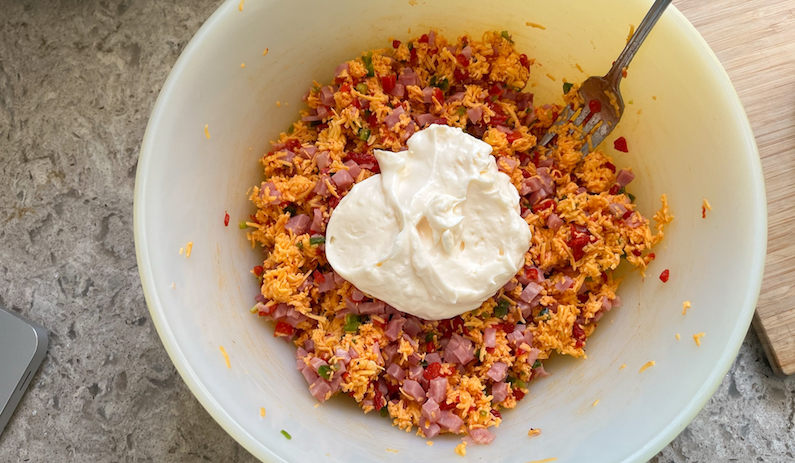
Chop the green onion, both white and green parts, finely and separate out a small pile of the green parts to use as garnish before baking. Do the same with the jalapeño. I discarded the jalapeño seeds and innards because they weren’t pretty. Use yours if you like and chop them finely as well. 


Preheat your oven to 400°F or 200°C. Generously grease your mini muffin pan with canola oil and put it in the oven about five minutes before the end of the preheating cycle. This batter makes about 20 mini muffins so grease accordingly.

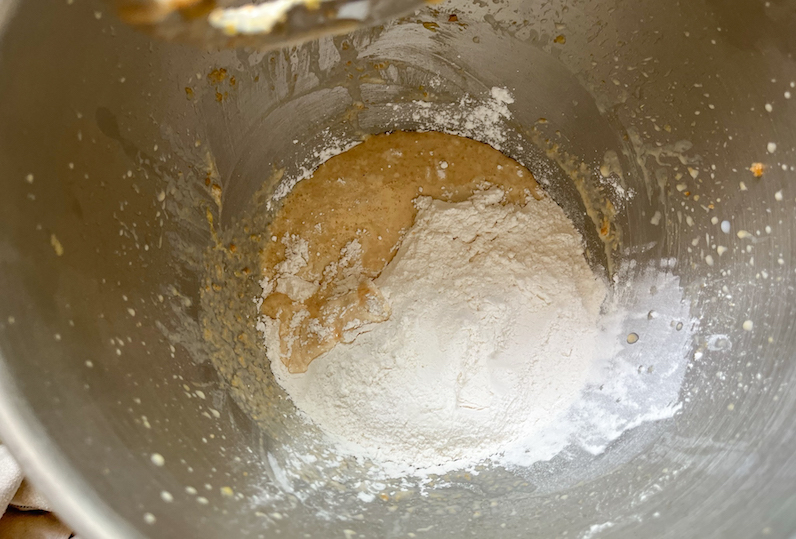
In a mixing bowl, whisk together the cornmeal, flour, baking powder, baking soda, salt, sugar and cayenne pepper. 


Stir in the bigger piles of onion and jalapeño.


Beat the egg, buttermilk, and oil in a small bowl. Pour the wet ingredients to the cornmeal mixture bowl and fold till it is just combined.


Carefully remove the pan from the hot oven and quickly divide the batter between the muffin cups. I like to use a small scoop, which speeds up the job.  As you can see, my last muffin wasn't very full but he still puffed up nicely. Top with the reserved chopped green onion and jalapeño.


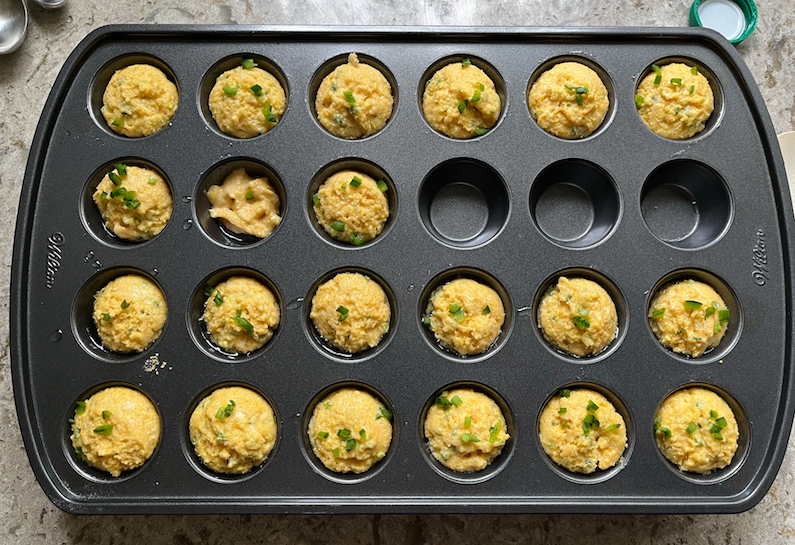
Bake until golden brown and crispy, 17 to 20 minutes. 


Insert a toothpick into the center of a baked hush puppy muffin and make sure it comes out clean. Serve hot or remove to a wire rack to cool. The crunchy golden bottoms are so good! 


Enjoy!

Food Lust People Love: These jalapeño hush puppy mini muffins have the hush puppy vibe down pat from the crunchy exterior to the fluffy interior, full of cornbread flavor!

It’s the last Monday of the month so that means it’s Muffin Monday! Check out all the great muffin recipes we are sharing today. 


#MuffinMonday is a group of muffin loving bakers who get together once a month to bake muffins. You can see all of our lovely muffins by following our Pinterest board. Updated links for all of our past events and more information about Muffin Monday can be found on our home page.


Pin these Jalapeño Hush Puppy Mini Muffins!

Food Lust People Love: These jalapeño hush puppy mini muffins have the hush puppy vibe down pat from the crunchy exterior to the fluffy interior, full of cornbread flavor!

 .

Sunday, April 24, 2022

Zucchini Noodle Lasagna

This zucchini noodle lasagna is made with zucchini “noodles” instead of pasta, upping your vegetable intake and lowering carbs. You won’t miss them!

Food Lust People Love: This zucchini noodle lasagna is made with zucchini “noodles” instead of pasta, upping your vegetable intake and lowering carbs. You won’t miss them!

I’ve wanted to share this recipe for the longest time but something kept getting in the way. I made it when we were attempting a keto diet and trying to eat more vegetables as well. The more veggies thing worked really well but the keto part, not so much. Pretty sure I gained weight. :D

While this dish is low carb, it’s not low calorie because of the beef, sausage and cheese. It is delicious!

For a vegetarian version, use double the amount of mushrooms in place of the beef and sausage or a meat substitute. 

Zucchini Noodle Lasagna

Unfortunately the process photos for the red sauce somehow went missing. I have no idea how or why but I hope the explanation is sufficiently clear. If you do have any questions, please leave me a comment and I will endeavor to respond in a timely manner. 

Ingredients
For the red sauce:
2 tablespoons olive oil
1 lb or 450g ground beef
14 oz or 387g smoked sausage
2 cans (14.1 oz or 400g) whole peeled tomatoes, with juice
4 3/4 oz or 135g tomato paste
2 tablespoons Italian seasonings  (I use Durkee Pasta Seasoning (<affiliate link) which has dehydrated onions, garlic, etc. along with the actual Italian spices.)*
2 bay leaves
1/2 teaspoon baking soda
*Without that lovely shortcut, mince 1 small onion and 3 cloves garlic. Add to pan while browning beef. 

For the cheese layers:
5 1/3 oz or 150g mozzarella, grated
8.8 oz or 250g fresh ricotta 
2 large eggs
Freshly ground black pepper

For the zucchini layers:
4 medium zucchini (about 1.1 lbs or 500g)
Fine sea salt

For topping:
1/2 cup or 55g Parmesan, grated
(Plus reserved grated mozzarella – see method below)
1 teaspoon oregano

Method
Add olive oil to pan, then the ground beef. Cook until ground beef is browned and the smaller bits are a little bit crispy. (Put in onion/garlic in at this point, when the smaller bits are well browned, if using.)

While that’s happening, cut the sausage lengthwise into four strips and then chop them into small cubes. Add the sausage to the beef pan and cook further until the sausage starts to brown. 

Add the Italian seasonings, canned tomatoes and tomato paste, along with about half a can of water, using that water to rinse out the tomato cans so as not to leave any tomato behind in them. 

Pop in the bay leaves, give the whole pot a good stir and simmer, covered, for about 45 minutes. 

Meanwhile, trim off the stem ends and slice your zucchini into thin strips with a vegetable peeler. 


Lay in single file on a clean kitchen towel. Lightly sprinkle the zucchini with salt and set aside. 


Put about 1/2 cup of the grated mozzarella in a small mixing bowl and stir in the Parmesan and dried oregano. Set aside till needed for topping. 

In a larger mixing bowl, whisk together the rest of the mozzarella, the ricotta, the eggs and some freshly ground black pepper. This is going to look much drier that the usual cheese layer for lasagna. Don’t worry. The cooking zucchini will ensure that this lasagna isn’t dry. 


After the red sauce has simmered for about 45 minutes, stir in the baking soda. I was taught this trick by an Italian American nonna. It’s going to bubble up as the soda reacts with the natural acids in the tomatoes. Keep stirring till about the bubbles are gone. The result is a sweeter, less acidic and according to my mentor nonna, more stomach-friendly sauce. 

Simmer for about 10-15 minutes longer, uncovered. Remove from the heat. Meanwhile, preheat your oven to 350°F or 180°C.

To assemble the zucchini noodle lasagna, remove the bay leaves from the red sauce and spoon a thin layer into your baking dish. (9x13in or 23x33cm for thin lasagna, a smaller pan for thicker lasagna).


Roll the zucchini tightly up in the clean kitchen towel to dry them off. Unroll the towel and top the red sauce with zucchini slices.


Add another layer of red sauce. Then spoon on a layer of the cheese mixture. 


Add another layer of zucchini, followed by red sauce and then cheese mixture. Keep going till you use up all the zucchini, the red sauce and cheese. In my pan, I did three complete sets of layers. 

Finish the dish by sprinkling it with the mozzarella/Parmesan cheese topping. 


Bake in your preheated oven for 45-50 minutes or until the zucchini noodle lasagna is hot through, bubbling around the edges and well browned on top. 


Leave to cool for about 10 minutes then cut in squares to serve. 

Food Lust People Love: This zucchini noodle lasagna is made with zucchini “noodles” instead of pasta, upping your vegetable intake and lowering carbs. You won’t miss them!

Enjoy! 

It’s Sunday FunDay and today we are sharing creative lasagna recipes! Check them all out below. 
 
We are a group of food bloggers who believe that Sunday should be a family fun day, so every Sunday we share recipes that will help you to enjoy your day. If you're a blogger interested in joining us, just visit our Facebook group and request to join.

Pin this Zucchini Noodle Lasagna!

Food Lust People Love: This zucchini noodle lasagna is made with zucchini “noodles” instead of pasta, upping your vegetable intake and lowering carbs. You won’t miss them!

 .

Thursday, April 21, 2022

Lighter Lemon Pound Cake #BundtBakers

This lighter lemon pound cake has less butter the original version but with the sour cream and lemon, you won’t miss it at all. Made with Swerve, everyone can enjoy it! For a little extra innocent richness, serve it with a dollop of lightly sweetened low fat Greek yogurt and berries. 

Food Lust People Love: This lighter lemon pound cake has less butter the original version but with the sour cream and lemon, you won’t miss it at all. Made with Swerve, everyone can enjoy it! For a little extra innocent richness, serve it with a dollop of lightly sweetened low fat Greek yogurt and berries.

For this month’s Bundt Bakers, our host chose “angel or devil” as the theme.  I interpreted this as healthy cake (relatively speaking) vs. decadent cake so I put on my thinking cap and started to Google search lighter pound cake. 

I came across all sorts of “lighter” pound cakes! Apparently it’s a thing. Who knew? Many of them claimed to be lighter but had a whole cup of butter and an equal amount of sugar. Umm, no. That’s regular pound cake. 

Lighter Lemon Pound Cake

I used “brown sugar” Swerve to bake these cakes to make them more diabetic friendly and I baked the batter in a Nordic Ware Duet pan, which has a capacity of 5 cups. It’s perfect for making one cake to keep and one to share. Which is the best “lighten up” option! Sharing is caring. If you bake yours in a 6-cup Bundt pan, it might need just a little longer in the oven. This recipe was adapted from one on Just a Pinch

Ingredients
1 1/2 cup or 180g cake flour, plus extra for pan
1 teaspoon baking powder
1/2 teaspoon baking soda
1/4 teaspoon fine sea salt
2 tablespoons butter, softened, plus extra for pan
3/4 cup, packed, or 75g Swerve or light brown sugar
1/2 cup or 120g sour cream
Zest 1 lemon 
2 tablespoons lemon juice
1 egg, at room temperature
1 egg white, at room temperature
2 tablespoons milk

Recommended for serving: 
Greek yogurt lightly sweetened with Swerve or sugar
Fresh berries

Method
Preheat oven to 350°F or 180°C and prepare your 5- or 6-cup Bundt pan by greasing it with butter and coating it with flour.

Whisk the flour, baking powder, baking soda and salt in a mixing bowl and set aside.


In another bowl, beat the butter and Swerve/sugar until creamy and lighter in color.


Add sour cream, lemon zest, lemon juice, egg,  egg white and milk to the butter mixture. 


Beat 2 minutes on high speed.

Add flour mixture. 


Beat on lowest speed, no more than 10 seconds, until just combined.


Spoon the cake batter into your prepared Bundt pans.


Place on one rack above middle in the oven. Bake for 25 - 30 minutes or until a toothpick inserted in the middle of the cake comes out clean.


Cool for about 7 minutes on a wire rack then use a wooden skewer to loosen the sides and middle then turn the cakes out of the pan. Cool completely. 

This cake is wonderful plain or if you want to fancy it up, with a dollop of Greek yogurt, sweetened with a little more Swerve or sugar, topped with fresh berries. 

Food Lust People Love: This lighter lemon pound cake has less butter the original version but with the sour cream and lemon, you won’t miss it at all. Made with Swerve, everyone can enjoy it! For a little extra innocent richness, serve it with a dollop of lightly sweetened low fat Greek yogurt and berries.

Enjoy! 

It’s the third Thursday of the month so welcome to Bundt Bakers! As mentioned above, our host chose angel or devil as our theme. Check out how our bakers interpreted that theme below. Many thanks to Rebekah of Making Miracles for hosting!

#BundtBakers badge

#BundtBakers is a group of Bundt loving bakers who get together once a month to bake Bundts with a common ingredient or theme. You can see all of our lovely Bundts by following our Pinterest board. We take turns hosting each month and choosing the theme/ingredient. Updated links for all of our past events and more information about BundtBakers, can be found on our home page.

Pin this Lighter Lemon Pound Cake!

Food Lust People Love: This lighter lemon pound cake has less butter the original version but with the sour cream and lemon, you won’t miss it at all. Made with Swerve, everyone can enjoy it! For a little extra innocent richness, serve it with a dollop of lightly sweetened low fat Greek yogurt and berries.

 .

Sunday, April 17, 2022

Spicy Ham Pimento Cheese Sandwiches

These Spicy Ham Pimento Cheese Sandwiches are a welcome savory treat that is perfect for parties or picnics. Like ‘em even spicier, add more jalapeño!

Food Lust People Love: These Spicy Ham Pimento Cheese Sandwiches are a welcome savory treat that is perfect for parties or picnics. Like ‘em even spicier, add more jalapeño!

A couple of weeks ago, my husband made a dish that called for eight ounces of roasted red peppers aka pimentos. Younger daughter was dispatched to the store and came home with a 12-ounce jar. Now you or I might have just hummed the whole thing in but my husband is still quite the recipe rule follower (although he is getting better with experience) so he weighed out 8 ounces and put the rest in the refrigerator. 

Fortuitously, my pimento cheese recipe calls for exactly four ounces so it did not go to waste. To change things up a little, I added eight ounces of diced ham as well. Delicious!

Spicy Ham Pimento Cheese Sandwiches

For this sandwich spread, I used a pack of ready diced ham but this would also be an excellent use for some of your leftover baked ham from Easter or Christmas. If you don’t have leftover pimentos, there are 4 oz jars available at most grocery stores. 

Ingredients 
1 (4 oz or 113g)) jar pimentos, drained and chopped
1-2 teaspoons finely grated onion, plus any juice
8 oz or 227g extra sharp cheddar cheese, finely grated
1 fresh jalapeño, minced
8 oz or 227g diced ham
1/2 cup or 120ml mayonnaise
10 slices sandwich bread, crusts removed

Method
Grate the cheddar finely into a large bowl with plenty of room for mixing. Use a microplane to grate the onion right in top of the cheese so that any onion juice will also drip in. 


Add in the minced jalapeño and the pimentos. Use a fork to mix them thoroughly with the cheese and onion.


Add in the diced ham and mix again. It’s easier to mix thoroughly when the ingredients are dry so make sure to do this before adding the mayonnaise. 


Now, add in the mayonnaise and mix well.


Spread on bread for sandwiches. Be generous! Put it on thick. No one likes skimpy sandwich filling.


Or if you want to get fancy, cut the sandwiches into three. These will be very popular on a party table.


If you make them ahead, refrigerate the sandwiches covered with slightly damp paper towels and then cling film. This keeps the bread from getting dried out and stale. 

Food Lust People Love: These Spicy Ham Pimento Cheese Sandwiches are a welcome savory treat that is perfect for parties or picnics. Like ‘em even spicier, add more jalapeño!

Enjoy!

Happy Easter to my readers who celebrate today! It’s Sunday FunDay and my friends and I are sharing creative ham sandwiches. Check out the links below. Many thanks to our host, Sue of Palatable Pastime

 
We are a group of food bloggers who believe that Sunday should be a family fun day, so every Sunday we share recipes that will help you to enjoy your day. If you're a blogger interested in joining us, just visit our Facebook group and request to join.


Pin these Spicy Ham Pimento Cheese Sandwiches!

Food Lust People Love: These Spicy Ham Pimento Cheese Sandwiches are a welcome savory treat that is perfect for parties or picnics. Like ‘em even spicier, add more jalapeño!
 .

Friday, April 15, 2022

Artichoke Tuna Bean Salad

This tasty Artichoke Tuna Bean Salad is easy to toss together but it’s full of flavor and makes a wonderful starter or light meal. 

Food Lust People Love: This tasty Artichoke Tuna Bean Salad is easy to toss together but it’s full of flavor and makes a wonderful starter or light meal.

One pantry staple we are never without is tuna in a can. Many an afternoon I hear the snick-snick of the can opener and either my husband or daughter is opening a can to eat with fork, straight from the can. It’s one of my favorite things to eat as well. 

That said, often of a morning you will find me boiling eggs in the Instant Pot, just to make my southern-style tuna salad. Where I come from, tuna salad has to have boiled eggs in it! I love to eat it on soft sandwich bread or piled high on Triskets. 

Back in my college days, what I called tuna surprise was one of my favorite meals. It required just three ingredients: noodles, cream cheese and a can of tuna. 

Bonus Tuna Surprise recipe: Just boil the noodles and drain. Add the cream cheese to the hot pot of pasta and stir till melted. Add tuna and stir again. This is seriously delicious and a relatively cheap, warm bowl of comfort food. If you want to get fancy, pour the whole pot in a casserole dish and bake till browned on top but that step is not really necessary.

Artichoke Tuna Bean Salad

This recipe is adapted from one in New York Times Cooking. According to the original author, it’s a mainstay in her house since it uses ingredients she usually has on hand for an easy light meal. I added a few ingredients but would still wholeheartedly agree.

Ingredients – Serves 4-6 as a starter
1 jar (6.5 oz or 185g) marinated quartered artichoke hearts, drained and 1/4 cup or 60ml marinade reserved
1 small or 1/2 medium red onion, peeled and very thinly sliced 40g
1 small red chili pepper, minced
2 teaspoons cider vinegar 
1 tablespoon plain Greek yogurt
½ teaspoon Dijon mustard
1 (12-oz or 340g) can water-packed albacore tuna, drained
1 (15-ounce) can cannellini beans or borlotti beans, drained through a strainer and rinsed
Several sprigs Italian parsley leaves, chopped
Salt and freshly ground black pepper

Baby spinach to serve, if desired

Method
Place the onion and chili pepper in a bowl and add the vinegar. Leave to marinate. 


Pour the vinegar into 1/4 cup or 60ml of the reserved artichoke marinade and then whisk in the Dijon mustard and yogurt. Add a pinch of fine sea salt and a few good grinds of black pepper.


In a large bowl, combine the artichoke hearts, beans, onion and chili pepper.


Add the tuna and pour on the dressing. Toss gently to coat. Garnish with parsley. 


Serve as is or put a small handful of baby spinach on each plate then top with the artichoke tuna bean salad. 

Food Lust People Love: This tasty Artichoke Tuna Bean Salad is easy to toss together but it’s full of flavor and makes a wonderful starter or light meal.

Enjoy!

It’s the second Friday of the month which means it’s time for my Fish Friday Foodies to share recipes. Today’s theme is Fish from a Can. I love this theme! Canned fish is tasty and convenient. I always have sardines, tuna, anchovies, smoked oysters, salmon, etc. in my pantry so I can’t wait to see all the other canned fish recipes. Check them out below. Many thanks to our host, Wendy of A Day in the Life on the Farm. 


Would you like to join Fish Friday Foodies? We post and share new seafood/fish recipes on the third Friday of the month. To join our group please email Wendy at wendyklik1517 (at) gmail.com. Visit our Facebook page and Pinterest page for more wonderful fish and seafood recipe ideas.

Pin this Artichoke Tuna Bean Salad!

Food Lust People Love: This tasty Artichoke Tuna Bean Salad is easy to toss together but it’s full of flavor and makes a wonderful starter or light meal.

 .

Tuesday, April 12, 2022

Sourdough Carrot Cake Waffles with Cream Cheese Syrup #BreadBakers

What could be more perfect for Easter breakfast or brunch than sourdough carrot cake waffles with a drizzle of cream cheese syrup? Not a single thing!

Food Lust People Love: What could be more perfect for Easter breakfast or brunch than sourdough carrot cake waffles with a drizzle of cream cheese syrup? Not a single thing!

This recipe idea came to me last month when I was baking the sourdough sweet carrot waffles for Muffin Monday. I made a little note for myself, as a reminder to try carrot cake waffles someday. 

When our Bread Bakers host for April decided on Easter breads as our theme, some day came sooner rather than later! Waffles are, after all, a quick bread. 

Sourdough Carrot Cake Waffles with Cream Cheese Syrup

This recipe makes 7 Belgian-style waffles. If you aren’t eating them at once pop them in the toaster to reheat and refrigerate the cream cheese syrup. It’s still quite spreadable, even cold.  

Ingredients  
For the waffle batter:
1 1/2 cups or 190g all purpose flour
1/4 cup, tightly packed, or 50g brown sugar
1 teaspoon baking powder
1 teaspoon cinnamon 
1/2 teaspoon baking soda
1/2 teaspoon salt
3/4 cup or 210g fed sourdough
1/2 cup or 120g mashed cooked carrots 
2/3 cup or 160ml milk 
1/4 cup or 60ml canola oil, plus extra for greasing the waffle iron
2 eggs 

For about 2/3 cup or 156ml cream cheese syrup:
4 oz or 113g cream cheese, softened
6 tablespoons powdered sugar, sifted
3 tablespoons milk, plus more to taste
1 teaspoon vanilla extract

Method
Make the cream cheese syrup by beating together the cream cheese and sugar until smooth. Whisk in the milk and vanilla. (Add a bit more milk if you prefer a thinner syrup.) Set aside while you make the waffles.

Preheat your waffle maker.

In a large mixing bowl, whisk together the flour, sugar, baking soda, cinnamon and salt. 


In another smaller bowl, whisk together the sourdough starter, mashed carrot, milk, canola, and eggs until fully combined. 


Pour the wet ingredients into the dry ingredient bowl and fold until just combined. Do not overmix. 


Grease your waffle iron, top and bottom, with a little canola oil.


Add the batter to the waffle maker. The size of your waffle iron will depend on how much batter you add but try not to overfill. That just makes a huge mess when it overflows. 


Cook according to manufacturer’s instructions until the first set of waffles are golden brown. Remove from the waffle iron and keep warm in a low oven. 


Continue cooking waffles until all the batter is used up. 

Serve with lashing of cream cheese syrup. 

Food Lust People Love: What could be more perfect for Easter breakfast or brunch than sourdough carrot cake waffles with a drizzle of cream cheese syrup? Not a single thing!

Enjoy! 

It’s the second Tuesday of the month so that means it’s time for Bread Bakers! As I mentioned above, we are sharing Easter breads. Check out the links below for inspiration. Many thanks to our host, Swathi of Zesty South Indian Kitchen.

BreadBakers
#BreadBakers is a group of bread loving bakers who get together once a month to bake bread with a common ingredient or theme. Follow our Pinterest board right here. Links are also updated each month on this home page. We take turns hosting each month and choosing the theme/ingredient.


Pin these Sourdough Carrot Cake Waffles!

Food Lust People Love: What could be more perfect for Easter breakfast or brunch than sourdough carrot cake waffles with a drizzle of cream cheese syrup? Not a single thing!

 .

Sunday, April 10, 2022

Feta and Strawberry Tabouli Salad

Feta and strawberry tabouli salad is a great twist on a Middle Eastern favorite. Juicy ripe strawberries brighten the salad, adding color and a welcome sweetness. This is one salad that’s just as good as leftovers!

Food Lust People Love: Feta and strawberry tabouli salad is a great twist on a Middle Eastern favorite. Juicy ripe strawberries brighten the salad, adding color and a welcome sweetness. This is one salad that’s just as good as leftovers!

As much as I love a traditional tabouli salad (which is A LOT!) it’s also fun to mix things up and put a new spin on an old favorite. Adding fresh strawberries was inspired by the fancy salads we enjoy with not only greens but also fruit, nuts and cheese. In this case, the nutty-flavored bulgur wheat is standing in for actual nuts. 

On a completely different subject, let’s talk about the first ingredient, a thing I like to call purple onion. In most recipes it is referred to as red onion or Spanish onion but since my first encounter with same as a child, I’ve called it purple onion. Because it is purple! This is my tiny hill and I am prepared to defend it. 

A Google search quickly revealed that in some European countries it is indeed called purple onion and now I want to know where. Annoyingly, Wikipedia didn’t say. Even BBC Food had the nerve to describe the onion thusly, “Red onions are an attractive, milder alternative to the yellow onion with their shiny purple skin.” Purple. That’s right. 

Have I convinced anyone? Join me on the purple side. It’s more accurate over here. Plus I have tasty salad.

Feta and Strawberry Tabouli Salad

For aesthetic reasons, I chose to use yellow cherry tomatoes for this festive salad. If you only have red ones, no worries. The flavor is what really matters. 

Ingredients
For the dressing:
1/2 medium purple onion, sliced very thinly (about 2 1/2 oz or 70g)
2 tablespoons or 30ml fresh lime juice
1/2 teaspoon fine sea salt
freshly ground black pepper
1/4 cup or 60ml extra virgin olive oil

For the salad:
1 cup or 210g bulgur wheat (3 1/4 cups or 615g when soaked and drained)
1 bunch green onions, just the green part, chopped (about 11/4 oz or 35g)
1 very large bunch (about 5 1/3 oz or 150g) cilantro
8 oz or 227g yellow cherry tomatoes, halved
14 oz or 400g strawberries, hulled and quartered
7 oz or 200g feta, crumbled (I prefer the sheep’s milk type.)
 
Method
In metal or heatproof bowl, cover your bulgur wheat with 1 3/4 cups or 414ml of boiling water and cover the bowl with an upside down plate or some cling film. Set aside. 


Put your thinly sliced onions in a large bowl and pour the lime juice over them. Sprinkle with the salt. Add a few good grinds of fresh black pepper. 


Let the onions marinate in the lime juice for a few minutes. This helps reduced their pungency and sharpness. Now mix in the olive oil. 

Chop your green onions finely and set aside. 


Cut the hard stalks off of the cilantro and discard.  (The tender, narrow stalks near the leaves are fine to leave in.) Wash the cilantro thoroughly several times and dry in a salad spinner or a dry dishcloth.  Chop it roughly. 

Once the bulgur wheat has absorbed all of the water it can, drain it in a strainer and push down on the top to get rid of any excess water. 


Fluff it with fork and leave it to cool. 

Now we can assemble the strawberry tabouli. Add the halved tomatoes to the dressing first. 


Tip in the cooled bulgur wheat, the green onions and cilantro and mix well to coat the wheat with the dressing.


Finally, add the strawberries and feta and toss gently to combine. This tabouli gets better and better as it sits so you can make it ahead without any problems.  


Enjoy!

Food Lust People Love: Feta and strawberry tabouli salad is a great twist on a Middle Eastern favorite. Juicy ripe strawberries brighten the salad, adding color and a welcome sweetness. This is one salad that’s just as good as leftovers!

It’s Sunday FunDay and my friends and I are sharing side dishes for your Easter table. Anything that isn’t a main course qualified so we’ve got you covered from appetizer to dessert! Many thanks to our host, Wendy of A Day in the Life on the Farm

 
We are a group of food bloggers who believe that Sunday should be a family fun day, so every Sunday we share recipes that will help you to enjoy your day. If you're a blogger interested in joining us, just visit our Facebook group and request to join.


Pin this Feta and Strawberry Tabouli Salad!

Food Lust People Love: Feta and strawberry tabouli salad is a great twist on a Middle Eastern favorite. Juicy ripe strawberries brighten the salad, adding color and a welcome sweetness. This is one salad that’s just as good as leftovers!

 .