Sunday, October 31, 2021

Caldo Tlalpeño

Caldo Tlalpeño is a deliciously nutritious chicken and vegetable soup, perfect for chilly days, served with fresh cheese and chipotle chili pepper on top. And avocado, if you've got some!

Food Lust People Love: Caldo Tlalpeño is a deliciously nutritious chicken and vegetable soup, perfect for chilly days, served with fresh cheese and chipotle chili peppers.

This dish is originally from Tlalpan, Mexico, one of the 16 administrative alcaldías or boroughs of Mexico City. It is the largest borough by area but most of it is forested rather than urban. According to Wikipedia, the city still boasts colonial era mansions and cobblestone streets. Frankly, it sounds lovely and totally worth putting on my list of places to visit, even if it didn’t also have a Six Flags amusement park. Which it does!

I love that this caldo is even mentioned in their tourist information. They are rightly very proud of it. What makes it so wonderful, in my opinion, is the fresh tomatoes in the broth. They give it a light, bright flavor, so much better than plain old chicken soup.

Despite photographic evidence to the contrary, I did serve this to my family with the crumbled fresh cheese as well as the required chipotle peppers in adobo sauce, I just completely forgot to put it on when taking the pictures. Some recipes mentioned adding avocados as well but I didn't have any. Add it cubed or sliced when serving, if you do.

Caldo Tlalpeño

I used unsalted homemade chicken stock for this dish so I did season the chicken with a little fine sea salt before poaching it in the stock. If you are using stock with salt, you can skip this step. I give the approximate weights for the vegetables below but know that if you have, say, a little more carrot or fewer green beans, this caldo will still be delicious. 

Ingredients
For the chicken:
1 1/2 lbs or 675g boneless, skinless chicken breast
¼ of a medium white onion
1 clove garlic
8 cups or 1.9L chicken stock 
1/2 teaspoon fine sea salt

For the caldo:
2 tablespoons canola or other light oil
4 medium carrots (about 13 oz or 370g)
1/4 white onion (
3 tomatoes (about 1 lb or 450g) 
1 clove garlic
5 oz or 142g green beans 
1 can (16 oz or 454g) chickpeas, drained and rinsed
2 sprigs coriander
4 epazote leaves (These are apparently a traditional ingredient and I was lucky enough to find some at my nearby Fiesta supermarket. If you can’t put your hands on some, just add a little more cilantro.)

To garnish:
Crumbled fresh cheese
Chipotle peppers in adobo sauce
(Avocado is also recommended but as I mentioned above, I didn't have any.)

Method
Season the chicken breasts with the salt (if using a salt free stock - see note above) and set aside for a few minutes. Cut the onion into thick slices and smash the garlic clove with the side of a large knife. 


Add the onion and garlic to a large pot along with the chicken. Pour in the stock and bring it to a soft boil over a medium flame.
 

Turn the fire down to simmer, put the lid on your pot and cook the chicken for 45 minutes. 

Remove the chicken from the pot and set aside until it is cool enough to handle. Use two forks to shred it.

Use two forks to shred the chicken.

Strain the broth into a heatproof bowl and discard the onion slices and garlic. 

Finely chop the onion and peel and slice the carrots. Core and chop the tomatoes. Cut the green beans into bite-sized pieces.

Finely chop the onion and peel and slice the carrots. Core and chop the tomatoes. Cut the green beans into bit sized pieces.

Add the oil to the pot and sauté the chopped onions and the carrots for about 10 minutes or until the onions are translucent and the carrots are starting to soften. I find the carrots cook faster if I put the lid on the pot so you might want to do the same. Just don’t forget to stir occasionally.

Add the oil to the pot and sauté the chopped onions and the carrots for about 10 minutes or until the onions are translucent and the carrots are starting to soften.

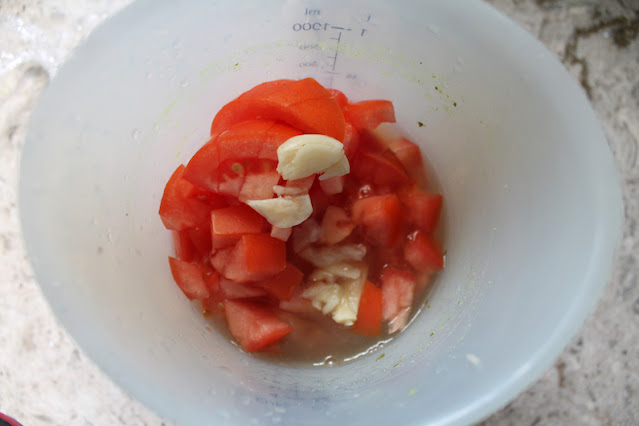
While the onion and carrots are cooking, place the tomatoes and garlic in the blender with a cup of the strained chicken broth. I have a hand blender so I popped mine in the hand blender vessel and whizzed them smooth with it. 

While the onion and carrots are cooking, place the tomatoes and garlic in the blender with a cup of the strained chicken broth. I have a hand blender so I popped mine in the hand blender vessel and whizzed them smooth with it.

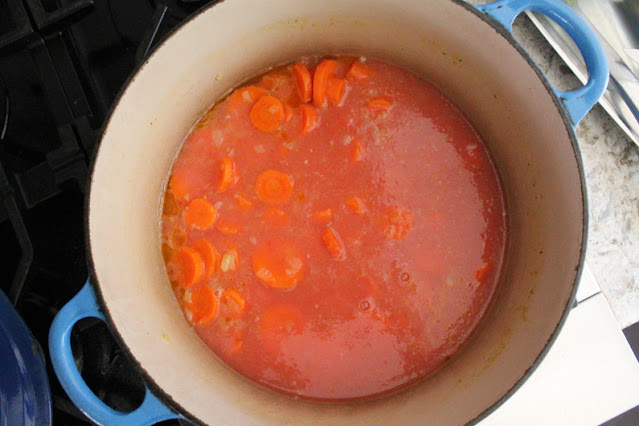
Add the tomatoes to the onion and carrots. 

Add the tomatoes to the onion and carrots.

Cook over a low heat for about 12 minutes or until the carrots are tender. At minute 8, add in the green beans. Give it a good stir. 


When the beans are just about cooked through, add the rest of the reserved chicken broth, chickpeas, epazote, cilantro, and shredded chicken. 

When the beans are just about cooked through, add the rest of the reserved chicken broth, chickpeas, epazote, cilantro, and shredded chicken.

Cook over low heat for 6 more minutes. Season with salt, if needed.

To serve, spoon the chicken and vegetables into bowls. Top with broth. Serve the cheese and chipotles in small plates at the table so that everyone can add what they’d like to their bowls. It is traditional to add one chipotle pepper to each bowl!

Food Lust People Love: Caldo Tlalpeño is a deliciously nutritious chicken and vegetable soup, perfect for chilly days, served with fresh cheese and chipotle chili peppers.

Enjoy!

It’s Sunday FunDay and my friends and I are sharing Mexican dishes to commemorate The Day of the Dead (el Día de los Muertos), a Mexican holiday where families welcome back the souls of their deceased relatives for a brief reunion that includes food, drink and celebration. Check out all the links below! Many thanks to our host, Camilla of Culinary Adventures with Camilla


We are a group of food bloggers who believe that Sunday should be a family fun day, so every Sunday we share recipes that will help you to enjoy your day. If you're a blogger interested in joining us, just visit our Facebook group and request to join.

Pin this Caldo Tlalpeño!

Food Lust People Love: Caldo Tlalpeño is a deliciously nutritious chicken and vegetable soup, perfect for chilly days, served with fresh cheese and chipotle chili peppers.

.

Monday, October 25, 2021

Lemon Poppy Seed Muffins #MuffinMonday

Lemon Poppy Seed Muffins are like a sweet burst of sunshine from the lemon juice and zest with the slightest crunch of the poppy seeds. 

Food Lust People Love: Lemon Poppy Seed Muffins are like a sweet burst of sunshine from the lemon juice and zest with the slightest crunch of the poppy seeds.

My younger daughter maintains that every time I ask her for muffin flavor suggestions she says lemon poppy seed. I honestly don’t think that can be true since, aside from the Meyer Lemon ones I baked back in 2014, I’ve never made plain lemon poppy seed muffins. And I’m usually pretty good about taking her suggestions.

In fairness though, I couldn’t legally own poppy seeds for the almost six years we lived in Dubai so maybe she asked me back then. Anyhoo, today I am finally fulfilling her request. These guys are just the right amount of tart and sweet.

Lemon Poppy Seed Muffins

To get more juice out of your lemon, put it in the microwave for about 15 seconds on high then roll it firmly under your hand on your kitchen counter or a cutting board. My lemon was small and I still managed to get 2 tablespoons of juice out of it!

Ingredients
For the muffins:
2 cups or 250g flour
2/3 cup or 132g sugar
2 teaspoons baking powder
1/2 teaspoon baking soda
1/4 teaspoon salt
2 tablespoons poppy seeds 
Grated zest and juice of 1 lemon (about 2 tablespoons)
3/4 cup or 184g Greek yogurt
1/4 cup or 60ml milk
2 large eggs, at room temperature
1/2 cup or 113g unsalted butter, melted and cooled, plus extra for the pan, if necessary

Method
Preheat your oven to 350°F or 180°C.  Prepare your 12-cup muffin pan by buttering it or line it with paper liners.

Add the flour, sugar, baking powder, baking soda, poppy seeds and salt to a large mixing bowl. Grate in the lemon zest and mix.


Juice your lemon into another mixing bowl. Add the eggs, milk, yogurt and melted butter to the juice bowl and whisk till well combined.


Pour the wet ingredients into the dry ones.


Stir until just mixed through.


Divide the mixture between the muffin cups in your prepared pan.


Bake in your preheated oven for 20-25 minutes or until golden. 


Allow the muffins to cool for a few minutes then remove the muffins to a wire rack to cool completely.  

Food Lust People Love: Lemon Poppy Seed Muffins are like a sweet burst of sunshine from the lemon juice and zest with the slightest crunch of the poppy seeds.

Enjoy!
Muffin Monday

#MuffinMonday is a group of muffin loving bakers who get together once a month to bake muffins. You can see all of our lovely muffins by following our Pinterest board. Updated links for all of our past events and more information about Muffin Monday can be found on our home page.


Pin these Lemon Poppy Seed Muffins!

Food Lust People Love: Lemon Poppy Seed Muffins are like a sweet burst of sunshine from the lemon juice and zest with the slightest crunch of the poppy seeds.

 .

Sunday, October 24, 2021

Bavarian Cheese Spread

Bavarian Cheese Spread, also known as obatzter, obazda, obazde, obazd'n and obatzda, is a strong cheese spread made with ripe Camembert, cream cheese, butter, onions, spices and, of course, beer. It’s a classic Bavarian beer garden recipe, best enjoyed with a cold stein of Weissbier or indeed, your own favorite brew.

Food Lust People Love: Bavarian Cheese Spread, also known as obatzter, obazda, obazde, obazd'n and obatzda, is a strong cheese spread made with ripe Camembert, cream cheese, butter, onions, spices and, of course, beer. It’s a classic Bavarian beer garden recipe, best enjoyed with a cold stein of Weissbier or indeed, your own favorite brew.

The original Obatzda recipe is credited to Katharina Eisenreich who was the innkeeper of the Bräustüberl Weihenstephan from 1920 -1958, a good long run. She served it to her guests as a light snack to accompany their morning beer and soon the idea spread, with many beer gardens creating their own special recipes. 

I'm just going to say that again to make sure you didn't skim by it: morning beer. Why don't we have a morning beer tradition? It sounds like a solid idea, at least on the weekend.

The recipe I’m sharing for this week’s Sunday FunDay Oktoberfest theme is purported to be that original Bavarian cheese spread recipe from the Bräustüberl Weihenstephan. I must confess that I had a certain reluctance to believe that a classic German cheese spread recipe would actually start with a French cheese. So I consulted an American friend who spent time in Germany growing up. Enough time that, in fact, she is fluent in German and is now a qualified German teacher. She kindly checked what she called the “German part of the web” and confirmed the recipe and added a bit more information. 

Bavarian Cheese Spread

Frau Eisenreich's Bavarian cheese spread does start with Camembert, the riper the better. The story there goes that it was created to use cheese that was reaching its use by date and was quite strong. Butter was added to make it milder. And to be authentic, obatzda must be mixed or kneaded together by hand. A side note that I found humorous: Apparently Germans call all cream cheese Philadelphia. 

Ingredients
8 3/4 oz or 250g Camembert cheese
1/3 cup or 70g butter
5 1/3 oz or 150g cream cheese, at room temperature.
4 1/4 oz or 120g onions, minced, plus extra sliced in rings to serve
1/4 teaspoon paprika, plus another pinch for garnish
1/4 teaspoon ground cumin
1 pinch each salt and pepper
7 tablespoons or 100ml Weißbier (weissbier/wheat beer)

Method
Cut the Camembert into small pieces with a sharp knife. This is easier when the Camembert is still chilled. Put it in a large mixing bowl and leave to come to room temperature.

Add butter, cream cheese, chopped onions, paprika, cumin, salt and pepper. 


Use your clean hands to thoroughly mix the ingredients together until you have a homogeneous paste. 


Use a rubber spatula to scrape the bowl, then add in the beer and mix again until all the beer is incorporated, using your hands or a wooden spoon. 


Cover the bowl with some cling film and refrigerate several hours or even till the next day to give the flavors time to combine.

Serve the Bavarian cheese spread sprinkled with a little paprika for garnish, along with brown bread or pretzels, slices of raw onion and, of course, beer. 

Food Lust People Love: Bavarian Cheese Spread, also known as obatzter, obazda, obazde, obazd'n and obatzda, is a strong cheese spread made with ripe Camembert, cream cheese, butter, onions, spices and, of course, beer. It’s a classic Bavarian beer garden recipe, best enjoyed with a cold stein of Weissbier or indeed, your own favorite brew.

It’s Sunday FunDay and we are here to help you celebrate Oktoberfest whether that’s a thing in your neck of the woods or not! Check out all the German fare we are sharing below! 


We are a group of food bloggers who believe that Sunday should be a family fun day, so every Sunday we share recipes that will help you to enjoy your day. If you're a blogger interested in joining us, just visit our Facebook group and request to join.

Pin this Bavarian Cheese Spread!

Food Lust People Love: Bavarian Cheese Spread, also known as obatzter, obazda, obazde, obazd'n and obatzda, is a strong cheese spread made with ripe Camembert, cream cheese, butter, onions, spices and, of course, beer. It’s a classic Bavarian beer garden recipe, best enjoyed with a cold stein of Weissbier or indeed, your own favorite brew.
 .

Thursday, October 21, 2021

Chocolate Spider Web Bundt Cake #BundtBakers

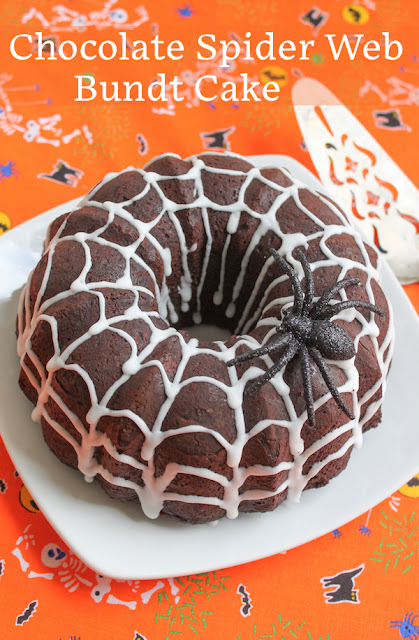
This Chocolate Spider Web Bundt Cake is super chocolate-y with a tender, light crumb and just the right amount of sweetness. Made with almond flour, sour cream and brown Swerve, it’s keto and diabetic friendly. 

Food Lust People Love: This Chocolate Spider Web Bundt Cake is super chocolate-y with a tender, light crumb and just the right amount of sweetness. Made with almond flour, sour cream and brown Swerve, it’s keto and diabetic friendly.

I know a lot of people took up new hobbies or learned a new craft last year during lockdown. I’m a little slow on the uptake. A few weeks ago an amazing knitter friend offered to teach a small group of us to knit. More for the camaraderie than anything, I agreed. 

My first project, a rather chunky small blanket made with thick yarn and immense needles, isn’t going as well as I could hope but I am determined to persevere and finish it. If only to say that I didn’t give up. I am enjoying the company of friends much more!

Yesterday, my small group – we like to call ourselves Well-Knit because aside from the actually knitting together now, we’ve been friends for almost 50 years! – came over for dinner. I made a pot of Four-Alarm Texas chili and a big spinach salad. This delicious cake was the perfect dessert for all of our varied diets and dietary needs, not to mention being holiday appropriate for October. 

Chocolate Spider Web Bundt Cake 

Aside from the eggs, the only leavening in this cake is the baking soda so it’s essential that you use unsweetened natural cocoa powder and not Dutch processed. The reaction between the acid in the natural cocoa (and the sour cream) and the baking soda is what gives this cake lift. 

Ingredients
For the cake:
melted unsalted butter for pan
4 large eggs
2/3 cup, packed, or 133g brown Swerve or brown sugar
2 teaspoons vanilla extract
1/2 cup or 120ml sour cream
2 cup or 226g almond flour
2/3 cup or 66g unsweetened cocoa powder (not Dutch processed), plus extra for pan
1/2 teaspoon fine sea salt
1 teaspoon baking soda

For the icing spider web:
2 tablespoons pasteurized egg whites (1 large egg white)
1 teaspoon lemon juice
1 1/3 cups 166g powdered Swerve or powdered sugar

For decoration: one plastic spider

Method
Preheat oven to 350°F or 163°C. Liberally butter a six-cup Bundt pan and sprinkle it thoroughly with cocoa powder.

In a large mixing bowl, whisk together the eggs, brown Swerve and vanilla extract. (This was my first time using Swerve and I was amazed by how much it looked exactly like brown sugar. But zero-calorie and low-glycemic. What sorcery is this?)


In another bowl. Sift together the cocoa powder, baking soda and salt. I live in a humid climate and despite keeping the cocoa powder and baking soda in airtight containers, they still get lumpy. If your cocoa and baking soda are free-flowing and lump free, you can skip the sifting step and put them right in the bowl. 


Whisk the sour cream, almond flour and cocoa powder mix into the egg/Swerve mixture.


Spoon the thick batter into your prepared pan. 


Bake until center is set, and a toothpick inserted in it comes out clean, 40-45 minutes.


Cool the cake for about 10 minutes, then turn it out on to a wire rack until it cools completely. 

To make the icing for the spider web, mix all the ingredients together in a small bowl. Stir well until it’s completely smooth. If it seems too runny to apply with a piping bag, add another tablespoon or two of powdered Swerve or sugar. 


Using a piping bag with a #3 tip, make lines down the Bundt cake from the bottom up and down the inside.


Starting at the top, pipe curves between the lines to complete the spider web. 


Use a spoon or spatula to fill the bottom of the spider with icing and press it gently to the cake to adhere. Royal icing hardens when it dries and will hold the spider in place nicely.

Food Lust People Love: This Chocolate Spider Web Bundt Cake is super chocolate-y with a tender, light crumb and just the right amount of sweetness. Made with almond flour, sour cream and brown Swerve, it’s keto and diabetic friendly.

Slice to serve!

Food Lust People Love: This Chocolate Spider Web Bundt Cake is super chocolate-y with a tender, light crumb and just the right amount of sweetness. Made with almond flour, sour cream and brown Swerve, it’s keto and diabetic friendly.

It’s Bundt Baker time and since it’s October and All Hallow’s Eve is nigh, we are sharing Halloween cakes! Check out the links below. Many thanks to our host, Wendy of A Day in the Life on the Farm!

#BundtBakers badge

#BundtBakers is a group of Bundt loving bakers who get together once a month to bake Bundts with a common ingredient or theme. You can see all of our lovely Bundts by following our Pinterest board. We take turns hosting each month and choosing the theme/ingredient. Updated links for all of our past events and more information about BundtBakers, can be found on our home page.

Pin this Chocolate Spider Web Bundt Cake!

Food Lust People Love: This Chocolate Spider Web Bundt Cake is super chocolate-y with a tender, light crumb and just the right amount of sweetness. Made with almond flour, sour cream and brown Swerve, it’s keto and diabetic friendly.
 .

Friday, October 15, 2021

Savory Craquelin Pastry Roast Salmon

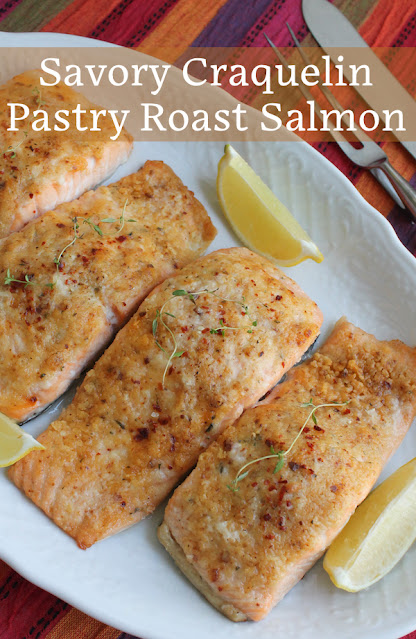
The topping on this Savory Craquelin Pastry Roast Salmon is a great way to add flavor and also make sure roast salmon doesn’t dry out in the oven. It's flavored with garlic, thyme, smoked sea salt flakes, aleppo pepper and just a sprinkle of nutmeg. 

Food Lust People Love: The topping on this Savory Craquelin Pastry Roast Salmon is a great way to add flavor and also make sure roast salmon doesn’t dry out in the oven. It's flavored with garlic, thyme, smoked sea salt flakes, aleppo pepper and just a sprinkle of nutmeg.

If you’ve seen my recipe for pineapple buns, you are already familiar with what craquelin pastry is, although to be fair, I never called it that. That thin topping I added to the buns - the one that baked up crunchy and shiny - is a craquelin. Indeed typically craquelin pastry is sweet. And it’s usually baked on a bread or pastry of some kind. 

The word itself is French, naturalment, and translates to “cracker.” I presume the topping was so named because it is crunchy like a cracker when baked, although I must warn you that that does not hold true when you bake it on top of fish.  It gets a little crunchy but certainly not cracker crisp!

Since craquelin pastry is usually sweet I was intrigued when I saw the recipe for savory craquelin in delicious. magazine and couldn’t wait to try it. Was it good? Suffice to say, I'll be making this again! The topping was flavorful and delightful and the salmon below was tasty and cooked to perfection.

Savory Craquelin Pastry Roast Salmon

As mentioned above, this recipe was adapted from one in the UK magazine delicious. March 2021 issue but you can also find it online. You can mix the craquelin by hand but it’s much easier to get it nice and smooth with an electric mixer and I promise you want it nice and smooth. 

Ingredients
4 salmon fillets, about 1.5 lbs or 800g altogether, at room temperature
Juice of 1/2 lemon, plus wedges for serving

For the craquelin pastry topping:
2 slightly rounded tablespoons unsalted butter (about 30g), at room temperature
1/2 teaspoon demerara sugar
1 teaspoon smoked sea salt flakes (I used Maldon.)
Sprinkle freshly grated nutmeg
1/2 teaspoon pul biber (aleppo pepper) or substitute 1/4 teaspoon cayenne pepper, plus extra to serve, if you like
1 fat clove garlic, crushed and minced
2 sprigs fresh thyme, leaves picked off and chopped, plus extra sprigs to serve
3 tablespoons plain flour

Method
Preheat your oven to 425°F or 218°C and prepare your baking pan by lining it with baking parchment.

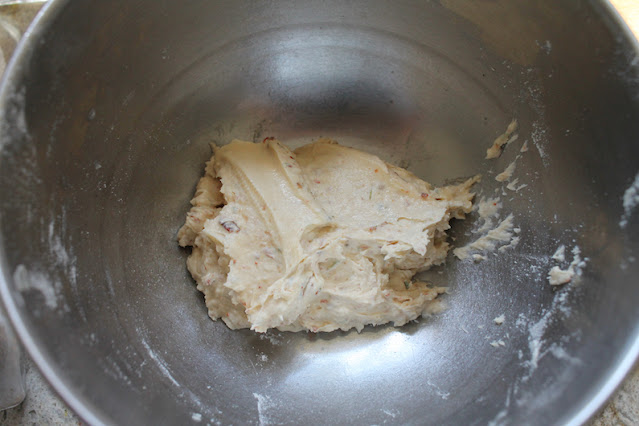
Use electric beaters to make the craquelin pastry topping by creaming the butter and sugar together until light and fluffy. Add in the salt, nutmeg, pul biber, garlic, thyme and flour.


Beat again until it’s thoroughly combined and spreadable.


Put the salmon on the lined baking pan, skin-side down. Dry the tops thoroughly with a paper towel. If the fish is wet, it’s a challenge to get the craquelin to stick and spread. 

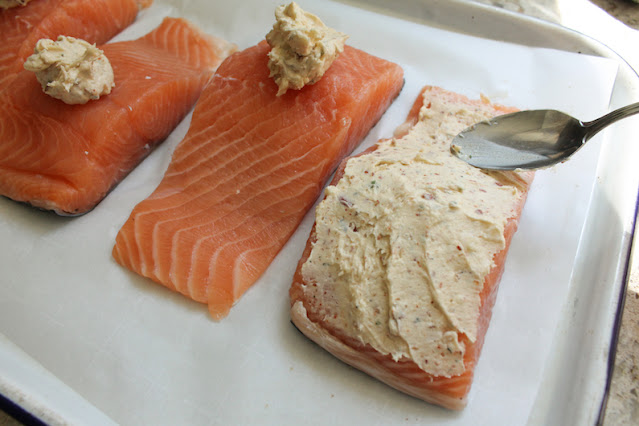
Divide the craquelin dough between the salmon fillets. Spread each over the top of the fish using the back of a spoon. 


Pop the pan in your preheated oven and bake for 15 minutes. Finish it off under the broiler for 1-2 minutes or until the top is golden and the fish is just cooked through.


Sprinkle the fillets with the lemon juice, then add an extra sprig of thyme to each and a pinch more aleppo pepper or cayenne, if desired. 


Enjoy!


It's the second Friday of the month so that means it's time for my Fish Friday Foodie friends to share recipes with you. Our theme today is Salmon Chanted Evening 🤣   but feel free to make these for lunch as well! Many thanks to our host, Sue of Palatable Pastime for the fun theme name and all her behind the scenes work! 


Would you like to join Fish Friday Foodies? We post and share new seafood/fish recipes on the third Friday of the month. To join our group please email Wendy at wendyklik1517 (at) gmail.com. Visit our Facebook page and Pinterest page for more wonderful fish and seafood recipe ideas.

Pin this Savory Craquelin Pastry Roast Salmon!

Food Lust People Love: The topping on this Savory Craquelin Pastry Roast Salmon is a great way to add flavor and also make sure roast salmon doesn’t dry out in the oven. It's flavored with garlic, thyme, smoked sea salt flakes, aleppo pepper and just a sprinkle of nutmeg.

 .

Tuesday, October 12, 2021

Sourdough Tangzhong Bread #BreadBakers

This Sourdough Tangzhong Bread is flavorful with a wonderful texture, perfect for eating on its own or toasted with butter and jam. Start a day or two ahead of when you want to bake for the best flavor.

Food Lust People Love: This Sourdough Tangzhong Bread is flavorful with a wonderful texture, perfect for eating on its own or toasted with butter and jam. Start a day or two ahead of when you want to bake for the best flavor.

Like many of us, I took the lockdown days of this pandemic as an opportunity to create a sourdough starter. I did have one before we left Dubai but I am not a dedicated enough owner to try to transport it in an airplane. The more devoted among you will probably be horrified to hear that I tipped my unnamed starter out, washed the jar and didn’t even feel guilty. 

That said, I’ve been enjoying this one in a variety of recipes. You might want to try my sourdough pancakes or sourdough chocolate Bundt cake. Both delicious. Still haven’t named my starter yet though, just in case it needs to go at some point. Or I kill it. 

As for the tangzhong, I learned all about it when I made my first loaf with the method, a rye bread where it came in very handy to add structure and substance. When the flour you are using is low in gluten, like rye, knowing how to make a tangzhong is a very good thing! Making it in the microwave was such a breeze that I’ll never do it any other way now. 

N.B. An accurate thermometer is essential for this recipe. 

Sourdough Tangzhong Bread

This recipe is adapted from one on Food Geek. The author says his is not a recipe for beginners so I simplified it. While I didn’t get as airy a loaf as he did, we were super pleased with the flavor and texture. 

Ingredients for two round loaves
For the tangzhong:
1/2 cup or 64g bread flour
1 cup + 2 1/2 tablespoons or 275ml water

For the dough:
4 1/4 cups or 540g bread flour
1 1/3 cups or 170g whole-grain wheat flour
2 1/2 teaspoons salt
1 2/3 cups or 380ml water
Tangzhong 
3/4 cup or 170g sourdough starter

Method
Make tangzhong by mixing the flour and water with a whisk in a microwaveable bowl. 


Microwave on high until the mixture is above 149°F or 65°C. It took about 1 minute and 40 seconds in my 1000W microwave. Whisk halfway through then whisk again at the end. Your tangzhong will be thick and glossy. 


Set the tangzhong aside to cool to at least 86°F or 30°C.

To make the dough, add 4 1/4 cups or 531g bread flour, 172g whole-grain wheat flour, and 16g salt to the bowl of your stand mixer. 

Add 1 2/3 cups or 380ml of water to the bowl along with the cooled tangzhong.


Incorporate all the water into the flour mixture using your paddle beater or bread hook. Just keep mixing until there's no dry flour left. Cover the bowl with a little cling film or a damp towel and set it aside for 30 minutes. 


Add 170g of the sourdough starter on top of the dough and use the bread hook to incorporate it. 


Cover the bowl again with cling film or a damp towel and let it rest again for another 30 minutes. 

Rather than traditional kneading, the gluten strands are formed and stretched in this dough by performing three sets of coil folds spaced out by 30 minutes. I’m going to save us all a long explanation by including this YouTube video that shows you exactly what to do. Here's the link in case the video isn't working. https://youtu.be/6JQm2n4aVZc


You want to do this once, wait 30 minutes, do it again, wait 30 minutes, then do the final coil fold for a total of three times in all.

Cover the bowl again with cling film or a damp towel and set it somewhere warm for about an hour or until it has doubled in size. 


Put the bowl in a refrigerator for 24-48 hours. 

On the day you are ready to bake, remove the dough from the refrigerator and divide and shape the dough by cutting it in half with a bench scraper.


Shape each half into a ball. Stretch each side out and fold it up and over the ball until you’ve done that from all four sides. Pinch the ends together. 


Use the scraper to flip the ball over onto a square of baking parchment. Sprinkle on flour liberally and use the scraper to tuck the edges of the dough into a snug circle. Repeat for the other dough ball.


Transfer the dough balls on the baking parchment to your baking pan. 

Sprinkle the dough balls with extra flour and put the whole pan inside a plastic bag. To make sure it doesn’t stick to the dough balls, I like to blow it full of air and secure the opening with a clip. Set aside in a warm place to rise for about 1 hour.


About half way through the rising time, put an empty baking pan or iron skillet on the bottom rack and preheat your oven to 450°F or 232°C.

Carefully remove the baking pan from the plastic bag. Put the kettle on now because you are going to need one cup or 240ml boiling water when you put the loaves in the oven. 

Use a sharp knife or lame to score the dough. This will allow the loaves to rise and expand as they bake. 


When your oven is sufficiently preheated, put the bread pan on the middle rack of your oven and carefully pour about 1 cup or 240ml boiling water into the empty pan or skillet on the bottom rack. Quickly close the oven door. 

Bake the loaves for about 35-40 minutes or until they are golden and sound hollow when thumped.


Take the bread out and put it on a wire rack. Let the loaves cool completely before slicing. 

Food Lust People Love: This Sourdough Tangzhong Bread is flavorful with a wonderful texture, perfect for eating on its own or toasted with butter and jam. Start a day or two ahead of when you want to bake for the best flavor.

Enjoy!

This month my Bread Bakers are all sharing bread recipes using a tangzhong. Check out the links below! Many thanks to our host, Karen of Karen’s Kitchen Stories!

BreadBakers
#BreadBakers is a group of bread loving bakers who get together once a month to bake bread with a common ingredient or theme. Follow our Pinterest board right here. Links are also updated each month on this home page. We take turns hosting each month and choosing the theme/ingredient.

Pin this Sourdough Tangzhong Bread!

Food Lust People Love: This Sourdough Tangzhong Bread is flavorful with a wonderful texture, perfect for eating on its own or toasted with butter and jam. Start a day or two ahead of when you want to bake for the best flavor.

 .