Monday, October 28, 2019

Tiny Taco Bites #MuffinMonday

These tiny taco bites are made with oven baked tortillas filled with spicy ground beef and extra sharp cheddar, then topped with a fresh pico de gallo made with onions, tomatoes and jalapeños. They’d be great as an appetizer for your next cocktail party, especially if you are serving margaritas.

Food Lust People Love: These tiny taco bites are made with oven baked tortillas filled with spicy ground beef and extra sharp cheddar, then topped with a fresh pico de gallo made with onions, tomatoes and jalapeños. They’d be great as an appetizer for your next cocktail party, especially if you are serving margaritas. For the taco seasoning, I use a brand called Tone’s. It comes in a large container so I just scoop out how much I need when seasoning taco and enchilada beef and even fajitas, rather than buying those little pouches of spice mix. Such a waste of packaging. You can always make your own, of course. Plenty of recipes online. For the tortillas, I love the ones at my local grocery store here in Houston, called mitad y mitad: half and half, by which they mean half corn and half flour. This is Texas, after all, where many aspire to be bilingual. They are flavorful because of the corn and supple because of the flour. Use whichever fresh tortillas you can find or your personal favorite.

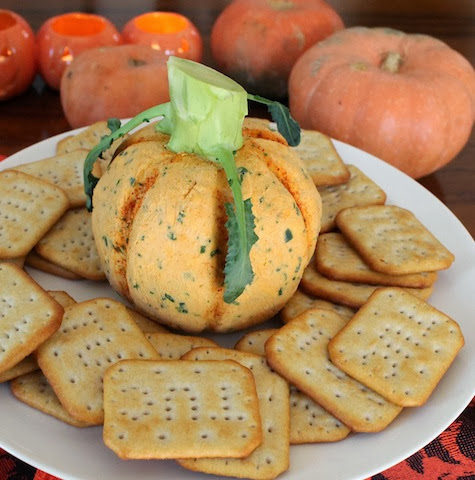
Saturday night we were invited over to my brother-in-law’s home for an early birthday dinner of fajitas and margaritas. (He turns 50 on Thursday!) Of course, I always ask what we can bring. “An appetizer,” came the response. It just so happens that my Muffin Monday friends are going rogue this month, that is to say, using our muffin pans for deliciousness other than actual muffins. Otherwise I’d have made some savory mini muffins. Perhaps even my artichoke dip mini muffins. We all LOVE those. I also considered my sincere pumpkin patch cheese ball, because Thursday is Halloween, after all. It's not just adorable but tasty too.


But I’ve long been wanting to make tiny taco bites using Tostitos scoops. They are already perfect little bowls! I floated that idea by my younger daughter and she shook her head. Apparently she finds Tostitos too salty. And anyway, I thought that was an idea for another day, since it didn’t use a muffin pan. Then inspiration struck. I could make the tiny taco bowls myself with fresh tortillas and a mini muffin pan, killing two birds with one stone, so to speak.

As with most of my other fabulous ideas, when I checked the interwebs, there were almost 4 million results. It would seem tacos in a muffin pan are a thing. Never mind. These are delicious and bite-sized, and everyone at the dinner party loved them! Make sure you scroll down and check out all the other fun non-muffin recipes you can make in your muffin pan.

Tiny Taco Bites

For the taco seasoning, I use a brand called Tone’s. It comes in a large container so I just scoop out how much I need when seasoning taco and enchilada beef and even fajitas, rather than buying those little pouches of spice mix. Such a waste of packaging. You can always make your own, of course. Plenty of recipes online. For the tortillas, I love the ones at my local grocery store here in Houston, called mitad y mitad: half and half, by which they mean half corn and half flour. This is Texas, after all, where many aspire to be bilingual. They are flavorful because of the corn and supple because of the flour. Use whichever fresh tortillas you can find or your personal favorite.

Ingredients
For the beef filling:
1 lb or 450g ground beef (I used ground sirloin. Because it’s lean, you don’t lose much weight as it cooks. More to eat!)
2 tablespoons olive oil – if your ground beef is fatty, you might not need as much
1/4 cup or taco seasonings
2/3 cup or 156ml water

For the tiny taco bowls:
16-18 (6-in or 15cm) soft corn, half corn/half flour or flour tortillas
2-3 teaspoons canola or other light oil for greasing the muffin pan

For the pico de gallo:
3 ripe Roma tomatoes (approx. 1 lb or 450g in weight)
1/2 large onion
2-3 fresh jalapeños
Small bunch fresh cilantro
2-3 tablespoon fresh lime juice
Pinch fine sea salt
Pinch sugar
Freshly ground black pepper

For topping:
4 oz or 113g extra sharp cheddar, grated finely

Method
Brown the beef in the olive oil over a medium high heat, breaking it up into little pieces as it browns. When it’s well browned, even crunchy in places, add the taco spice mix and the water.


Pop the lid on and lower the heat to simmer. Simmer covered for 5-7 minutes. Remove the lid and simmer uncovered until most of the water has evaporated, another few minutes. Remove from the heat and tip the pan to one side so any oil drains off and collects away from  the beef.

Meanwhile, preheat your oven to 325°F or 163°C. Grease a 24-cup mini muffin pan with a little canola.

Cut the tortillas into 3 in or 7cm circles using a cookie cutter. (Save all the scraps for making your favorite tortilla soup recipe!) With a 3 in (7cm) cookie cutter, I got 3 taco bowls per tortilla. They don’t hold much so the seasoned beef was enough for 54 tiny taco bites! The perfect bite-sized appetizer, truly.


Use the bottom of a small glass or jigger to press the circles of tortilla into the mini muffin pan. I find it helps them release if you also grease the jigger.


Bake the tiny taco bowls in your preheated oven for 10-12 minutes, rotating the pan halfway through so they brown evenly. Watch them closely so they don’t suddenly burn. Remove them from the oven. Some of them will be puffy and not so bowl-like anymore.

As soon as they are cool enough to handle, use a folded towel if you need to, pick the puffed ones out of the muffin pan and put the glass or jigger back in it and press the bowl back into the muffin pan. Place to cool on a wire rack. Cute, right?


Continue cutting and baking all of the tortillas, until you have about 50 of them.

While they bake, cut the onion into small bits. Stem and chop the jalapeños small as well. When chopping the jalapeños, remove the membranes and seeds if your family and friends aren’t chili lovers. At our house we say, the hotter, the better.

Put the chopped onion and jalapeños in a bowl with the fresh lime juice and a pinch of salt, a pinch of sugar and a few good grinds of black pepper. Stir well and set aside.


Cut the tomatoes in half and remove all the seeds and juice. We don't want the pico de gallo too wet or it will make the taco bowls soggy. Chop the tomatoes finely. Remove the hard stems from the cilantro and chop it roughly. Add the tomatoes and cilantro to the onion/jalapeño bowl. Mix well.


Turn your oven temperature up to 350°F or 180°C. In a large baking pan, arrange your tiny taco bowls and divide the spicy beef between them.

Top with the grated cheese.


Bake the tiny taco bites for about 10 minutes or until the cheese is melted and the beef is hot through. I actually made these through this step and then baked again for 10 minutes at 350° or 180° when I arrived at my brother-in-laws, just to warm them again. These guys are very forgiving though, delicious even at room temperature.


Top with pico de gallo or set the pico out with a spoon and let everyone top the tiny tacos themselves so they don't get soggy.

Food Lust People Love: These tiny taco bites are made with oven baked tortillas filled with spicy ground beef and extra sharp cheddar, then topped with a fresh pico de gallo made with onions, tomatoes and jalapeños. They’d be great as an appetizer for your next cocktail party, especially if you are serving margaritas. For the taco seasoning, I use a brand called Tone’s. It comes in a large container so I just scoop out how much I need when seasoning taco and enchilada beef and even fajitas, rather than buying those little pouches of spice mix. Such a waste of packaging. You can always make your own, of course. Plenty of recipes online. For the tortillas, I love the ones at my local grocery store here in Houston, called mitad y mitad: half and half, by which they mean half corn and half flour. This is Texas, after all, where many aspire to be bilingual. They are flavorful because of the corn and supple because of the flour. Use whichever fresh tortillas you can find or your personal favorite.


Enjoy!

Many thanks to Sue of Palatable Pastime for her fun suggestion that we go rogue for Muffin Monday and use our muffin pans for other delicious recipes. This just might be a more regularly scheduled theme, if feedback is positive. Check out the other great recipes below:
Muffin Monday
#MuffinMonday is a group of muffin loving bakers who get together once a month to bake muffins. You can see all of our lovely muffins by following our Pinterest board. Updated links for all of our past events and more information about Muffin Monday can be found on our home page.

Pin these Tiny Taco Bites!

Food Lust People Love: These tiny taco bites are made with oven baked tortillas filled with spicy ground beef and extra sharp cheddar, then topped with a fresh pico de gallo made with onions, tomatoes and jalapeños. They’d be great as an appetizer for your next cocktail party, especially if you are serving margaritas. For the taco seasoning, I use a brand called Tone’s. It comes in a large container so I just scoop out how much I need when seasoning taco and enchilada beef and even fajitas, rather than buying those little pouches of spice mix. Such a waste of packaging. You can always make your own, of course. Plenty of recipes online. For the tortillas, I love the ones at my local grocery store here in Houston, called mitad y mitad: half and half, by which they mean half corn and half flour. This is Texas, after all, where many aspire to be bilingual. They are flavorful because of the corn and supple because of the flour. Use whichever fresh tortillas you can find or your personal favorite.
.

Friday, October 18, 2019

Herb Butter Poached Wild Salmon #FishFridayFoodies

Herb butter poached wild salmon is tender and flavorful. The herbs complement the delicate flavor of the fish, and the simmering butter ensures that it won’t overcook or dry out.

Food Lust People Lust: Herb butter poached wild salmon is tender and flavorful. The herbs complement the delicate flavor of the fish, and the simmering butter ensures that it won’t overcook or dry out. Do not worry about all the “leftover” butter. It can be used to flavor vegetables, in another seafood dish or chill it and pop it in an airtight bag in the freezer to keep for the next time you poach fish.

I’m a fan of all salmon but I especially love the flavor of wild sockeye salmon. This is going to sound odd perhaps, but it reminds me more of crab than of its relation, farmed salmon. Aside from cost, the only problem with wild salmon is that it is so lean that it’s easy to overcook, if you are not careful. Nobody wants dry fish. Fish should be tender and flaky, and even, (dare I use the hated word?) moist.

Poaching to the rescue! One can, of course, poach seafood in all sorts of liquids. As a matter of fact, if you scroll on down past my wild salmon, you’ll find links to several recipes since that’s this month’s theme for my Fish Friday Foodies group. While researching methods, I came across a recipe for butter poaching fish and thought, sure. Confit duck is essentially duck poached long and slow in duck fat. No good reason why we can’t poach fish in butter. It just hadn’t occurred to me.

Wild salmon is perfect for poaching in herb butter. It cooks relatively quickly, even on a gentle simmer, and turns out so very - here I go again - moist. I’m not sure I can cook it any other way now. Such a treat.

I mean, really. Look at that color. Delicious as it can also be, farmed salmon cannot outdo wild salmon for color. Some people even say it's better for us.


Herb Butter Poached Wild Salmon

Do not worry about all the “leftover” butter. It can be used to flavor vegetables, in another seafood dish or chill it and pop it in an airtight bag in the freezer to keep for the next time you poach fish.

Ingredients
4 wild salmon fillets (about 1 lb or 450g in total)
1 1/2 cups or 340g butter
A few sprigs parsley
A few sprigs thyme
Fine sea salt
Freshly ground black pepper
Ground cayenne pepper
To serve: slices of lemon

Method
Remove any hard stems from the herbs and chop them finely. Season the fish fillets with a sprinkle of salt and the two peppers, on both sides.

Melt the butter in as small a pan as will fit your fish, with high enough sides to contain butter to cover. As it warms up, add in the minced herbs.


Gently add the fish fillets to the herbed butter, skin side down. Poach the salmon over a low heat until it flakes easily, about 10 minutes. If the butter doesn't quite cover it, spoon the simmering butter over it occasionally.


Remove the fish fillets from the herb butter. Serve with a spoonful of the herb butter over each fillet and a slice of juicy lemon.

Food Lust People Lust: Herb butter poached wild salmon is tender and flavorful. The herbs complement the delicate flavor of the fish, and the simmering butter ensures that it won’t overcook or dry out. Do not worry about all the “leftover” butter. It can be used to flavor vegetables, in another seafood dish or chill it and pop it in an airtight bag in the freezer to keep for the next time you poach fish.

Enjoy!

Food Lust People Lust: Herb butter poached wild salmon is tender and flavorful. The herbs complement the delicate flavor of the fish, and the simmering butter ensures that it won’t overcook or dry out. Do not worry about all the “leftover” butter. It can be used to flavor vegetables, in another seafood dish or chill it and pop it in an airtight bag in the freezer to keep for the next time you poach fish.

Check out all the lovely poached fish recipes my Fish Friday Foodie friends are sharing today. Many thanks to our group creator and organizer, Wendy from A Day in the Life on the Farm for this great theme and all of her behind the scenes work that keeps this blogging event running so smoothly.


Would you like to join Fish Friday Foodies? We post and share new seafood/fish recipes on the third Friday of the month. To join our group please email Wendy at wendyklik1517 (at) gmail.com. Visit our Facebook page and Pinterest page for more wonderful fish and seafood recipe ideas.


Pin this Herb Butter Poached Wild Salmon!

Food Lust People Lust: Herb butter poached wild salmon is tender and flavorful. The herbs complement the delicate flavor of the fish, and the simmering butter ensures that it won’t overcook or dry out. Do not worry about all the “leftover” butter. It can be used to flavor vegetables, in another seafood dish or chill it and pop it in an airtight bag in the freezer to keep for the next time you poach fish.
 .

Thursday, October 17, 2019

Classic Crème Caramel #BundtBakers

Rich, flavorful caramel? Check. Soft, spoonable custard? Check. Sticky sweet baked sides? Check. This classic crème caramel ticks all the boxes and, since it’s baked in a Bundt pan, it’s pretty too. Perfect for a party.

Food Lust People Love: Rich, flavorful caramel? Check. Soft, spoonable custard? Check. Sticky sweet baked sides? Check. This classic crème caramel ticks all the boxes and, since it’s baked in a Bundt pan, it’s pretty too. Perfect for a party. This recipe is adapted from one shared a couple of years ago by my fellow Bundt Baker, Felice from All That’s Left Are the Crumbs. It couldn’t be easier to make since the custard ingredients are blitzed together in a blender. The caramelized sugar is a little bit tricky but very manageable. I promise you the effort is worth it.


Many years ago, I somehow got the impression that crème caramel, aka flan, was my younger daughter’s favorite dessert. It must have been a weird conversation because she got the impression that it was mine.

It took us years, years I tell you, to figure out that we both misunderstood. Truth is, we both like it but it is not our favorite dessert. That may have changed for me with this recipe. I’m not a huge sweet lover but this crème caramel is just the perfect amount of sweet. It’s the creamiest, the softest, the very best crème caramel I’ve ever tasted. Seriously.

Classic Crème Caramel

This recipe is adapted from one shared a couple of years ago by my fellow Bundt Baker, Felice from All That’s Left Are the Crumbs. It couldn’t be easier to make since the custard ingredients are blitzed together in a blender. The caramelized sugar is a little bit tricky but very manageable. I promise you the effort is worth it.

Ingredients
6 large eggs
1 can (weight - 14 oz or 396g) sweetened condensed milk
1 1/2 cups or 354ml evaporated milk
1 1/2 cups or 354ml whole milk
2 teaspoons vanilla extract
1 1/4 cups or 250g sugar

Method
Preheat oven to 350℉ or 180℃.
Place your eggs in the blender and blend on medium high for about 15 seconds. I suggest you crack each egg into a small bowl before adding them to the blender. If you add a bad egg to the mix, you'll have to throw them all out and start again. Better safe than sorry.


Add the sweetened condensed milk, evaporated milk and whole milk to the blender, along with the vanilla. Blend on medium high for 30 seconds; set aside.


Place sugar in a dry saucepan and cook over medium high heat for about 5 minutes, until it starts to melt and turn golden in a few spots. If it should start to form clumps, break them up with a spoon and cook until the sugar liquefies again and turns completely golden. Be careful to take the syrup off the heat promptly because it can burn easily at this point.


Meanwhile, put a full kettle on to boil. You are going to need enough hot water to fill a roasting pan to at least two inches or 5cm up the side of a 12-cup Bundt pan.

Warm your Bundt pan by sitting it in a bowl with hot tap water. Use a silicone pastry brush to coat the Bundt pan with the golden caramel halfway up the sides of the pan, including the tube in the middle. If you live somewhere really warm, perhaps warming the pan wouldn’t be necessary but my kitchen was chilly and as I brushed the caramel on the cold pan, it solidified immediately. Warming the pan helped.


Place the Bundt pan into a deep roasting pan and carefully fill it with the vanilla custard.


Put the roasting pan with Bundt pan into your preheated oven, then pour hot water into the roasting pan, about 2 in or 5cm up the side of the Bundt pan.

Bake the crème caramel for 55-60 minutes or until an inserted knife comes out clean.

After removing it from the oven, leave it to cool for a few minutes on a wire rack, then use a rounded knife to ease the crème caramel away from the Bundt pan, around the edges and around the center tube.


After the crème caramel has cooled, tilt the Bundt pan back and forth gently, until you can see the caramel oozing up the sides of the pan.

Cover with cling film and refrigerate for at least 6 hours or overnight.

Tilt the Bundt pan again to see how thick your caramel is. Mine was still thin enough to seep up the sides. If yours is very thick, you might want to warm the Bundt pan briefly by setting it in a bowl of warm water to loosen the caramel before turning the crème caramel out.

To turn the crème caramel out of the Bundt pan, invert a rimmed platter on top of the Bundt pan. Note: The rim is very important because we don’t want to have the caramel roll off a flat platter!

Hold the platter tight against the Bundt pan and quickly flip the pan over, being careful not to lose the liquid caramel. I did this over the sink, just in case, but I am pleased to say I didn’t spill a drop. If you have someone nearby who can help you in the kitchen, have them take the platter from you when you flip it over.

Food Lust People Love: Rich, flavorful caramel? Check. Soft, spoonable custard? Check. Sticky sweet baked sides? Check. This classic crème caramel ticks all the boxes and, since it’s baked in a Bundt pan, it’s pretty too. Perfect for a party. This recipe is adapted from one shared a couple of years ago by my fellow Bundt Baker, Felice from All That’s Left Are the Crumbs. It couldn’t be easier to make since the custard ingredients are blitzed together in a blender. The caramelized sugar is a little bit tricky but very manageable. I promise you the effort is worth it.


Keep the crème caramel chilled until you are ready to cut and serve.

Food Lust People Love: Rich, flavorful caramel? Check. Soft, spoonable custard? Check. Sticky sweet baked sides? Check. This classic crème caramel ticks all the boxes and, since it’s baked in a Bundt pan, it’s pretty too. Perfect for a party. This recipe is adapted from one shared a couple of years ago by my fellow Bundt Baker, Felice from All That’s Left Are the Crumbs. It couldn’t be easier to make since the custard ingredients are blitzed together in a blender. The caramelized sugar is a little bit tricky but very manageable. I promise you the effort is worth it.


Enjoy!

This month my Bundt Bakers are sharing puddings baked in Bundt pans. Many thanks to our host, Sneha of Sneha’s Recipe, for the great theme and her behind the scenes work. Check out all of the great pudding Bundt recipes:
BundtBakers

#BundtBakers is a group of Bundt loving bakers who get together once a month to bake Bundts with a common ingredient or theme. You can see all of our lovely Bundts by following our Pinterest board. We take turns hosting each month and choosing the theme/ingredient. Updated links for all of our past events and more information about BundtBakers, can be found on our home page.

Pin this Classic Crème Caramel! 

Food Lust People Love: Rich, flavorful caramel? Check. Soft, spoonable custard? Check. Sticky sweet baked sides? Check. This classic crème caramel ticks all the boxes and, since it’s baked in a Bundt pan, it’s pretty too. Perfect for a party. This recipe is adapted from one shared a couple of years ago by my fellow Bundt Baker, Felice from All That’s Left Are the Crumbs. It couldn’t be easier to make since the custard ingredients are blitzed together in a blender. The caramelized sugar is a little bit tricky but very manageable. I promise you the effort is worth it.
.

Tuesday, October 8, 2019

Soft Potato Buns #BreadBakers

These soft potato buns are made with cooked mash potatoes. They are light, fluffy and just sweet enough to qualify as sweet bread, especially with the vanilla custard crosses.

Food Lust People Love: These soft potato buns are made with cooked mash potatoes. They are light, fluffy and just sweet enough to qualify as sweet bread, especially with the vanilla custard crosses.


Years ago, when we first moved to Kuala Lumpur, Malaysia, I was delighted to discover the hypermarket chain Carrefour there. I first fell in love with Carrefour’s clean, bright, well-stocked stores in their native France and again when a branch opened just outside of Rio de Janeiro, when we lived in Brazil. My friends and I would drop the kids at school, drive two and a half hours there for a big shopping trip, then turn around and drive back home. Good times!

One thing that Carrefour does very well wherever they do business is offer high quality local products and traditional flavors, as well as imported French specialties. The best of both worlds.

In KL and Singapore, the in-house bakery made sweet soft potato rolls very much like the ones I am sharing today. They were baked on enormous sheet pans, then divided into groups of nine and bagged up warm. Nothing made us happier than to arrive just as a fresh batch came out.

Often we’d buy two steamy bags because that first one didn’t even make it home; it was quickly devoured as soon as we got in the car.

Soft Potato Buns

This recipe was adapted from one in Singaporean Chef Agnes Chang’s book I Can Bake which I found on the blog Bake for Happy Kids and adapted further. My elder daughter has been making it for the last couple of years, always preparing the dough and leaving it to rise slowly overnight, because you want these buns for breakfast! If you don’t have time to cook homemade custard, you can certainly substitute store-bought or, as in Chef Chang's original recipe, custard made from powder.

Ingredients
For the dough:
5 1/3 oz or 150g peeled potato
2 3/4 cups or 350g bread flour
1/3 cup or 80ml water used to boil the potatoes
1/3 cup or 66g sugar
2 teaspoons active dry yeast
30g milk powder
1 large egg
1/3 cup or 75g butter, softened, plus a little extra for dough bowl

For the egg wash:
1 egg yolk
2 tablespoons milk
pinch of salt

For the custard:
1⁄4 cup or 55g fine (caster) sugar
1⁄3 cup or 42g all-purpose flour
1⁄8 teaspoon salt
1 cup or 240ml milk
2 egg yolks
2 teaspoons butter
1 teaspoons vanilla extract

Method
Boil your potato in enough water to cover. When the potato is tender, strain out the water, setting it aside to cool a little. Mash the potato until smooth and set aside to cool as well. You should end up with about 3/4 cup or 162g of mashed potatoes.

In the bowl of your stand mixer, proof the yeast with the sugar, the tepid potato water and 1 cup or 125g of the bread flour. When the yeast bubbles up, you know it’s good and can continue with the next steps.


Add in the rest of the bread flour, mashed potato, egg, powdered milk and salt.

Use the bread hook and mix all the ingredients until they form a soft dough. Continue with the bread hook, kneading the dough until it is smooth and stretchy. Add in the butter, a few slices at a time, and continue kneading until it is all incorporated into the dough.


Butter a mixing bowl with room for the dough to double that will fit comfortably in your refrigerator. Put the dough in the buttered bowl and cover with a damp towel or cling film. Put it in the refrigerator for the dough to rise overnight.


Meanwhile, make your custard. If you are doing homemade, I use the method on this post. With the ingredient amounts above, you will have much more than you need for the buns, but trust me, it will get eaten and quickly. You might even have enough for a small personal banana cream pie.

Take the dough out of the refrigerator, punch it down and give it another quick knead in the bowl. Divide the dough into 12 even pieces. My dough weighed 778g, so each ball was about 64g. Roll each into a ball and place in a baking pan lined with baking parchment.


If you are so lucky as to have a proofing bag, use it. If not, use a new plastic garbage bag and pop the baking pan inside. Keeping it full of air, pinch the opening closed and secure it with a clip. Leave the buns to rise for 45-60 minutes or until nearly doubled in size.


When the buns are almost fully risen, preheat your oven to 350°F or 180°C.

To make the egg wash, whisk the egg yolk with the milk and salt. Use a soft pastry brush to apply the wash to the tops of the buns. With a piping bag, make a cross with the custard across each bun. Bake in the preheated for about 18-22 minutes or until the buns are well risen and golden.

Food Lust People Love: These soft potato buns are made with cooked mash potatoes. They are light, fluffy and just sweet enough to qualify as sweet bread, especially with the vanilla custard crosses.


Remove from the oven and cool for about 10 minutes in the pan. Slide the buns and parchment out onto a wire rack to cool completely. Or eat the soft potato buns warm and in your car for the whole Southeast Asian Carrefour experience.

Enjoy!

Food Lust People Love: These soft potato buns are made with cooked mash potatoes. They are light, fluffy and just sweet enough to qualify as sweet bread, especially with the vanilla custard crosses.

Many thanks to our Bread Baker host this month, Karen of Karen Kitchen Stories, for our great theme of “make ahead bread” and all of her behind the scenes work. Check out all the other lovely breads we are sharing today:


#BreadBakers is a group of bread loving bakers who get together once a month to bake bread with a common ingredient or theme. You can see all our of lovely bread by following our Pinterest board right here.  Links are also updated after each event on the BreadBakers home page. We take turns hosting each month and choosing the theme/ingredient.
BreadBakers

Pin these Soft Potato Buns! 

Food Lust People Love: These soft potato buns are made with cooked mash potatoes. They are light, fluffy and just sweet enough to qualify as sweet bread, especially with the vanilla custard crosses.
 .

Wednesday, October 2, 2019

Cider-braised Pig Cheeks with Apples #FoodieExtravaganza

These cider-braised pig cheeks with apples are a triumph of slow cooking at its tender-making best. Both the pork and the apples are melt in your mouth delicious, a perfect bowl of Autumn on a chilly day.

Food Lust People Love: These cider-braised pig cheeks with apples are a triumph of slow cooking at its tender-making best. Both the pork and the apples are melt in your mouth delicious, a perfect bowl of Autumn on a chilly day. For the two tart apples, use a variety like Granny Smith or, if you are so fortunate, Cox’s Orange Pippin. The two sweeter apples can be whichever you prefer for eating straight out of your hand, for instance, Royal Gala or Red Delicious . If you don’t have pork stock (or a pork stock cube to dissolve in water), you can substitute chicken or vegetable stock.


I’ve been reading about pig cheeks for ages, without every actually coming across any. Apparently, along with their bovine counterpart, pig cheeks became a trendy cut for chefs, presumably originally, because they were inexpensive, yet divine when treated properly, that is to say, cooked long and slow. Well, like all ingredients that become trendy – I’m looking at you, oxtail and marrow bones – the price goes up.

Imagine my delight then, to find a package labeled “Pig Cheeks” in the frozen section of the pork department in my Dubai grocery store. And it was relatively affordable.

Cider-braised Pig Cheeks with Apples

For the two tart apples, use a variety like Granny Smith or, if you are so fortunate, Cox’s Orange Pippin. The two sweeter apples can be whichever you prefer for eating straight out of your hand, for instance, Royal Gala or Red Delicious . If you don’t have pork stock (or a pork stock cube to dissolve in water), you can substitute chicken or vegetable stock. This recipe is adapted from one of Nigel Slater’s in his Guardian newspaper column.

Ingredients
Fine sea salt
Freshly ground black pepper
3 tablespoons olive oil
2.2 lbs or 1 kg pigs’ cheeks, cut in chunks
4 medium sized purple onions
4 apples - 2 tart, 2 sweet
2 1/2 cups or 600ml pork stock
1 large can dry cider 440ml – I recommend Strongbow
Flat leaf parsley to garnish

Method
Warm the oil in a large Dutch oven over a moderate to high heat. Sprinkle the pigs’ cheeks with salt and pepper, then brown then in the oil. You will have to do this in batches, removing the browned pork to a bowl as you go.


Pig cheeks, or I should say, the pig cheeks available in Dubai (imported from Kenya) are very fatty. Nigel doesn’t mention this at all so perhaps my so-called pig cheeks were some other fattier cut, but never mind. Once the fat is rendered, we are going to pour it off and continue apace.

While the cheeks are browning, peel the onions, quarter them then cut them into thick slices.


Once all of your cubed cheeks are golden, pour off most of the rendered fat. Turn the heat down and add the onions to the pot. Sauté them until soft and translucent.


Preheat your oven to 325°F or 163°C.

Once the onions are tender, remove the Dutch oven from the stove. Add the cubed pig cheeks to the pot and give the whole thing a stir.


Cut the apples into quarters, removing the cores as you go. Add them to the Dutch oven and top with the stock and the cider.

Food Lust People Love: These cider-braised pig cheeks with apples are a triumph of slow cooking at its tender-making best. Both the pork and the apples are melt in your mouth delicious, a perfect bowl of Autumn on a chilly day. For the two tart apples, use a variety like Granny Smith or, if you are so fortunate, Cox’s Orange Pippin. The two sweeter apples can be whichever you prefer for eating straight out of your hand, for instance, Royal Gala or Red Delicious . If you don’t have pork stock (or a pork stock cube to dissolve in water), you can substitute chicken or vegetable stock.


Put the pot back on the stove. Over a medium flame, bring the liquid to a quick boil. Remove from the stove, pop the lid on tightly and put the pot in the preheated oven.

Braise the cheeks, covered, for 2 1/2 hours, stirring them gently, and checking the liquid level about half way through. Add a little water if they look like they are going dry.

When your cooking time is up, remove the lid and bake the cheeks uncovered for about 20-30 minutes or until the liquid is lovely and spoon-able, like a good stew - not too thin.

Check the seasoning, adding a little more salt and pepper, if needed.

Sprinkle with some chopped parsley for garnish. Serve in warmed bowls, making sure every one gets some pork, onion and apple in each.

Enjoy!

Food Lust People Love: These cider-braised pig cheeks with apples are a triumph of slow cooking at its tender-making best. Both the pork and the apples are melt in your mouth delicious, a perfect bowl of Autumn on a chilly day. For the two tart apples, use a variety like Granny Smith or, if you are so fortunate, Cox’s Orange Pippin. The two sweeter apples can be whichever you prefer for eating straight out of your hand, for instance, Royal Gala or Red Delicious . If you don’t have pork stock (or a pork stock cube to dissolve in water), you can substitute chicken or vegetable stock.

Check out the other apple recipes my Foodie Extravaganza group is sharing today. Many thanks to our host, Kelley from Simply Inspired Meals.

Foodie Extravaganza is where we celebrate obscure food holidays by cooking and baking together with the same ingredient or theme each month.

Posting day is always the first Wednesday of each month. If you are a blogger and would like to join our group and blog along with us, come join our Facebook page Foodie Extravaganza. We would love to have you! If you're a spectator looking for delicious tid-bits check out our Foodie Extravaganza Pinterest Board!

Pin these Cider-Braised Pig Cheeks with Apples!

Food Lust People Love: These cider-braised pig cheeks with apples are a triumph of slow cooking at its tender-making best. Both the pork and the apples are melt in your mouth delicious, a perfect bowl of Autumn on a chilly day. For the two tart apples, use a variety like Granny Smith or, if you are so fortunate, Cox’s Orange Pippin. The two sweeter apples can be whichever you prefer for eating straight out of your hand, for instance, Royal Gala or Red Delicious . If you don’t have pork stock (or a pork stock cube to dissolve in water), you can substitute chicken or vegetable stock.
.