Friday, January 13, 2012

Rustic Potato Bread


I’ve got the oven on in the kitchen because the heater is not working downstairs and it is cold, cold, cold.  Who knew Africa could get so cold?  I feel guilty having the oven on just for heat, so I am baking bread.  Rustic potato bread because I forgot to pack a bread pan and this Julia Child recipe from her Baking with Julia doesn’t need one.  If you need an excuse to warm your kitchen, join me.  Also, there is nothing more divine than the aroma of bread baking.  

Ingredients
3/4 lb or 340g russet potatoes (I don’t have russets so local potatoes will have to do.)
2 teaspoons salt
1/4 cup or 60ml tepid reserved potato water (80 – 90°F or 26.7 – 32.2°C)
1/2 tablespoon dry yeast
1 tablespoon extra-virgin olive oil
2 1/4 – 2 1/2 cups or 280g – 310g flour

Method
Peel your potatoes and cut them into cubes.   (Julia says just to scrub them but, really, peels in bread?  I don’t think so.)


In a small pot, cover the potatoes with water and add 1 teaspoon of the salt.  Cook until they are fork-tender.  Reserve 1/4 cup or 60ml of the potato water and then drain the potatoes in a colander.  Put them in a single layer if you can, to make sure they can dry completely.  Cool for 20-30 minutes.


When the potatoes are cool, stir the yeast into the potato water, warming it again if necessary.  It needs to be warm enough to activate the yeast.  Leave for about five minutes. 

It should get all foamy like this.

Meanwhile, put your cool, dry potato cubes in a mixer and beat until they are nicely mashed. 


Add in the olive oil, the yeast/water mixture and the last teaspoon of salt. 


Mix until the liquids are incorporated into the mashed potato.


Change your mixer attachment to the dough hook and start adding in the flour.  This mixture is going to be very dry at the beginning.  I had to come back and check Julia’s recipe several times because I was sure I had missed some liquid but the 1/4 cup of potato water is it!  Just trust and keep mixing.  As she says, the dough will transform.  And it does.  Ideally you will mix for 11 minutes.  I ended up stopped at about 9 1/2 minutes because the dough got so sticky that it just went round and round on my dough hook and it didn’t look like any kneading was happening like that.


For the first rise, put a bit of cling film on the top of the mixing bowl and allow the dough to rest for 20-30 minutes at room temperature.  Making bread in Cairo brings me back to my Paris winter days of bread making.  Room temperature was too cold for the dough to rise, so I used to run hot water in the stoppered sink and add a kettle of boiling water.  I would carefully float my dough in a bowl or the baking pan in the hot water.  It was the only way to get the dough to rise.  It works just great if you are in a cold climate.  Here I filled a pot with hot water and floated the bowl in it. 


Meanwhile, preheat your oven to 375°F or 190°C and flour a tea towel, as a resting place for the final rise.  If you have a baking stone, put it in at this point as well.  If not, about halfway through your preheating, put the baking tray in the oven so it can get nice and hot.


Once your first rise is done, roll the dough into a ball and then press out into a round disk.   Starting at the end farthest from you, roll the dough into a tube.  When you get to the last turn, put a little flour on the final edge and fold the corners in.  Roll it over and place it on the well-floured tea towel, seam down.  With marble all over this cold kitchen, I placed mine in a baking pan and put it on the warm stove.


Let rise for 20 minutes.

Julia’s recipe calls for spraying the insides of your oven with water to create steam when you put the loaf in to bake.  I prefer to put a pan in the bottom of the oven about halfway through the preheating process.  This pan gets really hot and a half cup of water added just as you put in the loaf creates enough steam for a great crust.  


When the second rising is done, pull your oven shelf out enough to allow you to roll the dough from the tea towel to your heated pan.  Julia wanted me to put it seam side up but that just didn’t work out. 


Making steam!

Bake for about 45-50 minutes or until the crust is nice and brown and the loaf sounds hollow when thumped.  If you are so inclined, you can check the internal temperature which Julia says should be 200°F or 93°C.

This recipe is easily doubled to make two loaves, since that is actually what Julia made.


Enjoy!


Thursday, January 12, 2012

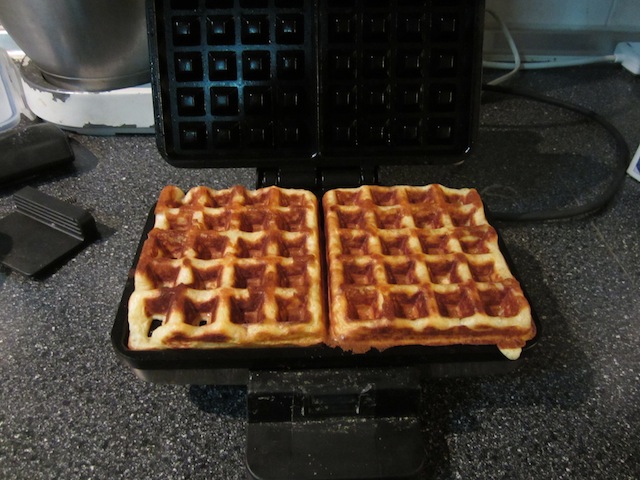
Homemade Buttermilk Waffles

Traditional homemade buttermilk waffles make a great breakfast for dinner option! Glass of wine optional. But recommended.

Food Lust People Love: Traditional homemade buttermilk waffles make a great breakfast for dinner option! Glass of wine optional. But recommended.

I’ve got to start out by saying, I am not a breakfast person.  Now that doesn’t mean that I am not a morning person, because I absolutely am.  Cup of coffee and I am good to go.  I just think that Western breakfast foods like eggs and pancakes and waffles are mere convention and other cultures would rarely eat those things, even for breakfast.  

I was delighted when I first traveled to Asia in 1981 and the hotel breakfast buffet included fried rice, fried noodles, various curries and even bowls of chopped chilies to add on to all three. My favorite breakfast is dinner from the night before. Leftover whatever: pork chops, curry, spaghetti Bolognese.  All joy on my morning plate.  That said, occasionally we do have conventional breakfast for dinner!  Which complicates matters for my breakfast the next morning. But never you mind.

First fry up some bacon. Not too crispy.  You want to be able to chew on it.  Okay, that’s how I like it.  Make it crispy if you must.

Then make up some homemade buttermilk waffles.  Glass of wine optional.

Ingredients
1 3/4 cups or 220g flour
2 tablespoons sugar
1 teaspoon double-acting baking powder
1 teaspoon baking soda or bicarbonate of soda
1⁄2 teaspoon salt
2 cups or 475ml buttermilk or 2 tablespoons of white vinegar and milk up to the two-cup or 475ml measure.
1/3 cup or 78ml salad oil
2 eggs

Method
Preheat your waffle maker as per manufacturer’s instructions.  

In a large mixing bowl, whisk together the dry ingredients. 


Add in the buttermilk (or milk/vinegar mixture which is an excellent substitute for buttermilk) and salad oil and the eggs. Beat until thoroughly blended.


Pour batter into the center of the lower half of the waffle maker, being careful to leave room for when the batter spreads out as you lower the lid and also for when the waffle starts to bake when rising. 


Close the lid and watch for the signal that your waffle is cooking.  On my waffle maker, the light goes green when it is ready for batter, red when it is cooking and then green again when the waffle is ready. 


I leave the waffle in just a little bit longer after the light turns green so the waffles are nice and crispy.  Yes, I know, limp bacon, but crispy waffles.  I am a woman of contradictions.

Food Lust People Love: Traditional homemade buttermilk waffles make a great breakfast for dinner option! Glass of wine optional. But recommended.

Serve with butter and syrup with bacon on the side. And your preferred beverage.  Enjoy!  

Food Lust People Love: Traditional homemade buttermilk waffles make a great breakfast for dinner option! Glass of wine optional. But recommended.


Pin these homemade buttermilk waffles! 

Food Lust People Love: Traditional homemade buttermilk waffles make a great breakfast for dinner option! Glass of wine optional. But recommended.

Wednesday, January 11, 2012

Creamy Broccoli Soup


Finally, soup weather!  For the last 10 years we have been living in equatorial Kuala Lumpur and Singapore.  And while KL is near and dear to my heart, and Singapore holds a special place as our very first overseas posting as a married couple, frankly, the weather doesn’t change much.  We had rainy and warm, and less rainy and warm.   So for a soup person like me, really rainy days become soup days.   But Cairo is cold right now! (I had to go out and buy slippers and I can tell you, although you might not believe me, I chose the most demure ones on offer.) This is one of my favorite soups and it’s the starter for dinner tonight, since IT’S SOUP WEATHER HERE.  Simple, easy and delicious.

Biggest broccoli ever - almost 1 kg or 2lbs
Ingredients
One head of broccoli
1/4 cup heavy cream
1 chicken or vegetarian stock cube
Sea salt
Black pepper


Method
Cut the stem off of the broccoli as close to the florets as you can.  Then trim closer so you have only little bitty “heads” of broccoli left.


Peel the stem pieces by cutting into the stem just inside the hard outside and pulling down to pull the outside off.  It should come right off easily, like stringing a piece of celery.


Good inside stem to the left.  Hard outer peel to the right. 
Whenever I am chopping broccoli, Beso waits patiently. Usually he gets the stems. Sorry, buddy, not tonight. 

Chop the stem into small pieces.  Put the stem and half of the florets into a pot and cover them with water.  Add your stock cube and bring to a boil on the stove.  


They were covered!  They are just floating now. 
Turn the fire down to medium and cook until the broccoli is turning to mush.   Take it off the stove and allow to cool slightly.  We are going to blend this and we don’t want to burn ourselves.


Meanwhile, cut your larger florets in halves or quarters, depending on how big they are.  You are looking for bite-sized pieces that won’t take long to cook through. 


Using a hand blender or a regular blender, puree the cooked broccoli until smooth.


Put it back on the fire and heat till just boiling.  Add in the remaining florets and cook until they are done to your satisfaction.  Some people want them still a little crunchy; some want them tender. 


Add in your 1/4 cup cream – or more or less, as you like.  Stir and taste, adding salt, if needed and a good grind or two of fresh black pepper.


Serve with an additional drizzle of cream.  Enjoy!


And here are my slippers.  Go ahead, judge me. You didn't see the other choices.


Tuesday, January 10, 2012

Bacony Garlicky Carrots and Green Beans


We are in Cairo and counting our blessings.  Not the least of which is having internet again.  And a Carrefour hypermarket about 20 minutes away from our new home.  

Years and years and years ago, we lived in a little oilfield town on the island of Borneo, called Balikpapan.  When I would tell people the name, they would say, “Oh, Bali!”  And I would have to reply, “Don’t I wish!”  They were worlds apart.  We didn’t really have a proper grocery store and there was no fresh milk or cheese unless we managed to get into the Huffco commissary, and even there, shipments arrived so sporadically that I caught them covering the expiration labels with future dates so that they could sell old stuff that had somehow just arrived or hadn’t sold.  We ordered meat from Jakarta and it came frozen, packed in dry ice.  There was only one decent restaurant at one decent hotel, the Benakutai. And the vegetables in the market were limited to local greens, potatoes, carrots and green beans. 

But you know what, those were two wonderful years!  Elder daughter was born while we lived there (not actually THERE, of course) and I made great friends.  One of them was an old friend of my mother-in-law’s from Peru named Clara Hart.  A sweeter, more gentle person, you could never hope to meet.  She showed me around and told me all of the places to get things we needed.  She tried to teach me Bridge, bless her.  She was also my pass to the Huffco commissary, until Vico took over and they finally made it open to the public just before I left Balikpapan.

I picked up this recipe from her.  I don’t know if I make it just like she did but this is how I remember her dish and how I have been making it ever since.  This is one of the things that gives me hope when I move to a new place, that I have gained something from every friend over the years and that gain accompanies me forever, even in a new place like Cairo, where I don’t know many people yet.  There will be much to gain here.  I just need to be patient.

Ingredients
250g or 1/2 pound green beans
1 good-sized carrot or two small ones
2 slices of bacon
2 cloves garlic
Olive oil
Sea salt
Black pepper
Cayenne pepper (optional)


Method
Cut the stem ends off of the green beans.  Holding your knife at an angle, cut the beans into more manageable pieces.


Peel your carrot and cut it into pieces about the size of your green beans.  Rinse the green beans and carrots in a colander.


Slice the garlic very thinly.  Cut the bacon into little strips.


Fry the bacon and garlic in a little olive oil until semi-crispy making sure not to let the garlic burn.


Tip in the green beans and carrots.  Give the whole pot a good sprinkle of salt, black pepper and cayenne, if desired.  (I’m pretty sure that the cayenne is my addition and that Clara would have used only black pepper.)


 Cook, covered, until you are happy with the tenderness of your vegetables.

 The last two nights I was cooking with only the one saucepan and pot I had bought at Carrefour on the house hunting trip, so no lid.  But our AIR SHIPMENT ARRIVES TODAY! YAY!
 Give them a quick taste and add more salt and pepper if necessary before serving.  Enjoy!

The complete meal included mashed potatoes and roast chicken with onion gravy.
On biodegradable plates bought in Singapore. :) 

Here's a photo from our Balikpapan days.  Let's see how many people read all the way to the bottom!

With us is our first Boxer, Bogus (his father named him!) who traveled from Houston to Abu Dhabi to
Balikpapan to Paris. It's good to have a Boxer on one's traveling journeys.