Showing posts sorted by relevance for query ice cream. Sort by date Show all posts

Wednesday, July 1, 2015

Crushed Pineapple Ice Cream #FoodieExtravaganza


Old-fashion ice cream made with a sweet egg custard and crushed pineapple is simplicity itself because sometimes one shouldn’t mess with a good thing.

Not too long back, we were cleaning out the storage space in my laundry room and came across a brand new ice cream maker that had been a gift from my older sister when we were living in Brazil. We never did use it because cream was so dang expensive there, so it got moved to Houston in 1999 and was never really unpacked. It was time to make ice cream! Suggestions were solicited and I expected Mom to ask for peach, her favorite fruit, but she surprised me with the request for pineapple ice cream.

When my mom was growing up in southern Louisiana, family picnics always included hand-cranked ice cream makers filled with the ingredients for pineapple ice cream in the middle, surrounded by rock salt and ice. She says sometimes as many as six were lined up under the shade of the old pecan trees. The menfolk chatted and cranked until the ice cream started freezing and the handles became harder and harder to turn. Then the ice cream machines would be covered with old burlap sacks until the ice cream was hard enough and ready to serve, several hours later. What a great finish to a family picnic!

This crushed pineapple ice cream brought back good childhood memories for her and I am delighted to share it today for our Foodie Extravaganza creative ice cream event, hosted by Camilla of Culinary Adventures with Camilla.

Recipe adapted from the pineapple ice cream in Quick Cooking May/June 2002 issue. (No longer published, more’s the pity.)

N.B.: You need a thermometer to accurately prepare this recipe, as written.

Ingredients
2 cups or 480ml milk
1 cup or 200g sugar
3 eggs, lightly beaten
1-3/4 cups or 414ml heavy whipping cream
1 small can (8 oz or 227g) crushed pineapple in 100% juice - Do not drain!

Method
In a bowl large enough to hold the pot you plan to make your ice cream base or custard in, cover the bottom with ice cubes two layers deep. Set aside.

In a large pot, heat your milk to 175°F or 80°C. Add in the sugar and stir till it is dissolved.


Whisk a small amount of the hot mixture into the eggs.


Return all to the pot, whisking constantly.


Cook and stir over low heat until the mixture reaches at least 160°F or 72°C and coats the back of a metal spoon.

Remove from the heat. Add some water to the ice bowl and place the pot in the ice water to cool quickly. Stir constantly for two minutes.

Now stir in the whipping cream and the can of crushed pineapple.


Pour the mixture into a Ziploc bag and press the air completely out of it. Pop it in your freezer until chilled through, about one hour.


Pour into your ice cream maker and follow manufacturer’s instructions. Depending on your ice cream maker, you may have to transfer the ice cream into an airtight container to freeze completely before serving.

After about 30 minutes of churning in an electric ice cream freezer.

Enjoy!


Check out all the great frozen treats we have for you this month! Thanks for hosting, Camilla! 


Foodie Extravaganza is where we celebrate obscure food holidays or cook and bake together with the same ingredient or theme each month. This month - Camilla of Culinary Adventures with Camilla is hosting - she invited bloggers to come up with creative ice cream creations.

So during this first full month of summer, it's all about ice cream. But that can include gelato, semi-freddo, and even popsicles! We hope you all enjoy our delicious frozen creations this month and come back to see what we bring for you next month.

Posting day is always the first Wednesday of each month. If you are a blogger and would like to join our group and blog along with us, come join our Facebook page Foodie Extravaganza. We would love to have you!

If you're a reader looking for delicious recipes check out our Foodie Extravaganza Pinterest Board! Looking for our previous parties? Check them out HERE.


.

Tuesday, July 1, 2014

Thai Coconut Ice Cream

Make your own Thai coconut ice cream with coconut cream, coconut milk, sweetened with palm sugar and enriched with powdered coconut cream. So creamy and delicious!


I did it! I finally used my ice cream machine for the very first time. It was a special occasion in more ways than one. First off, despite it being close to 20 years old, it worked. I guess in motor-years - like dog years, only different - it is still brand new.

Secondly, I was sent a fabulous new cookbook full of great ice cream recipes to review.  It’s called Scoop Adventures: The Best Ice Cream of the 50 States: Make the Real Recipes from the Greatest Ice Cream Parlors in the Country (< affiliate link*) and was written by the Scoop Queen herself, Lindsay Clendaniel, creator of the very popular ice cream blog also called Scoop Adventures.

She brings us 50 imaginative recipes from all over the United States. I was gratified to find that Texas’ entry is from none other than Amy’s in Austin. How does Peach Honey Habanero grab you? As a person who recently made apricot habanero jam, the sweet and spicy combination sounds like my kind of ice cream!

The final chapter in the book is full of Lindsay’s own creative ice creams. I am particularly taken with two: Mint Julep and Rosemary Honey Walnut. Now that I’m home again in Dubai, I REALLY need to buy a 220V ice cream maker. Seriously. I was so sad to have to leave my new “old” friend in Houston.

For today’s special edition of Ice Cream Tuesday, I am joining a lovely group of friends, organized by Jenni of Pastry Chef Online, all making ice cream either from Lindsay’s book or from her blog.  Make sure to follow all the links in the list to see their gorgeous ice creams.


I chose to recreate Lindsay’s Thai coconut ice cream because of a special request from my younger daughter who asked for “coconut, please, but without bits.” Lindsay’s recipe calls for powdered milk but I decided to up the coconut ante by using powdered coconut cream and actual coconut cream in place of some of the coconut milk. I upped the Thai ante by using palm sugar for sweetener and agar-agar for the thickener, since they are both commonly used in Thai desserts. These substitutions ended up making the base thicker than it should be so I thinned it with more regular milk. Which is reflected in my ingredient list. I’d have used coconut milk for that too but was all out. All in all, very creamy, very coconut-ty and the family loved it!

Thai Coconut Ice Cream


Homemade ice cream, whether made in an ice cream machine or using the whipping cream/sweetened condensed milk method, is easy to make and the possible flavor combinations are infinitely delicious.

Ingredients

1 14-ounce or 414ml can regular unsweetened coconut milk
1 14-ounce 414ml can regular unsweetened coconut cream
2 teaspoons unflavored, powdered agar-agar
2 tablespoons cornstarch
1 cup or 120g powdered coconut cream
3/4 cup or 380g palm sugar
1/8 teaspoon salt
1 2/3 cups or 190ml milk

Optional for topping: sweetened coconut flakes

Method
Half fill a large bowl with ice and water and set aside. Put all of the ingredients into a deep pot.  Whisk to begin combining and set the pan on the stove over a medium-high heat.


Bring to a gentle boil and continue whisking occasionally until the sugar, powdered cream and agar-agar are dissolved.


Remove from the heat and nestle the saucepan in the ice water bath.

Keep whisking occasionally until it’s cool. Once cooled completely, transfer the mixture to an airtight container and put in the refrigerator until completely chilled and softly set.

Pour the base into an ice cream maker and freeze according to the manufacturer’s instructions. Mine’s the old-fashioned kind that requires ice and rock salt and churns with a big paddle.


Complete churning and transfer to a freezer-safe container.

The big paddle! 

Top with some coconut flakes if your intended eaters don’t mind bits in their ice cream. (Or even if some do. They don’t need to eat the top scoops!) Freeze until firm, at least four hours. I tell you, we could have eaten it right then, like soft serve. Divine!

Enjoy!


In closing, I’d like to share with the final words from Lindsay’s introduction in Scoop Adventures, with which I wholeheartedly concur:

Love people. Make them ice cream.


Check out all the other delicious ice cream recipes you are going to LOVE:


*Disclaimer: This post contains affiliate links to the book, Scoop Adventures. If you buy after clicking on my link, I make some small change from the sale and you are still charged the normal price. Win-win! I received a free copy of this book for review purposes, with no other personal compensation. All opinions are entirely my own.


Sunday, July 27, 2025

Vanilla Bean No Churn Ice Cream with Fresh Strawberry Sauce

Creamy and sweet, this vanilla bean no churn ice cream is so easy and delicious! Since it’s strawberry season, add some fresh strawberry sauce. So good! 

Food Lust People Love: Creamy and sweet, this vanilla bean no churn ice cream is so easy and delicious! Since it’s strawberry season, add some fresh strawberry sauce. So good!

Years and years ago, we were living in a small oilfield town in Brazil, about three hours up the coast from Rio de Janeiro. Shopping was a challenge but I managed to find most things we loved or I figured out how to make them myself. (Looking at you, bagels, for one!) 

Ice cream was readily available but it was ridiculously expensive so I asked my sister to bring me an ice cream maker the next time she visited. This was before the days of fancy ice cream makers you just plugged in. The one she brought was a modern electric version of the old hand-cranked kind that needed rock salt. 

I was so excited when she and the machine arrived! My bubble was burst when I discovered that rock salt was hard to come by and the cost of cream was the reason ice cream was so expensive! It would cost me more to make my own than to buy the overpriced supermarket stuff. Deep sigh. 

It was the very early days of the internet so I didn’t know about no churn ice cream. Now I’m delighted by the plethora of no churn recipes and I live where cream is affordable. Good times! 

Vanilla Bean No Churn Ice Cream with Fresh Strawberry Sauce

Can you serve this ice cream plain or with another sauce? Absolutely! I include the fresh strawberry sauce recipe because it complements the sweet ice cream beautifully but it’s also lovely for strawberry shortcake. Maybe it should get its own post for that. 

Ingredients
For the vanilla bean ice cream:
I vanilla bean
1 can (14 oz or 397g) sweetened condensed milk
2 teaspoons vanilla extract
2 cups or 480ml heavy cream

For the strawberry sauce:
14oz or 397g fresh strawberries
⅓ cup or 66g sugar
1 tablespoon lemon juice
2 teaspoons cornstarch
1 teaspoon vanilla extract

Method
Split and use a spoon to scrape the tiny bits from inside your vanilla bean.


Add them to the condensed milk in a mixing bowl allong with the vanilla extract and stir well.  


Whip the cream until stiff peaks form. 


Gently fold the condensed milk into the whipped cream. 


Line a loaf pan with cling film and spoon the mixture into it. Put a spoon or two in each corner first so you can straighten out the cling film.


Then pour the rest in and smooth the top. 


Cover loosely with more cling film then freeze your vanilla bean ice cream in the loaf pan for at least 6 hours.

To make the strawberry topping, hull the strawberries. 


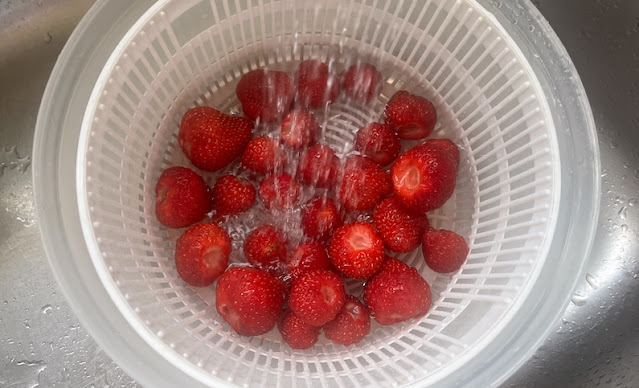
Rinse the strawberries well with cool water and spin them dry. 


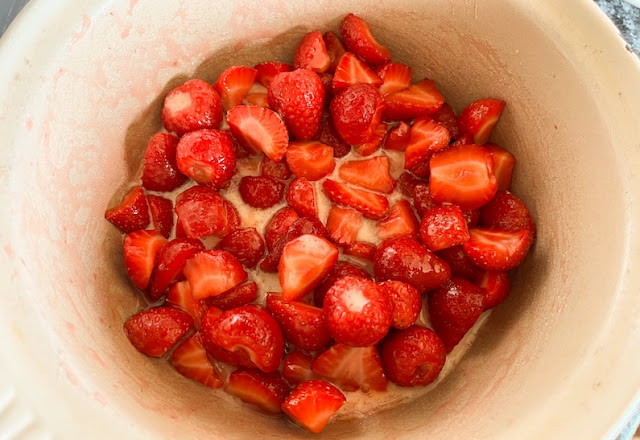
Cut the large ones in quarters, the medium ones in half and leave any smaller ones whole. Please don't skip this step. Strawberries have little hairs (called styles) that need to be cleaned off, not to mention the potential chemicals that might have been used.


Combine the strawberries and sugar in a medium pot. 


Cook over a medium heat until the sugar dissolves, stirring often. This takes just a few minutes.


In a small bowl, whisk together the lemon juice, vanilla extract and cornstarch.


Pour the mixture over the strawberries and stir well.


Bring to a boil once over medium-high heat, then reduce to medium heat and simmer sauce until berries are soft and juices have thickened slightly, about 5 minutes for a chunky topping. 


Decant to a bowl and refrigerate, covered with cling film, until ready to serve.


When the vanilla bean ice cream is sufficiently frozen, remove the pan from the freezer. 


Use the cling film lining to remove the ice cream from the pan to a cutting board. Warm your knife in hot water and cut slices of the ice cream to serve. 


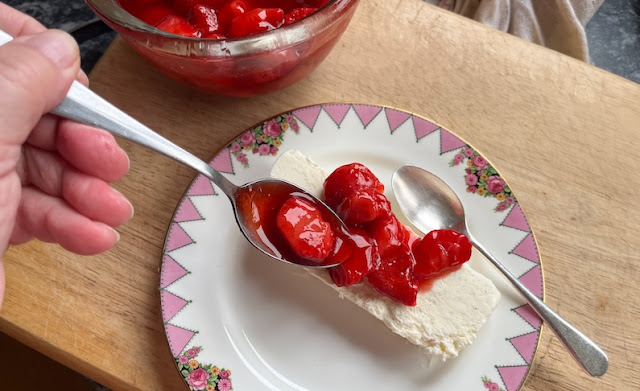
Top each slice of ice cream with chilled fresh strawberry sauce. Rewrap any leftover ice cream and pop it back in the freezer. 

Food Lust People Love: Creamy and sweet, this vanilla bean no churn ice cream is so easy and delicious! Since it’s strawberry season, add some fresh strawberry sauce. So good!

Enjoy! 

Food Lust People Love: Creamy and sweet, this vanilla bean no churn ice cream is so easy and delicious! Since it’s strawberry season, add some fresh strawberry sauce. So good!

It’s Sunday FunDay. I’m hosting and today we are celebrating National Ice Cream Month! Check out all the ice cream recipes we are sharing below.

 
We are a group of food bloggers who believe that Sunday should be a family fun day, so every Sunday we share recipes that will help you to enjoy your day. If you're a blogger interested in joining us, just visit our Facebook group and request to join.


Pin this Vanilla Bean No Churn Ice Cream
with Fresh Strawberry Sauce

Food Lust People Love: Creamy and sweet, this vanilla bean no churn ice cream is so easy and delicious! Since it’s strawberry season, add some fresh strawberry sauce. So good!

.

Thursday, August 19, 2021

Coffee Ice Cream Bundtlettes #BundtBakers

With just four ingredients you can turn coffee ice cream into these delicious Coffee Ice Cream Bundtlettes. Or use your favorite flavor.

Food Lust People Love: With just four ingredients you can turn coffee ice cream into these delicious Coffee Ice Cream Bundtlettes. Or use your favorite flavor.

Since it’s so dang hot outside, it’s a challenge to serve ice cream firm so for this month’s Bundt Bakers, we are making the best of melted ice cream and turning it into cake!

I’ve made homemade ice cream in the past so I know it often starts with a custard, which means it’s made with eggs and milk and butter. But before our Bundt Bakers host proposed this theme, I had never really considered that those ingredients are a shortcut to cake batter. 

A little googling revealed a plethora of cake recipes made with melted ice cream! Who knew? Most of them called for two ingredients: ice cream and cake mix. Not that I have anything against cake mix but we all know that when one of your ingredients is cake mix, that’s kind of cheating on the whole two ingredient thing since cake mix is just paying someone else to measure out flour, cocoa powder, baking powder, etc. 

Fortunately there were also quite a few recipes made from scratch! Seriously google it. So many melted ice cream cakes! Now you know what to do next time the freezer quits on you. Or it's just summertime.

Coffee Ice Cream Bundlettes

This cake can be made with any flavor of ice cream you have on hand, as long as it is full cream and not low fat or non-fat. This is cake, after all! This recipe is adapted from one on Hebbar’s Kitchen

Ingredients
2 cups or 370g full cream coffee ice cream
1 1/2 cups or 190g flour, plus a little extra for the pan
2 teaspoons baking powder
1/4 teaspoon salt

Butter, to grease the pan

Optional for decoration and extra coffee flavor:  
1/2 cup or 90g espresso chips

Optional to serve: 6 scoops of coffee ice cream 

Method
Set your oven to preheat at 350°F or 180°C and prepare your Bundtlette pan by buttering and flouring it. Set it aside. (As you will see in photos to come, I used my mini 6 1/2 cup Nordic Ware Classic Bundtlette pan that makes six small Bundt cakes.)

In a large mixing bowl, use your stand mixer or electric beaters to beat the ice cream briefly. Sift in the flour, baking powder and salt. 


Beat until thoroughly mixed to form a thick batter without any little lumps. 


Spoon the batter into your prepared pan and smooth out the top. 


Bake the bundtlettes in your preheated oven for 20 to 25 minutes or until a wooden skewer comes out clean. (If you use one larger capacity Bundt pan, your cake could take a bit longer to bake.) 


Leave to cool in the pan for about five minutes, then loosen the sides of the little bundtlettes with your wooden skewer and turn them out onto a wire rack to cool completely. 

Food Lust People Love: With just four ingredients you can turn coffee ice cream into these delicious Coffee Ice Cream Bundtlettes. Or use your favorite flavor.

When the little cakes are cool, melt the espresso chips in a microwave-safe vessel with a couple of quick zaps in the microwave. I do 10 seconds, then stir. Another 10 seconds, then stir. Depending on your microwave you may need a few seconds more.

Drizzle the melted chips or use a piping bag to decorate the cooled cakes. 

Food Lust People Love: With just four ingredients you can turn coffee ice cream into these delicious Coffee Ice Cream Bundtlettes. Or use your favorite flavor.

I served these with a scoop of coffee ice cream on top! You might want to do the same. No pictures of that because it was late and dark after dinner. Sorry!

Food Lust People Love: With just four ingredients you can turn coffee ice cream into these delicious Coffee Ice Cream Bundtlettes. Or use your favorite flavor.

Enjoy! 

It’s the third Thursday of the month and that means it’s time for Bundt Bakers. Check out the delicious melted ice cream cakes we are sharing below! Many thanks to our host, Sue of Palatable Pastime for this fun theme! 

BundtBakers


#BundtBakers is a group of Bundt loving bakers who get together once a month to bake Bundts with a common ingredient or theme. You can see all of our lovely Bundts by following our Pinterest board. We take turns hosting each month and choosing the theme/ingredient.

Updated links for all of our past events and more information about BundtBakers, can be found on our home page.

Pin these Coffee Ice Cream Bundtlettes! 

 .