Showing posts with label Mexican recipes. Show all posts

Sunday, October 31, 2021

Caldo Tlalpeño

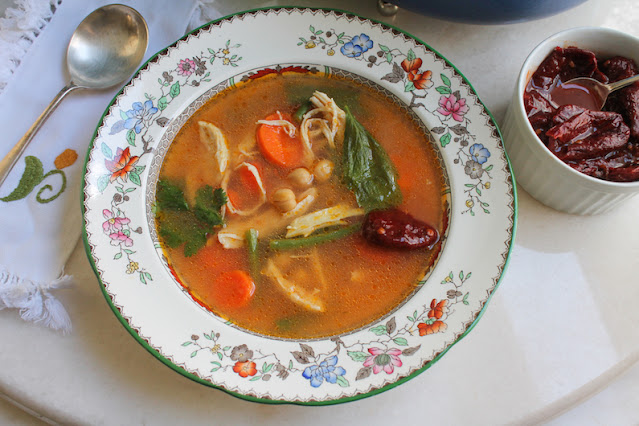
Caldo Tlalpeño is a deliciously nutritious chicken and vegetable soup, perfect for chilly days, served with fresh cheese and chipotle chili pepper on top. And avocado, if you've got some!

Food Lust People Love: Caldo Tlalpeño is a deliciously nutritious chicken and vegetable soup, perfect for chilly days, served with fresh cheese and chipotle chili peppers.

This dish is originally from Tlalpan, Mexico, one of the 16 administrative alcaldías or boroughs of Mexico City. It is the largest borough by area but most of it is forested rather than urban. According to Wikipedia, the city still boasts colonial era mansions and cobblestone streets. Frankly, it sounds lovely and totally worth putting on my list of places to visit, even if it didn’t also have a Six Flags amusement park. Which it does!

I love that this caldo is even mentioned in their tourist information. They are rightly very proud of it. What makes it so wonderful, in my opinion, is the fresh tomatoes in the broth. They give it a light, bright flavor, so much better than plain old chicken soup.

Despite photographic evidence to the contrary, I did serve this to my family with the crumbled fresh cheese as well as the required chipotle peppers in adobo sauce, I just completely forgot to put it on when taking the pictures. Some recipes mentioned adding avocados as well but I didn't have any. Add it cubed or sliced when serving, if you do.

Caldo Tlalpeño

I used unsalted homemade chicken stock for this dish so I did season the chicken with a little fine sea salt before poaching it in the stock. If you are using stock with salt, you can skip this step. I give the approximate weights for the vegetables below but know that if you have, say, a little more carrot or fewer green beans, this caldo will still be delicious. 

Ingredients
For the chicken:
1 1/2 lbs or 675g boneless, skinless chicken breast
¼ of a medium white onion
1 clove garlic
8 cups or 1.9L chicken stock 
1/2 teaspoon fine sea salt

For the caldo:
2 tablespoons canola or other light oil
4 medium carrots (about 13 oz or 370g)
1/4 white onion (
3 tomatoes (about 1 lb or 450g) 
1 clove garlic
5 oz or 142g green beans 
1 can (16 oz or 454g) chickpeas, drained and rinsed
2 sprigs coriander
4 epazote leaves (These are apparently a traditional ingredient and I was lucky enough to find some at my nearby Fiesta supermarket. If you can’t put your hands on some, just add a little more cilantro.)

To garnish:
Crumbled fresh cheese
Chipotle peppers in adobo sauce
(Avocado is also recommended but as I mentioned above, I didn't have any.)

Method
Season the chicken breasts with the salt (if using a salt free stock - see note above) and set aside for a few minutes. Cut the onion into thick slices and smash the garlic clove with the side of a large knife. 


Add the onion and garlic to a large pot along with the chicken. Pour in the stock and bring it to a soft boil over a medium flame.
 

Turn the fire down to simmer, put the lid on your pot and cook the chicken for 45 minutes. 

Remove the chicken from the pot and set aside until it is cool enough to handle. Use two forks to shred it.

Use two forks to shred the chicken.

Strain the broth into a heatproof bowl and discard the onion slices and garlic. 

Finely chop the onion and peel and slice the carrots. Core and chop the tomatoes. Cut the green beans into bite-sized pieces.

Finely chop the onion and peel and slice the carrots. Core and chop the tomatoes. Cut the green beans into bit sized pieces.

Add the oil to the pot and sauté the chopped onions and the carrots for about 10 minutes or until the onions are translucent and the carrots are starting to soften. I find the carrots cook faster if I put the lid on the pot so you might want to do the same. Just don’t forget to stir occasionally.

Add the oil to the pot and sauté the chopped onions and the carrots for about 10 minutes or until the onions are translucent and the carrots are starting to soften.

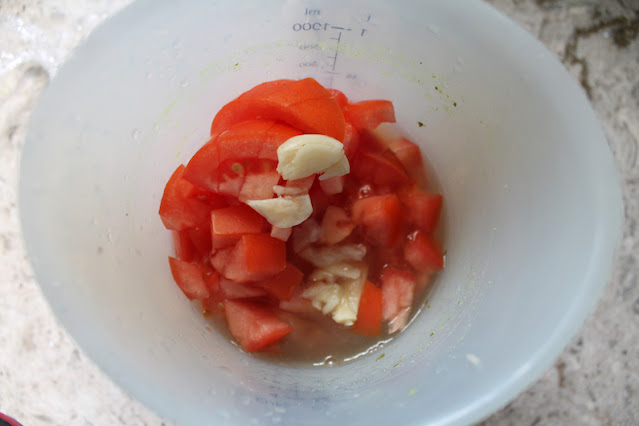
While the onion and carrots are cooking, place the tomatoes and garlic in the blender with a cup of the strained chicken broth. I have a hand blender so I popped mine in the hand blender vessel and whizzed them smooth with it. 

While the onion and carrots are cooking, place the tomatoes and garlic in the blender with a cup of the strained chicken broth. I have a hand blender so I popped mine in the hand blender vessel and whizzed them smooth with it.

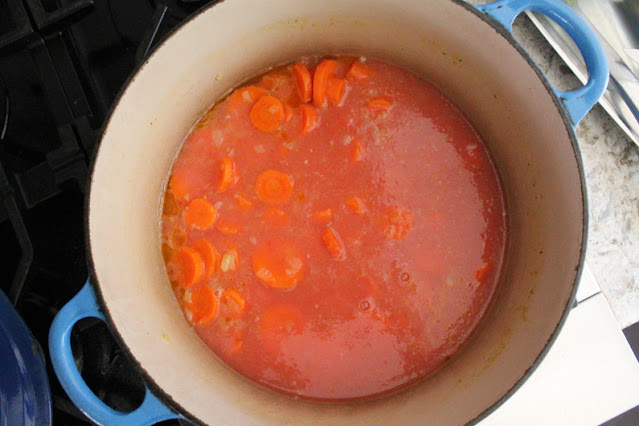
Add the tomatoes to the onion and carrots. 

Add the tomatoes to the onion and carrots.

Cook over a low heat for about 12 minutes or until the carrots are tender. At minute 8, add in the green beans. Give it a good stir. 


When the beans are just about cooked through, add the rest of the reserved chicken broth, chickpeas, epazote, cilantro, and shredded chicken. 

When the beans are just about cooked through, add the rest of the reserved chicken broth, chickpeas, epazote, cilantro, and shredded chicken.

Cook over low heat for 6 more minutes. Season with salt, if needed.

To serve, spoon the chicken and vegetables into bowls. Top with broth. Serve the cheese and chipotles in small plates at the table so that everyone can add what they’d like to their bowls. It is traditional to add one chipotle pepper to each bowl!

Food Lust People Love: Caldo Tlalpeño is a deliciously nutritious chicken and vegetable soup, perfect for chilly days, served with fresh cheese and chipotle chili peppers.

Enjoy!

It’s Sunday FunDay and my friends and I are sharing Mexican dishes to commemorate The Day of the Dead (el Día de los Muertos), a Mexican holiday where families welcome back the souls of their deceased relatives for a brief reunion that includes food, drink and celebration. Check out all the links below! Many thanks to our host, Camilla of Culinary Adventures with Camilla


We are a group of food bloggers who believe that Sunday should be a family fun day, so every Sunday we share recipes that will help you to enjoy your day. If you're a blogger interested in joining us, just visit our Facebook group and request to join.

Pin this Caldo Tlalpeño!

Food Lust People Love: Caldo Tlalpeño is a deliciously nutritious chicken and vegetable soup, perfect for chilly days, served with fresh cheese and chipotle chili peppers.

.

Sunday, July 25, 2021

Carlota de Limón – Lime Charlotte

Marie biscuits are layered with a tangy filling of lime juice, sweetened condensed milk and evaporated milk to make this easy no-bake Carlota de Limón or Lime Charlotte.

Food Lust People Love: Maria biscuits are layered with a tangy filling of lime juice, sweetened condensed milk and evaporated milk to make this easy no-bake Carlota de Limón or Lime Charlotte.

When it’s hotter than all get-out outside, what we all need is a dessert that can be made without turning the stove or oven on, don’t you agree? That’s why I chose no-bake desserts as this week’s Sunday FunDay theme. Personally, I think some of us should get extra points for a dessert that's served super cold as well.

Make sure you scroll down past my recipe to see the other lovely no-bake desserts my blogger friends are sharing, perfect for these hot summer days. 

Carlota de Limón – Lime Charlotte

Carlota de Limón is a classic Mexican dessert that is served very cold (as if it were an ice cream cake). As you make your shopping list, keep in mind that Marie biscuits are also called Maria biscuits or cookies in some places. In a pinch, you could also substitute plain graham crackers. 

Ingredients
1 1/2 cups or 360ml evaporated milk
1 can (14 oz or 397g) condensed milk
1⁄2 cup or 120ml dulce de leche (or sub more condensed milk) 
1⁄2 cup or 120ml fresh lime juice
Zest 1 lime
Maria biscuits – about 30

Optional to decorate/serve:
Whipped cream
Strawberries, halved 
1 lime, sliced thinly

Method
Use electric beaters or a whisk to combine the condensed milk, dulce de leche and evaporated milk. Add in the lime juice and zest and beat until thickened.


Line a deep round pan with foil and cover the bottom with a layer of Maria biscuits, scoring and breaking some to fill the gaps. I had a bunch of crumbs in my biscuit packet so I sprinkled them on the base as well. 


Spoon in one third of the filling, spreading it carefully to cover the biscuit base.


Top with another layer of Maria biscuits, again, scoring and breaking a couple to fill the gaps.


Top with second third of the filling, a final layer of biscuits, then the last third of the filling.


Pop the carlota de limón in the freezer for an hour or two or until firm.

When you are ready to serve, remove the carlota de limón from the freezer. Lift it out of the pan with the foil and carefully move the carlota to a serving plate. Decorate with whipped cream, halved strawberries and sliced limes, if desired.

Food Lust People Love: Maria biscuits are layered with a tangy filling of lime juice, sweetened condensed milk and evaporated milk to make this easy no-bake Carlota de Limón or Lime Charlotte.

Enjoy! 

Food Lust People Love: Maria biscuits are layered with a tangy filling of lime juice, sweetened condensed milk and evaporated milk to make this easy no-bake Carlota de Limón or Lime Charlotte.

Check out the no-bake desserts my Sunday FunDay blogger friends are sharing today! Which one will you make first? 

We are a group of food bloggers who believe that Sunday should be a family fun day, so every Sunday we share recipes that will help you to enjoy your day. If you're a blogger interested in joining us, just visit our Facebook group and request to join.
Pin this Carlota de Limón – Lime Charlotte!

Food Lust People Love: Maria biscuits are layered with a tangy filling of lime juice, sweetened condensed milk and evaporated milk to make this easy no-bake Carlota de Limón or Lime Charlotte.
 .

Monday, April 12, 2021

Chicken Chili Tortilla Casserole

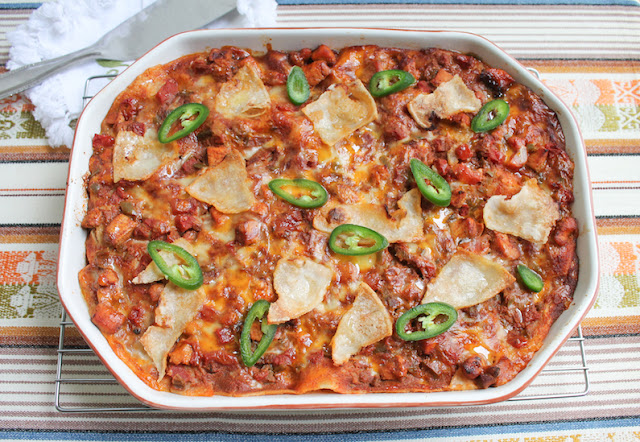
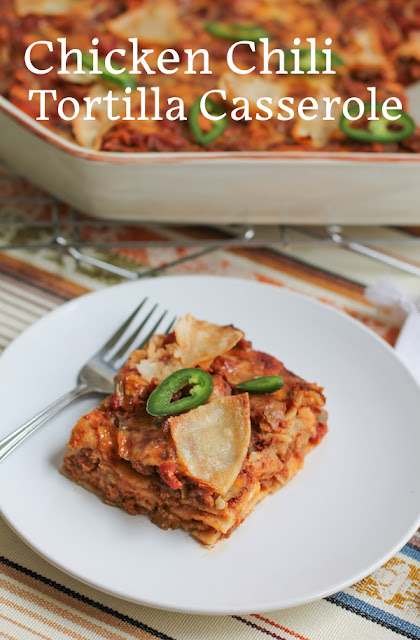
This chicken chili tortilla casserole is like enchiladas made easier by layering the “filling” with corn tortillas and topping each layer with cheese. It is assembled, with apologies to all Italians: lasagna style. 

Food Lust People Love: This chicken chili tortilla casserole is like enchiladas made easier by layering the “filling” with corn tortillas and topping each layer with cheese. It is assembled, with apologies to all Italians: lasagna style.

We love enchiladas at our house so I’ve been known to make ones with beef, chicken with chorizo and even a mix of chicken and black beans. If you need a vegetarian version, I can highly recommend my cheesy bean enchilada recipe made with pintos and vegetarian refried beans. Topped with jalapeños and black olives it is as pretty as it is tasty. You won’t even miss the meat, I promise. 

The only reason I don’t make enchiladas more is the messy hassle of saucing the tortillas to soften and then filling them. This casserole avoids that whole palaver.

That said, the chicken chili is also delicious on its own. :) 

Chicken Chili Tortilla Casserole

In the US, unlike in most of the world where chili powder is literally just ground chili peppers, chili powder is a spice mix made with (at least in the McCormick brand powder) toasted whole ripe chili peppers, cumin, oregano, garlic and salt. To make it clear, I’m going to call it chili (seasoning) powder in the ingredients list below. 

Ingredients
1 lb or 450g trimmed chicken breasts
fine sea salt
freshly ground black pepper
2 tablespoons canola or other light oil, plus extra for the baking dish
1/2 small onion, finely chopped
1/2 green pepper, finely chopped
1-2 fresh jalapeños, finely chopped
3 tablespoons chili (seasoning) powder (see note above)
1 1/2 teaspoons ground cumin
1/2 teaspoon smoked paprika
1 can (14.5 oz or 411g) small dice tomatoes with green chili peppers
1 tablespoon tomato paste
14 fresh corn tortillas
8 oz or 225g extra sharp cheddar or a blend of cheeses, grated

Optional garnish:
sliced fresh jalapeños

Method
Cut the chicken into small pieces. I like to put my hand on the breasts and cut them in two through the middle so the pieces are thinner, then cut them into small cubes. You can just kinda chop it up with a sharp knife, if you prefer. 


Season the chicken pieces with a good sprinkle of salt and a few generous grinds of black pepper. 

Warm the oil in a large pot and then sautéed the chopped vegetables in the oil until softened, about five minutes. 


Add in the chili powder, cumin and paprika and give the whole thing a good stir. Cook for another two minutes, then add in the chicken. Stir well to coat the chicken with the seasonings. 


Cook for another few minutes then add in the canned tomatoes and the tomato paste then using the tomato can as a measuring vessel, add a full can of water. 


Bring to a slow boil then reduce the heat and simmer for 30 minutes, covered. 

Preheat your oven to 350°F or 180°C. 

Grease the bottom of a casserole dish with a little oil and cover it with a layer of corn tortillas, cutting them to make them fit. I chose this ridiculously shaped pan so it got a little more complicated than necessary. (Another wedding gift from 25 years ago, it matches the quiche dish.) 


Spoon over 1/3 third of the chicken chili and sprinkle on 1/3 of the cheese. 


Cover this with another layer of corn tortillas, another 1/3 of the chicken chili and 1/3 of the cheese. 

Repeat with another layer of tortillas, the balance of the chicken and the balance of the cheese. Rip a couple of tortillas into pieces and strew them decoratively over the casserole. (This step is not strictly necessary but I like the crunch that they add to the top.)


Cover with foil and bake in your preheated oven for 30 minutes. Remove the foil and cook for an additional 10-15 minutes or until the top is browned. 

Leave to cool for about 10 minutes before garnishing with sliced fresh jalapeños, if using, and cutting the casserole into squares to serve. 

Food Lust People Love: This chicken chili tortilla casserole is like enchiladas made easier by layering the “filling” with corn tortillas and topping each layer with cheese. It is assembled, with apologies to all Italians: lasagna style.

Enjoy!

Food Lust People Love: This chicken chili tortilla casserole is like enchiladas made easier by layering the “filling” with corn tortillas and topping each layer with cheese. It is assembled, with apologies to all Italians: lasagna style.

Today I’m joining my Baking Blogger friends who are sharing Mexican recipes. Check them out below. I know mine isn’t in any way authentically Mexican but I hope it is close enough to qualify. Many thanks to our host and organizer, Sue from Palatable Pastime
Baking Bloggers is a friendly group of food bloggers who vote on a shared theme and then post recipes to fit that theme one the second Monday of each month. If you are a food blogger interested in joining in, inquire at our Baking Bloggers Facebook group. We'd be honored if you would join us in our baking adventures.

Pin this Chicken Chili Tortilla Casserole!

Food Lust People Love: This chicken chili tortilla casserole is like enchiladas made easier by layering the “filling” with corn tortillas and topping each layer with cheese. It is assembled, with apologies to all Italians: lasagna style.

 .

Friday, August 21, 2020

Camarones a la Diabla - Deviled Shrimp #FishFridayFoodies

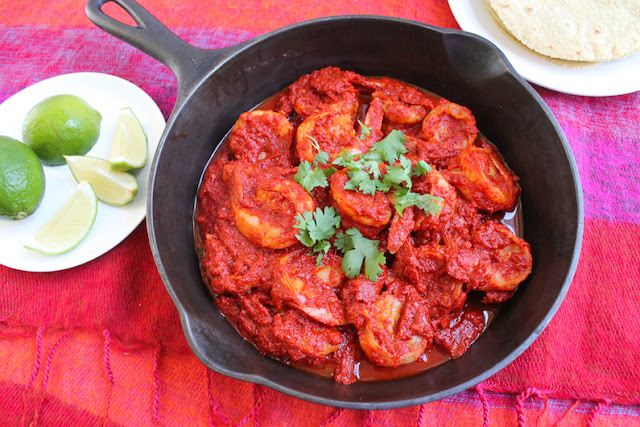
The wonderful bright sauce for Camarones a la Diabla or Deviled Shrimp is made with dried chili peppers, roma tomatoes, garlic and onions but the star of this dish is definitely the large flavorful shrimp. Serve with fresh corn tortillas as an appetizer or with rice as a main course.

Food Lust People Love: The wonderful bright sauce for Camarones a la Diabla or Deviled Shrimp is made with dried chili peppers, roma tomatoes, garlic and onions but the star of this dish is definitely the large flavorful shrimp. Serve with fresh corn tortillas as an appetizer or with rice as a main course.


Here in Texas we are big into Mexican food but frankly, much of it is what should properly called Tex-Mex and wouldn’t be recognized as Mexican food in its supposed country of origin. That’s why I was delighted when this month’s Fish Friday Foodies theme of Mexican seafood dishes was chosen. It’s always fun to explore new recipes and I rightly guessed that many I’d find on the internet were completely unfamiliar.

As with many regional dishes - this favorite is from the state of Veracruz, on the Gulf of Mexico coast - there seem to be as many camarones a la diabla recipes as there are Mexican mamás. Most use dried chili peppers and fresh tomatoes but sometimes chipotle peppers in adobo and roasted tomatoes are added and/or substituted.

I found them served with white rice, saffron rice, corn tortillas, avocados, limes and even fried platano, those lovely big bananas that turn super sweet when their skin is black and are wonderful for breakfast fried with butter.

I cooked fresh corn tortillas and served them with guacamole. Probably not traditional but they were delicious.

Camarones a la Diabla - Deviled Shrimp

I thought my Roma tomatoes, while quite lovely and ripe, were smaller than the ones I’m used to buying so I used four for this recipe. Come to find out, mine (at around 3 oz or 85g each) were in the medium range since Romas range in weight from 2-5 oz and 57-142g. Who knew? I give the exact weight I used below but know that a little more or less will still be delicious. My recipe is adapted from one on Isabel Eats.

Ingredients
8 dried guajillo chiles
3 dried chile de arbol chiles
4 Roma tomatoes (about 11 1/2 oz or 325g before coring)
2 cloves garlic
1/2 medium onion
1 teaspoon fine sea salt plus more as needed
1 teaspoon sugar
4 tablespoons olive oil
1 1/2 lbs or 680g frozen headless shrimp, peel on (about 20 large shrimp)
salt and pepper, to taste

To garnish: fresh cilantro
To serve: corn tortillas, limes and (not pictured) guacamole or see suggestions above.

Method
Set the shrimp in a colander in the sink or over a bowl to thaw and drain, preferably overnight in the refrigerator. If you don’t have time for this, run a little tap water over the shrimp to thaw them drain in the refrigerator while you make the sauce.

Once thawed and drained, peel and clean the shrimp but leave the tails on. Sprinkle with 1/2 teaspoon sea salt and refrigerate again until needed.


Meanwhile, remove the stems from your arbol chiles (the little ones) and remove the stems and seeds from the dried guajillos (the large ones.) I find the easiest way to deseed guajillos is to run a pair of scissors or a sharp knife up one side to open the pepper. The seeds fall out with hardly any effort.


Put the dried peppers in a heatproof bowl and cover them with boiling water. Set a plate on top to hold the heat in.  Set aside for 15 minutes or until the chiles have softened.


Remove the hard cores and chop your Roma tomatoes into large dice. Leave the seeds in; they add flavor.


Dice the onion and roughly chop the garlic.


Transfer the softened chiles with a pair of tongs to a large blender or a deep vessel suitable for a hand blender. Add the tomatoes, garlic, onion, salt and sugar along with 1/4 cup or 60ml of the soaking water. Puree until completely smooth.


Heat a large sauté pan or skillet over medium-high heat. Add the olive oil and shrimp. Cook shrimp for a minute or two per side, or until shrimp is lightly browned but not cooked through. You may have to do this in two batches as I did, to make sure you don’t crowd the pan. Remove the shrimp to a plate.


Add the red sauce to the pan. Cook for about 10-12 minutes over a medium low heat or until the mixture is thick and doesn’t taste as sharply of raw onion and garlic.


Add in the shrimp back to the pan and stir to coat the shrimp with the sauce.

Raise the heat and cook for 3 to 5 minutes, until the shrimp are cooked through and the sauce is really stuck to them. Taste and season with more salt, if necessary.

Food Lust People Love: The wonderful bright sauce for Camarones a la Diabla or Deviled Shrimp is made with dried chili peppers, roma tomatoes, garlic and onions but the star of this dish is definitely the large flavorful shrimp. Serve with fresh corn tortillas as an appetizer or with rice as a main course.


Remove the pan from the heat, garnish with cilantro if using and serve right away. The camarones a la diabla can also be refrigerated for a day and gently reheated in a pan in over a medium fire before serving.

Food Lust People Love: The wonderful bright sauce for Camarones a la Diabla or Deviled Shrimp is made with dried chili peppers, roma tomatoes, garlic and onions but the star of this dish is definitely the large flavorful shrimp. Serve with fresh corn tortillas as an appetizer or with rice as a main course.
Enjoy!

This month my Fish Friday Foodies friends are cooking Mexican seafood dishes at the instigation of our host Rebekah of Making Miracles. Check out all the great recipes below:


Are you a food blogger who would you like to join Fish Friday Foodies? We post and share new seafood/fish recipes on the third Friday of the month. To join our group please email Wendy at wendyklik1517 (at) gmail.com. Visit our Facebook page and Pinterest page for more wonderful fish and seafood recipe ideas.


Pin these Camarones a la Diabla - Deviled Shrimp!


Food Lust People Love: The wonderful bright sauce for Camarones a la Diabla or Deviled Shrimp is made with dried chili peppers, roma tomatoes, garlic and onions but the star of this dish is definitely the large flavorful shrimp. Serve with fresh corn tortillas as an appetizer or with rice as a main course.
 .

Monday, October 28, 2019

Tiny Taco Bites #MuffinMonday

These tiny taco bites are made with oven baked tortillas filled with spicy ground beef and extra sharp cheddar, then topped with a fresh pico de gallo made with onions, tomatoes and jalapeños. They’d be great as an appetizer for your next cocktail party, especially if you are serving margaritas.

Food Lust People Love: These tiny taco bites are made with oven baked tortillas filled with spicy ground beef and extra sharp cheddar, then topped with a fresh pico de gallo made with onions, tomatoes and jalapeños. They’d be great as an appetizer for your next cocktail party, especially if you are serving margaritas. For the taco seasoning, I use a brand called Tone’s. It comes in a large container so I just scoop out how much I need when seasoning taco and enchilada beef and even fajitas, rather than buying those little pouches of spice mix. Such a waste of packaging. You can always make your own, of course. Plenty of recipes online. For the tortillas, I love the ones at my local grocery store here in Houston, called mitad y mitad: half and half, by which they mean half corn and half flour. This is Texas, after all, where many aspire to be bilingual. They are flavorful because of the corn and supple because of the flour. Use whichever fresh tortillas you can find or your personal favorite.

Saturday night we were invited over to my brother-in-law’s home for an early birthday dinner of fajitas and margaritas. (He turns 50 on Thursday!) Of course, I always ask what we can bring. “An appetizer,” came the response. It just so happens that my Muffin Monday friends are going rogue this month, that is to say, using our muffin pans for deliciousness other than actual muffins. Otherwise I’d have made some savory mini muffins. Perhaps even my artichoke dip mini muffins. We all LOVE those. I also considered my sincere pumpkin patch cheese ball, because Thursday is Halloween, after all. It's not just adorable but tasty too.


But I’ve long been wanting to make tiny taco bites using Tostitos scoops. They are already perfect little bowls! I floated that idea by my younger daughter and she shook her head. Apparently she finds Tostitos too salty. And anyway, I thought that was an idea for another day, since it didn’t use a muffin pan. Then inspiration struck. I could make the tiny taco bowls myself with fresh tortillas and a mini muffin pan, killing two birds with one stone, so to speak.

As with most of my other fabulous ideas, when I checked the interwebs, there were almost 4 million results. It would seem tacos in a muffin pan are a thing. Never mind. These are delicious and bite-sized, and everyone at the dinner party loved them! Make sure you scroll down and check out all the other fun non-muffin recipes you can make in your muffin pan.

Tiny Taco Bites

For the taco seasoning, I use a brand called Tone’s. It comes in a large container so I just scoop out how much I need when seasoning taco and enchilada beef and even fajitas, rather than buying those little pouches of spice mix. Such a waste of packaging. You can always make your own, of course. Plenty of recipes online. For the tortillas, I love the ones at my local grocery store here in Houston, called mitad y mitad: half and half, by which they mean half corn and half flour. This is Texas, after all, where many aspire to be bilingual. They are flavorful because of the corn and supple because of the flour. Use whichever fresh tortillas you can find or your personal favorite.

Ingredients
For the beef filling:
1 lb or 450g ground beef (I used ground sirloin. Because it’s lean, you don’t lose much weight as it cooks. More to eat!)
2 tablespoons olive oil – if your ground beef is fatty, you might not need as much
1/4 cup or taco seasonings
2/3 cup or 156ml water

For the tiny taco bowls:
16-18 (6-in or 15cm) soft corn, half corn/half flour or flour tortillas
2-3 teaspoons canola or other light oil for greasing the muffin pan

For the pico de gallo:
3 ripe Roma tomatoes (approx. 1 lb or 450g in weight)
1/2 large onion
2-3 fresh jalapeños
Small bunch fresh cilantro
2-3 tablespoon fresh lime juice
Pinch fine sea salt
Pinch sugar
Freshly ground black pepper

For topping:
4 oz or 113g extra sharp cheddar, grated finely

Method
Brown the beef in the olive oil over a medium high heat, breaking it up into little pieces as it browns. When it’s well browned, even crunchy in places, add the taco spice mix and the water.


Pop the lid on and lower the heat to simmer. Simmer covered for 5-7 minutes. Remove the lid and simmer uncovered until most of the water has evaporated, another few minutes. Remove from the heat and tip the pan to one side so any oil drains off and collects away from  the beef.

Meanwhile, preheat your oven to 325°F or 163°C. Grease a 24-cup mini muffin pan with a little canola.

Cut the tortillas into 3 in or 7cm circles using a cookie cutter. (Save all the scraps for making your favorite tortilla soup recipe!) With a 3 in (7cm) cookie cutter, I got 3 taco bowls per tortilla. They don’t hold much so the seasoned beef was enough for 54 tiny taco bites! The perfect bite-sized appetizer, truly.


Use the bottom of a small glass or jigger to press the circles of tortilla into the mini muffin pan. I find it helps them release if you also grease the jigger.


Bake the tiny taco bowls in your preheated oven for 10-12 minutes, rotating the pan halfway through so they brown evenly. Watch them closely so they don’t suddenly burn. Remove them from the oven. Some of them will be puffy and not so bowl-like anymore.

As soon as they are cool enough to handle, use a folded towel if you need to, pick the puffed ones out of the muffin pan and put the glass or jigger back in it and press the bowl back into the muffin pan. Place to cool on a wire rack. Cute, right?


Continue cutting and baking all of the tortillas, until you have about 50 of them.

While they bake, cut the onion into small bits. Stem and chop the jalapeños small as well. When chopping the jalapeños, remove the membranes and seeds if your family and friends aren’t chili lovers. At our house we say, the hotter, the better.

Put the chopped onion and jalapeños in a bowl with the fresh lime juice and a pinch of salt, a pinch of sugar and a few good grinds of black pepper. Stir well and set aside.


Cut the tomatoes in half and remove all the seeds and juice. We don't want the pico de gallo too wet or it will make the taco bowls soggy. Chop the tomatoes finely. Remove the hard stems from the cilantro and chop it roughly. Add the tomatoes and cilantro to the onion/jalapeño bowl. Mix well.


Turn your oven temperature up to 350°F or 180°C. In a large baking pan, arrange your tiny taco bowls and divide the spicy beef between them.

Top with the grated cheese.


Bake the tiny taco bites for about 10 minutes or until the cheese is melted and the beef is hot through. I actually made these through this step and then baked again for 10 minutes at 350° or 180° when I arrived at my brother-in-laws, just to warm them again. These guys are very forgiving though, delicious even at room temperature.


Top with pico de gallo or set the pico out with a spoon and let everyone top the tiny tacos themselves so they don't get soggy.

Food Lust People Love: These tiny taco bites are made with oven baked tortillas filled with spicy ground beef and extra sharp cheddar, then topped with a fresh pico de gallo made with onions, tomatoes and jalapeños. They’d be great as an appetizer for your next cocktail party, especially if you are serving margaritas. For the taco seasoning, I use a brand called Tone’s. It comes in a large container so I just scoop out how much I need when seasoning taco and enchilada beef and even fajitas, rather than buying those little pouches of spice mix. Such a waste of packaging. You can always make your own, of course. Plenty of recipes online. For the tortillas, I love the ones at my local grocery store here in Houston, called mitad y mitad: half and half, by which they mean half corn and half flour. This is Texas, after all, where many aspire to be bilingual. They are flavorful because of the corn and supple because of the flour. Use whichever fresh tortillas you can find or your personal favorite.


Enjoy!

Many thanks to Sue of Palatable Pastime for her fun suggestion that we go rogue for Muffin Monday and use our muffin pans for other delicious recipes. This just might be a more regularly scheduled theme, if feedback is positive. Check out the other great recipes below:
Muffin Monday
#MuffinMonday is a group of muffin loving bakers who get together once a month to bake muffins. You can see all of our lovely muffins by following our Pinterest board. Updated links for all of our past events and more information about Muffin Monday can be found on our home page.

Pin these Tiny Taco Bites!

Food Lust People Love: These tiny taco bites are made with oven baked tortillas filled with spicy ground beef and extra sharp cheddar, then topped with a fresh pico de gallo made with onions, tomatoes and jalapeños. They’d be great as an appetizer for your next cocktail party, especially if you are serving margaritas. For the taco seasoning, I use a brand called Tone’s. It comes in a large container so I just scoop out how much I need when seasoning taco and enchilada beef and even fajitas, rather than buying those little pouches of spice mix. Such a waste of packaging. You can always make your own, of course. Plenty of recipes online. For the tortillas, I love the ones at my local grocery store here in Houston, called mitad y mitad: half and half, by which they mean half corn and half flour. This is Texas, after all, where many aspire to be bilingual. They are flavorful because of the corn and supple because of the flour. Use whichever fresh tortillas you can find or your personal favorite.
.

Wednesday, May 2, 2018

Cheesy Bean Enchiladas #FoodieExtravaganza

These cheesy bean enchiladas made with pintos and refried beans are flavorful and easy to put together. They make a great vegetarian main course to serve for your Cinco de Mayo celebrations or pretty much any day of the year.

Food Lust People Love: These cheesy bean enchiladas made with pintos and refried beans are flavorful and easy to put together. They make a great vegetarian main course to serve for your Cinco de Mayo celebrations or pretty much any day of the year.


I should say up front that my favorite restaurant enchiladas are filled with ground beef. That's all I ever order at a Tex-Mex restaurant because the cheese ones are too rich and bean enchiladas are never offered. Beans - frijoles - are a side dish, not part of the main course.

This recipe came to me like many of mine do, with a question. Can beans be used to fill enchiladas without making them dry and unpalatable? The answer is a resounding yes, and the trick is mixing refried beans with your whole ones.

The two together, with enchilada sauce and cheese, make a satisfying filling that has become a house favorite. Best of all, these are delicious as leftovers the next day (packed lunches!) and freeze wonderfully. Since it’s only my husband and I at home, that’s very important.

Cheesy Bean Enchiladas

You can use your favorite cheese for these cheesy bean enchiladas, but I love a mix of extra sharp cheddar and either pepper jack or habanero jack. For the refried beans, I tend to use the vegetarian ones since those with lard are rarely available here. This dish will serve eight, with a side dish or salad.

Ingredients
For the filling:
1 can (15oz or 425g) pinto beans, drained and rinsed
7 oz or 200g extra sharp cheddar and/or pepper jack cheese, grated
1 teaspoon ground cumin
1/2 teaspoon salt
1/2 teaspoon cayenne
1 can (15oz or 425g) refried beans
1 1/4 cup or 295ml red enchilada sauce (My recipe for the sauce: Click here.)

To assemble:
16 corn tortillas
1 1/4 cup or 295ml enchilada sauce

For topping:
3 1/2 oz or 100g extra sharp cheddar and/or pepper jack cheese, grated
3-4 whole jalapeños, sliced - optional
Generous handful sliced black olives -optional

Method
In a large bowl, mix together your pinto beans, cheese, cumin, salt and cayenne pepper. In another smaller bowl, stir together the refried beans and the enchilada sauce. This loosens the canned refried beans, making them easier to stir into the dry ingredients.


Pour the saucy beans into the larger bowl and fold until well combined. Set the filling aside.


Preheat your oven to 350°F or 180°C.

To assemble the cheesy bean enchiladas, start by covering the bottom of a large casserole dish with a thin layer of sauce. 

One by one, fold the tortillas in half and fill with 1/16 of the filling.

Lay them single file, slightly overlapping, in the casserole dish.


Cover with the remaining sauce, the cheese for topping and the sliced jalapeños and olives, if using.

Food Lust People Love: These cheesy bean enchiladas made with pintos and refried beans are flavorful and easy to put together. They make a great vegetarian main course to serve for your Cinco de Mayo celebrations or pretty much any day of the year.


Bake in the preheated oven for 45-50 minutes until the enchiladas are bubbling and the cheese is golden.

Food Lust People Love: These cheesy bean enchiladas made with pintos and refried beans are flavorful and easy to put together. They make a great vegetarian main course to serve for your Cinco de Mayo celebrations or pretty much any day of the year.


Leave to rest for 5-10 minutes, then cut into portions of more or less two enchiladas each to serve.

Food Lust People Love: These cheesy bean enchiladas made with pintos and refried beans are flavorful and easy to put together. They make a great vegetarian main course to serve for your Cinco de Mayo celebrations or pretty much any day of the year.


Enjoy!

It's almost Cinco de Mayo! Get out your blender for my super easy, always perfect margaritas (or perhaps switch it up with a pomelo version) but don't forget to put enchilada ingredients on your shopping list.

This month my Foodie Extravaganza friends are all sharing enchilada recipes, many using the myriad peppers available from Melissa’s Produce, sent to them with compliments. Make sure to check them out in the links below. Many thanks to our host this month, Camilla from Culinary Adventures with Camilla.


Pin it!

Food Lust People Love: These cheesy bean enchiladas made with pintos and refried beans are flavorful and easy to put together. They make a great vegetarian main course to serve for your Cinco de Mayo celebrations or pretty much any day of the year.
 .