Showing posts with label yeast bread recipes. Show all posts

Tuesday, June 14, 2022

Peanut Butter Babka Buns #BreadBakers

These peanut butter babka buns have a tender crumb filled with a delicious ribbon of peanut butter in a slightly sweet dough. 

Food Lust People Love: These peanut butter babka buns have a tender crumb filled with a delicious ribbon of peanut butter in a slightly sweet dough.

If you’ve never made babka before, these buns are an easier entry point to learn. In real babka loaves, the baker must stretch the dough out super thin but with these rolls, you can just roll the balls out with a rolling pin. 

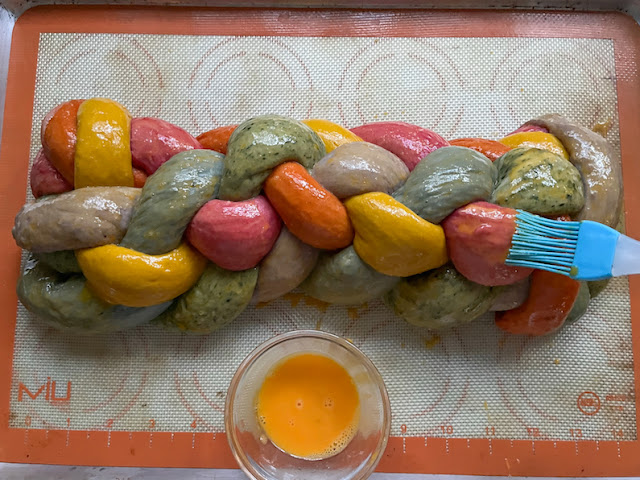
My son-in-law was the babka master and it was such a pleasure to watch him in action. He managed to stretch the dough so thin you could see the grain in the wooden table below it. Truly impressive.  Like everything Dai did in the kitchen, he did it to the highest level possible. I give you example one: 


I hope he’d be proud of my buns, even if they are a sacrilegious flavor. Traditional babka are chocolate, as above,  or cinnamon. 

Peanut Butter Babka Buns

Like any enriched dough, that is one with eggs and/or butter, this one is quite sticky initially. You can make it by hand with great effort but I highly recommend the use of a stand mixer. 

Ingredients - for 6 buns
2 teaspoons active dry yeast
3 tablespoons lukewarm milk
1 2/3 cups or 208g all-purpose flour
1/8 cup or 14g nonfat powdered milk 
1/4 cup or 25g sugar
3/4 teaspoon salt
1 large egg
1 egg white (save yolk for egg wash before baking)
4 1/2 tablespoons or 63g room-temperature unsalted butter
Canola or other light oil for drizzling the dough bowl and greasing the muffin pan

For the peanut butter filling:
1/2 cup or 125g peanut butter, slightly warmed
1 1/2 tablespoon dark brown sugar
3/4 teaspoon vanilla
pinch salt

Egg Wash:
1 egg yolk, whisked with drizzle of water

Method
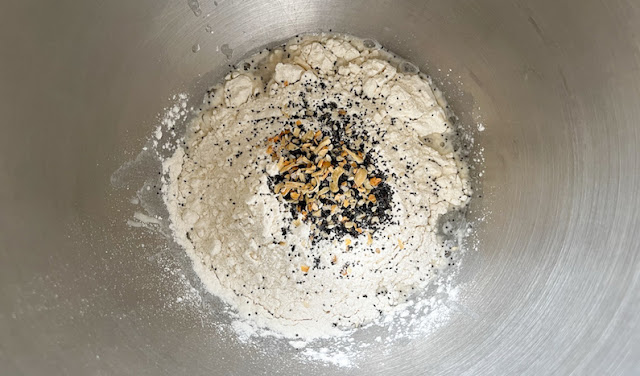
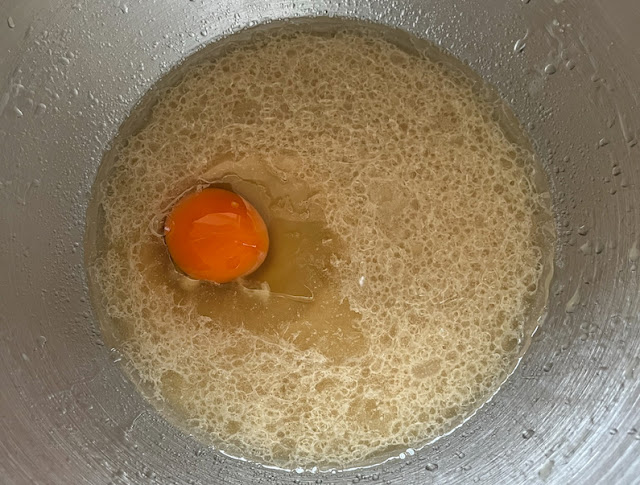
In the bowl of your stand mixer, combine the yeast with the warm milk and set aside for  few minutes to activate the yeast. You should start seeing some foaming and bubbles which tell you the yeast is still alive. 

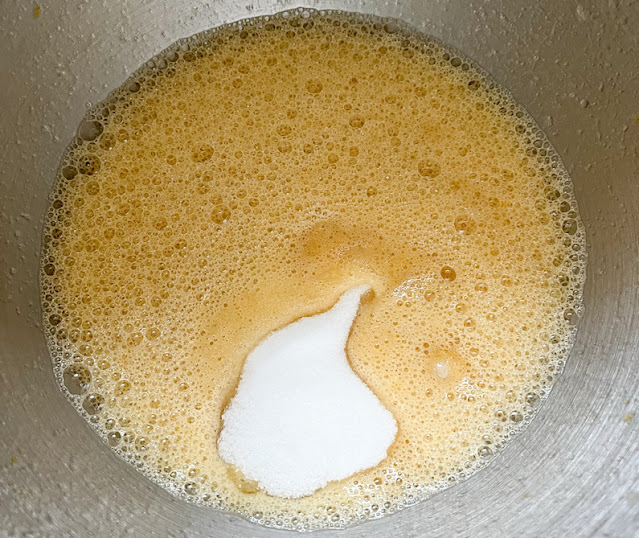
Add the flour, powdered milk, sugar, salt, the whole egg, egg white and butter.


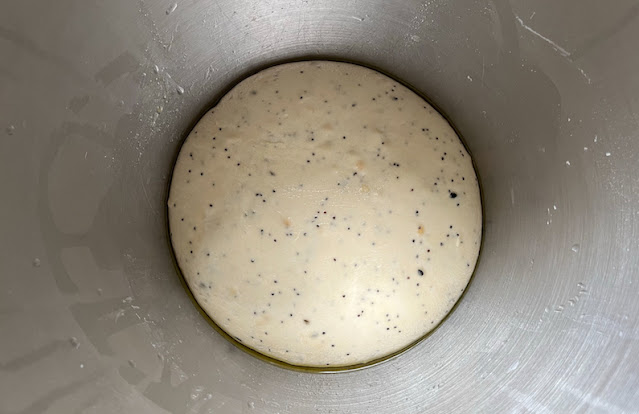
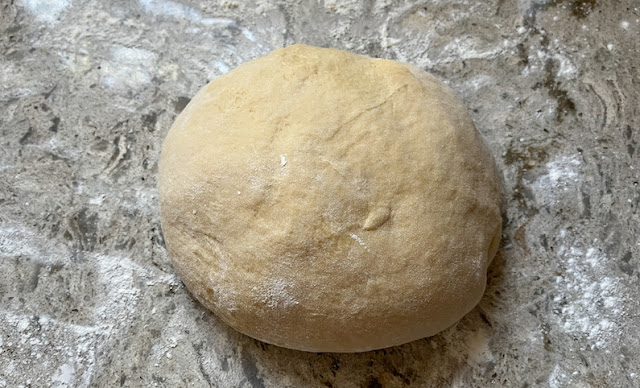
With the dough hook, mix together all of the dough ingredients to form a mostly smooth, shiny dough. Don't worry; what starts out as a sticky mess becomes beautifully satiny as it kneads. Knead this dough on medium speed for about 5 minutes.

Drizzle a little canola around your dough and use a spatula to lift the dough and coat the bowl under it so the dough ball isn’t stuck to the bowl. 


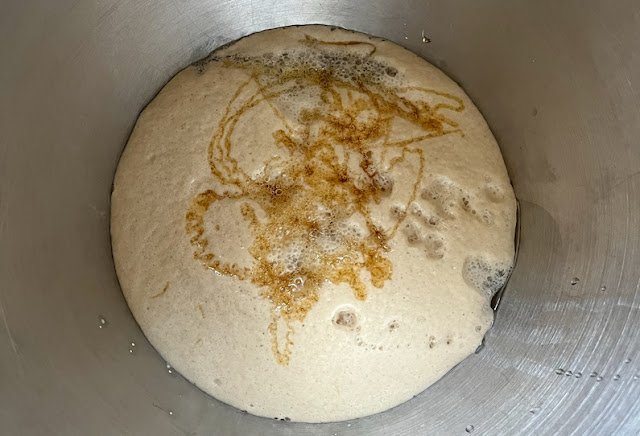
Cover the bowl with cling film and let it rise for 1 1/2-2 hours, until doubled, or overnight in the refrigerator.

To make the peanut butter filling: Place all of the filling ingredients in a bowl and beat until thoroughly combined.


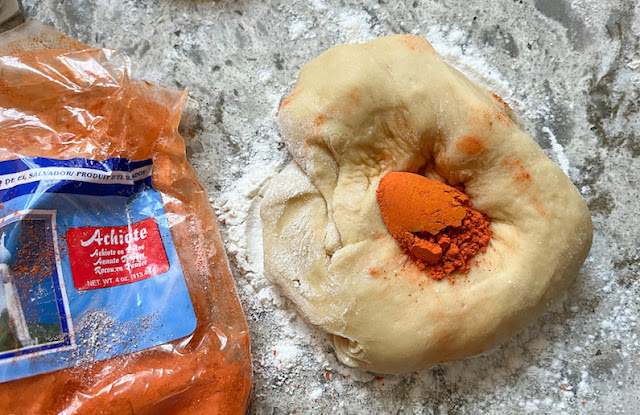
On a liberally floured surface, dump the dough out and form it into a rectangle.  Divide the dough into 6 equal pieces and roll them into balls. Cover with a damp cloth. 


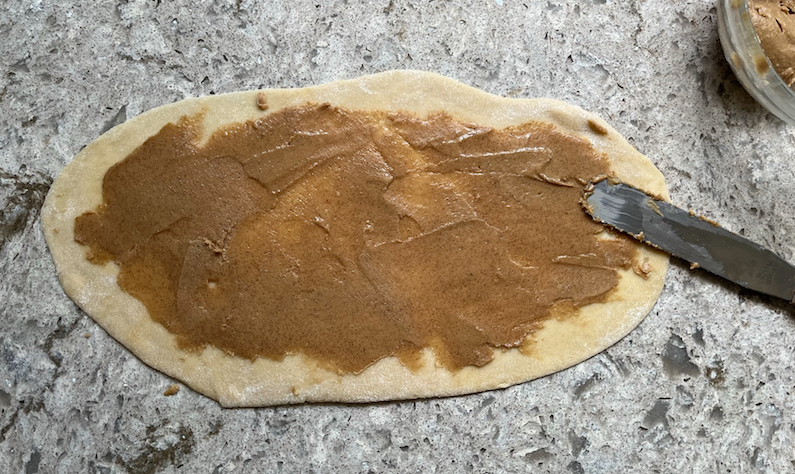
With the first piece of dough, roll it out into a 4 1/2-inch wide by 12-inch wide long rectangle. 


Spread a few teaspoons of the filling evenly onto the rectangle, stopping before the edge. 


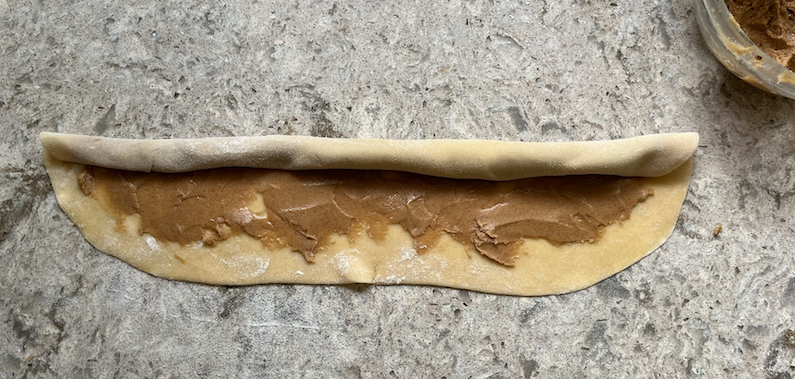
Roll the rectangle tightly, in a horizontal fashion, into a log. 


Transfer the log to a platter that can fit in your freezer and put it in there. Repeat with the other pieces of dough. Transfer the logs to the freezer as you make them. 

Brush the muffin pan with canola and set aside. 

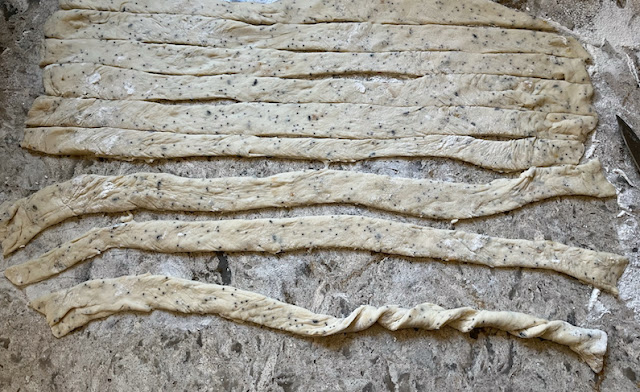
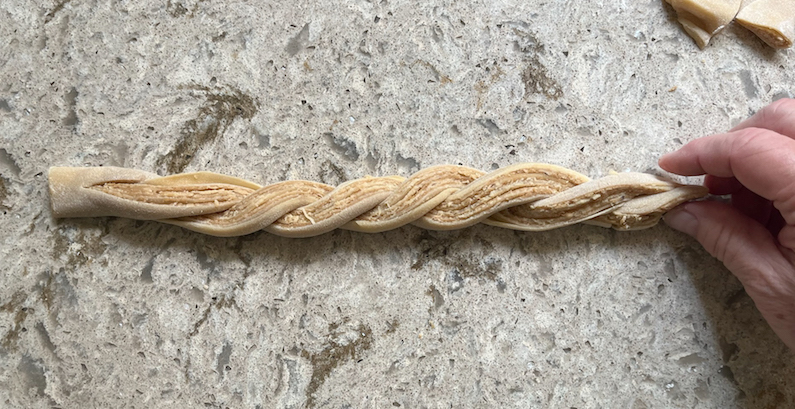
Remove the first roll of dough you made from the freezer and trim off the edges on both sides of the roll. Using your clean kitchen scissors, cut the roll in half, lengthwise, almost all the way to the end, so the striations of the dough and filling are visible. Leave the very end connected on one side. 


With the cut sides facing up, place the left side of the log over the right and then repeat with the right over the left until you've braided or twisted the two together. Pinch the cut end closed. 


Shape the braided dough into a circle, making sure the "ends" go past the circle and overlap one another. 


Tuck the long ends under the up through the center hole.
 

Transfer to the greased cavities of your muffin pan. Repeat with the remaining logs.  


Cover with a clean kitchen towel and allow to rise 1 hour or until the rolls have risen out of the muffin pan. Preheat the oven to 350°F or 180°C

Gently brush the tops of the buns with egg wash and transfer to the oven to bake for 15-17 minutes, until lightly golden brown.


Allow to cool in muffin pan for 5 minutes and then move to a cooling rack. 

Food Lust People Love: These peanut butter babka buns have a tender crumb filled with a delicious ribbon of peanut butter in a slightly sweet dough.

Enjoy! 

Food Lust People Love: These peanut butter babka buns have a tender crumb filled with a delicious ribbon of peanut butter in a slightly sweet dough.

It's time for my Bread Bakers group to share recipes for babka! Check out the links below. Many thanks to our host, Kelly from Passion Kneaded


#BreadBakers is a group of bread loving bakers who get together once a month to bake bread with a common ingredient or theme. Follow our Pinterest board right here. Links are also updated each month on this home page. We take turns hosting each month and choosing the theme/ingredient.

Pin these Peanut Butter Babka Buns!

Food Lust People Love: These peanut butter babka buns have a tender crumb filled with a delicious ribbon of peanut butter in a slightly sweet dough.

 .

Tuesday, February 8, 2022

Crunchy Everything Bagel Breadsticks #BreadBakers

These Crunchy Everything Bagel Breadsticks are made with everything bagel spice mix inside and out. Baked until golden and crispy, they are the perfect accompaniment to your favorite cocktail or glass of wine. 

Food Lust People Love: These Crunchy Everything Bagel Breadsticks are made with everything bagel spice mix inside and out. Baked until golden and crispy, they are the perfect accompaniment to your favorite cocktail or glass of wine.

Anyone who has ever tried to top a bagel, bun or even cupcake with seedy things or decorative sprinkles knows that a quite a few are going to bounce off and onto your countertop or tray. And, ugh, floor. That’s just the way it works no matter how much egg wash or icing you slather on first.

I know I have often regretted the waste when my sprinkle colors or seeds got mixed up and I had to sweep them up and discard. It made me really happy to learn recently that avoiding that waste is how young bakery worker David Gussin and his boss Charlie started to make everything bagels, by using up the leftover mixed toppings from each day’s baking. Brilliant, right? And, oh so popular!

According to an article in USA Today on January 15, 2022 - which happened to be National Bagel Day - everything bagels are the third most popular, right after blueberry and cinnamon raisin. 

My favorite bagel is cheddar and jalapeƱo, but I do like using everything bagel spice mix for other things, especially crispy baked goods. It adds some extra crunch and flavor that is most welcome. 

Crunchy Everything Bagel Breadsticks

My particular bag of everything bagel spice mix came from The Spice House in Chicago and was a gift to my daughter from a close friend. I highly recommend it because it’s not too salty, which some mixes can be. Of course, you can use your favorite brand. 

Ingredients
For the dough:
3/4 cup or 180ml lukewarm water (about 125-130°F or 51-54°C)
1 teaspoon active-dry yeast
1/4 teaspoon sugar
2 cups or 250g strong bread flour, plus more if needed
1 tablespoon everything bagel seasoning
Drizzle olive oil for the dough bowl

For baking:
1 egg, beaten
1 teaspoon everything bagel seasoning

Method
Put the yeast and sugar in the bowl of your stand mixer. Pour in the warm water and give it a stir. Set aside for a few minutes. It should start to get foamy on top. If it does not, your yeast is dead and you will have to buy more and start over.

Add the flour and spice mix to the yeast mixture and mix well to form a soft dough.

Adding the flour and spice mix to the yeast

Using the dough hook on the stand mixer, or kneading by hand against the counter, knead the dough until it forms a smooth, slightly tacky ball that springs back when you poke it, 5 to 8 minutes. If the dough sticks to the bowl or your hands, add a tablespoon of flour at a time until it’s easier to work with.

Avoid adding too much flour if possible. This is the sort of thing that can change with your flour and the humidity in the air. 

If you're planning to make the breadsticks today, then give the dough a rise. Clean out the mixing bowl, coat it with a little oil, and transfer the dough back inside. 

The dough in the oiled bowl, ready to rise

Cover the bowl with plastic wrap or a damp kitchen towel and let the dough rise until doubled in size, 1 to 1 1/2 hours, in a warm place. When my kitchen is cold, I fill my sink partially with hot water and stand the bowl in it. 

After one hour rising in a warm place

Alternatively, you can store the dough in the fridge and make the breadsticks the next day. Cover the bowl with plastic wrap and refrigerate. When you are ready to bake, take the dough out of the refrigerator about half an hour before you start rolling and shaping the breadsticks.

Line a large baking pan with baking parchment and preheat your oven to 400°F or 200°C.

On a lightly floured surface, roll out the breadstick dough into a 16x8 in or 41x20cm rectangle. 

Rolling out the dough

Cut it into twelve strips lengthwise and twist into breadsticks. They are going to look pretty rustic but that's part of their charm so don't stress about it. Transfer them to your prepared pan as you make them.

Cutting into strips and twisting

Brush with the beaten egg and sprinkle with everything bagel spice mix. 

Ready to do in the oven

Bake in the preheated oven until golden and crunchy, about 21-24 minutes. Keep a close eye on them and turn your pan around occasionally so they cook evenly. 

Ready to go in the oven

Remove to a wire rack to cool.

Food Lust People Love: These Crunchy Everything Bagel Breadsticks are made with everything bagel spice mix inside and out. Baked until golden and crispy, they are the perfect accompaniment to your favorite cocktail or glass of wine.

Enjoy!

The second Tuesday has come early this month but as usual it’s time for my Bread Baker friends to share their recipes with you. Our theme, as you might guess from the titles below, is breadsticks. Many thanks to our host, Karen of Karen's Kitchen Stories
BreadBakers
#BreadBakers is a group of bread loving bakers who get together once a month to bake bread with a common ingredient or theme. Follow our Pinterest board right here. Links are also updated each month on this home page. We take turns hosting each month and choosing the theme/ingredient.

Pin these Crunchy Everything Bagel Breadsticks!

Food Lust People Love: These Crunchy Everything Bagel Breadsticks are made with everything bagel spice mix inside and out. Baked until golden and crispy, they are the perfect accompaniment to your favorite cocktail or glass of wine.

 .

Tuesday, January 11, 2022

Natural Rainbow Challah #BreadBakers

This natural rainbow challah is colored with spices, fruit and vegetables for a bright and festive look without artificial dyes. It would make a beautiful addition to any party table or weekend brunch. 

Food Lust People Love: This natural rainbow challah is colored with spices, fruit and vegetables for a bright and festive look without artificial dyes. It would make a beautiful addition to any party table or weekend brunch..

Here’s where I suggest, right up at the top, that if you plan to make this bread on the day you want to eat it, you will want to make your natural dyes a day ahead of time. None of this is hard to do but it is time consuming. 

Also, this would be a great project for Easter because you end up with way more dye than you need for this bread and it could be used up dying eggs the old fashioned way. I felt really bad tipping it all out when I was done, without another use for it. 

Natural Rainbow Challah

The inspiration for this challah was a post on the blog What Jew Wanna Eat and the recipe itself is a combo of that post and Joan Nathan’s favorite challah on New York Times Cooking. 
 
Ingredients
For the food coloring:
Pink - 1 small beet (about 3 oz or 85g)
Orange – 1- 1 1/2 teaspoons ground annatto aka achiote
Yellow – 1- 1 1/2 teaspoons ground turmeric
Green – 1 cup, packed, or 85g spinach leaves
Purple – 1 cup or 140g fresh or frozen blueberries 
Blue – unused cooked blueberry juice from purple + 1 teaspoon baking soda

For challah dough:
2 1/4 teaspoons active dry yeast 1 packet
3/4 cups or 80ml warm water 
1/2 cup or 100g sugar
1/4 cup or 60ml canola or other light oil, plus more for dough bowls
1/4 cup or 60ml honey 
2 large eggs +1 egg white  (Save that 1 egg yolk for glazing)
1 teaspoon fine sea salt
5 cups or 625g bread flour, plus more as needed for kneading

Method
First, we’ll make the dye colors.

For the pink, boil your beet in just enough water to cover until tender. When it’s cool enough to handle, use a paper towel to push the peels off. Blend it in small food processor until smooth. Set aside to cool completely. 

Blending the beet

For the green dye, simmer the spinach leaves or greens with a little bit of water in a covered skillet until they completely wilted. Blend in small food processor until smooth. Set aside to cool completely.

Blending the spinach

For the purple, simmer the fresh or frozen blueberries in 2 tablespoons water in a covered pot until they fall apart. Cool, drain, and reserve the liquid.

Cooking the blueberries

We'll make the blue out of the purple once we've used it to color one ball of dough by adding the baking soda to the balance. 

Now, make your challah dough. Prepare the yeast in a large mixing bowl for a stand mixer by whisking it with warm water and 1 teaspoon sugar. Leave it for a few minutes to activate the yeast. It should bubble up and get foamy. This means your yeast is live. 

Beat the oil and honey into the foamy yeast mixture. 

Adding the oil and honey

Add in the two eggs, one at a time, beating with each addition, then add the egg white. 

Adding the eggs, one at a time

Beat in the remaining sugar and salt. 

Adding the balance of the sugar and the salt

Gradually add flour beating with each addition. As the dough gets thicker, you might need to change to the bread hook. 

Adding the first amount of flour

When dough holds together and isn't too sticky, you are ready to start adding your natural dyes.

The finished plain dough

Divide your dough into six even pieces. I used a food scale to weigh them out. The dough weighed 1162g so each ball was approximately 94g.

Flatten out each piece one at a time (keep the others covered) and put some of each of the homemade food coloring in the middle of each one.  Fold the dough over the dye and pop it back in your stand mixer with the bread hook. Knead until the dye is thoroughly mixed in. 

I started with the easy ones that didn't add liquid, the annatto and turmeric! 

Adding the annatto to the dough ball


Add a little more flour or dye as needed. I had to hand knead some of mine as well to get the colors well mixed. Form the dough into a ball and place it in a greased bowl and cover lightly with cling film. 

Repeat with the four more dough balls, making a yellow one with the turmeric and adding a little flour as needed for the pink, green and purple dyes. 

Once you've colored the purple ball, add 1 teaspoon of baking soda to the blueberry juice. This will turn it a dark indigo blue. Color the final ball of dough with some of this and knead to incorporate it as you did with the others. 

The blue ball!


Put the six dough balls in lightly oiled bowls and cover them with cling film. Leave them to rise in a warm place until they have at least doubled in size, about 1 hour. 

To form the rainbow challah, roll the colored balls into long tubes. 

All six colored dough balls rolled into tubes

Now braid and tuck by following these instructions here on the King Arthur Flour YouTube channel: How to braid a six-strand challah. They make the process much clearer than I ever could with words so I'm not even going to try to confuse you! 

Food Lust People Love: This natural rainbow challah is colored with spices, fruit and vegetables for a bright and festive look without artificial dyes. It would make a beautiful addition to any party table or weekend brunch..

Leave your challah to rise again on a parchment or silicone lined baking sheet, lightly covered, until doubled in size, about 45 minutes. 

My latest wintertime trick is to heat a couple of inches of water to boiling in a bowl in the microwave. I open it quickly and set my baking pan on top, closing the door again swiftly. This creates a moist, warm environment for the dough to rise in.  Works like a charm as long as no one else needs the microwave for an hour or so.

When the challah is almost finished rising, preheat your oven to 350° F or 180°C. 

Whisk the egg yolk with 1/2 tablespoon water and generously brush the mixture over the challah.

Brushing on the egg wash

Bake for 40-45 minutes in your preheated oven, rotating the pan halfway through. If it starts to brown too fast, make a foil tent to cover it. It’s done when the internal temperature reaches 190°F or 88°C.

Food Lust People Love: This natural rainbow challah is colored with spices, fruit and vegetables for a bright and festive look without artificial dyes. It would make a beautiful addition to any party table or weekend brunch..

Leave to cool then slice and enjoy! 

Food Lust People Love: This natural rainbow challah is colored with spices, fruit and vegetables for a bright and festive look without artificial dyes. It would make a beautiful addition to any party table or weekend brunch..

It’s the second Tuesday of the month so that means my Bread Bakers are out in force! Today we are sharing naturally colored breads. One over-achiever (looking at Kelly from A Messy Kitchen!) even baked two different breads. Check out all the links below. Many thanks to our host, Radha of Magical Ingredients for this fun and challenging theme!


BreadBakers
 
#BreadBakers is a group of bread loving bakers who get together once a month to bake bread with a common ingredient or theme. Follow our Pinterest board right here. Links are also updated each month on this home page. We take turns hosting each month and choosing the theme/ingredient.


Pin this Natural Rainbow Challah! 

Food Lust People Love: This natural rainbow challah is colored with spices, fruit and vegetables for a bright and festive look without artificial dyes. It would make a beautiful addition to any party table or weekend brunch..


 .

Tuesday, January 12, 2021

Ham and Cheese Elephant Rolls #BreadBakers

Children and adults alike will love these soft ham and cheese elephant rolls. They are cute AND tasty! I mean really. Look at their golden ears and currant eyes!

Food Lust People Love: Children and adults alike will love these soft ham and cheese elephant rolls. They are cute AND tasty! I mean really. Look at their golden ears and currant eyes!

I have no idea what I was browsing the internet for when I came across bread dough shaped like animals last year. There were hedgehogs, bunnies, puppy and kitty faces, even some starfish and so much more. 

That gave me this idea for a Bread Bakers theme and, bless their hearts, my bread baking friends were up for the challenge to start off the new year. Make sure you scroll down to the bottom to see the menagerie they’ve created! 

Many years ago, while we were living in Malaysia, we had several opportunities to visit an elephant sanctuary a short distance from our home. Whenever we had visitors to entertain, it became a highlight of their holiday. We’d put on our swimsuits topped with t-shirts and shorts, load up the car with fruit to share with the elephants and make our way through up the highway, then into the jungle. 

The sanctuary showed small groups of visitors a short introductory film where we learned about their work rescuing orphaned or threatened elephants and then came the exciting part, we got to feed and bathe them! 


(Hence the swimsuits – the latter part was a wet job! If you got really lucky, you got to ride one of the elephants down to the river for the bath. We all got lucky a few times over the years.)


Possibly due to this frequent early exposure, our younger daughter became a collector of elephant statues, big and small. I thought it would be fun to create some of those wonderful creatures and take photos of the elephant rolls with some of her collection. 

Ham and Cheese Elephant Rolls

This recipe is adapted from one I found originally on the Japanese site Cookpad. Fortunately they also have a sister site in the UK which has been translated into English - which still took me a while to work through. I got there in the end!

Ingredients
For the dough:
1/3 cup or 80ml milk 
2 teaspoons butter
1 teaspoon active dry yeast
1/2 teaspoon sugar
1 1/4 cups or 156g bread flour
1/4 teaspoon fine sea salt
1 egg, separated into white and yolk

For the filling:
3 oz or 85g thick sliced ham (I used leftover spiral cut cooked ham.)
1 3/4 oz or 50g extra sharp cheddar or your favorite aged cheese

For the eyes:
6 raisins or currants

Method
Warm the milk and butter in the microwave or in a small pot on the stove until the butter is melted and the milk is lukewarm to the touch. 

In a mixing bowl, combine the milk with the yeast and sugar and set the mixture aside to prove. Within a few minutes, you should see bubbles forming which assure you that the yeast is indeed active. 


Sift the flour and salt into the bowl, add the egg white and mix well to make a soft dough. 


Knead until your dough is smooth and elastic. Set the bowl in a warm place for the first rise of about 45 minutes till it doubles in size. 


Meanwhile, slice your ham into rounded pieces about 1/4 in or 1/2cm thick and 2 x 2.5 in or 5 x 6.5cm. Cut your cheese into similar size slices and lay one piece of cheese on each slice of ham. I also trimmed the top corners of the cheese off to match the curve of the ham. 


Once your dough has risen sufficiently, cut it into six equal pieces. (My dough weighed about 284g so each piece was about 47g, if you are a user of a digital scale.)

Roll each piece into balls and then roll them into long ovals a little more than twice the length of your ham.

Place the ham and cheese on top of the oval, a little closer to the right to leave room for cutting the trunk. Fold the dough up over the ham and cheese, pressing any air out and sealing the edges all around. 


Use a sharp knife to cut a triangle on the left side to form the trunk and a small slit on the right side for the tail. According to Feng Shui, elephant trunks pointed up indicate a good mood, so I turned mine up! 


Roll the little triangle of dough into a ball then roll it out in a small oval to form the elephant’s ear. Lightly press the ear on to attach it. 


Continue the process until all six ham and cheese elephant rolls are done. Use the end of a chopstick to press an eyehole into each. 


Place them on your baking pan lined with a silicone liner or baking parchment and put them in a warm place to rise for 30 minutes. I’ve discovered that my microwave oven is large enough to hold my pan so I heat a small bowl of water to almost boiling, then pop the pan on top and close the microwave door. Game changer for those of us without proving drawers!


In a small bowl, soak the six currants for the eyes in a little hot water. Leave them to plump. 

Depending on how long your oven takes to preheat, start that process setting the oven to 350°F or 180°C sometime in the 30 minutes of rising time. 

When the little elephants have risen sufficiently, whisk your egg yolk with two tablespoons of water and brush them with the elephants with the mixture. 


Drain the currants and dry them off. Use the end of your chopstick to poke one into each eyehole. 

Food Lust People Love: Children and adults alike will love these soft ham and cheese elephant rolls. They are cute AND tasty! I mean really. Look at their golden ears and currant eyes!

Bake the elephants in your preheated oven for about 18-20 minutes or until they are puffed and golden. 

Food Lust People Love: Children and adults alike will love these soft ham and cheese elephant rolls. They are cute AND tasty! I mean really. Look at their golden ears and currant eyes!

Remove from the oven and leave to cool for as long as you can resist before eating.  

Food Lust People Love: Children and adults alike will love these soft ham and cheese elephant rolls. They are cute AND tasty! I mean really. Look at their golden ears and currant eyes!

Enjoy! 

Check out all of the other animal bread my Bread Bakers are sharing today!
BreadBakers
#BreadBakers is a group of bread loving bakers who get together once a month to bake bread with a common ingredient or theme. You can see all our lovely bread by following our Pinterest board right here. Links are also updated after each event on the #BreadBakers home page. We take turns hosting each month and choosing the theme/ingredient.

Pin these Ham and Cheese Elephant Rolls!

Food Lust People Love: Children and adults alike will love these soft ham and cheese elephant rolls. They are cute AND tasty! I mean really. Look at their golden ears and currant eyes!
 .