Friday, October 19, 2018

Spicy Shrimp Stuffed Squid Salad #FishFridayFoodies

Spicy shrimp stuffed squid salad says it all. Shrimp, chili peppers, garlic and cheese are stuffed into clean squid and baked! Once sliced, these beauties make a tasty colorful addition to a fresh tomato salad. This salad looks fancy, if you have special guests that need impressing, but it’s really quite easy to make.

Food Lust People Love: Spicy shrimp stuffed squid salad says it all. Shrimp, chili peppers, garlic and cheese are stuffed into clean squid and baked! Once sliced, these beauties make a tasty colorful addition to a fresh tomato salad. This salad looks fancy, if you have special guests that need impressing, but it’s really quite easy to make.


Way back circa 2005, we had a lovely gentleman builder named Dave Price supervising renovation work on our house in the Channel Islands. As I spent more time with Dave, I found out that master construction was not his only skill; he also did a lot of the cooking in his family. We’d discuss recipes and what memorable dish we’d made for dinner recently over many cups of strong tea.

When Dave told me about one of his specialties, stuffed squid, I couldn’t wait to write it down and try it. Squid are so perfectly stuff-able! Why hadn’t I thought of that?

This month I am the host of Fish Friday Foodies and our theme is seafood stuffing. When I created the event, I was thinking along the lines of seafood that would be stuffed into something else, like a crepe, taco or baked potato. But as I shuffled through my old files, I knew I had to share Dave’s recipe. I can’t recall if he said what he served the stuffed squid with but I decided to add it into a fresh tomato salad.

Spicy Shrimp Stuffed Squid Salad

Dave’s original instructions called for one 6-inch squid per person. Mine were much smaller so I bought eight, but the size really doesn’t matter that much since we are going to slice them anyway. Use what you can find. This serves 2-3 people as a main or 4-5 as a starter or side dish.

Ingredients
For the stuffed squid:
8 medium squid
25 medium shrimp (peeled and cleaned weight = 9 1/3 oz or 266g)
2 oz or 57g extra sharp cheddar, grated
1/4 cup or 56g sour cream
2 small red chili peppers, minced
2 cloves garlic, minced
1/4 teaspoon salt
Freshly ground black pepper
2 tablespoons olive oil

For the salad:
3 ripe but firm tomatoes, sliced
1 small bunch cilantro, hard stems removed

Method
Clean each squid, first removing the head, tentacles and cartilage (cuttlebone)  from the tube. Use a sharp knife to cut the head away from the tentacles and discard it. Remove the beak from the tentacles and discard. Rub the outer colored film off of the tube with a dry paper towel. It should rub off quite easily.


Run the tubes under cool water and make sure they are clean inside. Set aside to drain.  If you need visuals of the cleaning process, check out this thorough post on The Spruce Eats.

Preheat your oven to 400°F or 200°C.

Chop the tentacles and shrimp into small bits then mix them with the chili peppers, garlic, salt and a few good grinds of black pepper.


Add in the cheese and stir well. Mix in the sour cream.


Stuff this mixture into your cleaned squid tubes.


Sew up the opening with poultry string and tie a knot to keep it from coming open. I use a semi circular needle, which makes it easy to catch both sides of the squid as you stitch.


Put the shrimp stuffed squid in a baking pan and drizzle them with the olive oil.

Bake them in your preheated oven for about 20 minutes. They will release a lot of beautifully flavored liquid. Remove the squid to a cutting board and leave to cool. Save any bits of shrimp that managed to escape.


Strain the juice from the cooking pan and put it in a small jar or jug. Once whisked, this makes a gorgeous dressing for the salad. Taste it and add a pinch more salt if necessary.

Once the squid are cool enough to handle, use a sharp knife to cut them into circles.

Arrange these on your sliced tomatoes, along with the cilantro and any salvaged shrimp bits.

Food Lust People Love: Spicy shrimp stuffed squid salad says it all. Shrimp, chili peppers, garlic and cheese are stuffed into clean squid and baked! Once sliced, these beauties make a tasty colorful addition to a fresh tomato salad. This salad looks fancy, if you have special guests that need impressing, but it’s really quite easy to make.
Whisk the dressing again and drizzle it over the tomatoes and squid.

Enjoy!

Food Lust People Love: Spicy shrimp stuffed squid salad says it all. Shrimp, chili peppers, garlic and cheese are stuffed into clean squid and baked! Once sliced, these beauties make a tasty colorful addition to a fresh tomato salad. This salad looks fancy, if you have special guests that need impressing, but it’s really quite easy to make.


Check out the other seafood stuffing recipes my Fish Friday Foodie friends are sharing today!


Would you like to join Fish Friday Foodies? We post and share new seafood/fish recipes on the third Friday of the month. To join our group please email Wendy at wendyklik1517 (at) gmail.com. Visit our Facebook page and Pinterest page for more wonderful fish and seafood recipe ideas.

Pin it! 

Food Lust People Love: Spicy shrimp stuffed squid salad says it all. Shrimp, chili peppers, garlic and cheese are stuffed into clean squid and baked! Once sliced, these beauties make a tasty colorful addition to a fresh tomato salad. This salad looks fancy, if you have special guests that need impressing, but it’s really quite easy to make.
 .

Thursday, October 18, 2018

Lemon Raspberry Marble Bundt #BundtBakers

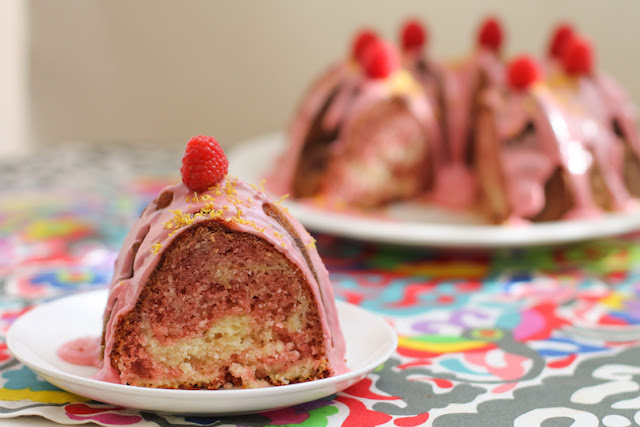
Layer a tangy lemon batter with a zippy pink raspberry batter and give them a swirl to create this lemon raspberry marble Bundt cake. The crumb is light but buttery. The lemon raspberry glaze adds a delightfully tart sweetness, or just sprinkle with a little powdered sugar to serve.

Food Lust People Love: Layer a tangy lemon batter with a zippy pink raspberry batter and give them a swirl to create this lemon raspberry marble Bundt cake. The crumb is light buttery. The lemon raspberry glaze adds even more tart sweetness, or just sprinkle with a little powdered sugar to serve.


This month’s Bundt Baker theme is marble cakes which, in case you are not familiar, means two (or even three) batters, all swirled together in one cake pan. Ideally the cut cake shows off the different colors when baked and cut. The trick, I think, is not to swirl too vigorously and to make sure your batters are contrasting colors.

The most popular recipes when one searches for marble cake are vanilla and chocolate, which surely provide the most definitive contrast but I wanted to go a different direction. For the last week or so, my mind has been mulling the problem in the background, even as I get other things done. I’m special that way.

The fresh raspberries available at my nearby supermarket clinched the deal. Lemon and raspberry it would be.

Lemon Raspberry Marble Bundt

The basic yellow cake batter recipe comes from my old favorite standby, Good Housekeeping Illustrated Cookbook, 1980 edition. As both of my flavor additions are acidic, I also added baking soda, to help lighten the cake crumb.

Ingredients
For the batter:
2 cups or 250g flour
2 teaspoons baking powder
1/2 teaspoon baking soda
1/4 teaspoon salt
1 1/2 cups or 300g sugar
3/4 cup or 170g butter, softened
3 large eggs
2/3 cup whole milk

For the raspberry flavoring:
1/4 cup or 80g raspberry preserves
1/4 cup or 45g fresh raspberries (about 10), plus extra for decoration, if desired
1/4 teaspoon no taste red food coloring gel - optional

For the lemon flavoring:
1/4 cup or 60ml fresh lemon juice
grated zest 1/2 lemon (grate the whole lemon and save half for decorating the cake)

For the glaze:
1 1/2 cups or 187g powdered sugar
2 tablespoons raspberry mixture (as explained below)*
3-4 teaspoons lemon juice

Method
Preheat oven to 350°F or 180°C. Grease a 10-cup Bundt pan with butter and then coat it with flour.

In a large mixing bowl, whisk the flour, baking powder, baking soda and salt together. In a small bowl, mash the fresh raspberries thoroughly with a fork and then mix in the raspberries preserves.*
Once mixed, set aside two tablespoons to use later for the glaze.


In large bowl, with your mixer on low speed, beat the sugar and butter just until blended. Increase the speed to high and beat 3 minutes or until creamy, occasionally scraping bowl with rubber spatula. Reduce speed to low again and the add eggs, one at a time, beating well after each addition.


Beat in flour mixture alternately with milk mixture, beginning and ending with flour mixture just until blended, scraping bowl occasionally.


Spoon half of the batter into another large mixing bowl. (You can just eyeball this but if you are a scale-using baker, half of mine weighed 514g. Depending on the exact weight of your eggs, this might vary a little bit but it should be a good estimate of half. )

To one bowl of batter, add your raspberry mixture and fold it in till it’s completely combined.

Since a marbled look is our goal, I also added about a 1/4 teaspoon of Wilton No Taste Red coloring gel. Without it, the batter was a soft purple-y grey. No doubt it would be tasty but not necessarily attractive.


I used a clean toothpick to scoop the gel out of the little bottle because it’s so sticky, then I put the gel-coated end of the toothpick into the little bowl with the raspberry mixture that will flavor the glaze.

Add the fresh lemon juice and lemon zest to the second bowl of batter and fold them in till completely combined.


Using two tablespoons, alternate dropping spoonfuls of batter into your prepared Bundt pan.


Keep layering the different batters, raspberry on top of lemon, on top of raspberry, etc. until they are both finished.


Using a wooden skewer or chopstick, gently swirl the batter from the middle to the outside and back again, around the Bundt pan.


The batter is light and fluffy so it doesn’t take long to bake. About 35-40 minutes should do it or when the sides start to pull away from the pan and a wooden skewer comes out of the center clean. Set the Bundt pan on a wire rack to cool for about 20 minutes. Use the tip of your wooden skewer to loosen the edges of the cake from the pan then invert it onto the wire rack to cool completely before glazing.


For the glaze, mix the powdered sugar with the reserved raspberry mixture and add the lemon juice a teaspoon at a time until you reach your desired consistency.


I stopped at 3 teaspoons but really should have added more. As you can see, my glaze was very thick. But I’ve got to tell you, the raspberry flavor shone through! I was very, very pleased with that.

Food Lust People Love: Layer a tangy lemon batter with a zippy pink raspberry batter and give them a swirl to create this lemon raspberry marble Bundt cake. The crumb is light buttery. The lemon raspberry glaze adds even more tart sweetness, or just sprinkle with a little powdered sugar to serve.


Enjoy!

Food Lust People Love: Layer a tangy lemon batter with a zippy pink raspberry batter and give them a swirl to create this lemon raspberry marble Bundt cake. The crumb is light buttery. The lemon raspberry glaze adds even more tart sweetness, or just sprinkle with a little powdered sugar to serve.


Many thanks to this month’s Bundt Bakers host, Sue of Palatable Pastime, for the great theme and challenge as well as her behind the scenes work. Have you ever made a marble aka swirl cake? We are hoping this fabulous list of recipes will motivate you to try:

BundtBakers

#BundtBakers is a group of Bundt loving bakers who get together once a month to bake Bundts with a common ingredient or theme. You can see all our of lovely Bundts by following our Pinterest board. We take turns hosting each month and choosing the theme/ingredient. Updated links for all of our past events and more information about BundtBakers, can be found on our home page.

Pin it!

Food Lust People Love: Layer a tangy lemon batter with a zippy pink raspberry batter and give them a swirl to create this lemon raspberry marble Bundt cake. The crumb is light buttery. The lemon raspberry glaze adds even more tart sweetness, or just sprinkle with a little powdered sugar to serve.
.

Tuesday, October 9, 2018

Fatayer Jebneh - Arabic Cheese Pies #BreadBakers

A soft yeast dough filled with a blend of three salty cheeses, cilantro and nigella seeds, fatayer jebneh or Arabic cheese pies are baked till golden on the outside. The melted cheese on the inside is the perfect complement to the tender crust.

Food Lust People Love: A soft yeast dough filled with a blend of three salty cheeses, cilantro and nigella seeds, fatayer jebneh or Arabic cheese pies are baked till golden on the outside. The melted cheese on the inside is the perfect complement to the tender crust.


Fatayer jebneh are boat-shaped cheese “pies” that are a popular traditional snack in many Arabic speaking countries. They are available not only in bakeries, but even supermarket deli counters will offer these convenient ready-to-go savory treats.

When we first moved to Cairo back in 2012, I started searching online for a book about the city and its food traditions. I came across Apricots on the Nile* by Colette Rossant, originally published as Memories of a Lost Egypt. Ms. Rossant weaves a fascinating tale of her childhood along with sharing many recipes for favorite dishes.

If you are interested in Egyptian cuisine, you might want to check out two other specialties I’ve made from Apricots on the Nile: Lahma Mashshiya or Beef Rolls with Onion Gravy and Sambusaks, another cheese-filled butter pastry but made without a yeast dough.

Occasionally Ms. Rossant would mention a dish for which the recipe was not included, so I started searching online for food blogs that might fill the gap. Despite living in Abu Dhabi years before, I found that I was woefully ignorant about much of Middle Eastern cuisine. One of my very favorites was called Chef in Disguise, written by a talented cook and photographer named Sawsan. As she says in her About Me, Sawsan is an orthodontist by day, a food blogger at night. A Palestinian who was raised in Jordan, she was passionate about sharing her traditional recipes – in English, thank goodness! – with the world.

Fatayer Jebneh or Arabic Cheese Pies 

This recipe is adapted from Chef in Disguise. If you cannot find the akkawi or kashkaval cheeses, substitute another salty cheese like feta.

Ingredients
For the dough:
1 tablespoon yeast
1 teaspoon sugar
1/2 cup or 120ml warm water + 1-2 tablespoons more if the dough is dry
3 cups or 375g flour
1/4 teaspoon salt
1/4 cup or 60ml canola or other light oil, plus extra for the mixing bowl
1/4 cup or 60g plain yogurt

For the stuffing:
3 1/2 oz or 100g akkawi cheese, grated
3 1/2 oz or 100g kashkaval, grated
3 1/2 oz or 100g sharp cheddar, grated
1 tablespoon nigella seeds (aka kalonji)
small bunch cilantro, tough stems removed, chopped

2 tablespoons milk – for brushing on the fatayer jebneh before baking

Note on flour: Here’s the thing about flour and making bread dough. Sometimes, even if you measure your flour by weight, it might need more water when the dough starts coming together. The first time I made this recipe, we were living in Egypt and the dough came out beautifully with exactly half a cup of warm water. I don’t know if the flour I can buy here in Dubai is drier – or maybe the air is drier? – but I had to add two tablespoons of water as the dough came together so it would hang together so I could knead it. Use your best judgement.

Method
Add the yeast and sugar to a bowl or large measuring vessel then stir in the warm water. Set it aside until you need it again. You are looking for it to foam up, proving that the yeast is still active. If it doesn’t bubble up, buy new yeast and start again.

In a large bowl, whisk together the flour and salt till combined. This also helps aerate the flour and takes the place of sifting.

Drizzle in the oil and use a pastry cutter or your clean fingers to mix it in, creating a crumbly texture.


Add the yeast mixture and the yogurt to the flour and mix thoroughly.


I used my stand mixer at this point. You can certainly do it by hand, it’s just gonna give your arms a workout.

When you can press the dough into a ball, take it out of the bowl and knead it for several minutes or until it’s stretchy. This is also where you might need to add some more water, as I did, if the dough is not hanging together nicely and won't form a nice ball. (See photo above.)

After kneading, roll the dough into a ball and drizzle a little bit of oil into the mixing bowl. Put the dough back in and turn it so it’s well oiled.

Cover the bowl with a damp towel and put it in a warm place for about an hour or until the dough has doubled in size.

Traditional fatayer jebneh are a bit bigger than the ones I made, each starting with an egg-sized piece of dough. You can get about 10 of that size with this recipe. I find those a bit large, so I divide the dough into 16 pieces.


Either way, the cheese filling is enough since the smaller pies hold less cheese. Divide your dough into either 10 or 16 small balls.

Cover the balls with a clean damp towel and leave them to rest for 10 minutes.

In a mixing bowl, combine the cheeses, chopped cilantro and nigella seeds.


One at a time, roll each dough ball out into an elongated oval.


Fill the middle with the correct portion of cheese. For my 16 smaller pies, two tablespoons or (if you are a scale user) about 19g each worked perfectly.

Brush the ends of the oval with a little water.

Starting on the right side of the elongated oval, fold the far side toward you. Close that end by folding the near side back.

On the left side, start by folding the near side back, then close that side by folding the far side forward. In other words, the two ends should be mirror images of each other.


Use your fingers to press the sides of the gap together.


Place the fatayer jebneh on a baking pan, leaving room for them to expand a bit while they bake. When the first pan is full, set it aside for about 15 minutes and preheat your oven to 400°F or 200°C. Meanwhile, roll, fill and form the rest of the pies.


When the oven is hot, brush the fatayer jebneh with a little milk and pop them in the oven. I baked mine in two batches because I was still forming the second group when the oven was hot enough.

Bake for about 14-16 minutes or until the dough is golden and the cheese is melted and bubbling.

Remove from the oven and allow to cool a bit before eating. Melted cheese will seriously burn your mouth if you bite in too soon!

Serve warm. If not eaten right away, these can be kept in the refrigerator in an airtight container. Give them 10 seconds on high in the microwave before serving.

Enjoy!

Food Lust People Love: A soft yeast dough filled with a blend of three salty cheeses, cilantro and nigella seeds, fatayer jebneh or Arabic cheese pies are baked till golden on the outside. The melted cheese on the inside is the perfect complement to the tender crust.


This month my Bread Bakers group are celebrating October with Middle Eastern breads. Many thanks to our host, Karen from Karen's Kitchen Stories. Check out all the great recipes!


#BreadBakers is a group of bread loving bakers who get together once a month to bake bread with a common ingredient or theme. Follow our Pinterest board right here. Links are also updated each month on this home page.

We take turns hosting each month and choosing the theme/ingredient.

Pin it!

Food Lust People Love: A soft yeast dough filled with a blend of three salty cheeses, cilantro and nigella seeds, fatayer jebneh or Arabic cheese pies are baked till golden on the outside. The melted cheese on the inside is the perfect complement to the tender crust.

 .

*Amazon affiliate link - If you buy through my affiliate link, I earn a few cents at no extra cost to you. Thanks for supporting Food Lust People Love.