Showing posts with label #SundayFunDay. Show all posts

Sunday, January 28, 2024

Chili-Fritoque

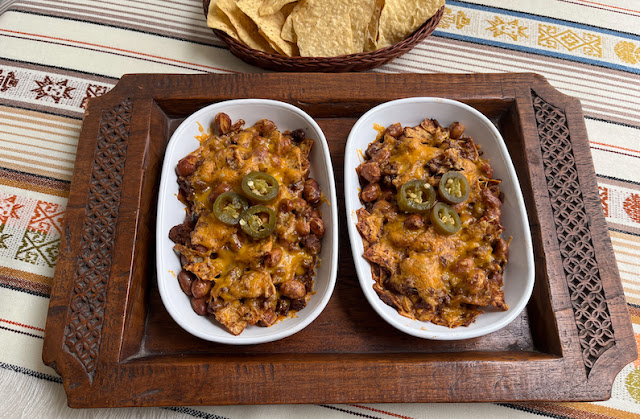
Sort of a precursor to nachos, chili-fritoque is a great appetizer made with broken tortilla chips, chili con carne and pinto beans, topped with cheese and jalapeños.

Food Lust People Love: Sort of a precursor to nachos, chili-fritoque is a great appetizer made with broken tortilla chips, chili con carne and pinto beans, topped with cheese and jalapeños.

Pronounced free-TOKΕ-ay, this dish is found on the World War II–era menu of the Original Mexican Restaurant in San Antonio. It was founded in 1899 and sadly closed in 1960. (There another restaurant by the same name now used by permission of the Farnsworths, the restaurant’s owners.) 

The original recipe included just beans but there was also a version called chiltoque with chili con carne instead of the beans. You know I had to take it one step farther and use both. As I was writing up this post, I google searched Chili-Fritoque and I'm not the only one who made this good decision.

Personally, why would anyone order just beans and cheese or just chili and cheese when you could add all three to this tasty corn chip dish? 

Chili-Fritoque

The recipe is adapted from The Texas Cookbook by Arthur and Bobbie Coleman, published in 1949.  For the chili con carne, homemade is always better than canned. I use this recipe here: Classic Chili con Carne. An oldie but goodie. 

Ingredients
2 cups or 360g cooked pinto beans (canned are fine but rinse them!)
2 cups or 540g chili con carne
2 cups (or more) broken tortilla chips (I'm a fan of more.)
2-4 small dried red chili peppers
1 cup or 113g grated cheddar or American cheese

For serving: sliced jalapeños 

Method
Preheat your oven to 350°F or 180°C. 

Use a coffee grinder or mortar and pestle to grind your dried chili peppers finely.


Mix the beans, chili con carne and ground chili peppers together in a large bowl. 


If you are baking all the chili-fritoque servings at once, mix in all the broken tortilla chips. 


If not, separate the mixture and the broken chips and only mix the chips into the portions that you are ready to bake and serve. Place the chip/mixture in individual baking dishes.


Divide cheese evenly, sprinkling a fair share over each one. 


Bake in your preheated oven just long enough to melt the cheese and heat the beans and chili through, about 10-15 minutes. You can broil right at the end if you’d like the cheese to brown a little. Top with a few slices of jalapeño. 


Serve with extra chips and a spoon for scooping, if desired. 

Food Lust People Love: Sort of a precursor to nachos, chili-fritoque is a great appetizer made with broken tortilla chips, chili con carne and pinto beans, topped with cheese and jalapeños.

Enjoy! 

Tomorrow is National Corn Chip Day so my Sunday Fun Day friends and I are sharing recipes that will help you celebrate this foodie holiday. Check out the links below: 

 
We are a group of food bloggers who believe that Sunday should be a family fun day, so every Sunday we share recipes that will help you to enjoy your day. If you're a blogger interested in joining us, just visit our Facebook group and request to join.


Pin this Chili-Fritoque appetizer!

Food Lust People Love: Sort of a precursor to nachos, chili-fritoque is a great appetizer made with broken tortilla chips, chili con carne and pinto beans, topped with cheese and jalapeños.

 .

Sunday, September 24, 2023

Warm Root Vegetable Salad with Pomegranate Molasses Dressing

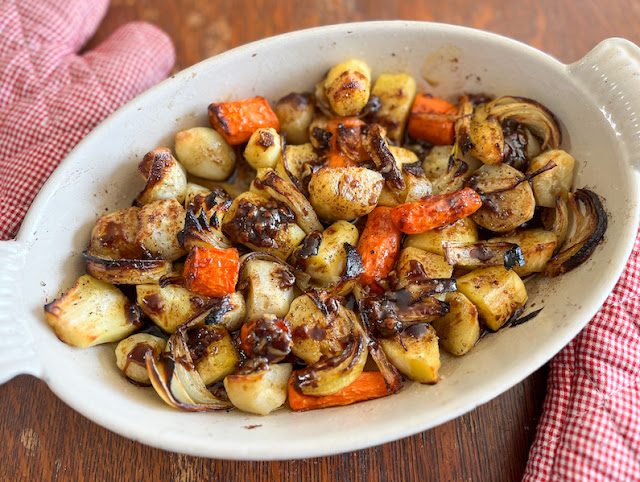
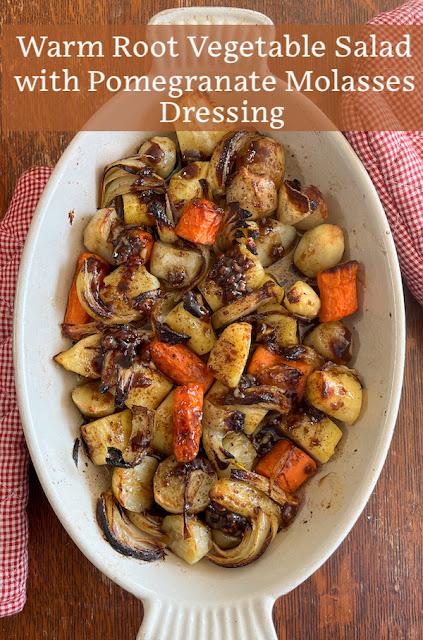
This warm root vegetable salad with pomegranate molasses dressing is perfect for an autumn meal, hearty but tangy, a nice transition from lighter summer salads.

Food Lust People Love: This warm root vegetable salad with pomegranate molasses dressing is perfect for an autumn meal, hearty but tangy, a nice transition from lighter summer salads.

When are vegetables a salad and not just a side dish? For me, it’s the dressing that makes the difference to what this dish is called. If I parboiled the root vegetables, roasted them and simply added butter, this would not be a salad! 

I give the approximate weight of the root vegetables I used below but feel free to mix it up and substitute an approximate amount of your favorites. My mom would probably welcome turnips here. I’m not a fan but maybe you are. Can’t find Jerusalem artichokes? Use more of the other vegetables or substitute potatoes. 

That said, the dressing goes best if the root vegetables do have some innate sweetness, like parsnips and carrots do. 

Warm Root Vegetable Salad with Pomegranate Molasses Dressing

This dish serves two as a light lunch with, perhaps, some crusty bread, and four as a side dish. If you have a bigger roasting pan, it is also easily doubled. Pomegranate molasses can be found at most Middle Eastern stores and occasionally in the international aisle of some supermarkets. 

Ingredients
For the warm root vegetable salad:
11 1/3 oz or 320g Jerusalem artichokes 
2.2 lbs or 500g parsnips
7 oz or 200g carrots
1 small brown onion
4 cloves garlic
Generous drizzle olive oil
Fine sea salt
Freshly ground black pepper

To stop the peeled vegetables from oxidizing:
Bowl of cold water
2-3 tablespoons lemon or lime juice

For the dressing: 
8 tablespoons extra virgin olive oil
2 tablespoons pomegranate molasses
(The garlic above after roasting)

Method
Get a pan of water on to boil for steaming the vegetables. 

Peel the artichokes and cut them in half, adding them to the bowl with cold water and the lemon or lime juice to stop them turning brown. Small ones can be left whole. 

Peel the parsnips and cut them into large pieces, Add them to the lemon water as well.  

Peel and cut the carrots into large pieces and place them in a steamer basket above the boiling water. Drain and add the artichokes and parsnips. 


Cover and steam for about 15-20 minutes or until all the vegetables are just tender. 

While the vegetables are steaming, start your oven to preheat at 400°F or 200°C. Peel the onion and cut it into wedges. 


When the vegetables are just tender, tip them into a roasting pan where they fit in a single layer. 


Tuck the onion wedges and garlic cloves, whole and unpeeled, in among the vegetables. Pour over the drizzle of oil, season with fine sea salt and freshly ground black pepper. 


Toss the vegetables gently to make sure they are coated in the oil and seasonings. Roast in your preheated oven for about an hour or until they are golden. 


Check that they are soft inside. If they start to brown too much or too early, turn the oven down to 350°F or 180°C.

While the vegetables are roasting, make the dressing by whisking the olive oil into the pomegranate molasses in a small bowl. 

As soon as the roasted root vegetables come out of the oven, remove the garlic cloves and peel them.


Use the side of a large knife to mash them with a good pinch of fine sea salt. 


Add them to the dressing and whisk well to combine. 


Spoon over the dressing over the vegetables. 


Serve warm.

Food Lust People Love: This warm root vegetable salad with pomegranate molasses dressing is perfect for an autumn meal, hearty but tangy, a nice transition from lighter summer salads.

Enjoy! 

It’s Sunday FunDay and today my blogger friends and I are sharing recipes to celebrate the Mid-Autumn Festival which takes place on the 15th day of the 8th month of the lunisolar calendar with a full moon at night, corresponding to mid-September to early October of the Gregorian calendar. This year, Mid-Autumn Festival falls on Friday, September 29, 2023. Check out all the recipe links below!


We are a group of food bloggers who believe that Sunday should be a family fun day, so every Sunday we share recipes that will help you to enjoy your day. If you're a blogger interested in joining us, just visit our Facebook group and request to join.


Pin this Warm Root Vegetable Salad
with Pomegranate Molasses Dressing! 

Food Lust People Love: This warm root vegetable salad with pomegranate molasses dressing is perfect for an autumn meal, hearty but tangy, a nice transition from lighter summer salads.

 .

Sunday, August 27, 2023

Banana Pecan Caramel Sauce

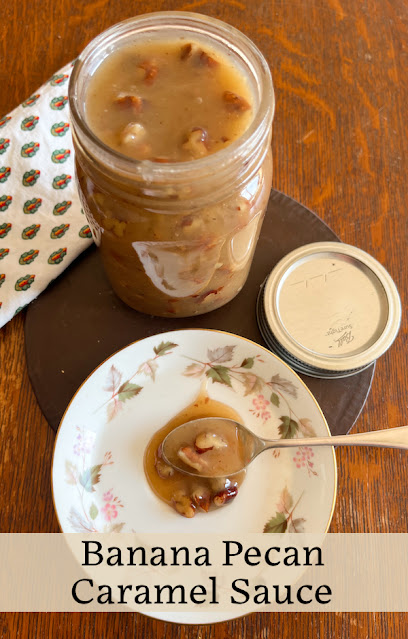
Gooey, sweet and sticky, this banana pecan caramel sauce is perfection over ice cream, brownies or baked apples. Or you can just eat it with a spoon. You won’t get any judgment from me. Seriously, it’s that good. 

Food Lust People Love: Gooey, sweet and sticky, this banana pecan caramel sauce is perfection over ice cream, brownies or baked apples. Or you can just eat it with a spoon. You won’t get any judgment from me. Seriously, it’s that good.

I am not a big sweet eater but I do have a fondness for caramel. The caramelization of sugar adds a welcome slight bitterness that I find very appealing and I know I’m not alone in that. Some of the most popular candies in the world have caramel as an element. Think Snickers, Milky Way and Twix to name just three.

As a kid, my movie candy of choice was always a big box of Milk Duds and I loved Sugar Daddys which were basically a solid rectangle of caramel on a stick. Those would pull your fillings out if you weren’t careful! Totally worth the risk. 

If you feel the same way as I do about caramel, you are going to love this sauce. 

Banana Pecan Caramel Sauce

This recipe makes a little more than two cups of sauce. Because of the bananas, I recommend you store any leftovers in a refrigerator, which means it will turn solid but spoon-able. Gently rewarm it back to sauce consistency before using. This recipe is adapted from one on Marsha’s Baking Addiction.

Ingredients
1 cup or 240ml water
2 cups or 400g sugar
1/2 cup or 57g chopped pecans
2 medium bananas (about 180g), pureed until smooth
1/2 cup or 120ml heavy cream, at room temperature
1 teaspoon vanilla extract


Method
In a large saucepan over medium-high heat, add the water and sugar. Bring to the boil, stirring constantly to dissolve the sugar.


Turn the heat down to medium and allow the mixture to come to a light amber color without stirring. 


Instead, swirl the pan around occasionally to make sure the mixture caramelizes evenly. (This can take a while. Be patient, and don't be tempted to turn up the heat!)

Remove the pan from the heat, and add in the chopped pecans. Stir well.


 Add in the pureed banana. Stir constantly until combined and the bubbling has stopped.


Place back on the heat, and keep stirring until the mixture becomes a deep, rich amber color.


Remove from the heat and gradually pour in the heavy cream, stirring constantly until combined. The sauce might sugar up at this point if your cream isn't room temperature but just keep stirring and all will be well, as the sugar melts again and it turns back into a sauce. 


Take the pot off of the stove and stir in the vanilla.


Pour the caramel into a heat-proof jar and allow to cool completely before using. Serve over ice cream or even spread on toast or pancakes. 

Food Lust People Love: Gooey, sweet and sticky, this banana pecan caramel sauce is perfection over ice cream, brownies or baked apples. Or you can just eat it with a spoon. You won’t get any judgment from me. Seriously, it’s that good.

Or eat it with a spoon. 

Food Lust People Love: Gooey, sweet and sticky, this banana pecan caramel sauce is perfection over ice cream, brownies or baked apples. Or you can just eat it with a spoon. You won’t get any judgment from me. Seriously, it’s that good.

Again, no judgment from me.

Enjoy!

It’s Sunday FunDay and my blogger friends and I are celebrating National Banana Lover’s Day, which is today! How will you celebrate? We’ve got a list of great recipes you might like to try. Check them out below: 

 
We are a group of food bloggers who believe that Sunday should be a family fun day, so every Sunday we share recipes that will help you to enjoy your day. If you're a blogger interested in joining us, just visit our Facebook group and request to join.


Pin this Banana Pecan Caramel Sauce!

Food Lust People Love: Gooey, sweet and sticky, this banana pecan caramel sauce is perfection over ice cream, brownies or baked apples. Or you can just eat it with a spoon. You won’t get any judgment from me. Seriously, it’s that good.

 .

Sunday, August 6, 2023

Smoked Salmon Smørrebrød

This smoked salmon smørrebrød is the perfect open-faced sandwich made with lemony cream cheese flavored and flecked with green chives, on sourdough toast. Topped to finish with watercress, it’s the perfect light lunch or snack. 

Food Lust People Love: This smoked salmon smørrebrød is the perfect open-faced sandwich made with lemony cream cheese flavored and flecked with green chives, on sourdough toast. Topped to finish with watercress, it’s the perfect light lunch or snack.

When our host decided on Sandwich Recipes for today’s Sunday FunDay theme, I knew immediately what I wanted to make. Some rendition of the “Dutch sandwiches” I made for a post in the very first year I started this blog. (So please forgive the ugly photos. I keep those up to remind myself how far I’ve come.)

I tell the story of working at the Inter-Continental Hotel in Abu Dhabi and how I first learned about open-faced sandwiches. Despite spending some of my formative years as an expat child, clearly, I still had a lot to learn about other cultures. 

For this post I did a bit more research to discover that many other countries also enjoy open-face sandwiches so my Dutch title was a bit misplaced. In fact, according to Wikipedia, “In countries like Denmark, where smørrebrød is common, smørrebrød is not considered a form of sandwich; rather, a sandwich is considered a form of smørrebrød with an extra piece of bread on top.” 

To-may-to, to-mah-to. Whatever we call it, the research was fun and we loved the sandwiches. 

Smoked Salmon Smørrebrød

The cream cheese can be made a day ahead and, in fact, tastes better when it is because the flavors have time to meld. If you can’t get your hands on chives, use green onion tops and mince finely. The cream cheese will make more than two large open-faced sandwiches but if you are as generous with the salmon as I am, you’ll need to buy more. 

Ingredients
7 oz or 200g block cream cheese (not whipped spread) at room temperature
Zest 1 lemon
Small bunch fine chives, plus extra for garnish
Freshly ground black pepper
3 1/2 oz or 100g smoked salmon, finely slices
2 large slices sourdough bread

Baby watercress for garnish

Method
Finely slice the chives.


Mix them into the softened cream cheese, along with the lemon zest and a few good grinds of black pepper. 


Refrigerate in a covered container until about 30 minutes before you are really to assemble the open-faced sandwiches. 


Spread the bread, toasted or untoasted – your choice – with the chive lemon cream cheese. 


Top with smoked salmon. 


Add on some watercress and more chives, if desired, along with a couple of grinds of black pepper. 


As my sourdough slices are so large, I cut them in four pieces each to serve. 

Food Lust People Love: This smoked salmon smørrebrød is the perfect open-faced sandwich made with lemony cream cheese flavored and flecked with green chives, on sourdough toast. Topped to finish with watercress, it’s the perfect light lunch or snack.

Enjoy! 

It’s Sunday FunDay! Hope the weather is nice where you live. The sun has finally come out over here and we are beyond delighted. In honor of National Sandwich Month, my fellow bloggers and I are sharing sandwich recipes. Check out the links below. Many thanks to our host Wendy of A Day in the Life on the Farm. 


We are a group of food bloggers who believe that Sunday should be a family fun day, so every Sunday we share recipes that will help you to enjoy your day. If you're a blogger interested in joining us, just visit our Facebook group and request to join.


Pin this Smoked Salmon Smørrebrød!

Food Lust People Love: This smoked salmon smørrebrød is the perfect open-faced sandwich made with lemony cream cheese flavored and flecked with green chives, on sourdough toast. Topped to finish with watercress, it’s the perfect light lunch or snack.

 .

Sunday, July 30, 2023

Lentil Mushroom Feta Calzones

These lentil mushroom feta calzones are the perfect picnic food, easy to transport and even easier to eat. The filling is tasty and the crust divine. 

Food Lust People Love: These lentil mushroom feta calzones are the perfect picnic food, easy to transport and even easier to eat. The filling is tasty and the crust divine. The combination of lentils, mushrooms and feta creates a hearty filling that even the carnivores in your family will enjoy.

I made these into four large calzones to feed four hungry people but the dough and filling could be easily divided into small portions to make more smaller calzones. The combination of lentils, mushrooms and feta creates a hearty filling that even the carnivores in your family will enjoy. 

Lentil Mushroom Feta Calzones

The folding technique for the edges of the calzones is one that is employed by the bakers of the traditional Cornish pasty. Except I like to leave the little tail out rather than tucking in under. Check out how here: Cousin Jack's Pasty Co.

Ingredients
For the dough:
3/4 cup or 180ml lukewarm water (not hot)
1 teaspoon active-dry yeast
1/4 teaspoon sugar
2 cups or 250g strong bread flour, plus more if needed
1 teaspoon salt
Drizzle olive oil for the dough bowl

For the filling:
1/2 cup or 110g uncooked or 1 1/8 cups or 220g cooked/rinsed Puy (French) lentils (If you are cooking them, boil with 1/2 teaspoon baking soda till tender. Drain and rinse.)
6 1/3 oz or 180g baby portabella mushrooms
2-3 medium cloves garlic
Drizzle of oil for the cooking pan
1 medium tomato – about 4 2/3 oz or 130g, cut into small pieces
1 fresh jalapeño, optional but recommended, chopped 

Method
Put the yeast and sugar in a bowl. Pour in the warm water and give it a stir. Set aside for a few minutes. It should start to get foamy on top. 

In a large bowl or the bowl of your stand mixer, whisk the flour and salt together. Pour in the yeast mixture and mix well to form a soft dough.

Using the dough hook on the stand mixer, or kneading by hand against the counter, knead the dough until it forms a smooth, slightly tacky ball that springs back when you poke it, 5 to 8 minutes. If the dough sticks to the bowl or your hands, add a tablespoon of flour at a time until it’s easier to work with.


Avoid adding too much flour if possible. I didn’t add any this time whereas the last time, I added two tablespoons. This is the sort of thing that can change with your flour and the humidity in the air. 

If you're planning to make the calzones today, then give the dough a rise. Clean out the mixing bowl, coat it with a little oil, and transfer the dough back inside. Cover the bowl with plastic wrap or a damp kitchen towel and let the dough rise until doubled in size, 1 to 1 1/2 hours.

Alternatively, you can store the dough in the fridge and make the calzones the next day. Cover the bowl with plastic wrap and refrigerate. 

Either way, make the filling which can also be stored in the refrigerator overnight or cooled and used the same day. 

Put the cooked, rinsed lentils in a mixing bowl that is large enough to hold all of the filling ingredients, with room to stir. 

Clean and chop the mushrooms and mince the garlic. 


Drizzle a little oil into a big the pot and add the garlic. 


Cook it briefly, making sure it doesn’t burn, then add the mushrooms. 


Cook them until golden. Add them to the lentil bowl. 


Add the tomato and jalapeño, if using, to the now empty pot along with another drizzle of oil. 


Cook for 8-10 minutes, until the tomato and jalapeño are well cooked and slump into a paste. Add the paste to the lentil/mushroom bowl and stir well. Leave to cool. 


Once the rest of the filling is cool, crumble the feta and gently fold it in. 


Take the dough out of the refrigerator about half an hour before you are ready to bake. Preheat your oven to 350°F or 180°C.

Divide the dough into four balls.


Roll one ball of dough out into a thin circle about 7 in or 17.75cm across. 


Put about 1/4 of the cooled filling (about 5 1/3 oz or 150g) on one side of the circle.


Gently lift the other side up and over, pressing the air out as you stick the edges of the two halves together.


Starting on one side of the semi circle, crimp the edges to seal the calzones. (See note above the ingredient list for a link to an instructional video.) Repeat until all of the calzones have been filled and formed.


Transfer the calzones to your baking tray, leaving enough room between them so that they can rise while baking. Brush the tops lightly with olive oil.


Bake in your preheated oven for 25-30 minutes, or until golden brown and puffed.

Food Lust People Love: These lentil mushroom feta calzones are the perfect picnic food, easy to transport and even easier to eat. The filling is tasty and the crust divine. The combination of lentils, mushrooms and feta creates a hearty filling that even the carnivores in your family will enjoy.

These can be eaten hot or at room temperature. 

Food Lust People Love: These lentil mushroom feta calzones are the perfect picnic food, easy to transport and even easier to eat. The filling is tasty and the crust divine. The combination of lentils, mushrooms and feta creates a hearty filling that even the carnivores in your family will enjoy.

Enjoy! 

Food Lust People Love: These lentil mushroom feta calzones are the perfect picnic food, easy to transport and even easier to eat. The filling is tasty and the crust divine. The combination of lentils, mushrooms and feta creates a hearty filling that even the carnivores in your family will enjoy.

It’s Sunday FunDay and since it’s National Picnic Month, we are going on a picnic! Hope the weather is fine where you live. Check out all the great recipe links below. Many thanks to our host, Camilla at Culinary Cam!

 
We are a group of food bloggers who believe that Sunday should be a family fun day, so every Sunday we share recipes that will help you to enjoy your day. If you're a blogger interested in joining us, just visit our Facebook group and request to join.


Pin these lentil mushroom feta calzones!

Food Lust People Love: These lentil mushroom feta calzones are the perfect picnic food, easy to transport and even easier to eat. The filling is tasty and the crust divine. The combination of lentils, mushrooms and feta creates a hearty filling that even the carnivores in your family will enjoy.

 .

Sunday, July 2, 2023

Tenderstem Broccoli (Broccolini) Potato Salad

This tenderstem broccoli (broccolini) potato salad is made with Jersey Royal potatoes and a tangy, light, creamy dressing. It’s pretty much the perfect side for your next barbecue or brunch buffet. 

Food Lust People Love: This tenderstem broccoli (broccolini) potato salad is made with Jersey Royal potatoes and a tangy, light, creamy dressing. It’s pretty much the perfect side for your next barbecue or brunch buffet.

Like quite a few of you, I imagine, I belong to a bunch of Facebook groups. One I get a particular kick out of is affiliated with the great food magazine, delicious. published in the UK. Members share their recent dish photos, many from the magazine, and if we are lucky, they include a link to the magazine’s website with the recipe. 

I saw the inspiration for this salad there. Full disclosure, I’m one of the volunteer moderators so I can tell you that we’d love to have you join our happy band of delicious. food lovers. And if you haven’t perused their website yet, you are in for a treat. So many gorgeous recipes. 

A note about the name of the green vegetable. A cross between gai lan and broccoli, in the UK it’s called tenderstem broccoli but in the US, the name broccolini was trademarked in a cooperative agreement between the Japanese developer and Mann Packing Company, its first US distributor. In one of my past lives, I interviewed Gina Nucci, one of the then owners at Mann’s (twitter handle @ginabroccolini🤣) and learned all about it. She was an absolute delight. 

Tenderstem Broccoli (Broccolini) Potato Salad 

This salad can be made a day ahead and refrigerated overnight so it’s great for bringing to a potluck. As mentioned above, mine is an adaptation of this one from delicious. magazine. It was published in the May 2023 issue. 

Ingredients
1 lb  or 450g Jersey Royals or new potatoes, smaller ones left whole, larger ones halved
2 teaspoons fine sea salt, plus more for seasoning the salad at the end
7 oz or 200g tenderstem broccoli
1 tablespoon white wine vinegar
2 green onions aka spring onions
2 tablespoons mayonnaise
1 tablespoon crème fraiche, sour cream or plain Greek yogurt
1 teaspoon Dijon mustard
Freshly ground black pepper

Method
Scrub your new potatoes clean (usually the skins rub right off so there’s no need to peel them) and pop them in a pot with water to cover by a couple of inches. Add the salt and bring the pan to the boil. 


Cook the potatoes for about 12-15 minutes or until just tender.

Trim and discard any dry ends off of your tenderstem broccoli and split any thick stems in half.  


Finely mince the white part of the green onions, then slice the green part. Set aside some of the green parts for garnish.


In a mixing bowl, measure in the vinegar, then add the whites of the spring onions to marinate. This takes some of the sharp bite out of the onion and flavors the vinegar. 


When the potatoes are just tender, add the tenderstem broccoli to the pot and continue cooking for 3 minutes more. Drain in a colander and set aside to cool. (If you leave them in the hot pot, the broccoli may overcook.)


Arrange the broccoli on a serving plate.


Whisk the mayonnaise, crème fraiche (or substitute) and mustard into the onion/vinegar bowl. 


Add the green parts of the green onions and the slightly warm potatoes. 


Mix together until the potatoes are well coated with the dressing. Season with a sprinkle of fine sea salt and freshly ground black pepper and stir again. 


Spoon the dressed potatoes on top and around the broccoli. The dressing will drip down and dress the broccoli too, in a most delightful manner. Sprinkle on the reserved green onion for garnish. And perhaps just a few more grinds of black pepper. 

Food Lust People Love: This tenderstem broccoli (broccolini) potato salad is made with Jersey Royal potatoes and a tangy, light, creamy dressing. It’s pretty much the perfect side for your next barbecue or brunch buffet.

Serve warm or allow to cool, then chill. 

If you are serving it cold, bring it out of the refrigerator about 30 minutes before serving so it’s not too cold. 

Enjoy! 

Love broccolini in salads? You might also enjoy my Broccolini Chicken Pear Blue Cheese Salad. It serves two as a main and four as a starter. We love it. 

Food Lust People Love: Who says greens have to be leafy to make a great salad? Lightly cooked broccolini adds great flavor and bite to this wonderful recipe for broccolini chicken pear blue cheese salad.


It’s Sunday FunDay so that means I’m joining my fellow bloggers and sharing recipes we hope your family will enjoy. This week’s theme is Salads Galore! Many thanks to our host, Wendy from A Day in the Life on the Farm. Check out all the lovely salads below: 


We are a group of food bloggers who believe that Sunday should be a family fun day, so every Sunday we share recipes that will help you to enjoy your day. If you're a blogger interested in joining us, just visit our Facebook group and request to join.


Pin this Tenderstem Broccoli Potato Salad!

Food Lust People Love: This tenderstem broccoli (broccolini) potato salad is made with Jersey Royal potatoes and a tangy, light, creamy dressing. It’s pretty much the perfect side for your next barbecue or brunch buffet.


 .