Showing posts with label picnic food. Show all posts

Tuesday, August 13, 2024

Niçoise Picnic Squares #BreadBakers

Baked with the eponymous French salad inspired toppings on a savory quick bread layer, these Niçoise picnic squares are perfect to pack up and go! 

Food Lust People Love: Baked with the eponymous French salad inspired toppings on a savory quick bread layer, these Niçoise picnic squares are perfect to pack up and go!

We have FINALLY been enjoying some picnic friendly weather in this weirdest of summers so these pretty squares have come in handy. They travel well and are tasty as well as filling.

My toppings, loosely based on the ingredients of a classic French Salade Niçoise, shout Summer is here! for me. I hope they do for you as well. 

Niçoise Picnic Squares

Depending on your tastes or what you have on hand, the toppings can be changed up but don’t leave out the seasoning and herbs in the fluffy bread base as they add so much flavor to the squares. Keep the vegetables thin or, as I have, parboil or boil them first to make sure they will be cooked completely. 

Ingredients
For the topping:
6-8 cherry tomatoes, halved
1 egg
3 artichoke hearts, drained well and quartered
A few pitted black olives, halved or slices
1/4  purple onion, thinly sliced
7-8 anchovies, well drained
8-12 new or small waxy potatoes
12 fine green beans 

For the base:
1 1/2 cups or 190g plain flour
1 tablespoon minced fresh herbs, such as thyme, oregano and/or rosemary
1 ¼ teaspoons baking powder
½ teaspoon fine sea salt
1/2 teaspoon crushed red pepper
¼ teaspoon freshly ground black pepper
2 oz or 57g grated mozzarella
3 large eggs, at room temperature
1/3 cup or 80ml olive oil, plus extra for greasing the pan and drizzling on the bread before baking

For baking:
Grated Parmesan

For serving: 
small leaves of rosemary, thyme and basil
grated Parmesan

Method
Heat the oven to 350°F or 180°C and put a rack in the middle of it. Grease and line a 9 in or 23cm square baking pan, leaving enough of a paper overhang that you can grab it to lift out the bread later. Tip: Scrunching the baking parchment into a tight ball then spreading it back out makes it much easier to fit into a square pan nicely. 

Put a small pot of salted water on to boil and fill a small bowl with ice and cold water. When the water boils, add in the green beans and cook for 1 minute. Use tongs to remove the green beans to the ice water bowl. 


Add the new potatoes to the boiling water. 


Cook for 5 minutes or until a toothpick poked into the biggest one goes in easy. Remove the potatoes from the pot and set aside to cool. 

Add your egg to the pot and bring the water back to the boil. Boil for one minute, then remove the pot from the heat and cover for 10 minutes. When the 10 minutes are up, transfer the egg to the ice water bowl. When cool enough, peel and quarter.

Meanwhile, halve the cherry tomatoes and quarter the artichoke hearts. Put the tomatoes and artichokes on paper towels and let them sit for the few minutes it takes you to prepare the batter. 


For the base, whisk the flour, herbs, baking powder, salt, crushed red pepper and black pepper in a large bowl. 


Add in the mozzarella and stir to coat. 

In another bowl, whisk together the eggs and oil. Pour the wet ingredients over the dry and fold until just combined. 


Scrape the batter into the lined pan.


Spread it out evenly. The batter is thick and the layer is thin, so you’ll have to poke and push it into the corners.


Arrange the topping ingredients on top in whatever pattern you like, keeping them to a single layer – drizzle with olive oil and sprinkle on some Parmesan.


Bake for 22-25 minutes or until the edges are golden and a toothpick pushed into the center comes out clean. 


Transfer the bread pan to a rack, then wait five minutes before running a table knife around the edges. Lift out the bread, then slide off the paper. 

Return the bread to the rack and leave it to cool a bit before cutting it into squares. 


Sprinkle the top with the herb leaves and more Parmesan.

Food Lust People Love: Baked with the eponymous French salad inspired toppings on a savory quick bread layer, these Niçoise picnic squares are perfect to pack up and go!

The squares are best eaten on the day they’re made but they can be stored overnight in the refrigerator and reheated in a warm oven, if they last that long. We also enjoyed them cold! 

Food Lust People Love: Baked with the eponymous French salad inspired toppings on a savory quick bread layer, these Niçoise picnic squares are perfect to pack up and go!

Enjoy! 

It's the second Tuesday of the month so that means it's time for me and my fellow Bread Bakers to share our bakes. This month we also celebrate a special anniversary: 10 years since we created the Bread Bakers group! Our inaugural event was actually in September though. You can read my very first post here.

Our theme this month is picnic bread! Many thanks to our host, Camilla from Culinary Cam. Check out the recipe links below.


#BreadBakers is a group of bread loving bakers who get together once a month to bake bread with a common ingredient or theme. Follow our Pinterest board right here. Links are also updated each month on this home page. We take turns hosting each month and choosing the theme/ingredient.


Pin these Niçoise Picnic Squares!

Food Lust People Love: Baked with the eponymous French salad inspired toppings on a savory quick bread layer, these Niçoise picnic squares are perfect to pack up and go!

.
 

Sunday, July 30, 2023

Lentil Mushroom Feta Calzones

These lentil mushroom feta calzones are the perfect picnic food, easy to transport and even easier to eat. The filling is tasty and the crust divine. 

Food Lust People Love: These lentil mushroom feta calzones are the perfect picnic food, easy to transport and even easier to eat. The filling is tasty and the crust divine. The combination of lentils, mushrooms and feta creates a hearty filling that even the carnivores in your family will enjoy.

I made these into four large calzones to feed four hungry people but the dough and filling could be easily divided into small portions to make more smaller calzones. The combination of lentils, mushrooms and feta creates a hearty filling that even the carnivores in your family will enjoy. 

Lentil Mushroom Feta Calzones

The folding technique for the edges of the calzones is one that is employed by the bakers of the traditional Cornish pasty. Except I like to leave the little tail out rather than tucking in under. Check out how here: Cousin Jack's Pasty Co.

Ingredients
For the dough:
3/4 cup or 180ml lukewarm water (not hot)
1 teaspoon active-dry yeast
1/4 teaspoon sugar
2 cups or 250g strong bread flour, plus more if needed
1 teaspoon salt
Drizzle olive oil for the dough bowl

For the filling:
1/2 cup or 110g uncooked or 1 1/8 cups or 220g cooked/rinsed Puy (French) lentils (If you are cooking them, boil with 1/2 teaspoon baking soda till tender. Drain and rinse.)
6 1/3 oz or 180g baby portabella mushrooms
2-3 medium cloves garlic
Drizzle of oil for the cooking pan
1 medium tomato – about 4 2/3 oz or 130g, cut into small pieces
1 fresh jalapeño, optional but recommended, chopped 

Method
Put the yeast and sugar in a bowl. Pour in the warm water and give it a stir. Set aside for a few minutes. It should start to get foamy on top. 

In a large bowl or the bowl of your stand mixer, whisk the flour and salt together. Pour in the yeast mixture and mix well to form a soft dough.

Using the dough hook on the stand mixer, or kneading by hand against the counter, knead the dough until it forms a smooth, slightly tacky ball that springs back when you poke it, 5 to 8 minutes. If the dough sticks to the bowl or your hands, add a tablespoon of flour at a time until it’s easier to work with.


Avoid adding too much flour if possible. I didn’t add any this time whereas the last time, I added two tablespoons. This is the sort of thing that can change with your flour and the humidity in the air. 

If you're planning to make the calzones today, then give the dough a rise. Clean out the mixing bowl, coat it with a little oil, and transfer the dough back inside. Cover the bowl with plastic wrap or a damp kitchen towel and let the dough rise until doubled in size, 1 to 1 1/2 hours.

Alternatively, you can store the dough in the fridge and make the calzones the next day. Cover the bowl with plastic wrap and refrigerate. 

Either way, make the filling which can also be stored in the refrigerator overnight or cooled and used the same day. 

Put the cooked, rinsed lentils in a mixing bowl that is large enough to hold all of the filling ingredients, with room to stir. 

Clean and chop the mushrooms and mince the garlic. 


Drizzle a little oil into a big the pot and add the garlic. 


Cook it briefly, making sure it doesn’t burn, then add the mushrooms. 


Cook them until golden. Add them to the lentil bowl. 


Add the tomato and jalapeño, if using, to the now empty pot along with another drizzle of oil. 


Cook for 8-10 minutes, until the tomato and jalapeño are well cooked and slump into a paste. Add the paste to the lentil/mushroom bowl and stir well. Leave to cool. 


Once the rest of the filling is cool, crumble the feta and gently fold it in. 


Take the dough out of the refrigerator about half an hour before you are ready to bake. Preheat your oven to 350°F or 180°C.

Divide the dough into four balls.


Roll one ball of dough out into a thin circle about 7 in or 17.75cm across. 


Put about 1/4 of the cooled filling (about 5 1/3 oz or 150g) on one side of the circle.


Gently lift the other side up and over, pressing the air out as you stick the edges of the two halves together.


Starting on one side of the semi circle, crimp the edges to seal the calzones. (See note above the ingredient list for a link to an instructional video.) Repeat until all of the calzones have been filled and formed.


Transfer the calzones to your baking tray, leaving enough room between them so that they can rise while baking. Brush the tops lightly with olive oil.


Bake in your preheated oven for 25-30 minutes, or until golden brown and puffed.

Food Lust People Love: These lentil mushroom feta calzones are the perfect picnic food, easy to transport and even easier to eat. The filling is tasty and the crust divine. The combination of lentils, mushrooms and feta creates a hearty filling that even the carnivores in your family will enjoy.

These can be eaten hot or at room temperature. 

Food Lust People Love: These lentil mushroom feta calzones are the perfect picnic food, easy to transport and even easier to eat. The filling is tasty and the crust divine. The combination of lentils, mushrooms and feta creates a hearty filling that even the carnivores in your family will enjoy.

Enjoy! 

Food Lust People Love: These lentil mushroom feta calzones are the perfect picnic food, easy to transport and even easier to eat. The filling is tasty and the crust divine. The combination of lentils, mushrooms and feta creates a hearty filling that even the carnivores in your family will enjoy.

It’s Sunday FunDay and since it’s National Picnic Month, we are going on a picnic! Hope the weather is fine where you live. Check out all the great recipe links below. Many thanks to our host, Camilla at Culinary Cam!

 
We are a group of food bloggers who believe that Sunday should be a family fun day, so every Sunday we share recipes that will help you to enjoy your day. If you're a blogger interested in joining us, just visit our Facebook group and request to join.


Pin these lentil mushroom feta calzones!

Food Lust People Love: These lentil mushroom feta calzones are the perfect picnic food, easy to transport and even easier to eat. The filling is tasty and the crust divine. The combination of lentils, mushrooms and feta creates a hearty filling that even the carnivores in your family will enjoy.

 .

Friday, July 16, 2021

Southern-style Tuna Salad

My Southern-style tuna salad is an old family recipe, the one I grew up with. It’s like egg salad but, of course, with added tuna, like we make it in the Southern United States. 

Food Lust People Love: My Southern-style tuna salad is an old family recipe, the one I grew up with. It’s like egg salad but, of course, with added tuna, like we make it in the Southern United States.

Another short tale. Many years ago, I was on the board of the American Association of Malaysia. Once a month, we would meet to deal with association business and we would bring dishes to share for a working lunch. 

One month I made tuna salad sandwiches. They were fancy sandwiches, crusts cut off, this recipe inside. We were discussing some item on the agenda when the chairperson stopped short and looked right at me. “Your egg salad has tuna in it!” she exclaimed. My retort was “No, my tuna salad has eggs in it! Doesn't yours?” 

A lively discussion by the whole board (a mixed group of Americans from all over) followed whereby I learned that there seems to be a north-south divide. In the northern US states tuna salad does not have eggs, southern-style tuna salad does. Who knew? 

Growing up, this is the way I remember my grandmothers and my mother making the “dressing” for not only tuna salad but also potato salad (at least on the days when no one had the wherewithal to whip up homemade mayonnaise.) Homemade mayo was always preferred but, you know, who has time for that? (Another parenthetical aside: My elder daughter would disagree. She always has time for that and she is a pro at homemade mayo! But she is not with me right now and I cannot be bothered.) 

Southern-style Tuna Salad 

You can chop up the egg yolks along with the whites and just add them to the tuna salad but you’ll miss the opportunity to enrich the mayonnaise and mustard dressing and make it seem more like homemade. Trust me, it makes a difference in flavor somehow. 

Ingredients
4 hard-boiled eggs
2 cans (5 oz or 142g) wild-caught chunk white albacore tuna in water
1/2 cup or 120ml mayonnaise
2-3 tablespoons yellow mustard
1/4 teaspoon fine sea salt
1/4 teaspoon freshly ground black pepper
1/4 teaspoon cayenne
1/4 medium onion

To garnish: chopped green onions and a good sprinkle of cayenne

Method
Drain the canned tuna in a sieve and use the can lid to press out as much liquid as you can. If you don't the tuna salad will be a bit "wet."


Cut the boiled eggs in half with a sharp knife and put the yolks in a mixing bowl. Mash them with a fork. 


Add in the mayonnaise, mustard and seasonings then grate in the onion. I use a microplane so the onion is very fine (and juicy) because I like the flavor but personally don’t like to find crunchy bits of onion in my tuna salad. You are welcome to mince the onion with a sharp knife if onion bits don’t bother you. Mix well. 


Chop the egg whites and add them to the mixing bowl, along with the tuna. Mix well to combine. 


Food Lust People Love: My Southern-style tuna salad is an old family recipe, the one I grew up with. It’s like egg salad but, of course, with added tuna, like we make it in the Southern United States.

Garnish with some chopped green onions and a sprinkle of cayenne pepper, if desired. 

Food Lust People Love: My Southern-style tuna salad is an old family recipe, the one I grew up with. It’s like egg salad but, of course, with added tuna, like we make it in the Southern United States.

Chill until ready to serve. This tuna salad is great on bread rolls, sliced bread or crackers. It is perfect for a picnic. Just bring it chilled in the cooler, provide the appropriate starchy things and let everyone help themselves! 

Food Lust People Love: My Southern-style tuna salad is an old family recipe, the one I grew up with. It’s like egg salad but, of course, with added tuna, like we make it in the Southern United States.

Enjoy! 

This month my Fish Friday Foodie friends are going on a picnic. Check out all the picnic friendly recipes below! Many thanks to our host and organizer, Wendy of A Day in the Life on the Farm


Are you a food blogger who would you like to join Fish Friday Foodies? We post and share new seafood/fish recipes on the third Friday of the month. To join our group please email Wendy at wendyklik1517 (at) gmail.com. Visit our Facebook page and Pinterest page for more wonderful fish and seafood recipe ideas. 


Pin this Southern-style Tuna Salad! 

Food Lust People Love: My Southern-style tuna salad is an old family recipe, the one I grew up with. It’s like egg salad but, of course, with added tuna, like we make it in the Southern United States.
 .

Monday, February 8, 2021

Potato Salad Bites

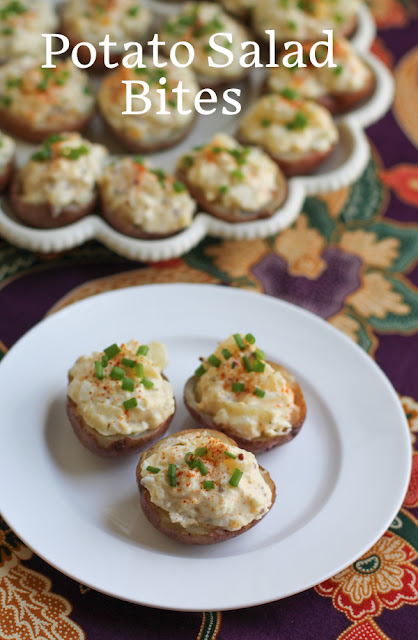
These Potato Salad Bites combine my favorite baked potato skins with my beloved potato salad recipe. They are perfect for your picnics or parties. 

Food Lust People Love: These Potato Salad Bites combine my favorite baked potato skins with my beloved potato salad recipe. They are perfect for your picnics or parties.

Potato salad is one of my favorite things to make for a picnic because it goes so great with fried chicken and/or sandwiches but then you need utensils and plates or bowls to serve it which unnecessarily complicates a simple picnic. 

When the leader of our Baking Blogger group announced the theme of this month’s challenge, bite-size baking, I put my thinking cap on to solve that problem. Not that we've been enjoying many picnics since it's still pretty chilly but I do like to plan ahead. 

So here you go, finally, potato salad that’s finger food! I hope you enjoy them as much as we did. I put some in a single layer in a plastic container to bring them to my Mom and I hope you'll be as pleased as I was to know that they arrived in perfect form. 

Potato Salad Bites

I used baby red potatoes but you can use whichever small potatoes are available to you. As you can see, mine fit in my deviled egg plate so that gives you an idea of their size. 

Ingredients
For the potato salad:
1 lb 7 oz or 652g small red potatoes (about 10-11)
1 tablespoon olive oil
Fine sea salt
Freshly ground black pepper
2 eggs, hardboiled
1/4 small Spanish onion 
1/4 cup or 60ml mayonnaise
1/4 cup or 60ml sour cream
2 teaspoons whole grain mustard

For garnish: 
green onion tops
sprinkle of paprika or cayenne

Method
Preheat your oven to 375°F or 190°C. Place the potatoes in a small baking pan and drizzle them with olive oil. Shake them around to coat them with the oil. 


Bake for about 30 minutes or until they are cooked through. I stabbed mine with a pointy knife all the way to the middle to check.

Remove the potatoes from oven, and cool 15 minutes on a wire rack. Don’t turn the oven off but do lower the temperature to 350°F or 180°C.

Meanwhile, finely grate the onion into a mixing bowl. I used a microplane so the onion is super fine. If you don't mind little onion bits in your salad, feel free to use a grater with larger holes. Cut the two hard-boiled eggs into slices into the bowl.


Use the tines of a dinner fork to mash them into smaller bits.


Add in the mayonnaise, sour cream and mustard, as well as a couple of generous grinds of black pepper. Mix well. Set aside.


As soon as the potatoes are cool enough to handle (Despite photos to the contrary, I held mine in a clean towel.) cut each potato in half crosswise. Carefully scoop out the insides of the potatoes, leaving a skin shell about 1/4 in or 1/2 cm thick. Try to keep the scooped potato pieces as large as possible so they don’t turn into mashed potato when we make the potato salad with them. 


Place the shells, cut side up, on a baking sheet.  Sprinkle them with salt and freshly ground black pepper.   


Bake in your still hot oven until dry, about 10 more minutes. Cool completely, about 30 minutes.

When the potato innards are cool, add them to your mixing bowl and fold to combine. Again, trying not to mash the potato pieces completely but you can break up any really large pieces. Taste for salt and add more if needed, plus a couple of generous grinds of black pepper.  Depending on the saltiness of your mayo and whole grain mustard, you might not need much, if any, salt. 


Spoon or scoop the mixture generously into each potato shell. 


Top with some chopped green onion and a sprinkle of cayenne or paprika for color. I use cayenne because we like spicy but my mom and grandmothers always sprinkled a little paprika on a bowl of potato salad so either is good. Chill the potato salad bites until you are ready to serve them.  

Food Lust People Love: These Potato Salad Bites combine my favorite baked potato skins with my beloved potato salad recipe. They are perfect for your picnics or parties.

Enjoy! 

Food Lust People Love: These Potato Salad Bites combine my favorite baked potato skins with my beloved potato salad recipe. They are perfect for your picnics or parties.

It's Baking Blogger Monday and we are sharing bite-sized food, which is super fun! Many thanks to our organizer and host, Sue of Palatable Pastime. Check out the link list below. 


Baking Bloggers is a friendly group of food bloggers who vote on a shared theme and then post recipes to fit that theme one the second Monday of each month. If you are a food blogger interested in joining in, inquire at our Baking Bloggers Facebook group. We'd be honored if you would join us in our baking adventures.

Pin these Potato Salad Bites! 

Food Lust People Love: These Potato Salad Bites combine my favorite baked potato skins with my beloved potato salad recipe. They are perfect for your picnics or parties.

 .

Sunday, July 20, 2014

Jacques’ Cucumber Salad (but) with Onions

Cucumber salad, made Jacques Pepin’s way, stays crunchy for several days, making it a great make-ahead contribution for your next potluck or barbecue party. You’ll want to double or even quadruple this recipe for a crowd. 

This week Sunday Supper is going to a barbecue party and bringing along everything you need from drinks to salads to ribs (You gotta have the ribs!) to make it just perfect. I love a fresh dish, but sometimes time does not allow for in-the-moment creations. That’s where Jacques Pépin and his cucumber salad come to the rescue. In the chef’s own words, “The salt, you will discover, draws the juices from the cucumbers, making them limp, and, paradoxically, very crisp at the same time. Prepared this way, the cucumbers will stay crisp for several days.” And so they do.

Many thanks to our hosts today, Jennie from The Messy Baker and Melanie from Melanie Makes! This recipe is adapted from Jacques Pépin's Complete Techniques.

Ingredients
4 cucumbers – weight 1 1/3 lbs or 585g
1 1/4 teaspoons coarse salt – I used sel gris.
1/2 small purple onion – about 2 oz or 55g
1 tablespoon fresh lemon juice
2 tablespoons sour cream
Freshly ground pepper
1 tablespoon peanut oil

Jacques’ ingredient list calls for three cucumbers, which he says will give you five cups sliced. I got two cups out of my four cucumbers so I don’t know where we went wrong but I reduced the rest of the ingredients proportionally to fit what I had. After all, you can’t salt two cups of cucumbers with the same salt that’s meant for five!

See? His aren't bigger than average. 


Method
Peel your cucumbers and cut them in half lengthwise. Scoop out the seeds with a spoon.


Cut them into slices about a 1/4 inch or 1/2cm wide.


Pop them into a colander, over a bowl to catch the juice. Sprinkle the cucumbers with salt and mix well. Allow to drain for at least an hour but preferably two, at room temperature.


Meanwhile, slice your half onion as thinly as you can manage and soak the slices in a small bowl in the lemon juice. Stir it occasionally as it sits.


When the time is up for the cucumbers, rinse them thoroughly under cold water and then press them lightly to get rid of excess water.


I laid them out briefly on some paper towels.


Mix the sour cream and the peanut oil into the lemon juice and onions, along with a good few grinds of fresh peppercorn.


Pour this mixture over the cucumbers and stir.

Jacques says more salt won’t be necessary and he is absolutely right. Because of the sour cream, refrigerate this salad if not eating immediately.


Enjoy!

Are you looking for more barbecue party recipes? Sunday Supper’s got you covered!

Beverages
Appetizers
Sides and Accompaniments
Main Dishes
Desserts