Showing posts with label #foodieextravaganza. Show all posts

Wednesday, January 6, 2021

Shrimp Salad Finger Sandwiches

Shrimp salad finger sandwiches with tiny shrimp, green onions and slightly spicy pink sauce are perfect for a tea party, brunch or shower. 


I’ve made shrimp salad before but always with normal sized shrimp, chopped up. In fact, this curried version is one of my favorite dishes of all time. Until I happened to notice them in the freezer section of my local grocery store, I didn’t even know that salad shrimp were a thing. 

Apparently the only thing that makes them “salad shrimp” is their diminutive size. To be labeled salad shrimp there must be more than 60 per pound. Who knew? I can say they make a lovely shrimp salad! They were great in these little finger sandwiches or you could heap this shrimp salad in avocado halves as a starter for your next dinner party, whenever THAT is possible again.  

Shrimp Salad Finger Sandwiches

If you can’t find salad shrimp, by all means use bigger ones and just chop them up with a sharp knife. All shrimp are good shrimp. For those of you around the world who call them prawns, those work as well. 

Ingredients
12 oz or 340g salad shrimp, thawed and drained, if frozen
2 green onions
1/2 cup or 120ml mayonnaise
2 tablespoons ketchup
1/4 teaspoon English mustard powder
1/4 teaspoon freshly ground black pepper
1 teaspoon hot sauce – optional but highly recommended
10 slices sandwich bread (the square kind)

Method
Pop the shrimp on a couple of paper towels to get rid of any excess water then discard the paper towels. 


Slice the green onions lengthwise, then chop them finely. Put them in a mixing bowl with the mayonnaise, ketchup, English mustard powder, black pepper and hot sauce, if using.  Mix thoroughly. 


Add in the shrimp and stir to combine. 


Refrigerate the shrimp salad until you are ready to assemble the sandwiches. 

When you are ready to assemble the sandwiches, use a serrated knife to cut the crusts off of your slices of sandwich bread, then cut each slice in half. 


Pile the shrimp salad on one half and then cover it with the other. 


Press down gently so the shrimp salad will stick to both sides of the sandwich. 

Continue until all the sandwiches are made and transfer them to a serving plate. If you aren’t serving the sandwiches immediately, slightly dampen a paper towel by flicking it with cold water. Cover the sandwiches with the paper towel then cover the paper towel and plate with cling film. The damp paper towel will keep the bread from drying out. 

Refrigerate until ready to serve. I also sprinkled on a little chopped green onion to pretty them up. 


Enjoy! 

January is Hot Tea Month so my Foodie Extravaganza friends are sharing recipes for tea drinks, something you would serve at a tea party, or anything that uses hot tea for cooking. Many thanks to our host, Camilla of Culinary Adventures with Camilla. Check out all the links below. 


Foodie Extravaganza is where we celebrate obscure food holidays by cooking and baking together with the same ingredient or theme each month. Posting day is always the first Wednesday of each month. If you are a blogger and would like to join our group and blog along with us, come join our Facebook page Foodie Extravaganza. We would love to have you! If you're a spectator looking for delicious tid-bits check out our Foodie Extravaganza Pinterest Board

Pin these Shrimp Salad Finger Sandwiches!


 .

Wednesday, December 2, 2020

Stuffed Bagel Balls

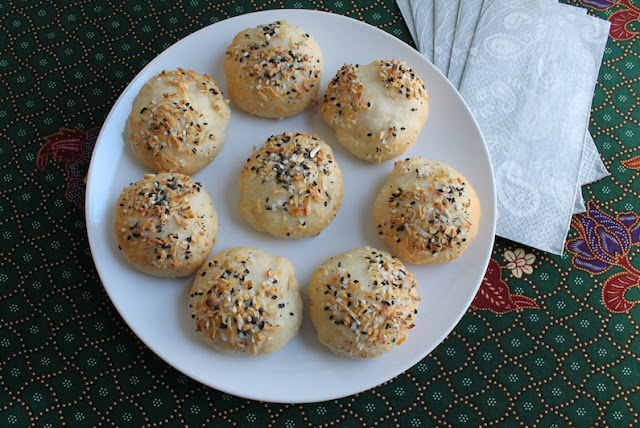
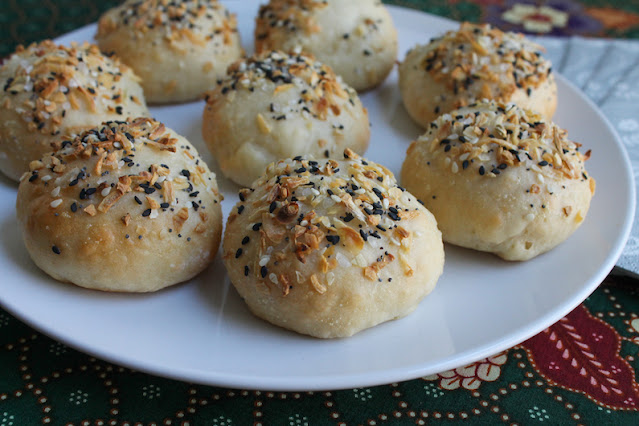
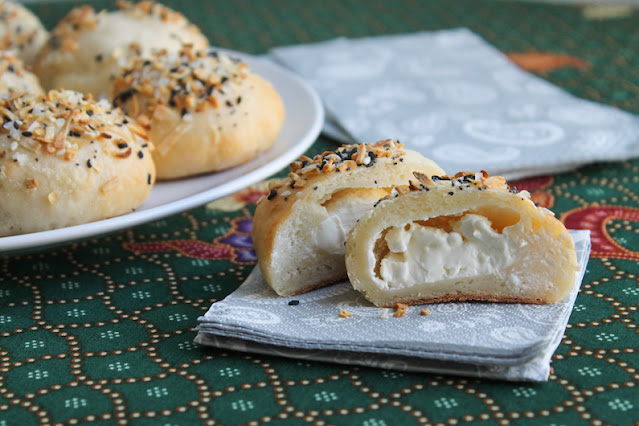
These stuffed bagel balls are baked till golden with lovely cream cheese inside, topped with everything bagel seasoning. 

Food Lust People Love: These stuffed bagel balls are baked till golden with lovely cream cheese inside, topped with everything bagel seasonings. From the fundraising cookbook, Family Meal in aid of the Restaurant Workers' Community Foundation.

During the pandemic, I’ve been borrowing e-books like crazy through the Libby app, which allows you to add a number of library cards and search for books in your own local libraries. I have three cards, two here in Texas and one in the UK so I have had a wide variety of books to choose from. 

One of my recent loans was the cookbook Family Meal, published to raise money for the Restaurant Workers’ Covid-19 Emergency Relief Fund. Since I didn’t buy the book I made a donation but I wanted to tell you about it, in case any of my readers might want to buy one. Or to make a donation to the fund, click here

Each recipe is preceded by a personal introduction from the chef or bakers and I really enjoyed getting to know many of whom I had never heard like Dominque Crenn, Gina Homolka and Sam Sifton and many I already love/admire like Ruth Reichl, Kwame Onwauchi, Ina Garten and Eric Ripert, among others. 

Stuffed Bagel Balls 
This recipe is based on the one Gina Homolka shared for her family’s favorite Bantam Bagel balls which she says they normally buy at their neighborhood Starbucks or in the freezer section at their local supermarket. I've never tried to buy them so I cannot verify this but she says they are often out of stock. No more worries when you can make them at home! I don't know about you but I almost always have these ingredients on hand as well. 

Ingredients
4 oz or 113g cream cheese in a block
1 cup or 125g all-purpose flour, plus extra for kneading, dusting, etc. 
2 teaspoons baking powder 
3/4 teaspoons fine sea salt 
1 cup or 245g non-fat Greek yogurt   

For topping: 
1 egg white, beaten
Everything bagel seasoning

Method
Chill the cream cheese block in the freezer for about 15 minutes and then cut it into 8 even pieces. Pop it back in the freezer while you make the dough.

Cutting the cream cheese in 8 pieces.

In a medium bowl combine the flour, baking powder, and salt and whisk well. Add the yogurt to the flour mixture. 

Adding the yogurt to the flour mix.

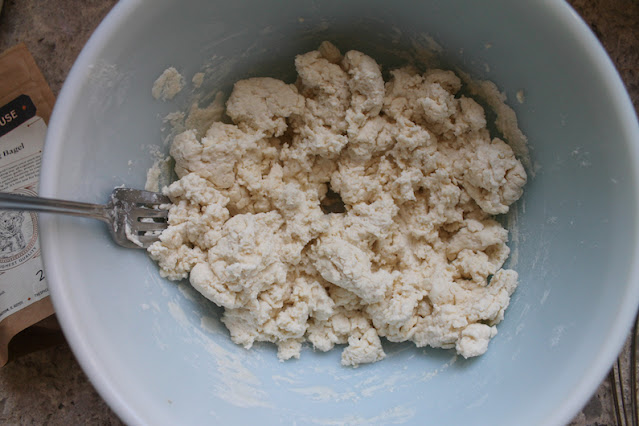
Use a fork and a light touch to gradually mix the flour into the yogurt. Gina says you'll get small crumbles but mine was wetter and more clumpy than that. 

The dough coming together in large lumps.

Use a small strainer or sieve to lightly flour your work surface and turn the dough out on it. 

The dough ready to knead on a well floured surface.

Knead the dough, sprinkling with flour as needed when it gets too sticky. You want a smooth dough without lumps. Cut the dough into 8 pieces of equal size. I am a electronic scale user so I weighed the whole ball of dough and then I calculated how heavy each piece should be when divided by eight. Or you can eyeball it, your call. Roll each piece into a ball. 

The dough divided into 8 equal balls then rolled into spheres.

Remove the cream cheese from the freezer and use clean damp hands to roll each piece into a ball or at least a cube with rounded corners. Return to the freezer. 

The cream cheese cubes rolled into somewhat balls with damp hands.

Preheat your oven to 375°F or 190°C and prepare a baking pan by lining it with baking parchment or a silicone liner. 

Flatten one ball of dough into a circle about 3 1/2 in or 9cm and then put one ball (or rounded lump, if we are being realistic) of cream cheese in the middle. 

Dough circle pressed out into a circle and topped with a cream cheese ball.

Pull the sides of the circle up to cover the cream cheese and pinch the dough to seal it well. 

The dough circle pinched up to form a ball around the cream cheese.

Roll it between your hands gently and place it sealed side down on the prepared baking pan. Repeat the process with the other seven dough/cream cheese balls.

Eight stuffed bagel balls ready for egg white wash and topping.

Finally, use a pastry brush to brush the balls with the beaten egg white and sprinkle liberally with the everything bagel seasoning. I am a "the more toppings the better" kind of person. If I'd thought I could get away with rolling them in the egg wash and then the seasoning, I'd have totally tried it. In retrospect, that would have worked, so you do you. Next time! 

Sprinkling the everything bagel seasoning on the egg wash.

Tip: If you have an extra (read: clean/dry) pastry brush, use it to sweep up the seasonings on the pan from time to time so you can reuse it for sprinkling. This avoids waste but also stops all the toppings from burning on the pan, which no one wants. 

Eight stuffed bagel balls, ready for baking!

Bake the bagel balls for about 22 to 25 minutes, or until golden, turning the pan 180° midway through so the bagel balls brown evenly.

Food Lust People Love: These stuffed bagel balls are baked till golden with lovely cream cheese inside, topped with everything bagel seasonings. From the fundraising cookbook, Family Meal in aid of the Restaurant Workers' Community Foundation.

Let them cool for at least 10 minutes.  Then enjoy! 

Food Lust People Love: These stuffed bagel balls are baked till golden with lovely cream cheese inside, topped with everything bagel seasonings. From the fundraising cookbook, Family Meal in aid of the Restaurant Workers' Community Foundation.

It’s the first Wednesday of the month, so that means it’s time for a Foodie Extravaganza party. As you might guess from the list below, our theme is all things bagel. Many thanks to this month’s host, Sue of Palatable Pastime


Foodie Extravaganza is where we celebrate obscure food holidays by cooking and baking together with the same ingredient or theme each month. Posting day is always the first Wednesday of each month. If you are a blogger and would like to join our group and blog along with us, come join our Facebook page Foodie Extravaganza. We would love to have you! If you're a spectator looking for delicious tid-bits check out our Foodie Extravaganza Pinterest Board

Pin these Stuffed Bagel Balls!

Food Lust People Love: These stuffed bagel balls are baked till golden with lovely cream cheese inside, topped with everything bagel seasonings. From the fundraising cookbook, Family Meal in aid of the Restaurant Workers' Community Foundation.

.

Wednesday, November 4, 2020

Spicy Lime Peanut Chicken

This spicy lime peanut chicken recipe combines zesty lime juice with sweet and salty peanut butter to top boneless chicken breasts for a fabulously delicious main course. 

Food Lust People Love: This spicy lime peanut chicken recipe combines zesty lime juice with sweet and salty peanut butter to top boneless chicken breasts for a fabulously delicious main course.

Spicy lime peanut chicken reminds me of the wonderfully fragrant chicken satay with peanut sauce I love from our many years in Indonesia, Malaysia and Singapore, but with way less trouble. 

Because the boneless skinless chicken breasts are cooked quickly and with such a generous heaping of the sauce, there is little danger of them drying out. My family loved this dish! I suggest serving it with coconut rice and a green bean salad. 

Spicy Lime Peanut Chicken

For the second time this week, I’m sharing a recipe adapted from one by my favorite tv chefs, Jamie Oliver. You can find his original here. My method is a bit different because 1. My non-stick skillet is not ovenproof and 2. I was concerned about cooking the chicken all the way through if I transferred it to a cold pan, raw side down. It was cooked perfectly my way. :) 

Ingredients
4 skinless boneless chicken breasts (about 8 3/4oz or 250g each)
2 tablespoons olive oil, plus extra for serving
4 limes, plus extra for serving
Fine sea salt
Freshly ground black pepper
8 cloves garlic
4 heaped tablespoons peanut butter
1-2 fresh red chili peppers, plus extra for garnish

Method
Zest the limes and set three-quarters of the zest aside for later. Put one quarter into a small bowl. 

Add in the olive oil, two generous pinches of sea salt and a few grinds of black pepper. Mix well to combine.


Score the thick part of the chicken breasts in a crisscross fashion. The reasons for scoring are two-fold. It helps the chicken cook more quickly and more evenly and also gives more surface area for the flavors to be absorbed. 


Rub the lime zest mixture into the scored side of the chicken breasts. Really get it in all the spaces!


Turn the broiler (BrE: grill) in your oven on to preheat to 350°F or 180°C, if your broiler has that ability. If not, just turn it on to preheat. 

Peel and finely grate the garlic into a bowl. Squeeze the juice from 3 limes into the garlic bowl. 

Stir in the peanut butter and loosen with just enough water to give you a spoon-able consistency.


Finely slice the chili peppers and mix them through the sauce, taste and season with another good pinch of sea salt and a few grinds of black pepper.


Heat a non-stick frying pan over medium-high heat. Place the breasts flat side down and cook for about 5-7 minutes or until the chicken looks cooked halfway up the side. That is to say, the bottoms will be golden but the tops will still be pink.


If your non-stick pan is ovenproof continue as follows in the next paragraph. If it is not, transfer the chicken breasts to an ovenproof pan, scored still side up. I'm including this photo because it illustrates that the breasts are cooked about halfway up already, which wasn't really obvious in the prior photo. 


Spoon the peanut sauce over the breasts.


Put the pan under the broiler/grill, roughly 4 inches or 10cm from the heat, for about 5 minutes, or until the chicken is charred in spots and cooked through.

Food Lust People Love: This spicy lime peanut chicken recipe combines zesty lime juice with sweet and salty peanut butter to top boneless chicken breasts for a fabulously delicious main course.

Sprinkle the remaining lime zest over the chicken breasts then drizzle with a little extra virgin olive oil to serve. Garnish with chopped chili peppers, if desired. Pop some extra lime slices on the plate. 

Food Lust People Love: This spicy lime peanut chicken recipe combines zesty lime juice with sweet and salty peanut butter to top boneless chicken breasts for a fabulously delicious main course.

Enjoy!

Food Lust People Love: This spicy lime peanut chicken recipe combines zesty lime juice with sweet and salty peanut butter to top boneless chicken breasts for a fabulously delicious main course.

This month my Foodie Extravaganza friends are sharing recipes with peanut butter in celebration of National Peanut Butter Lovers Month aka November. Many thanks to our host Rebekah of Making Miracles. Check out the recipe list below:


Foodie Extravaganza is where we celebrate obscure food holidays by cooking and baking together with the same ingredient or theme each month. Posting day is always the first Wednesday of each month. If you are a blogger and would like to join our group and blog along with us, come join our Facebook page Foodie Extravaganza. We would love to have you! If you're a spectator looking for delicious tid-bits check out our Foodie Extravaganza Pinterest Board

Pin this Spicy Lime Peanut Chicken! 

Food Lust People Love: This spicy lime peanut chicken recipe combines zesty lime juice with sweet and salty peanut butter to top boneless chicken breasts for a fabulously delicious main course.

 .

Wednesday, October 7, 2020

Caramel Stuffed Brownie Bites #FoodieExtravaganza

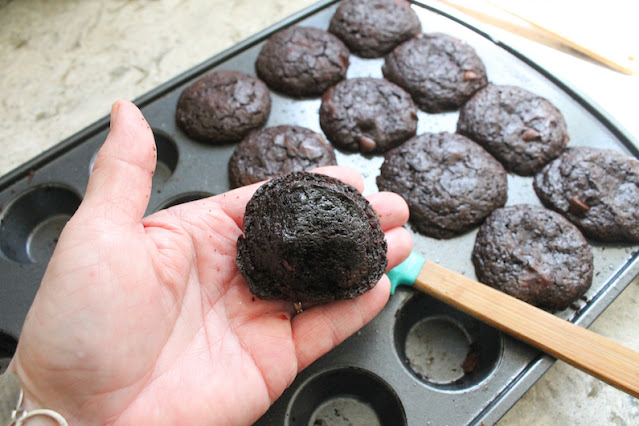
These caramel stuffed brownie bites combine the chewiest fudgy brownies with a big square of chewy caramel in the middle. 

Food Lust People Love: These caramel stuffed brownie bites combine the chewiest fudgy brownies with a big square of chewy caramel in the middle.

I’m one of those kind of people: The kind that buys ingredients with no plan in mind, you know, just in case someday I might need them. A perfect example is the bag of Kraft caramel squares that I’ve been storing in the door of my freezer for going on three years now.

Sure of course they are expired by now, but they’ve been frozen all this time! And I’m pleased to tell you that frozen caramel doesn’t change texture or flavor. You are welcome. 

Caramel Stuffed Brownie Bites

Be sure to liberally oil the mini muffin pan inside the cups and on the tope between them as well. The brownie bites expand over the top and you do not want them to stick. 

Ingredients
2 cups or 400g granulated sugar
1 cup or 125g flour
1 cup or 120g Dutch process cocoa powder
3/4 cup or 94g icing sugar, sifted if lumpy
3/4 cup or 75g semi-sweet chocolate chips
1 teaspoon fine sea salt
3 large eggs
3/4 cup or 180ml canola oil or other light oil, plus extra for pan
3 tablespoons full fat plain Greek style yogurt
3/4 teaspoon vanilla extract
24 caramel squares (I used the individually wrapped Kraft ones)

Method
Preheat the oven to 325°F or 163°C. Prepare your 24-cup mini muffin pan by brushing it with oil. 

In a large bowl, whisk together the sugar, flour, cocoa powder, powdered sugar and salt. Now add in the chocolate chips and stir to distribute them well. 


In a medium bowl, whisk together the eggs, oil, yogurt and vanilla.


Fold the wet ingredients into the dry until barely combined. Fold in the chocolate chips. Don’t over mix.


Spoon half of the thick batter into the muffin pan then poke one (unwrapped!) caramel in each muffin hole.


Cover with the second half of the brownie batter. 


Bake for 25-30 minutes or until the tops are slightly cracked and shiny.


Remove from the oven and set aside to cool on a wire rack for about 25-30 minutes.

Use a heat resistant silicone spatula to carefully release the brownies from the muffin pan.


You may end up deforming them slightly but you can press them back into shape. 

Food Lust People Love: These caramel stuffed brownie bites combine the chewiest fudgy brownies with a big square of chewy caramel in the middle.

Place them on the wire rack to cool completely. 

Enjoy!

Food Lust People Love: These caramel stuffed brownie bites combine the chewiest fudgy brownies with a big square of chewy caramel in the middle.

This month my Foodie Extravaganza friends are sharing recipes featuring caramel. Many thanks to our host, Kelley of Simply Inspired Meals


Foodie Extravaganza is where we celebrate obscure food holidays by cooking and baking together with the same ingredient or theme each month. Posting day is always the first Wednesday of each month. If you are a blogger and would like to join our group and blog along with us, come join our Facebook page Foodie Extravaganza. We would love to have you! If you're a spectator looking for delicious tid-bits check out our Foodie Extravaganza Pinterest Board.

Pin these Caramel Stuffed Brownie Bites!

Food Lust People Love: These caramel stuffed brownie bites combine the chewiest fudgy brownies with a big square of chewy caramel in the middle.

 .

Wednesday, September 2, 2020

Mustard Honey Buttered Carrots #FoodieExtravaganza

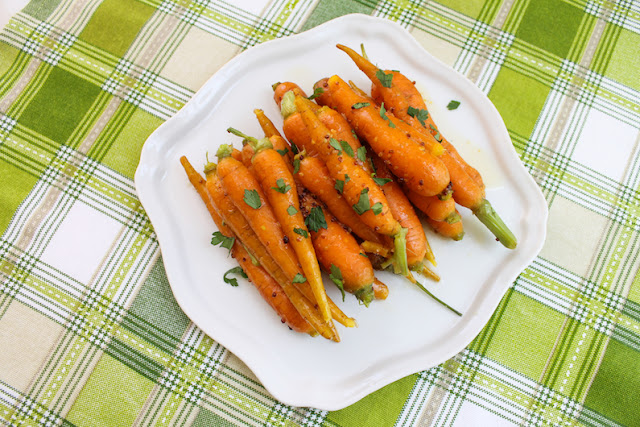
Mustard Honey Buttered Carrots are slightly sweet with a lovely sharpness and, of course, shiny with just the right amount rich butter. They make a beautiful side dish, served hot or at room temperature. 

Food Lust People Love: Mustard Honey Buttered Carrots are slightly sweet with a lovely sharpness and, of course, shiny with just the right amount rich butter. They make a beautiful side dish, served hot or at room temperature.


I love putting carrots in things – like soups or stews or even cakes and muffins – but rarely make them a star in their own right. I think of them more as an ingredient in mirepoix than something to fill a whole bowl with.

Maybe it’s because my younger daughter is not such a fan of cooked carrots. On the odd day that I did prepare carrots as a side dish when she was little, I served her portion raw and she was happy to munch them that way. 

All that changed when I started buying baby carrots. They are always sweet, always tender and they also look beautiful. What more can one ask of a side dish? 

Mustard Honey Buttered Carrots

If you aren’t lucky enough to be able to find baby carrots in your local market, by all means use whatever sweet carrots you can buy. Cut them into sticks or coins but make sure not to overcook them.

Ingredients
1 lb or 450g baby carrots
1 teaspoon fine sea salt, plus more to season, if needed
1 tablespoon butter
1 tablespoon honey
1 teaspoon whole grain mustard

Chopped parsley for garnish, optional

Method
Scrub the baby carrots and trim the green stems, leaving a few inches on for color. Put them in a pot and cover them with water. Add the teaspoon of salt.


Bring the water to the boil and cook the carrots for 5-7 mins or until just tender. Drain, and discard any stems that have detached themselves. 

While the carrots are cooking, warm the butter, honey and mustard and whisk them together. (I used the microwave, a few short zaps will do it, but you can also use a small pot on the stove.) 


Drain the carrots and transfer them to a bowl. Immediately pour the mustard honey butter over them and toss gently to coat.


Sprinkle with a little salt, if desired but I find that the saltiness of the whole-grained mustard is sufficient for our taste. 

Transfer the carrots to a serving plate and make sure to pour any dressing left behind in the bowl over the top. 

Food Lust People Love: Mustard Honey Buttered Carrots are slightly sweet with a lovely sharpness and, of course, shiny with just the right amount rich butter. They make a beautiful side dish, served hot or at room temperature.

Sprinkle with some chopped parsley for garnish, if using. Serve the carrots immediately hot, or at room temperature. 

Food Lust People Love: Mustard Honey Buttered Carrots are slightly sweet with a lovely sharpness and, of course, shiny with just the right amount rich butter. They make a beautiful side dish, served hot or at room temperature.


Enjoy! 

This month's Foodie Extravaganza theme is honey to celebrate National Honey Month which is September. Many thanks to our host, Rebekah of Making Miracles. Check out all the honey recipes we are sharing:


Foodie Extravaganza is where we celebrate obscure food holidays by cooking and baking together with the same ingredient or theme each month. Posting day is always the first Wednesday of each month. If you are a blogger and would like to join our group and blog along with us, come join our Facebook page Foodie Extravaganza. We would love to have you! If you're a spectator looking for delicious tid-bits check out our Foodie Extravaganza Pinterest Board.


Pin these Mustard Honey Buttered Carrots!

Food Lust People Love: Mustard Honey Buttered Carrots are slightly sweet with a lovely sharpness and, of course, shiny with just the right amount rich butter. They make a beautiful side dish, served hot or at room temperature.

 .

Wednesday, June 3, 2020

Soy Braised Pork with Eggs #FoodieExtravaganza

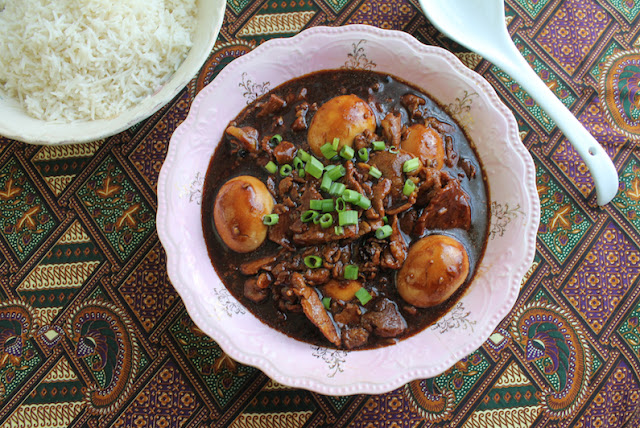
Also known as lor bak or dau yew bak, depending on the Chinese dialect, this braised soy sauce pork with eggs dish has the most delectable sauce, delightfully flavored with spices like star anise, cloves, black pepper, as well as ginger and garlic. You will be licking your plate to get the last drops.

Food Lust People Love: Also known as lor bak or dau yew bak, depending on the Chinese dialect, this braised soy sauce pork with eggs dish has the most delectable sauce, delightfully flavored with spices like star anise, cloves, black pepper, as well as ginger and garlic. You will be licking your plate to get the last drops.


Many years ago when we were living in the small oilfield town of Macaé, Brazil, one of my close neighbors was a Singaporean woman named Millie. Our girls were about the same ages and we hit it off immediately over a love of cooking. Millie only had to make this dish once and I was hooked!

Sadly, I don’t think I ever got her recipe, or perhaps I misplaced it because I distinctly remember making it way back then.

Once the internet became a thing, I would occasionally search for soy sauce pork with eggs. I always thought of it as a Singaporean dish, and I really didn’t remember what Millie called it, which made it tricky to find online. None of the recipes I found seem quite right. Whether that was my faulty memory is up for debate.

I finally decided I was just going have to do a mash up of several to make what I did remember. But at least with all the research, I now know what to call it.

Braised Soy Sauce Pork with Eggs

The easiest way to slice the pork into very thin pieces is to freeze the pork loin first. Take it out to thaw and use a sharp knife to slice it as thinly as you can while it’s still quite frozen.

Ingredients
For the marinade:
4 tablespoons dark soy sauce
2 tablespoon light soy sauce
2 tablespoon Shaoxing wine

For the braised pork:
2 lbs or 900g pork loin
10 cloves garlic
1 thumb-sized piece ginger
1 tablespoon canola or other light oil
3 star anise
2 to 3 whole cloves
2 sticks cinnamon, 3 inches in length
1 teaspoon black (or mixed) peppercorns
1 teaspoon Chinese 5 spice powder
4 tablespoons dark soy sauce
2 tablespoons light soy sauce
2 tablespoons sugar
1 tablespoon oil
2 cups or 480ml water
6 hard-boiled eggs

Optional to thicken sauce:
2 tablespoons cornstarch

To serve:
Steamed rice
Green onion tops for garnish

Method
Use a sharp knife to cut your pork into thin slices. (See tip above the ingredients list.)


In a large bowl, mix the marinade ingredients: dark soy sauce, light soy sauce and Shaoxing wine. Pile the pork in and use your clean hands to turn the slices in the marinade until they are all well coated.


Cover the bowl with cling film and pop it in the refrigerator for about 30 minutes.

Meanwhile crush and roughly chop the cloves of garlic and peel and mince the ginger. I also find it helpful to measure out the other liquid ingredients into a measuring cup or bowl so I can pour it in all at once when needed.


In a heavy based pot, heat up the cooking oil. Add the star anise, cinnamon sticks, peppercorns, and five-spice powder. Fry till fragrant, about 2-3 minutes. Add in the garlic and ginger and fry for a few more minutes.


Turn the heat up to high and add the marinated pork and any marinating liquid that wasn’t absorbed by the meat. Cook for about 5 minutes, stirring regularly.


Add dark soy, light soy and sugar.


Add 2 cups or 480ml of water. Mix well and bring to a slow boil.

Lower the heat to simmer and cover the pot. Braise for about 20 minutes. Add the eggs in and turn them to coat with the sauce. Tuck them into the pork as much as possible.


Braise, covered, for another 20 minutes more or until pork is tender. If your eggs aren't deep enough, you will want to turn then halfway through to get proper color on all sides.

If desired, you can thicken the sauce with 2 tablespoons of cornstarch thinned with a couple of tablespoons of cold water. Remove the eggs from the pot with a slotted spoon, so you don’t break them up by stirring.

Food Lust People Love: Also known as lor bak or dau yew bak, depending on the Chinese dialect, this braised soy sauce pork with eggs dish has the most delectable sauce, delightfully flavored with spices like star anise, cloves, black pepper, as well as ginger and garlic. You will be licking your plate to get the last drops.
Add the cornstarch slurry to the pot and cook on medium high until thickened about 5 minutes.

 Pop the eggs back in. Sprinkle with chopped green onions.

Food Lust People Love: Also known as lor bak or dau yew bak, depending on the Chinese dialect, this braised soy sauce pork with eggs dish has the most delectable sauce, delightfully flavored with spices like star anise, cloves, black pepper, as well as ginger and garlic. You will be licking your plate to get the last drops.


Serve with steamed rice. Enjoy!

Food Lust People Love: Also known as lor bak or dau yew bak, depending on the Chinese dialect, this braised soy sauce pork with eggs dish has the most delectable sauce, delightfully flavored with spices like star anise, cloves, black pepper, as well as ginger and garlic. You will be licking your plate to get the last drops.


Today is National Egg Day so this month our Foodie Extravaganza celebration is all about eggs. Many thanks to our host, Karen from Karen's Kitchen Stories.

Check out everyone's recipes with eggs:
Foodie Extravaganza is where we celebrate obscure food holidays by cooking and baking together with the same ingredient or theme each month. Posting day is always the first Wednesday of each month. If you are a blogger and would like to join our group and blog along with us, come join our Facebook page Foodie Extravaganza. We would love to have you! If you're a spectator looking for delicious tid-bits check out our Foodie Extravaganza Pinterest Board.


Pin this Soy Braised Pork with Eggs - Lor Bak!

Food Lust People Love: Also known as lor bak or dau yew bak, depending on the Chinese dialect, this braised soy sauce pork with eggs dish has the most delectable sauce, delightfully flavored with spices like star anise, cloves, black pepper, as well as ginger and garlic. You will be licking your plate to get the last drops.
.