Showing posts with label main courses. Show all posts

Monday, January 18, 2021

Beef and Mushroom Bourguignon (Instant Pot)

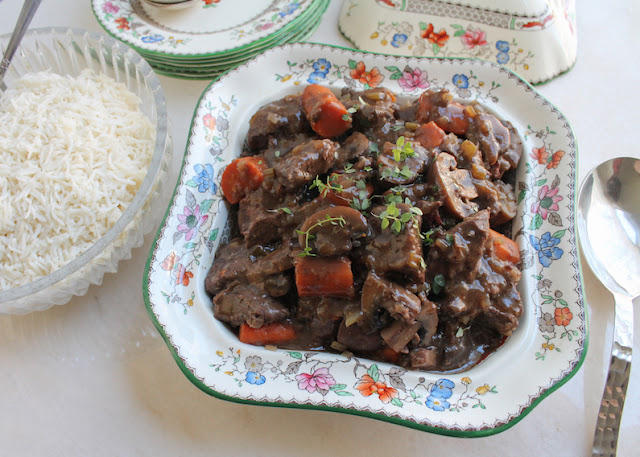
Beef and Mushroom Bourguignon is rich and flavorful, a hearty comforting meal for cold winter nights, made quicker than usual in an Instant Pot. 

Food Lust People Love: Beef and Mushroom Bourguignon is rich and flavorful, a hearty comforting meal for cold winter nights, made quicker than usual in an Instant Pot.

Normally beef bourguignon requires a long slow braise to tenderize the meat, which is all very fine and well if you have the time. If I’m being honest, these days I mostly do. That said, ever since our kitchen renovation early in 2020 when I was cooking in my Instant Pot in the laundry room, I’ve been enamored with that small appliance. Why not use it? 

The Instant Pot makes short work of a long braise (35 minutes!) and best of all, there’s only one pot to clean. Whenever my mom sees me taking it out, she wonders what my grandmother would have thought of such a thing. As a working woman still expected to put a meal on the table every day, I think she would have been intrigued. I know she used her pressure cooker and this is just a more efficient one. 

If you don’t have an Instant Pot, by all means fry the bacon, brown the beef and sauté the onions and celery in a skillet on the stove, then transfer the whole lot into a slow cooker. Add the stock, wine, carrots and mushrooms and cook on high for 6-8 hours, or until the beef is tender. 

Beef and Mushroom Bourguignon

A traditional beef bourguignon does include mushrooms but they are definitely a supporting player for the star beef. In this recipe, I’ve significantly upped the amount of mushrooms and used “beefier” baby bellas instead of the standard white mushrooms, cutting larger ones in quarters and halving smaller ones. This is a great way to both stretch your beef budget and make this a healthier meal. 

Ingredients
1 lbs 10oz or 740g top sirloin beef
Fine sea salt
Freshly ground black pepper
1/4 cup or 31g all-purpose flour
Olive oil
3 slices thick-cut bacon, (about 4 oz or 115g) 
2 large carrots, cut into 2-inch pieces (about 7 1/4 oz or 205g)
3 celery stalks (about 3 1/2 oz or 100g)
1 medium yellow onion, chopped (about 9 1/3 oz or 265g)
1 lb or 450g fresh baby bella mushrooms, cleaned
3 sprigs fresh thyme
1 cup or 240ml dry red wine plus extra for the cook
2 cups or 480ml beef broth

For a slurry to thicken the sauce:
2 tablespoons cornstarch
2 tablespoons cold water

Fine sea salt and freshly cracked black pepper to taste

Method
Trim the fat and gristle off of the beef and discard. Cut the meat into small chunks. Sprinkle the chunks liberally with fine sea salt and freshly ground black pepper. 


Peel the onion and carrots. Finely chop the onion and celery stalks. Cut the carrot into chunks. 


Trim any hard stems off of the mushrooms and quarter the larger ones. Halve the smaller ones.


Sprinkle the seasoned beef with some of the flour. I have a small sieve I use for this purpose and it works really well to get even coverage. Toss the beef pieces around a little and keep sprinkling the flour on until the beef is evenly coated. 


Set your Instant Pot to sauté mode adjusted to medium heat (the middle light). Fry the bacon in the pot until it is crisp. Use a slotted spoon to transfer the cooked bacon to a plate and set aside.

Add the cubed chuck to your Instant pot in batches so that you don't overcrowd the pot, and sear it for 3-4 minutes, using tongs to turn the meat and sear all sides.


When the brown crust is formed, it will release from the Instant Pot so just be patient. Remove each batch of beef once seared. Set aside. I piled mine up on top of the bacon. 


Turn the Instant Pot off and add in the onions and celery. 


Let them sit without stirring for a few minutes. The residual heat from the sauté function will continue to cook them and when you do start stirring, you will be able to use a wooden spoon or spatula to free all the browned goodness from the bottom of the Instant Pot. 


Now turn the sauté function back on and set it to low. Continue to cook the celery and onion until they are softened, about five minutes. Add the beef chunks and the bacon back into the pot. Stir well to mix the vegetables and the beef. 


Pour in the stock and red wine. 


Add in the fresh thyme then the carrots. 


Now pile in the mushrooms. Do not stir! For optimum tenderness, we want to be sure the beef is completely covered by the stock and wine.


Cook on the stew setting under pressure for 35 minutes. When time is up, turn the Instant Pot off. Use a towel to cover the steam lever and carefully release the pressure. 

Remove the lid. Use a slotted spoon to remove the beef, carrots and mushrooms and put them in a large bowl. 

Food Lust People Love: Beef and Mushroom Bourguignon is rich and flavorful, a hearty comforting meal for cold winter nights, made quicker than usual in an Instant Pot.

According the markings on the inside of the Instant Pot, you should have about 3 cups of liquid left in the pot. Cook on the sauté high setting for about 15-20 minutes or until the liquid is reduced by one third, that is to say you will have two cups left. 

Make a slurry of the cornstarch and cold water. Turn the Instant Pot off and whisk constantly as you pour the slurry in. Since the pot is still very hot, it should thicken right up. 

Add the beef, mushrooms and carrots back in and stir gently to coat them with the sauce. Have a taste and add a little fine sea salt and black pepper as needed. 

Food Lust People Love: Beef and Mushroom Bourguignon is rich and flavorful, a hearty comforting meal for cold winter nights, made quicker than usual in an Instant Pot.

Serve with some extra thyme leaves for garnish, if desired. This is great over white rice or mashed potatoes. 

Food Lust People Love: Beef and Mushroom Bourguignon is rich and flavorful, a hearty comforting meal for cold winter nights, made quicker than usual in an Instant Pot.

Enjoy!

It's MultiCooker Monday! Check out all the small appliance cooked dishes my friends are sharing today. Many thanks to our group leader and host, Sue of Palatable Pastime


Multicooker Monday is a blogger group created by Sue of Palatable Pastime for all of us who need encouragement to make better use of our small appliances like slow cookers, Instant Pots, Air Fryers, rice cookers and sous vide machines. We get together every third Monday of the month to share our recipes. If you are a food blogger who would like to post with us, please request to join our Facebook group. 

Pin this Beef and Mushroom Bourguignon!

Food Lust People Love: Beef and Mushroom Bourguignon is rich and flavorful, a hearty comforting meal for cold winter nights, made quicker than usual in an Instant Pot.

 .

Sunday, January 10, 2021

Cheesy Eggplant Pork Roast Rolls

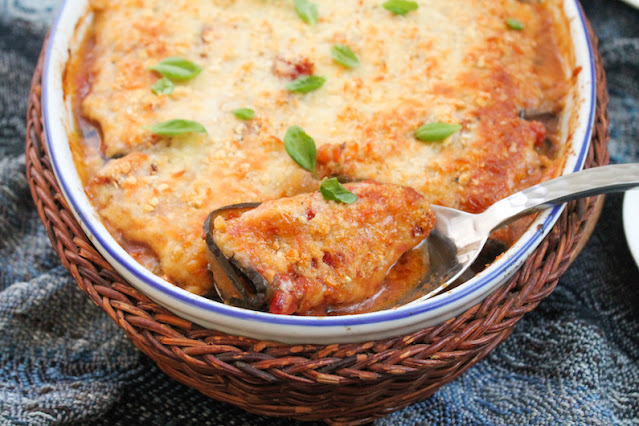
These cheesy eggplant pork roast rolls are filled with pork, eggplant and mozzarella, baked in a fresh tomato sauce, then topped with more cheese.

Food Lust People Love: These cheesy eggplant pork roast rolls are filled with pork, eggplant and mozzarella, baked in a fresh garlicky tomato sauce, then topped with more cheese.

When you are just two people in a household, leftovers are a fact of life. This recipe is one I cooked quite a while back when it was just my husband and I alone in our empty nest. First we enjoyed a pork roast that I prepared with my sous vide precision cooker. It was fabulous but clearly too big for two. 

That’s when I had this idea. What if I rolled slices of pork with slices of eggplant and stuffed them with cheese? I couldn’t wait to try it and I was not disappointed. The rolls are tender and flavorful, especially cooked in a fresh garlicky tomato sauce.  

Cheesy Eggplant Pork Roast Rolls

I call these pork roast rolls because, as mentioned above, I used leftover pork roast from this sous vide recipe, but you can also substitute roast pork or beef from your nearby delicatessen or deli counter at the grocery store. I think they’d also be tasty with ham. 

Ingredients
For the rolls:
15 thin slices from the middle of two large eggplants
1 cup or 85g chopped eggplant
15 thin slices pork roast (about 1 1/2 lbs or 700g) 
1 cup or 135g roast pork, chopped
2 tablespoons olive oil
1 medium onion, chopped
2 cloves garlic, chopped 
1/2 teaspoon fine sea salt
1/4 teaspoon ground cayenne
3 1/2 oz or 100g mozzarella cheese, finely grated
8-10 leaves fresh basil, chiffonade (rolled and cut into thin strips)

For the fresh tomato sauce:
1 3/4 cups or 500g canned crushed tomatoes (+ 1/3 cup or water)
1 large clove garlic, chopped into slivers
8-10 leaves fresh basil, chiffonade (rolled and cut into thin strips)
1/2 teaspoon sugar

For the topping:
3 1/2 oz or 100g mozzarella, finely grated
1 3/4 oz or 50g Parmesan, finely grated
1/2 cup or 40g fresh bread crumbs
fresh ground black pepper

Note: You will have plenty of sliced eggplant leftover since only the best and biggest middle slices are suitable for this dish. Store them in an airtight container for another recipe. I’d like to suggest my mashup (in the musical sense) of pizza and Arabic flatbread: Manousah or my easy eggplant parmigiana

Method
Combine all of the ingredients for the fresh tomato sauce together in a mixing bowl.


Thinly slice your eggplant on a mandolin. 


When you get to the bottom of the eggplant, where it’s too hard to continue slicing, remove the peel with a sharp knife and chop the flesh into small cubes. As mentioned in the ingredients, you’ll need 1 cup or about 85g of chopped eggplant. Some of the narrower slices can also be used for this. 


In a saucepan with the olive oil, sauté the onions and garlic until they soften. Add in the chopped eggplant and chopped pork. 


Cook the mixture for about 10 minutes or until the eggplant has softened. Sprinkle on the cayenne. Remove from the heat and leave to cool for a few minutes, stirring occasionally. Once it’s cooled, add in the basil and mozzarella and stir to combine.


Preheat your oven to 350°F or 180°C and spoon in enough fresh tomato sauce to cover the bottom of your casserole dish.

Choose the best and biggest 15 slices of eggplant. 

Put one slice of pork roast on top of one slice of eggplant. Add about 2 tablespoons of the filling. 


Roll the eggplant and pork roast up, tucking the filling in as you go. Lay the roll end side down in the casserole dish. 


Continue stacking, filling and rolling until all of your eggplant pork roast rolls are assembled, adding them to the casserole dish as you go. 

Spoon the rest of the fresh tomato sauce over the top of the rolls. 


Cover the casserole with foil. Bake in your preheated oven for 45 minutes.

Meanwhile, put your topping ingredients together in a small bowl and grind in some black pepper. Mix well. 

Remove the casserole from the oven. Sprinkle the topping on evenly and return the casserole to the oven, uncovered, for an additional 15 minutes or until the topping is golden and bubbling. 


Garnish the casserole with extra basil leaves.

Food Lust People Love: These cheesy eggplant pork roast rolls are filled with pork, eggplant and mozzarella, baked in a fresh garlicky tomato sauce, then topped with more cheese.

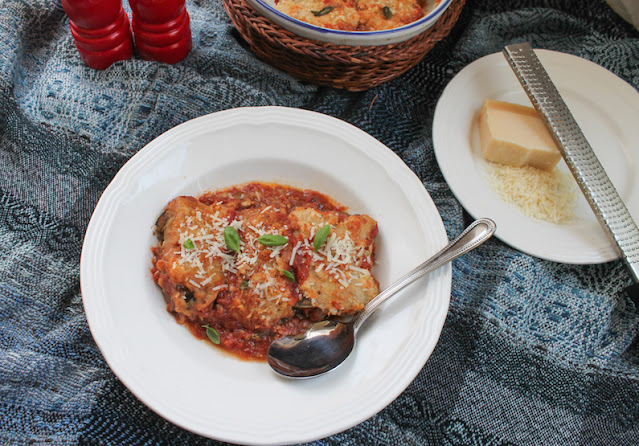
Serve with a Parmesan wedge and grater on the side, in case anyone wants to add more.  

Food Lust People Love: These cheesy eggplant pork roast rolls are filled with pork, eggplant and mozzarella, baked in a fresh garlicky tomato sauce, then topped with more cheese.

Enjoy! 

Today’s Sunday FunDay theme celebrates dairy so you’ll find lots of wonderful sweet and savory recipes below. Many thanks to our host Rebekah of Making Miracles
We are a group of food bloggers who believe that Sunday should be a family fun day, so every Sunday we share recipes that will help you to enjoy your day. If you're a blogger interested in joining us, just visit our Facebook group and request to join.


Pin these Cheesy Eggplant Pork Roast Rolls!

Food Lust People Love: These cheesy eggplant pork roast rolls are filled with pork, eggplant and mozzarella, baked in a fresh garlicky tomato sauce, then topped with more cheese.

 .

Friday, November 20, 2020

Cheesy Shrimp Stuffed Poblano Peppers

These cheesy shrimp stuffed poblano peppers are wrapped in bacon and roasted till the bacon is crispy and the cheese is soft and melted. They make a fabulous starter or even a good main course, served with sides. 

Food Lust People Love: These cheesy shrimp stuffed poblano peppers are wrapped in bacon and roasted till the bacon is crispy and the cheese is soft and melted. They make a fabulous starter or even a good main course, served with sides.

Pretty sure I’ve mentioned this before but my meals each week are often predicated on whatever catches my eye in the market or grocery store. (These days mostly just the grocery store since I am limiting my forays into the public to once a week.) 

These shiny green poblano peppers jumped out at me and I suddenly remembered a recipe I made years and years ago around this time, from a post on my friend Christine’s blog, where she used cornbread dressing to stuff poblanos. Girl after my own Texas heart. 


When she first posted it, I had never come across poblano peppers in Dubai but then, suddenly, my supermarket had some! You’ve never seen anyone so excited over a vegetable since, honestly, I don’t know when. I know, I'm sad, but here we are. 

Meanwhile, I'm back in Texas where poblanos abound. I didn’t have any cornbread stuffing on hand but I did have queso fresco or farmer’s cheese, shrimp and bacon and who can resist those? If you are looking for a non-traditional Thanksgiving dish, try these stuffed peppers. We loved them!

Cheesy Shrimp Stuffed Poblano Peppers

For this dish I used jalapeño bacon but any smoked bacon would be just as lovely. We happen to be chili pepper freaks in our house so our motto is the more heat the better. It’s also hard to tell from the photos but my poblano peppers were about 6-7 in or 15-18cm long. The cheese is a fresh, soft, dry curd cheese highly prized for many recipes in Mexico and South America. If you can’t get a similar cheese, perhaps try a fresh goat cheese instead. The flavor will be different but still delicious. We are looking for something that will melt without melting out of the pepper. In a pinch you could use grated cheddar mixed through with well-drained cottage cheese or ricotta so it doesn’t completely melt and drip out of the peppers because no one wants that. 


Ingredients
4 fresh poblano peppers (480g total)
10 1/2 oz or 300g raw, peeled, cleaned shrimp
2 cloves garlic, minced
2 tablespoons butter
5 oz or 142g queso fresco
8 slices smoked bacon 

Optional to serve: your favorite salsa

Method
Heat your broiler to high, move your oven rack up to the top position and put the peppers on a big sheet of aluminum foil on a large baking pan. 

Roast the peppers for several minutes on each side, making sure to keep a close eye on them so they just pop and char a little but don’t completely burn. 


When they are nice and scorched on all sides, remove the pan from the oven and wrap the foil loosely around the peppers, closing the steam in by crimping the sides.  Set aside for 10 minutes. 

Open the foil and gentle remove the outer peelings. Cut a slit up the middle of each pepper. Save the foil for use later. 


Sauté the garlic in the butter for a few minutes, being careful not to let it color or, God forbid, burn. Add in the shrimp and cook till they release their water, then cook a few more minutes, until the pan is almost, but not quite, dry again. Remove from the heat and set aside to cool. 


Preheat your oven to 400°F or 200°C. 

Slice the cheese into slim sticks and fill the bottom of the pepper with a little of them, tucking cheese right up under the seeded core at the stem end.


Add in one quarter of the shrimp with garlic.


 Top with more cheese. 


As best you can, try to gently pull up the sides of the pepper to close the slit. Stick a toothpick in, if that helps. Use two slices of bacon to wrap around and around the pepper to hold it closed.


Repeat until all four peppers are stuffed and bacon-wrapped. 

Return the peppers to the foil and put it back on the baking pan.


Bake in the preheated oven for 15-20 minutes or until the bacon is cooked and golden. 

Remove from the oven and leave to cool for about five minutes. 

Food Lust People Love: These cheesy shrimp stuffed poblano peppers are wrapped in bacon and roasted till the bacon is crispy and the cheese is soft and melted. They make a fabulous starter or even a good main course, served with sides.

Serve with your favorite salsa for a generous first course or with a side salad and veggies as a main course. 

Food Lust People Love: These cheesy shrimp stuffed poblano peppers are wrapped in bacon and roasted till the bacon is crispy and the cheese is soft and melted. They make a fabulous starter or even a good main course, served with sides.

Enjoy! 

This month my Fish Friday Foodie friends are sharing recipes to serve for Thanksgiving. Many thanks to our founder and host, Wendy of A Day in the Life on the Farm. Check out the recipes below.


Are you a food blogger who would you like to join Fish Friday Foodies? We post and share new seafood/fish recipes on the third Friday of the month. To join our group please email Wendy at wendyklik1517 (at) gmail.com. Visit our Facebook page and Pinterest page for more wonderful fish and seafood recipe ideas.

Pin these Cheesy Shrimp Stuffed Poblano Peppers!

Food Lust People Love: These cheesy shrimp stuffed poblano peppers are wrapped in bacon and roasted till the bacon is crispy and the cheese is soft and melted. They make a fabulous starter or even a good main course, served with sides.

.

Sunday, November 15, 2020

Roasted Bruschetta Pattypan Squash

This roasted bruschetta pattypan squash - filled with ripe tomatoes, garlic and basil splashed with balsamic vinegar - makes a delicious and gorgeous main course for any special occasion. Added bonus: Even your vegetarian and vegan family and friends can enjoy it!

Food Lust People Love: This roasted bruschetta pattypan squash - filled with ripe tomatoes, garlic and basil splashed with balsamic vinegar - makes a delicious and gorgeous main course for any special occasion. Added bonus: Even your vegetarian and vegan family and friends can enjoy it!

I can’t tell you how excited I was when I came across two lovely large pattypan squash grown by a local farmer. I didn’t even know they grew that big! Prior to these, the pattypans of my experience were either tiny baby squash or more typically, they were about four or five inches across. 

Special squash deserves to be made into a special dish. I couldn’t bring myself to cut it up and spoil its beauty. Stuffing seemed to be the best answer. With the tomatoes so wonderful and ripe, I wanted them to shine too. 

Except for the chopped squash, this stuffing is exactly the same topping I put on toasted baguette slices for our family favorite classic bruschetta, hence the title. The wonderful bruschetta filling infuses the squash with great flavor as it roasts to golden perfection. 

Roasted Bruschetta Pattypan Squash

If you can’t find large pattypan squash, use whatever squash is your favorite. Don’t worry about the weight of your tomatoes. A little more or less won’t really matter. 

Ingredients
1 large pattypan or scallop squash (mine weighed 1 lb 9 oz or 650g)
For the filling: 
1 large clove garlic
4 small tomatoes (mine weighted about 9 oz or 260g)
7-8 leaves fresh basil, plus extra for garnish, if desired
2 tablespoons olive oil, plus a little extra for the baking pan
1 tablespoon best quality balsamic vinegar
1/4 teaspoon fine sea salt
Freshly ground black pepper

Optional to serve: 
Freshly grated Parmesan cheese

Method
Cut the top off of the squash. Use a spoon to scrape the seeds and fibers out of the middle.


Use a sharp knife to trim off the squash to enlarge the cavity. Chop the squash bits you trim off and set them aside. We’ll add these to the bruschetta filling.


Preheat your oven to 350°F or 180°C. Lightly grease a baking pan or iron skillet. 

Remove the cores from the tomatoes and chop them into small pieces. Put a couple of paper towels on your cutting board to catch the juice that will inevitably pour off. Otherwise you’ll find it dripping off the work surface onto your feet. Not that that has ever happened to me. 

Mince the garlic. Roll the basil leaves together and slice them thinly into strips. Then chop the rolled slices roughly. 


Put the tomatoes, chopped squash bits, garlic and basil into a small mixing bowl. 

Add in the olive oil, vinegar, salt and several good grinds of black peppers. Stir well to combine. 


Spoon the filling into the pattypan squash.

Food Lust People Love: This roasted bruschetta pattypan squash - filled with ripe tomatoes, garlic and basil splashed with balsamic vinegar - makes a delicious and gorgeous main course for any special occasion. Added bonus: Even your vegetarian and vegan family and friends can enjoy it!

Roast in your preheated oven for 55-60 minutes or until the squash is cooked through. 

Remove from the oven. Sprinkle with basil strips. 

Food Lust People Love: This roasted bruschetta pattypan squash - filled with ripe tomatoes, garlic and basil splashed with balsamic vinegar - makes a delicious and gorgeous main course for any special occasion. Added bonus: Even your vegetarian and vegan family and friends can enjoy it!

Cut the squash into quarters to serve and let your guests add grated Parmesan, as desired. 

Enjoy! 


Happy Sunday FunDay, where we share recipes your families will love every Sunday. Today our theme is Squash it to me! - perfect for the season. Many thanks to our host, Rebekah of Making Miracles

Pin this Roasted Bruschetta Pattypan Squash!

Food Lust People Love: This roasted bruschetta pattypan squash - filled with ripe tomatoes, garlic and basil splashed with balsamic vinegar - makes a delicious and gorgeous main course for any special occasion. Added bonus: Even your vegetarian and vegan family and friends can enjoy it!

 .

Wednesday, November 4, 2020

Spicy Lime Peanut Chicken

This spicy lime peanut chicken recipe combines zesty lime juice with sweet and salty peanut butter to top boneless chicken breasts for a fabulously delicious main course. 

Food Lust People Love: This spicy lime peanut chicken recipe combines zesty lime juice with sweet and salty peanut butter to top boneless chicken breasts for a fabulously delicious main course.

Spicy lime peanut chicken reminds me of the wonderfully fragrant chicken satay with peanut sauce I love from our many years in Indonesia, Malaysia and Singapore, but with way less trouble. 

Because the boneless skinless chicken breasts are cooked quickly and with such a generous heaping of the sauce, there is little danger of them drying out. My family loved this dish! I suggest serving it with coconut rice and a green bean salad. 

Spicy Lime Peanut Chicken

For the second time this week, I’m sharing a recipe adapted from one by my favorite tv chefs, Jamie Oliver. You can find his original here. My method is a bit different because 1. My non-stick skillet is not ovenproof and 2. I was concerned about cooking the chicken all the way through if I transferred it to a cold pan, raw side down. It was cooked perfectly my way. :) 

Ingredients
4 skinless boneless chicken breasts (about 8 3/4oz or 250g each)
2 tablespoons olive oil, plus extra for serving
4 limes, plus extra for serving
Fine sea salt
Freshly ground black pepper
8 cloves garlic
4 heaped tablespoons peanut butter
1-2 fresh red chili peppers, plus extra for garnish

Method
Zest the limes and set three-quarters of the zest aside for later. Put one quarter into a small bowl. 

Add in the olive oil, two generous pinches of sea salt and a few grinds of black pepper. Mix well to combine.


Score the thick part of the chicken breasts in a crisscross fashion. The reasons for scoring are two-fold. It helps the chicken cook more quickly and more evenly and also gives more surface area for the flavors to be absorbed. 


Rub the lime zest mixture into the scored side of the chicken breasts. Really get it in all the spaces!


Turn the broiler (BrE: grill) in your oven on to preheat to 350°F or 180°C, if your broiler has that ability. If not, just turn it on to preheat. 

Peel and finely grate the garlic into a bowl. Squeeze the juice from 3 limes into the garlic bowl. 

Stir in the peanut butter and loosen with just enough water to give you a spoon-able consistency.


Finely slice the chili peppers and mix them through the sauce, taste and season with another good pinch of sea salt and a few grinds of black pepper.


Heat a non-stick frying pan over medium-high heat. Place the breasts flat side down and cook for about 5-7 minutes or until the chicken looks cooked halfway up the side. That is to say, the bottoms will be golden but the tops will still be pink.


If your non-stick pan is ovenproof continue as follows in the next paragraph. If it is not, transfer the chicken breasts to an ovenproof pan, scored still side up. I'm including this photo because it illustrates that the breasts are cooked about halfway up already, which wasn't really obvious in the prior photo. 


Spoon the peanut sauce over the breasts.


Put the pan under the broiler/grill, roughly 4 inches or 10cm from the heat, for about 5 minutes, or until the chicken is charred in spots and cooked through.

Food Lust People Love: This spicy lime peanut chicken recipe combines zesty lime juice with sweet and salty peanut butter to top boneless chicken breasts for a fabulously delicious main course.

Sprinkle the remaining lime zest over the chicken breasts then drizzle with a little extra virgin olive oil to serve. Garnish with chopped chili peppers, if desired. Pop some extra lime slices on the plate. 

Food Lust People Love: This spicy lime peanut chicken recipe combines zesty lime juice with sweet and salty peanut butter to top boneless chicken breasts for a fabulously delicious main course.

Enjoy!

Food Lust People Love: This spicy lime peanut chicken recipe combines zesty lime juice with sweet and salty peanut butter to top boneless chicken breasts for a fabulously delicious main course.

This month my Foodie Extravaganza friends are sharing recipes with peanut butter in celebration of National Peanut Butter Lovers Month aka November. Many thanks to our host Rebekah of Making Miracles. Check out the recipe list below:


Foodie Extravaganza is where we celebrate obscure food holidays by cooking and baking together with the same ingredient or theme each month. Posting day is always the first Wednesday of each month. If you are a blogger and would like to join our group and blog along with us, come join our Facebook page Foodie Extravaganza. We would love to have you! If you're a spectator looking for delicious tid-bits check out our Foodie Extravaganza Pinterest Board

Pin this Spicy Lime Peanut Chicken! 

Food Lust People Love: This spicy lime peanut chicken recipe combines zesty lime juice with sweet and salty peanut butter to top boneless chicken breasts for a fabulously delicious main course.

 .

Friday, August 21, 2020

Camarones a la Diabla - Deviled Shrimp #FishFridayFoodies

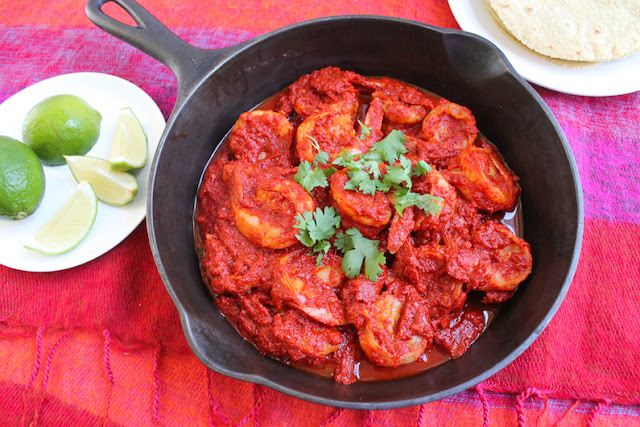
The wonderful bright sauce for Camarones a la Diabla or Deviled Shrimp is made with dried chili peppers, roma tomatoes, garlic and onions but the star of this dish is definitely the large flavorful shrimp. Serve with fresh corn tortillas as an appetizer or with rice as a main course.

Food Lust People Love: The wonderful bright sauce for Camarones a la Diabla or Deviled Shrimp is made with dried chili peppers, roma tomatoes, garlic and onions but the star of this dish is definitely the large flavorful shrimp. Serve with fresh corn tortillas as an appetizer or with rice as a main course.


Here in Texas we are big into Mexican food but frankly, much of it is what should properly called Tex-Mex and wouldn’t be recognized as Mexican food in its supposed country of origin. That’s why I was delighted when this month’s Fish Friday Foodies theme of Mexican seafood dishes was chosen. It’s always fun to explore new recipes and I rightly guessed that many I’d find on the internet were completely unfamiliar.

As with many regional dishes - this favorite is from the state of Veracruz, on the Gulf of Mexico coast - there seem to be as many camarones a la diabla recipes as there are Mexican mamás. Most use dried chili peppers and fresh tomatoes but sometimes chipotle peppers in adobo and roasted tomatoes are added and/or substituted.

I found them served with white rice, saffron rice, corn tortillas, avocados, limes and even fried platano, those lovely big bananas that turn super sweet when their skin is black and are wonderful for breakfast fried with butter.

I cooked fresh corn tortillas and served them with guacamole. Probably not traditional but they were delicious.

Camarones a la Diabla - Deviled Shrimp

I thought my Roma tomatoes, while quite lovely and ripe, were smaller than the ones I’m used to buying so I used four for this recipe. Come to find out, mine (at around 3 oz or 85g each) were in the medium range since Romas range in weight from 2-5 oz and 57-142g. Who knew? I give the exact weight I used below but know that a little more or less will still be delicious. My recipe is adapted from one on Isabel Eats.

Ingredients
8 dried guajillo chiles
3 dried chile de arbol chiles
4 Roma tomatoes (about 11 1/2 oz or 325g before coring)
2 cloves garlic
1/2 medium onion
1 teaspoon fine sea salt plus more as needed
1 teaspoon sugar
4 tablespoons olive oil
1 1/2 lbs or 680g frozen headless shrimp, peel on (about 20 large shrimp)
salt and pepper, to taste

To garnish: fresh cilantro
To serve: corn tortillas, limes and (not pictured) guacamole or see suggestions above.

Method
Set the shrimp in a colander in the sink or over a bowl to thaw and drain, preferably overnight in the refrigerator. If you don’t have time for this, run a little tap water over the shrimp to thaw them drain in the refrigerator while you make the sauce.

Once thawed and drained, peel and clean the shrimp but leave the tails on. Sprinkle with 1/2 teaspoon sea salt and refrigerate again until needed.


Meanwhile, remove the stems from your arbol chiles (the little ones) and remove the stems and seeds from the dried guajillos (the large ones.) I find the easiest way to deseed guajillos is to run a pair of scissors or a sharp knife up one side to open the pepper. The seeds fall out with hardly any effort.


Put the dried peppers in a heatproof bowl and cover them with boiling water. Set a plate on top to hold the heat in.  Set aside for 15 minutes or until the chiles have softened.


Remove the hard cores and chop your Roma tomatoes into large dice. Leave the seeds in; they add flavor.


Dice the onion and roughly chop the garlic.


Transfer the softened chiles with a pair of tongs to a large blender or a deep vessel suitable for a hand blender. Add the tomatoes, garlic, onion, salt and sugar along with 1/4 cup or 60ml of the soaking water. Puree until completely smooth.


Heat a large sauté pan or skillet over medium-high heat. Add the olive oil and shrimp. Cook shrimp for a minute or two per side, or until shrimp is lightly browned but not cooked through. You may have to do this in two batches as I did, to make sure you don’t crowd the pan. Remove the shrimp to a plate.


Add the red sauce to the pan. Cook for about 10-12 minutes over a medium low heat or until the mixture is thick and doesn’t taste as sharply of raw onion and garlic.


Add in the shrimp back to the pan and stir to coat the shrimp with the sauce.

Raise the heat and cook for 3 to 5 minutes, until the shrimp are cooked through and the sauce is really stuck to them. Taste and season with more salt, if necessary.

Food Lust People Love: The wonderful bright sauce for Camarones a la Diabla or Deviled Shrimp is made with dried chili peppers, roma tomatoes, garlic and onions but the star of this dish is definitely the large flavorful shrimp. Serve with fresh corn tortillas as an appetizer or with rice as a main course.


Remove the pan from the heat, garnish with cilantro if using and serve right away. The camarones a la diabla can also be refrigerated for a day and gently reheated in a pan in over a medium fire before serving.

Food Lust People Love: The wonderful bright sauce for Camarones a la Diabla or Deviled Shrimp is made with dried chili peppers, roma tomatoes, garlic and onions but the star of this dish is definitely the large flavorful shrimp. Serve with fresh corn tortillas as an appetizer or with rice as a main course.
Enjoy!

This month my Fish Friday Foodies friends are cooking Mexican seafood dishes at the instigation of our host Rebekah of Making Miracles. Check out all the great recipes below:


Are you a food blogger who would you like to join Fish Friday Foodies? We post and share new seafood/fish recipes on the third Friday of the month. To join our group please email Wendy at wendyklik1517 (at) gmail.com. Visit our Facebook page and Pinterest page for more wonderful fish and seafood recipe ideas.


Pin these Camarones a la Diabla - Deviled Shrimp!


Food Lust People Love: The wonderful bright sauce for Camarones a la Diabla or Deviled Shrimp is made with dried chili peppers, roma tomatoes, garlic and onions but the star of this dish is definitely the large flavorful shrimp. Serve with fresh corn tortillas as an appetizer or with rice as a main course.
 .