Showing posts with label #BreadBakers. Show all posts

Tuesday, October 10, 2023

Slow Rise Sourdough Baguettes

These slow rise sourdough baguettes are so flavorful that they just might be my favorite ever loaves. Slice and serve with butter. So good!

Food Lust People Love: These slow rise sourdough baguettes are so flavorful that they just might be my favorite ever loaves. Slice and serve with butter. So good!

This recipe is made in several easy steps and can take a couple of days but most of it is hands-off time. The dough is very forgiving so if you get busy and miss a pull and turn or leave it a bit longer in the refrigerator, no worries. Just pick up where you left off and it will be fine. 

We start by making the dough which spends the first overnight in the refrigerator then the next day, the sourdough starter is added, and you’ll pull and fold the dough a few times to build up the gluten. Then there’s a final night in the refrigerator before shaping and baking the baguettes on the third day. 

Slow Rise Sourdough Baguettes

This recipe is adapted from one on The Fresh Loaf. Mine didn’t turn out near as holey but the flavor is all there. 

Ingredients for two baguettes
3 2/3 cups or 455g strong white bread flour
1 1/3 cups or 320ml cold water
2/3 cup or 160g 100% hydration starter (fed equal parts water and flour by weight)
2 teaspoons fine sea salt 

Method
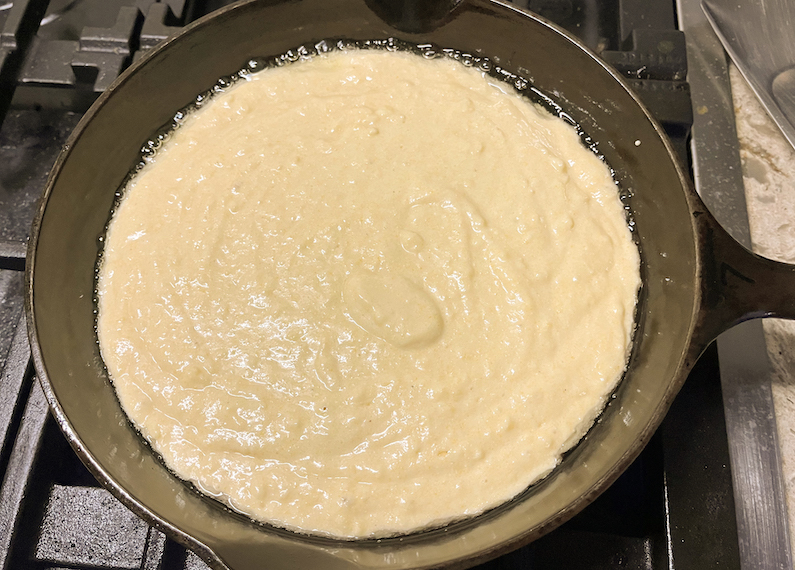
Mix the flour and cold water together to form a soft dough. 


Put it in a bowl and cover that with cling film. Refrigerate for 12-24 hours. Mine went in at 2:40 p.m. on day 1.

On day 2, using your clean hands, mix the sourdough starter and salt into the dough until it’s evenly distributed. 


I did this step at 11:40 a.m. that day so my dough was in the refrigerator for about 21 hours. 

Leave the dough out, the bowl covered with cling film, at room temp (70 to 75°F or 21 to 24°C) for about three hours until it grows about 1/3 in volume. 

Stretch and fold it every half hour or so to develop the gluten. (I set a timer to remind myself. You might want to do the same.) If your kitchen is too cool, find a warmer place to set the dough.


When the three hours are up, put the covered dough bowl back in the refrigerator for another overnight stay. Mine went back in the fridge a few minutes after the three-hour rise time was up, so around 2:50 p.m.

On day three, when you are ready to bake, take the dough out of the refrigerator. If it has not doubled or nearly doubled, give it more time to rise at room temperature. Mine was just about doubled that morning around 8 a.m. but I left it out for two hours to warm up. 


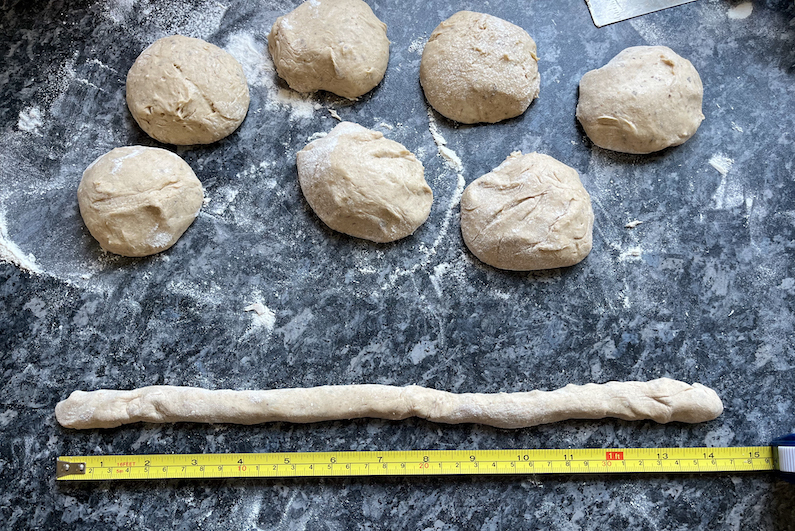
After your dough is sufficiently risen, divide it into two equal balls and and rest them for 40 minutes. 


Shape the dough into baguettes using this method here from King Arthur Flour: https://youtu.be/IRDL3lPQSkc

Proof for 24-28 minutes, then score deeply with a sharp knife or lame. Again, I offer you a King Arthur Flour video for method: https://youtu.be/ZaLnzomvEF8 Even after watching that a bunch of times, I still didn’t cut as deeply as I should have! 


During that last proof, preheat your oven to 450°F or 232°C with an iron skillet, if you have one, or another baking pan, if you don’t, on the bottom of the oven. 

Put the baguettes into the preheated oven bake and quickly add boiling water to the skillet on the bottom. Close the oven door immediately to keep in the steam. 

Bake the baguettes for about 25 minutes or until golden brown and well risen. 


Remove from the oven and leave to cool on a wire rack. 


When cool, slice to serve. 

Food Lust People Love: These slow rise sourdough baguettes are so flavorful that they just might be my favorite ever loaves. Slice and serve with butter. So good!

Food Lust People Love: These slow rise sourdough baguettes are so flavorful that they just might be my favorite ever loaves. Slice and serve with butter. So good!

Enjoy! 

It's the second Tuesday of the month so that means it's Bread Bakers time! Many thanks to our host, Renu of Cook with Renu. Check out the recipe links we are sharing below:

#BreadBakers is a group of bread loving bakers who get together once a month to bake bread with a common ingredient or theme. Follow our Pinterest board right here. Links are also updated each month on this home page. We take turns hosting each month and choosing the theme/ingredient.


Pin these Slow Rise Sourdough Baguettes!

Food Lust People Love: These slow rise sourdough baguettes are so flavorful that they just might be my favorite ever loaves. Slice and serve with butter. So good!

 .

Tuesday, August 8, 2023

Oatmeal Raisin Gluten-free Quick Bread

This oatmeal raisin gluten-free quick bread is made with oat flour and a bread flour mix for a light loaf that is great as is and even better toasted.

Food Lust People Love: This oatmeal raisin gluten-free quick bread is made with oat flour and a bread flour mix for a light loaf that is great as is and even better toasted.

If you search the internet for gluten-free flour mixes, there are countless recipes to combine at home. I’ve had really good luck though with the store-bought combos. Gluten-free bread flour mixes tend to have additives like xanthan gum which saves you from buying an extra ingredient so that’s what I used for this loaf. 

Oatmeal Raisin Gluten-free Quick Bread

If your family isn’t crazy about raisins, by all means substitute chocolate chips instead. I made my own oat flour by whizzing the required weight of oats in my small food processor. It worked great so I don’t hesitate to recommend you do the same. Note that your oven will start at a higher temperature for the first 10 minutes, then you’ll turn it down. 

Ingredients
1 ⅜ cups or 193g all-purpose gluten free flour blend 
¾ cup or 150g granulated sugar
⅝ cup or 75g certified gluten free oat flour (See note above.)
⅜ cup or 54g cornstarch
½ cup or 50g certified gluten free oatmeal, divided
2 teaspoons baking powder
¾ teaspoon xanthan gum (omit if your blend already contains it)
¾ teaspoon baking soda
½ teaspoon fine sea salt
1/2 cup or 75g raisins
1 cup or 245g plain yogurt, at room temperature
6 tablespoons or 84g unsalted butter, melted and cooled
2 eggs at room temperature
1 teaspoon vanilla extract

Method
Preheat your oven to 375°F or 190°C. Grease well an 8.5-inch x 4.5-inch loaf pan, then line it with some parchment paper. Set it aside.

In a large bowl, place the flour blend, sugar, oat flour, cornstarch, oat flour, baking powder, xanthan gum (if needed), baking soda and salt. Separate out a couple of tablespoons of the oats to use for decoration then add the rest to the bowl. Whisk to combine well.


Rinse and drain the raisins. Add them to the flour mixture and stir to coat. 


In another bowl, whisk together the yogurt, butter and eggs. 

Create a well in the center of the dry ingredients, and add the beaten wet ingredients.


Fold until just combined but no dry ingredients should be showing. 


Spoon the batter into the prepared baking pan and smooth the top. Sprinkle on some of the reserved oats. Wet a spatula and score the top of the loaf down the middle. Finish with the rest of the reserved oats. 


Place the pan in the center of the preheated oven and bake for 10 minutes.

Reduce the oven temperature to 350°F or 180°C and continue to bake for another 45 to 50 minutes, or until the top of the loaf springs back when pressed lightly and a toothpick inserted in the center comes out with, at most, a few moist crumbs attached.

If the top starts to brown too much, cover it lightly with foil for the remainder of the cooking time. 

Remove the loaf from the oven and allow to cool in the loaf pan for 15 minutes before transferring to a wire rack to cool completely. 

Food Lust People Love: This oatmeal raisin gluten-free quick bread is made with oat flour and a bread flour mix for a light loaf that is great as is and even better toasted.

Slice to serve either plain or toasted. 

Food Lust People Love: This oatmeal raisin gluten-free quick bread is made with oat flour and a bread flour mix for a light loaf that is great as is and even better toasted.

Enjoy! 

It’s the second Tuesday of the month and in my world that means it’s time for my Bread Bakers to get together and share recipes. Our theme today is gluten-free bread. Check out the links below. Many thanks to our host, Sneha of Sneha’s Recipe. 


#BreadBakers is a group of bread loving bakers who get together once a month to bake bread with a common ingredient or theme. Follow our Pinterest board right here. Links are also updated each month on this home page. We take turns hosting each month and choosing the theme/ingredient.


Pin this Oatmeal Raisin Gluten-free Quick Bread! 

Food Lust People Love: This oatmeal raisin gluten-free quick bread is made with oat flour and a bread flour mix for a light loaf that is great as is and even better toasted.

 .

Tuesday, June 13, 2023

Overnight Sourdough Cinnamon Waffles #BreadBakers

While the sourdough starter in these overnight sourdough cinnamon waffles adds flavor, the addition of buttermilk and baking soda makes them fluffy and light. 

Food Lust People Love: While the sourdough starter in these overnight sourdough cinnamon waffles adds flavor, the addition of buttermilk and baking soda makes them fluffy and light.

Since we got back to Jersey a couple of months ago, I’ve nursed my sourdough starter back to robust good health and have enjoyed using it in a number of baked treats like sourdough baguettes, rolls and muffins. 

Since it survived the several months of abandonment, I decided it finally deserved a name so it was duly christened Jane Dough. The quart jar sports a label now with her name.

Jane is the most forgiving of souls. She lives in the refrigerator most of the time, but when I know I’m going to need her good services, she has place of pride on the countertop where she gets a decent meal (100 percent hydration which means 50g water and 50g flour, stir well) and sits out for a night. If it’s chilly, I warm her up by sitting her jar in a bowl of warm water first. 

Overnight Sourdough Cinnamon Waffles

This recipe is adapted from one on the King Arthur Baking website. They used sourdough discard but I decided to feed Jane Dough up the day before instead because she was getting low and the half cup would have been a lot to use, leaving her dangerously small. If you have enough discard, certainly use it. 

Ingredients - makes 8 square Belgian waffles
For the overnight sponge: 
1/2 cup or 113g sourdough starter (fed or unfed)
1 cup or 125g flour
1 cup or 240ml buttermilk
1 tablespoon sugar

For the batter:
all of the overnight sponge
1 large egg
2 tablespoons canola or other light oil
1 teaspoon ground cinnamon 
1/2 teaspoon baking soda
Scant 1/2 teaspoon salt

Method
To make the overnight sponge, stir down your starter, and remove 1/2 cup or 113g. In a large bowl, whisk together the starter, flour, buttermilk and sugar, 


Cover with cling film and leave rest at cool room temperature (about 65°F to 70°F) for about 12 hours, or overnight.

The next morning, beat the egg and oil together in a small bowl. As you can see off to the left, Jane Dough has done some good work overnight. Bubbling along nicely. 


Add it to the overnight sponge, stirring just to combine.


Add in the cinnamon, salt and baking soda and fold well to combine. 


To make the waffles: Pour the batter onto your preheated, greased waffle iron, and bake according to the manufacturer's instructions. 


Repeat with the remaining batter.


If you like crunchy waffles, I suggest serving them immediately. You can hold them in a warm oven till they are all baked but they do lose some of their crispness then. 

Food Lust People Love: While the sourdough starter in these overnight sourdough cinnamon waffles adds flavor, the addition of buttermilk and baking soda makes them fluffy and light.

Serve with a generous smear of softened butter and lashings of syrup. 

Food Lust People Love: While the sourdough starter in these overnight sourdough cinnamon waffles adds flavor, the addition of buttermilk and baking soda makes them fluffy and light.

Enjoy! 

It’s the second Tuesday of the month so that means it Bread Baker day! We are sharing recipes for breads with spices. Many thanks to our host, Swathi of Zesty South Indian Kitchen. Check out all the links here: 

#BreadBakers is a group of bread loving bakers who get together once a month to bake bread with a common ingredient or theme. Follow our Pinterest board right here. Links are also updated each month on this home page. We take turns hosting each month and choosing the theme/ingredient.


Pin these Overnight Sourdough Cinnamon Waffles!

Food Lust People Love: While the sourdough starter in these overnight sourdough cinnamon waffles adds flavor, the addition of buttermilk and baking soda makes them fluffy and light.

 .

Tuesday, May 9, 2023

Cheesy Skillet Cornbread #BreadBakers

This cheesy skillet cornbread has a crunchy bottom and a tender cheesy crumb. It is the perfect accompaniment to your favorite soup or barbecue meal!

Food Lust People Love: This cheesy skillet cornbread has a crunchy bottom and a tender cheesy crumb. It is the perfect accompaniment to your favorite soup or barbecue meal!

This month for our Bread Bakers event, we are sharing breads that are great for cookouts and barbecues. Cornbread is a popular choice, especially in the south because it’s delicious and so easy to make. Serve it with butter to slather on and watch it disappear. 

Cheesy Skillet Cornbread 

This is essentially my mom’s cornbread recipe, just with the addition of cheese. She always heats the oil in the pan first to help create the crunchy crust we all love. Use an iron skillet for best results. 

Ingredients
1 cup or 150g yellow cornmeal (aka fine polenta)
1 cup or 125g all-purpose flour
2 tablespoons sugar
4 teaspoons baking powder
1/4 teaspoon fine sea salt
6 oz or 170g extra sharp cheddar, grated
1 cup or 240ml milk, sometimes I will add a tiny bit more milk if I find it too thick
1 egg
1/4 cup or 60ml canola oil, plus extra for the skillet

Equipment: a 10 in or 25cm well-seasoned iron skillet

Method
Preheat your oven to 425°F or 218°C.  

In a large bowl, combine cornmeal, flour, sugar, baking powder and salt. 


Add in the grated cheddar and stir so the cheese is coated.


Add milk, egg and oil. Beat until fairly smooth, about one minute. Scrape bottom and sides well. 


Coat the bottom of your small skillet with oil. Heat it on the stovetop till just smoking then pour the batter in it and put it in the oven.


Bake for 20-23 minutes or until the lightly browned on top. You can insert a toothpick in the middle to test for doneness. 

Food Lust People Love: This cheesy skillet cornbread has a crunchy bottom and a tender cheesy crumb. It is the perfect accompaniment to your favorite soup or barbecue meal!

Remove from the oven when golden on top and leave to cool for a few minutes before cutting it into wedges to serve. 

Food Lust People Love: This cheesy skillet cornbread has a crunchy bottom and a tender cheesy crumb. It is the perfect accompaniment to your favorite soup or barbecue meal!

Enjoy! 

Check out the great recipes my fellow Bread Bakers are sharing for your barbecue below. Many thanks to our host, Wendy of A Day in the Life on the Farm. 


#BreadBakers is a group of bread loving bakers who get together once a month to bake bread with a common ingredient or theme. Follow our Pinterest board right here. Links are also updated each month on this home page. We take turns hosting each month and choosing the theme/ingredient.

Pin this Cheesy Skillet Cornbread!

Food Lust People Love: This cheesy skillet cornbread has a crunchy bottom and a tender cheesy crumb. It is the perfect accompaniment to your favorite soup or barbecue meal!

.
 

Tuesday, April 11, 2023

Mixed Mushroom Soft Bread Sticks #BreadBakers

These mixed mushroom soft bread sticks are flavored with dried mushrooms, ground to a powder. They impart a hint of umami that complements the garlic. 

Food Lust People Love: These mixed mushroom soft bread sticks are flavored with dried mushrooms, ground to a powder. They impart a hint of umami that complements the garlic.

When our Bread Bakers host for April picked “mushrooms” for our theme, I debated about what to make. First thoughts were 1. either something with mushrooms as an ingredient or 2. with mushrooms as a topping. 

But as I started to explore my options, I came across a site selling mushroom powder and was intrigued. I have Trader Joe’s Umami Seasoning in the cupboard which contains both porcini and white mushroom powder, along with a few other seasonings. It’s great sprinkled on almost anything savory. 

Since I always have dried mushrooms in the pantry, I decided I’d make my own mushroom powder and incorporate it in a bread stick recipe. While I did have a bag of just shiitakes, the mixed bag seemed like a better idea for depth of flavor. 

Mixed Mushroom Soft Bread Sticks

This recipe is adapted from one on Woodland Foods, where they also sell dried mushroom powder, if you can't be bothered to make your own. It makes eight long bread sticks but if you prefer, you can divide them in half to make 16 shorter ones. 

Ingredients
1 cup or 240ml warm water, divided
1 rounded teaspoon active dry yeast
2  2/3 cups or 332g flour, plus extra for dusting
1/4 oz or 7g mixed dried mushrooms (or any single variety)
4 tablespoons unsalted butter, softened, divided
1 tablespoon sugar
1 1/2 teaspoons fine sea salt
1 small clove garlic, mashed and minced

Optional for finishing: Extra melted butter and flakey sea salt. 

Method
Brush the dried mushrooms with a clean, dry brush to remove any dirt or dust. 
Use a spice grinder to grind the mushrooms to a powder. I use a coffee bean grinder that I reserve for only spices which works great. 


Place 1/4 cup warm water and the sugar in the bowl of your stand mixer. Sprinkle in yeast and set aside until foamy, about 5 minutes.

Assuming your yeast has bubbled up and is active, add in the flour, 2 tablespoons of the butter, 1 teaspoon of the salt, 3/4 cup or 180ml of water and most of the ground mushrooms, leaving a half teaspoon or so for brushing on with butter before baking. 


Mix with paddle attachment until a slightly sticky dough forms.


Switch to the dough hook and knead until the dough is very smooth and soft, about five minutes. 


Turn the dough out only a floured surface. Cut it into eight equal pieces and roll them each into a ball. Roll the balls out into 14-inch or 35cm long bread sticks. 


I’m lazy so I kept mine long so that I didn’t have to leave space between the end of the bread sticks which would probably meant having to bake them in two batches. 
 
As you roll them out, arrange the bread sticks on a parchment-lined baking sheet. Cover with cloth or cling film, and let rise in warm spot until almost doubled.
 

Preheat your oven to 400°F or 200°C.

Melt the remaining butter. Mix the melted butter with the remaining ground mushrooms and 1/2 teaspoon salt.


Brush the mixture onto the bread sticks.


Bake the bread sticks in the preheated oven until golden, about 13-15 minutes.

Food Lust People Love: These mixed mushroom soft bread sticks are flavored with dried mushrooms, ground to a powder. They impart a hint of umami that complements the garlic.

If desired, brush the breadsticks with a little extra melted butter and sprinkle with flakey sea salt. 

Food Lust People Love: These mixed mushroom soft bread sticks are flavored with dried mushrooms, ground to a powder. They impart a hint of umami that complements the garlic.

Enjoy warm or at room temperature. 

My taste testers all agreed that while the mushroom flavor wasn’t prominent, the mushroom powder definitely added umami to the bread sticks. 

Food Lust People Love: These mixed mushroom soft bread sticks are flavored with dried mushrooms, ground to a powder. They impart a hint of umami that complements the garlic.

Enjoy! 

It’s the second Tuesday of the month so that means it’s Bread Baker time! Check out mushroom recipes we are sharing below. Many thanks to our host, Sue of Palatable Pastime. 
  • Pepperoni and Mushroom Pan Pizza from Karen’s Kitchen Stories
  • Cheesy Mushroom Calzone from Sneha’s Recipe
  • Wild Mushroom Flatbread from A Day in the Life on the Farm
  • Mushroom Swiss Bread from Palatable Pastime
  • Mixed Mushroom Soft Bread Sticks from Food Lust People Love
  • Porcini Swirl Bread from A Messy Kitchen

  • #BreadBakers is a group of bread loving bakers who get together once a month to bake bread with a common ingredient or theme. Follow our Pinterest board right here. Links are also updated each month on this home page. We take turns hosting each month and choosing the theme/ingredient.


    Pin these Mixed Mushroom Soft Bread Sticks! 

    Food Lust People Love: These mixed mushroom soft bread sticks are flavored with dried mushrooms, ground to a powder. They impart a hint of umami that complements the garlic.

     .

    Tuesday, March 14, 2023

    French Onion Soup Rolls #BreadBakers

    These French onion soup rolls have all the flavor of French onion soup in bread form! They are a great snack or accompaniment to any soup or stew. Or split them like a bun to use them for special sandwiches. The cheesy onion "jam" inside is fabulous.

    Food Lust People Love: These French onion soup rolls have all the flavor of French onion soup in bread form! They are a great snack or accompaniment to any soup or stew. Or split them like a bun to use them for special sandwiches. The cheesy onion "jam" inside is fabulous.

    Who doesn’t love a hot bowl of French onion soup, topped with crusty bread and melted cheese? I know it’s one of our favorites to eat at home and certainly to order in any French bistro. 

    When this month’s Bread Baker’s host decided on the allium family as our theme for today’s event, I had what I thought was the brilliant and unusual idea of turning the flavors of French onion soup into a yeasty bread. Initially I was going to make a rolled loaf filled with cheese and caramelized onions but, as it turns out, my idea wasn’t so unusual. 

    There are lots of recipes for French onion soup flavored bread! Who knew? The one I ended up adapting was for stuffed rolls and I must say, they are delicious! We ate them plain, with sliced corned beef roast and, one morning, I even made a fried egg sandwich with one. So good! 

    French Onion Soup Rolls

    This recipe is adapted by one from A Cozy Kitchen. The original makes a 9x13 pan full so I halved the recipe and also changed up the method. The rolls bake up fluffy and soft!

    Ingredients
    For the dough:
    2/3 cup or 157ml milk, lukewarm
    2 teaspoons sugar
    2 1/4 teaspoons or 7 grams active dry yeast 
    2 1/4 cups or 281g all-purpose flour
    1/2 teaspoon fine sea salt
    2 tablespoons unsalted butter (melted and cooled), plus extra for the baking pan
    1 large egg
    1 teaspoon olive oil for the dough bowl

    For the caramelized onions:
    1 tablespoon unsalted butter
    2 large sweet onions, peeled and thinly sliced (I used a mandoline!)
    Leaves from 2-3 sprigs fresh thyme
    Fine sea salt

    For the rolls:
    3 oz or 85g gruyere or cheddar cheese, grated 
    Fresh thyme leaves for garnish

    Method
    Butter a 9x9 in or 23x23cm baking pan. Add the yeast and sugar to the warm milk and set aside to proof for about five minutes. The yeast should get bubbly. If it does not, you need to buy new yeast and start over. 


    Mix together the flour, milk/yeast mixture, melted butter and salt in the bowl of your stand-up mixer (with the hook attachment.)
     

    Add the egg to the flour mixture and knead with the mixer on medium speed for about 5 to 7 minutes, until smooth and elastic.


    Rub a medium bowl with the teaspoon of olive oil and transfer the soft, wet dough to the bowl. 


    Cover it with cling film and leave to rise for 30-40 minutes. (If your kitchen is cold, as mine is right now, you can put the dough bowl in another bowl or your sink filled with warm water.)

    While the dough is rising, we’ll caramelize the onions. Add the butter to a wide-rimmed pan set over medium heat and add the sliced onions, thyme, and season lightly with salt.  


    Reduce the heat to medium-low, add a tablespoon or two of water and cover the pan for 15 minutes to soften the onions.

    Remove the lid and stir every few minutes, until the onions are caramelized. I kept the fire pretty low so mine took quite a while. 


    A higher flame will caramelize the onions faster but you really have to be stirring a lot to make sure they don't scorch. Remove the onions from the heat and transfer them to a plate, spread out to cool. 

    Punch down the dough. 


    Divide it into 9 equal pieces and roll them into balls. If you want them to be the same exact size, you can weigh them out. Each piece of dough should weigh around 58 grams.


    On your plate, divide the caramelized onions into 9 equal portions. Using HALF of the grated cheese, top each portion of caramelized onions with about 1/9 of the cheese. 


    Use your hands to press each dough ball into a circle and put the onion/cheese mixture in the middle. 


    Pinch up the sides to securely close the dough around the mixture. 


    Place the ball, seam down, in your buttered pan and repeat with the remaining dough balls.


    Cover the baking pan with a cling film and let the rolls proof for about 1 to 1 1/2 hours. The rolls should at least double in size.

    When your rolls are almost finished the second rise, preheat your oven to 350°F or 180°C. Sprinkle on the remaining grated cheese and fresh thyme leaves. 


    Bake the rolls in your preheated oven until golden brown, about 25 to 30 minutes. 

    Food Lust People Love: These French onion soup rolls have all the flavor of French onion soup in bread form! They are a great snack or accompaniment to any soup or stew. Or split them like a bun to use them for special sandwiches. The cheesy onion "jam" inside is fabulous.

    Enjoy! 

    Food Lust People Love: These French onion soup rolls have all the flavor of French onion soup in bread form! They are a great snack or accompaniment to any soup or stew. Or split them like a bun to use them for special sandwiches. The cheesy onion "jam" inside is fabulous.

    As I mentioned above, it’s Bread Baker day and our theme is the allium family with includes onions, garlic, leeks and, believe it or not, about 920 species in all!  Many thanks to our host, Karen of Karen’s Kitchen Stories! Check out the list of lovely breads below: 


    #BreadBakers is a group of bread loving bakers who get together once a month to bake bread with a common ingredient or theme. Follow our Pinterest board right here. Links are also updated each month on this home page. We take turns hosting each month and choosing the theme/ingredient.


    Pin these French Onion Soup Rolls!

    Food Lust People Love: These French onion soup rolls have all the flavor of French onion soup in bread form! They are a great snack or accompaniment to any soup or stew. Or split them like a bun to use them for special sandwiches. The cheesy onion "jam" inside is fabulous.

     .