Showing posts with label onion recipes. Show all posts

Tuesday, March 14, 2023

French Onion Soup Rolls #BreadBakers

These French onion soup rolls have all the flavor of French onion soup in bread form! They are a great snack or accompaniment to any soup or stew. Or split them like a bun to use them for special sandwiches. The cheesy onion "jam" inside is fabulous.

Food Lust People Love: These French onion soup rolls have all the flavor of French onion soup in bread form! They are a great snack or accompaniment to any soup or stew. Or split them like a bun to use them for special sandwiches. The cheesy onion "jam" inside is fabulous.

Who doesn’t love a hot bowl of French onion soup, topped with crusty bread and melted cheese? I know it’s one of our favorites to eat at home and certainly to order in any French bistro. 

When this month’s Bread Baker’s host decided on the allium family as our theme for today’s event, I had what I thought was the brilliant and unusual idea of turning the flavors of French onion soup into a yeasty bread. Initially I was going to make a rolled loaf filled with cheese and caramelized onions but, as it turns out, my idea wasn’t so unusual. 

There are lots of recipes for French onion soup flavored bread! Who knew? The one I ended up adapting was for stuffed rolls and I must say, they are delicious! We ate them plain, with sliced corned beef roast and, one morning, I even made a fried egg sandwich with one. So good! 

French Onion Soup Rolls

This recipe is adapted by one from A Cozy Kitchen. The original makes a 9x13 pan full so I halved the recipe and also changed up the method. The rolls bake up fluffy and soft!

Ingredients
For the dough:
2/3 cup or 157ml milk, lukewarm
2 teaspoons sugar
2 1/4 teaspoons or 7 grams active dry yeast 
2 1/4 cups or 281g all-purpose flour
1/2 teaspoon fine sea salt
2 tablespoons unsalted butter (melted and cooled), plus extra for the baking pan
1 large egg
1 teaspoon olive oil for the dough bowl

For the caramelized onions:
1 tablespoon unsalted butter
2 large sweet onions, peeled and thinly sliced (I used a mandoline!)
Leaves from 2-3 sprigs fresh thyme
Fine sea salt

For the rolls:
3 oz or 85g gruyere or cheddar cheese, grated 
Fresh thyme leaves for garnish

Method
Butter a 9x9 in or 23x23cm baking pan. Add the yeast and sugar to the warm milk and set aside to proof for about five minutes. The yeast should get bubbly. If it does not, you need to buy new yeast and start over. 


Mix together the flour, milk/yeast mixture, melted butter and salt in the bowl of your stand-up mixer (with the hook attachment.)
 

Add the egg to the flour mixture and knead with the mixer on medium speed for about 5 to 7 minutes, until smooth and elastic.


Rub a medium bowl with the teaspoon of olive oil and transfer the soft, wet dough to the bowl. 


Cover it with cling film and leave to rise for 30-40 minutes. (If your kitchen is cold, as mine is right now, you can put the dough bowl in another bowl or your sink filled with warm water.)

While the dough is rising, we’ll caramelize the onions. Add the butter to a wide-rimmed pan set over medium heat and add the sliced onions, thyme, and season lightly with salt.  


Reduce the heat to medium-low, add a tablespoon or two of water and cover the pan for 15 minutes to soften the onions.

Remove the lid and stir every few minutes, until the onions are caramelized. I kept the fire pretty low so mine took quite a while. 


A higher flame will caramelize the onions faster but you really have to be stirring a lot to make sure they don't scorch. Remove the onions from the heat and transfer them to a plate, spread out to cool. 

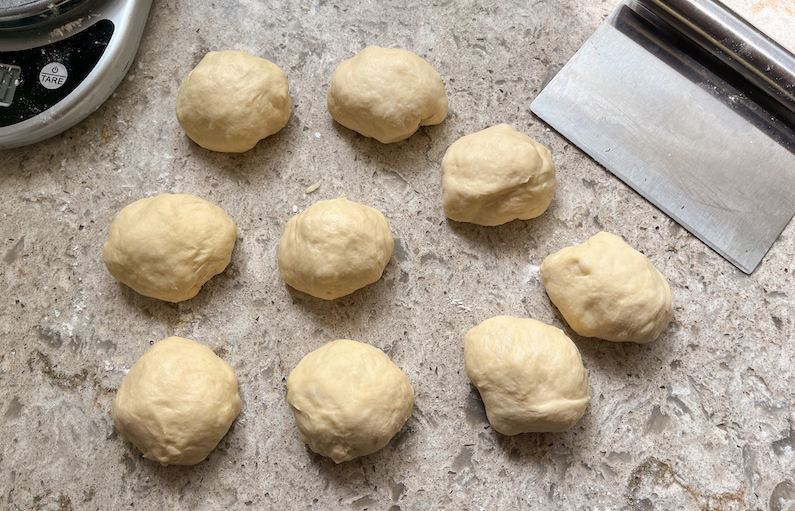
Punch down the dough. 


Divide it into 9 equal pieces and roll them into balls. If you want them to be the same exact size, you can weigh them out. Each piece of dough should weigh around 58 grams.


On your plate, divide the caramelized onions into 9 equal portions. Using HALF of the grated cheese, top each portion of caramelized onions with about 1/9 of the cheese. 


Use your hands to press each dough ball into a circle and put the onion/cheese mixture in the middle. 


Pinch up the sides to securely close the dough around the mixture. 


Place the ball, seam down, in your buttered pan and repeat with the remaining dough balls.


Cover the baking pan with a cling film and let the rolls proof for about 1 to 1 1/2 hours. The rolls should at least double in size.

When your rolls are almost finished the second rise, preheat your oven to 350°F or 180°C. Sprinkle on the remaining grated cheese and fresh thyme leaves. 


Bake the rolls in your preheated oven until golden brown, about 25 to 30 minutes. 

Food Lust People Love: These French onion soup rolls have all the flavor of French onion soup in bread form! They are a great snack or accompaniment to any soup or stew. Or split them like a bun to use them for special sandwiches. The cheesy onion "jam" inside is fabulous.

Enjoy! 

Food Lust People Love: These French onion soup rolls have all the flavor of French onion soup in bread form! They are a great snack or accompaniment to any soup or stew. Or split them like a bun to use them for special sandwiches. The cheesy onion "jam" inside is fabulous.

As I mentioned above, it’s Bread Baker day and our theme is the allium family with includes onions, garlic, leeks and, believe it or not, about 920 species in all!  Many thanks to our host, Karen of Karen’s Kitchen Stories! Check out the list of lovely breads below: 


#BreadBakers is a group of bread loving bakers who get together once a month to bake bread with a common ingredient or theme. Follow our Pinterest board right here. Links are also updated each month on this home page. We take turns hosting each month and choosing the theme/ingredient.


Pin these French Onion Soup Rolls!

Food Lust People Love: These French onion soup rolls have all the flavor of French onion soup in bread form! They are a great snack or accompaniment to any soup or stew. Or split them like a bun to use them for special sandwiches. The cheesy onion "jam" inside is fabulous.

 .

Wednesday, July 7, 2021

Homemade Pub-Style Pickled Onions

Homemade pub-style pickled onions are easy to make, crunchy and sour with a hint of sweetness, perfect with sharp cheddar cheese or in a dirty martini. 

Food Lust People Love: Homemade pub-style pickled onions are easy to make, crunchy and sour with a hint of sweetness, perfect with sharp cheddar cheese or in a dirty or dry martini.

Any pub in the UK worth its salt will have jars of pickled onions to serve with a ploughman’s lunch of cheese, bread and ham. The better ones will offer you pickled onions they’ve made themselves. Honestly, it’s so easy, they really all should. 

The only fiddly thing is peeling the tiny onions and that is made easier by covering them in boiling water and then refreshing them in iced water. The skins just slip right off. Save them to throw in your next stockpot so they don’t go to waste. 

Homemade Pub-Style Pickled Onions

Ideally, you should make this using genuine Sarson’s Malt Vinegar or, failing that here in the States, at least make sure you use malt vinegar. This recipe is adapted from one on the Sarson’s website.

Ingredients
2 cups or 475ml malt vinegar
1 lb or 450g small pickling onions 
2 tablespoons fine sea salt
1/2 cup or 100g granulated sugar
10 peppercorns
2 teaspoons mustard seeds
1 teaspoons coriander seeds 
2 bay leaves

Method
Put the onions in a large heatproof bowl. Cover them with boiling water and stir for about 30 seconds. Drain them in a colander them return them to the bowl and cover with iced water. Drain again. 


To peel them cut off the stem end and squeeze the little onion out of its peel. Or if you tend to lose another layer of onion this way, you can cut off both end and use a sharp knife to remove the skins. 


Once the onions are peeled, put them in non-reactive bowl and sprinkle them with the salt. Cover the bowl with a upturn plate or some cling film and leave overnight or up to 24 hours. When you think about it, give the onions a good shake to make sure they are all equally as salted.


Meanwhile pour the vinegar and sugar into a large saucepan with the peppercorns, mustard seeds and bay leaves. My bay leaves are fresh but you can certainly use dried ones. The Sarson recipe didn't specify. 


Put the lid on the pan, bring to the boil then remove from the heat and set aside to allow the spices to infuse.


The following day rinse the onions with cool running water and then pat them dry.

Pack the onions into a sterilized 20 oz or 600ml jar with the bay leaves. 


Pour over the vinegar, along with the mustard, peppercorns and coriander. Completely cover the onions with the liquid. Seal and leave to pickle in a cool place for 6 weeks. Since it’s a warm summer where I am right now, I left mine to pickle in the kitchen for three days and then refrigerated the jar for the rest of the time. 

Food Lust People Love: Homemade pub-style pickled onions are easy to make, crunchy and sour with a hint of sweetness, perfect with sharp cheddar cheese or in a dirty or dry martini.

Enjoy these pub-style pickled onions with cheddar and ham or in a dry martini. 

It’s the first Wednesday of the month and that means it’s time for our Foodie Extravaganza party. This month we are celebrating National Pickle Month. Check out of the great pickle recipes below. Many thanks to our host, Camilla of Culinary Adventures with Camilla


Foodie Extravaganza is where we celebrate obscure food holidays by cooking and baking together with the same ingredient or theme each month. Posting day is always the first Wednesday of each month. If you are a blogger and would like to join our group and blog along with us, come join our Facebook page Foodie Extravaganza. We would love to have you! If you're a spectator looking for delicious tid-bits check out our Foodie Extravaganza Pinterest Board.

Pin these Homemade Pub-Style Pickled Onions!

Food Lust People Love: Homemade pub-style pickled onions are easy to make, crunchy and sour with a hint of sweetness, perfect with sharp cheddar cheese or in a dirty or dry martini.
 .

Monday, August 10, 2020

Pissaladière - Bacon Onion Anchovy Olive Tart

This pissaladière or, to give it a much more descriptive name in English, Bacon Onion Anchovy Olive Tart is baked with a non-traditional sourdough crust. The bacon, anchovies and olives are beautifully salty, perfect atop the sweet onions. A square or two of pissaladière makes a great appetizer or anytime snack. If you don’t have time for all the rising and resting time necessary, feel free to substitute your favorite pizza dough instead.

Food Lust People Love: This pissaladière or, to give it a much more descriptive name in English, Bacon Onion Anchovy Olive Tart is baked with a non-traditional sourdough crust. The bacon, anchovies and olives are beautifully salty, perfect atop the sweet onions. A square or two of pissaladière makes a great appetizer or anytime snack. If you don’t have time for all the rising and resting time necessary, feel free to substitute your favorite pizza dough instead.


Pissaladière is originally a traditional Liguria dish that made its way over to southeastern France and found a new home. Such a firm home that I was convinced that it was all French when we lived in Paris. Pissaladière was initially made with a spiced anchovy paste called pissalat but recipes commonly found on the web these days use whole anchovies instead and occasionally introduce another non-original topping, lardons, which are small pieces of smoked bacon.

The base can be made either a yeast dough or with a nod to the French influence, sometimes a pastry crust or even puff pastry. In the past, I’ve made round pissaladières for family dinners but in bakeries all across France it is sold as a popular snack cut into squares, so this time I decided to go rectangular.

I will tell you that it is excellent with a glass of something bright and sparkling or even a cold beer.

Pissaladière - Bacon Onion Anchovy Olive Tart

This recipe was adapted from one on Journal Des Femmes, for the toppings that is. The crust for the bottom was adapted from the recipe for focaccia integrale from James Morton’s new cookbook, Super Sourdough, which is AH-MAZING. < affiliate link. Take your sourdough starter out of the fridge at least 8–14 hours before you want to bake. If it hasn’t been fed recently, give it a feed when you take it out. As I mentioned above though, you can also substitute your favorite pizza dough if you aren’t into sourdough but it won’t be the same!

Ingredients
For the base:
5 1/3 oz (by weight, not fl oz) or 150g rye or wholemeal (wholewheat) sourdough starter
3 1/3 cups or 425g strong white (bread) flour
1 1/2 scant teaspoons or 8g table salt
1 1/2 cups or 350g tepid-warm water (about 77°F or 25°C)
1/2 cup or 100g good-quality extra virgin olive oil, plus extra for oiling and drizzling

For the toppings:
1/4 teaspoon salt
2.2 lbs or 1 kg onions
6 tablespoons olive oil
several sprigs fresh thyme
1 can (2 oz or 56g) anchovy fillets, salt cured, in olive oil
20 black oil cured olives (about 60g whole)
1/2 cup or 60g bacon crumbles

Method
James Morton’s sourdough focaccia requires a lot of rising time so you’ll either want to start super early in the day or take his recommendation to leave it overnight in the refrigerator for the second rise. That way you can bake whenever you are ready the next day, simply taking the dough out with enough time for it to come to room temperature again and finish rising before topping and baking.

Let’s get started. In a large bowl, weigh your flour and salt, mixing them both together well. Pour in your sourdough starter along with the tepid water. Mix everything until you have a very wet dough.


You can use a wooden spoon or stiff spatula but a friend recently gave me a Danish whisk and it is a great tool for this! (Am I the only one who had never heard of this fabulous tool?)


Cover the bowl with a damp cloth and let the dough rest for about 20–30 minutes.

Scrape the dough out onto a clean surface with NO FLOUR. We don’t want to add more flour to this very soft dough. A scraper comes in very handy here.


Knead your dough with the slap and fold method. This is a different focaccia recipe (and mine never got that firm) but you can watch James knead it here with the slap and fold method.

Slap and fold for about 5 minutes and as soon as it feels smooth, add your oil. Mix this until completely combined and you’ve got a very soft, shiny dough. Again the Danish whisk came in very handy here. I simply scooped the dough and oil and let it drop from the whisk repeatedly until the oil was mixed in.


Cover your bowl again with the damp cloth and leave in a relatively warm place for about 4 hours.

Peel the onions and cut them in half. Remove the hard core at the end and cut them into 1/4 in or 1/2 cm thick slices. Place them in a casserole dish with 5 tablespoons of olive oil, 3 tablespoons of water and the salt.


Cover and cook for 40 minutes over a low fire, stirring occasionally.

At the end of cooking, remove the cover and continue to cook until almost all of the liquid has evaporated, but without allowing the onions to brown. You will be amazed at how much they will cook down and how sweet the onions become, almost jammy.


Meanwhile, pit your olives by hitting them with the flat side of a large knife and pulling the pits out. Cut them into halves.


Drain the can of anchovy fillets and pop them on a saucer. This will make it easier to separate them. I like to use the point of a toothpick to ease them away from each other till they are single file on the plate. I also like to cut the thicker ones in half lengthwise to spread the saltiness more evenly around the pissaladière.


After the 4-hour rise, oil a 12 x 16in or 30 x 40cm baking pan and then add a little oil on top of your proven dough.

Scrape the dough with your well-oiled hands into the well-oiled pan, easing the dough out to the edges, trying very hard not to pop its lovely air bubbles.


Now fold your dough in half, and then fold your new, longer dough in half again. My dough was so soft that it just oozed back larger before I could take a photo of it looking a quarter of its original size.


Add more oil if it’s sticking, and gently push your dough out into the corners of the baking pan.

Stick your pan inside a plastic bag and leave to prove for 2–3 more hours at room temperature.

Alternatively, you can retard this prove overnight by putting the bag covered dough in the refrigerator overnight or for up to 24 hours until your bread is ready to bake. If you do prove overnight, like I do, make sure to take the dough out a good hour before you want to bake so it can come to room temperature again and reach its full rise.

Before topping!


Preheat your oven to 480ºF or 250ºC at least 30–40 minutes before you expect to bake your bread.  James is a big advocate of baking stones so if you have one, put it on the middle rack of your oven to heat up, along with an iron skillet on the bottom to which you’ll add water for steam.

Just before it’s ready to bake, remove the dough pan from the plastic bag and add the toppings gently so as not to deflate all of the bubbles, starting with the onions, then adding the bacon crumbles and finally the anchovies and olives.


Put your baking pan on the stone, if using, or middle shelf and add one cup or 240ml of water to the skillet on the bottom. Close the oven quickly and turn the temperature down to 430°F or 220°C. Bake for 20 minutes then open the oven door briefly to allow any steam to escape and continue baking for a further 15-20 minutes or until the edges are a lovely golden brown color.

Remove your pissaladière from the oven and leave to cool for about 15 minutes before adding the sprigs of thyme and another drizzle of olive oil, if desired.

Food Lust People Love: This pissaladière or, to give it a much more descriptive name in English, Bacon Onion Anchovy Olive Tart is baked with a non-traditional sourdough crust. The bacon, anchovies and olives are beautifully salty, perfect atop the sweet onions. A square or two of pissaladière makes a great appetizer or anytime snack. If you don’t have time for all the rising and resting time necessary, feel free to substitute your favorite pizza dough instead.


Cut into squares to serve.

Food Lust People Love: This pissaladière or, to give it a much more descriptive name in English, Bacon Onion Anchovy Olive Tart is baked with a non-traditional sourdough crust. The bacon, anchovies and olives are beautifully salty, perfect atop the sweet onions. A square or two of pissaladière makes a great appetizer or anytime snack. If you don’t have time for all the rising and resting time necessary, feel free to substitute your favorite pizza dough instead.


Enjoy!

This month my Baking Blogger friends are all sharing French recipes at the instigation of our fabulous host and organizer, Sue of Palatable Pastime. Check out all the great bakes below:

Baking Bloggers is a friendly group of food bloggers who vote on a shared theme and then post recipes to fit that theme one the second Monday of each month. If you are a food blogger interested in joining in, inquire at our Baking Bloggers Facebook group. We'd be honored if you would join us in our baking adventures.


Pin this Pissaladière!

Food Lust People Love: This pissaladière or, to give it a much more descriptive name in English, Bacon Onion Anchovy Olive Tart is baked with a non-traditional sourdough crust. The bacon, anchovies and olives are beautifully salty, perfect atop the sweet onions. A square or two of pissaladière makes a great appetizer or anytime snack. If you don’t have time for all the rising and resting time necessary, feel free to substitute your favorite pizza dough instead.
 .

Thursday, August 14, 2014

Cheesy Bacon Baked Onions

Onions stuffed with cheese and herbs and then roasted so that the fat from the bacon on top can melt divinely into them, are a treat, an unusual side dish that elevates the onion from bit player to a starring role.


Onions are used in so many recipes as a seasoning or base flavor that I think we forget that they can be a side dish. Is there anything more delightful alongside a steak as some grilled onions? And onion rings done right, that is, lightly battered and crispy, are a joy. But we hardly ever think of onions as something to stuff or roast or bake with cheese on top. And that’s just a shame.

For my second post for week two of Bacon Month, I’d like to share with you a recipe from Jamie Oliver’s very first cookbook, the one that made his name a household word, The Naked Chef*, published almost 14 years ago.  Bacon is essential to a lot of recipes but never more than in this one where it flavors the onion as it bakes, as well as adding crunch to the finished dish.

Cheesy Bacon Baked Onions


Ingredients
4 tennis ball-sized yellow onions (about 1.1 lbs or 500g in total)
1 1/2 oz or 40g Parmesan or Pecorino Romano
Black pepper
Cayenne
1 1/2 – 2 tablespoons olive oil
4 slices smoked streaky bacon
1 tablespoon minced mixed fresh herbs. I used rosemary and parsley but thyme and marjoram or oregano would work as nicely.

Method
Peel the onions, leaving the root side intact.


Boil the onions in a pot of water for 15 minutes. Drain and set aside to cool.


When the onions are cool enough to handle, preheat your oven to 400°F or 200°C.

Cut the root end off of the onions so that they can sit upright securely. Hollow out a nice sized hole in the top of the each onion and chop up the bits you take out.


Grate your cheese with the small holes of your grater.

Mix the herbs, cheese and chopped onions together and add a few good grinds of black pepper.


Add in the olive oil and mix thoroughly.

Divide the onion/cheese mixture up into four equal parts and stuff it back in the onions.


Cover the top of each onion with a slice of bacon, folded in half.


Sprinkle each with a little cayenne pepper, if desired.


Bake in your preheated oven for about 20 minutes or until the bacon on top is crispy.


Enjoy!