Showing posts with label #ChristmasWeek. Show all posts

Saturday, December 12, 2015

Chocolate Praline Pretzels

The perfect mix of sweet and salty, these chocolate-covered pretzels are dipped in crunchy pecan praline. They make a great hostess gift or holiday party treat.


I am not a big sweet eater but the exception is any treat that mixes salty with sweet, like salted caramel or, indeed, these easy-to-make pretzels. You can use pretzel sticks or traditionally shaped ones, whatever you have on hand.

Chocolate Praline Pretzels

These are adapted from My Recipes. The original recipe makes only 16. I completely forgot to count how many this makes but it's a bunch. As you might guess from the ingredients list below, at least 55. Cue up a Christmas movie to watch while making them.

Ingredients
Butter for greasing pan
1 1/2 cups or 165g chopped pecans
1/4 cup, firmly packed, or 50g light brown sugar
1/4 teaspoon salt
2 tablespoons heavy cream
7 oz or 200g semisweet chocolate bars (I used two Lindt bars.)
Butter for greasing baking pan
55-65 pretzel sticks

Method
Preheat your oven to 350°F or 180°C and butter a 9 in or 23cm round cake pan.

Stir together your chopped pecans, brown sugar, salt and cream. Spread the mixture out evenly in the pan.


Bake for 10 minutes then take the pan out and stir the mixture.

Spread it out again and bake an addition 10-15 minutes or until sugar is slightly crystallized.

Cool in pan 10 minutes, then turn the praline out onto a cutting board. Allow to cool completely and then chop finely with a sharp knife.


Spread the praline bits out on waxed paper or baking parchment.

Place your chocolate in a microwave-safe measuring cup and microwave on high for 15 seconds at a time, stirring well in between time, until just melted. You don’t want the chocolate super hot or it will be too runny.

Dip your pretzels in the chocolate.


Then lay them on the praline bits.


Cover with more praline bits.

See the pretzel sticking out? The chocolate part should be completely covered.


Wait about 10-15 seconds till the praline bits are stuck on, tapping down gently on the pile.

Remove the covered pretzels to a lined tray to harden up. You may find as you go on that the smaller bits of praline stick first so you are left with bigger pieces in your pile. Use a knife to chop them more finely, if necessary.

The work station. Not pictured: A Charlie Brown Christmas showing on my laptop.
This job takes a while but requires little brain. 

Continue until you run out of praline bits or chocolate or pretzels. I ran out of praline bits first this time, and made more than 5 dozen chocolate praline pretzels.

The pile gets tiny. 


Now box these babies up and share them with a neighbor or friend!


Enjoy!

Christmas Week recipes! Please visit all our talented participants:


.

Monday, December 7, 2015

Coconut Pralines

Take a sweet pecan praline and add some coconut for a delicious candy that is easy to make and perfect for wrapping up to bring along to your holiday parties. If you can bear to share them.


I am not a big sweet eater but anything caramel or praline is one of my big exceptions. (Also sweet and salty together!) These things are easy to make and even easier to eat. Make a batch and see if you don't agree with me!

Coconut Pralines

When I was a child, my grandmother made fudge and other candies to give away at Christmas time. I don't specifically remember her making pralines, but since we were in southern Louisiana, it's quite likely. I think she would like my coconut version.

Ingredients- For about 3 dozen pralines
2 1/2 cups or 500g sugar
1/2 cup or 120ml milk
1/2 cup or 120ml corn syrup
1/2 cup or 113g butter
1/2 teaspoon salt
1 teaspoon vanilla extract
2 1/2 cups or 270g chopped pecans
2 cups or 175g sweetened shredded coconut

Method
In a bowl, combine coconut and pecans; set aside. Line a pan with nonstick aluminum foil, wax paper or a silicone liner.

Put your sugar, milk, corn syrup, butter and salt in a medium-sized pot and stir well to combine.

Cook over a medium-high heat and continue stirring until the mixture comes to a full rolling boil.


Let it boil while stirring for 5 minutes. If you want to use a candy thermometer, you are looking for the mixture to reach almost 230°F or 110°C.

Remove the pot from the heat and stir in the vanilla extract, then tip in the coconut/pecan mixture and stir well until everything is coated with the syrup.


Drop the mixture by large spoonfuls on your lined pan.


Leave to cool until the pralines harden completely.  This could take several hours or even overnight, depending on the temperature of your home.


Enjoy!


Recipes from Christmas Week Bloggers


.

Wednesday, December 11, 2013

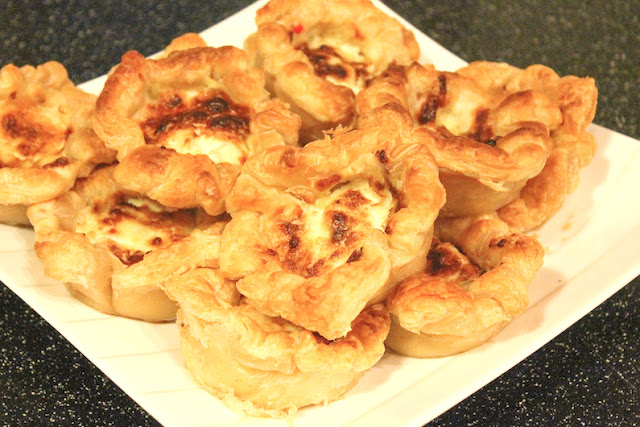
Artichoke Dip Puff Pastry Tarts

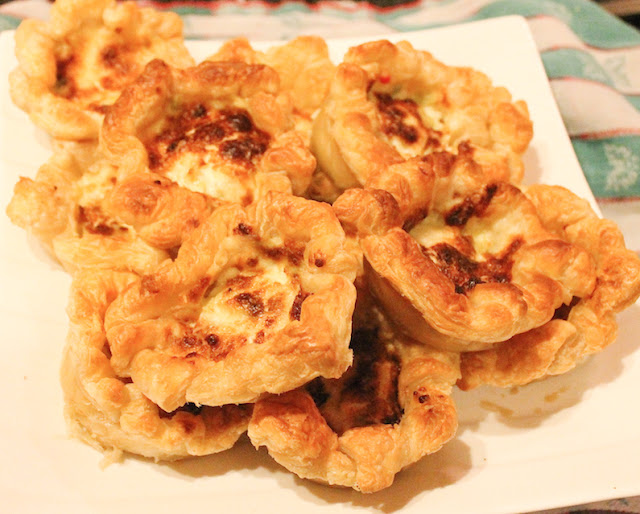
Bubbly cheesy artichoke dip makes a wonderful filling for a puff pastry tart. Artichoke Dip Puff Pastry Tarts are the perfect, easy appetizer for your Christmas party.

Food Lust People Love: Artichoke Dip Puff Pastry Tarts are a quick and easy way to transform artichoke dip into little handheld tarts, perfect for parties!


Artichoke dip is a staple at our house for Christmas Eve, when we eat only appetizers and drink Champagne. The tradition started many, many years ago when my older sister would come to visit and somehow we all got busy and many gifts remained unwrapped the night before Christmas. So preparing a big dinner was out of the question but nibbles would be perfect.

Early in the evening we sit around the heavily laden coffee table, sip Champagne and eat our appetizers while staking out a good position to wrap gifts with a little bit of privacy. Behind the bar is always a popular spot, which allows someone to be in front of the bar. Another person might be behind the couch and yet another behind the living room chair or over in the open plan dining room, when we have one. We can hear each other, if we talk loudly, but most importantly, everyone can hear the Christmas music. And everyone can take an extra little plate with them as well, for sustenance.

Artichoke Dip Puff Pastry Tarts

I have no idea where the classic artichoke dip recipe came from, although for us, it was always Tanya’s artichoke dip since my sister brought it with her originally. In the years since, I’ve also heard it referred to as Lizann’s dip, after another friend who introduced it to the school parents in Malaysia. I’d love to know who created it in the first place and thank them. Some years we add crabmeat, other years cooked shrimp or crispy bacon before baking the dip to bubbling richness. We usually serve it with crackers or sliced baguette. This year, making it for a completely different event, I had a brainstorm. And artichoke dip puff pastry tarts were born!

Ingredients
For the dip aka filling:
1 cup or 240g mayonnaise (NOT Miracle Whip or salad cream – they are too sweet.)
1 1/2 cups or about 190g finely grated Parmesan
1 can (14oz or 400g) artichoke hearts, drained weight 8 1/2oz or 240g
1 small hot red chili, optional but highly recommended (I think the original recipe called for a small can of mild green chilies.)

For the tart crust:
3 sheets already rolled puff pastry (about 8in x 8in or 20cm x 20cm each)

Method
Preheat your oven to 410°F or 210°C and cut the puff pastry into 12 reasonably even squares.


Tuck each piece into a muffin pan cup, folding in the edges to make them fit so the squares don’t touch between the muffin cups. Remember, they are going to puff up.


Chop the artichoke hearts roughly and the chili very finely and mix all the filling ingredients together thoroughly.


Spoon the filling into the prepared puff pastry crusts.


Bake in your preheated oven for 20-25 minutes or until the filling is golden and bubbling and the puff pastry is golden and puffy.

Food Lust People Love: Artichoke Dip Puff Pastry Tarts are a quick and easy way to transform artichoke dip into little handheld tarts, perfect for parties!


Allow the tarts to cool for about 10 minutes and then run a knife around the outside of the tarts to loosen them and then remove them to a serving plate.

Serve warm if possible but they are delicious even at room temperature.

Enjoy!

Food Lust People Love: Artichoke Dip Puff Pastry Tarts are a quick and easy way to transform artichoke dip into little handheld tarts, perfect for parties!


Visit all the other Christmas Week Peeps for more Holiday Baking Goodness:

Pin it!

Food Lust People Love: Artichoke Dip Puff Pastry Tarts are a quick and easy way to transform artichoke dip into little handheld tarts, perfect for parties!
 .

Tuesday, December 10, 2013

Mo's Easy Homemade Eggnog

It only takes four ingredients to make quick, easy, creamy, delicious homemade eggnog!  But bourbon is a highly recommended fifth.


Christmas at my grandmother’s meant a huge pot of her homemade eggnog at least one of the nights of our holiday.  The original called for one gallon of milk and 10 eggs!  I’d like to tell you how it kept and whether we rewarmed it successfully the next day but I honestly don’t remember having any leftovers!  It’s that good.  As a child, I drank it plain.  No nutmeg, and, of course, no bourbon.  Now I love adding both.

Ingredients
8 1/2 cups or 2 liters whole milk
5 eggs
1 1/2 cups or 300g sugar
1 heaped tablespoon cornstarch
Nutmeg and bourbon or rum (Optional for serving but highly recommended)

Method
Remove 1/2 cup or 120ml from your measured milk and set aside in a small bowl.

Heat the rest of the milk over a low fire.   Do be careful not to let it scorch.


While your milk is warming:  In a very large mixing bowl, beat the eggs until they are light yellow.  Add the sugar to the eggs and beat until creamy and almost fluffy.


Dissolve 1 heaping tablespoon cornstarch into your reserved cold milk.

Use a fork or small whisk to make sure there are not any lumps of cornstarch left.


When the pot of milk comes to the boil, slowly add the cornstarch/milk, stirring quickly.  (When I looked up the boiling point of milk, most references said it was close to the boiling point of water which is 212°F or 100°C but mine bubbled gently at about 190°F or 88°C.  In case you are the thermometer-using type.)  Cook for a few more minutes until it thickens slightly.

I need three hands!  I stirred like crazy before and then after I took the photo, as I kept pouring.

Add a couple of cups of the hot milk to the egg mixture by pouring it in very slowly and whisking quickly.

This is actually the second cup I am pouring in.  I was whisking like a mad woman when
the first hot cup drizzled in.  You should do the same!  In fact, don't stop to take photos at all. 
If you have a friend to help, one can whisk, while the other pours.  If you are alone, set your egg bowl on a towel so it won’t spin and whisk quickly with one hand while pouring slowly with the other.  If you rush this step, you risk cooking your eggs in the hot milk, which will make the eggnog eggy and lumpy.  It’s not a pretty sight.  It can be somewhat rescued by straining it through a fine mesh sieve but just don’t go there to start with.  And, yes, I know all this from sad experience.

Add all the now-warm egg/milk mixture back into the pot with the rest of milk.


Bring it to a gentle boil and let it thicken slightly.

Serve in mugs, topped with a sprinkle of nutmeg.

Go ahead and laugh but I wanted to show you my fake fireplace.  In Dubai.
 It looks like flames from an inside light but it does actually have an air blower that puts out heat too.
Bourbon or rum can also be added, if desired. If you are adding alcohol, give the mug a good stir before drinking and, of course, don't share with your kiddies.

My cup!  Get your own. 

Enjoy!


Visit all the other Christmas Week Peeps for more Holiday Baking Goodness: