Showing posts with label appetizers. Show all posts

Monday, November 26, 2018

Artichoke Dip Mini Muffins #MuffinMonday

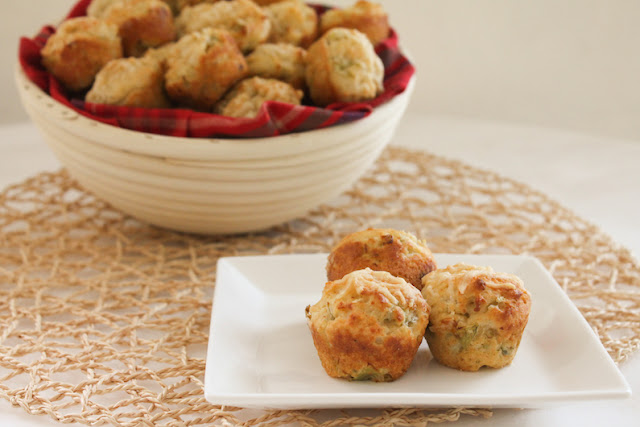
Cheesy artichoke dip mini muffins are made with all of the wonderful ingredients of our favorite hot baked dip: artichokes, of course, along with Parmesan cheese, mayonnaise and green chiles.

Food Lust People Love: Cheesy artichoke dip mini muffins are made with all of the wonderful ingredients of our favorite hot baked dip: artichokes, of course, along with Parmesan cheese, mayonnaise and green chiles.


Every Christmas Eve, our dinner menu is appetizers only:  Smoked salmon or home-cured salmon, angels on horseback, caviar, deviled eggs, potato latkes, a variety of stinky cheese and sometimes bruschetta. But artichoke dip always makes an appearance. As good as it is the day it is baked, it’s also wonderful as leftovers, stirred through some hot pasta or stuffed into a baked potato. (I’ve even used it as stuffing for puff pastry tarts!)

Here I recreate our favorite dip in muffin form. Bake some up and pour yourself a drink! And make sure to scroll down to the bottom to see the other Muffin Monday recipes I'm sharing.

Artichoke Dip Mini Muffins

To get most of the packing liquid out of the artichokes, give each one a gentle squeeze then place them bottom up in a sieve so they can continue draining. To completely drain the green chiles, put them in a sieve and press down with the back of a spoon.

Ingredients - Makes 34 mini muffins
2 cups or 250g flour
1 cup or 100g finely grated Parmesan
2 teaspoons baking powder
1/2 teaspoon cayenne (optional)
1⁄2 cup or 115g mayonnaise
3/4 cup or 180ml milk
1 can or jar artichoke hearts, drained weight 7.9oz or 225g*
1 small can (4.5 oz or 127g) chopped peeled green chiles, drained well
Canola or other light oil for greasing muffin pan

Optional for decoration: coarsely grated Parmesan

*Do not use marinated artichokes as those, even well drained, will add unnecessary oil to the muffins.

Method
Preheat your oven to 375°F or 190°C and brush your mini muffin pans with oil.

In a large mixing bowl, combine the flour, finely grated Parmesan and baking powder.


In another mixing bowl, whisk together the mayonnaise and milk.

Chop the well-drained artichoke hearts roughly and add them to the mayo/milk bowl, along with the drained green chiles. Stir well.


Pour the wet ingredients into the dry ones and fold just until the flour is moistened.


Use a tablespoon or scoop to fill the prepared muffin pan. My scoop is 2 tablespoons. Using it, the batter made 34 mini muffins.


Top with some extra grated Parmesan, if desired.


Bake in the preheated oven for 12-15 minutes, or until the muffins are golden and a toothpick inserted in the middle comes out clean.

Food Lust People Love: Cheesy artichoke dip mini muffins are made with all of the wonderful ingredients of our favorite hot baked dip: artichokes, of course, along with Parmesan cheese, mayonnaise and green chiles.


These delightful savory morsels are excellent served with cold beer, a crisp dry white wine or a full-bodied red.

Enjoy!

Food Lust People Love: Cheesy artichoke dip mini muffins are made with all of the wonderful ingredients of our favorite hot baked dip: artichokes, of course, along with Parmesan cheese, mayonnaise and green chiles.


This month my Muffin Monday group is sharing five wonderful recipes. Get baking!

Muffin Monday
#MuffinMonday is a group of muffin loving bakers who get together once a month to bake muffins. You can see all our of lovely muffins by following our Pinterest board.
Updated links for all of our past events and more information about Muffin Monday, can be found on our home page.

Pin it!

Food Lust People Love: Cheesy artichoke dip mini muffins are made with all of the wonderful ingredients of our favorite hot baked dip: artichokes, of course, along with Parmesan cheese, mayonnaise and green chiles.
 .

Sunday, July 16, 2017

Patatas Bravas Chorizo Sausage Rolls

Take a traditional sausage roll into delicious Spanish territory with these patatas bravas chorizo sausage rolls. ¡Olé! They are perfect with a chilled glass of rosé or beer for your summer party or picnic.


I love sausage rolls. In fact, they are one of my favorite snacks, whether made with puff pastry, short crust or yeast dough. And I don’t really mind which kind of sausage you put in the middle. Even a hot dog will do.

Back when my girls were students at the International School of Kuala Lumpur and I was often on campus doing volunteer work, I would eat sausage rolls most every morning. They were homemade - baked fresh each day - by the wonderful cooks who staffed the canteen.

Best of all, sausage rolls are portable so they are great for an on-the-go snack or picnic. Serve them hot or room temperature. Either way, they are delicious.

These patatas bravas chorizo sausage rolls are a spicy twist on my classic English sausage rolls.  If Spanish folks made sausage rolls, this is how I imagine they’d turn out. Not that they do, as far as I know.

Ingredients for 2 dozen bite-sized sausage rolls
For the sausage rolls:
7 1/2 oz or 215g puff pastry
Flour, for dusting
6 oz or 185g hot chorizo
6 oz or 185g potato, peeled and diced
1 small onion, minced
1 tablespoon tomato paste
1/2 teaspoon crushed red chili pepper
1/4 teaspoon smoked paprika
1/2 teaspoon sugar
1 egg

For baking
1 egg, beaten

Method
Remove the casing from the chorizo and chop it into small dice.


Cook the chorizo and the diced potatoes with a splash of water, covered, for about 5-7 minutes. When the water has evaporated and the oil has been released from the chorizo, remove the cover and add the onion.


Cook, with a splatter guard, over a medium high heat until the potatoes are browned and tender and the onions are soft.

Add in the tomato paste, crushed pepper, paprika and sugar. Stir well and cook for another 2 minutes.

Leave the mixture to cool for a few minutes and then spoon it into a food processor. Process with 1 egg till you have a homogeneous mixture that still has small pieces.


Roll the puff pastry into two long sheets on a lightly floured surface. Spoon the patatas brava chorizo filling onto the puff pastry.

Roll it up almost all the way then brush the beaten egg on the last section to help seal the roll. Wrap the rolls up in cling film and chill for 15 minutes.


Meanwhile, preheat your oven to 400°F or 200°C.

Use a serrated knife to cut the sausage rolls into bite-sized pieces. Set them on a baking sheet lined with baking parchment or a silicone liner. Brush them with the beaten egg.


Bake in the preheated oven for 12-15 minutes or until the patatas brava chorizo sausage rolls are puffed and golden.


Now pour yourself a glass of chilled rosé or beer and enjoy!

Are you a fan of picnics and picnic food? This week my Sunday Supper group is sharing our best recipes to take along on a picnic. Many thanks for our event manager Em, and our host this week, Christie of A Kitchen Hoor’s Adventures.

Starters, Skewers, and Sandwiches al Fresco

Stow-and-Go Sides and Salads

Drinks and Desserts for Outdoor Dining


Pin it!


.

Sunday, January 8, 2017

Baked Kibbeh with Yogurt Sauce

Lean beef seasoned with mint, onion, cumin and allspice is mixed with bulgur wheat then baked in small balls till golden. Perfect for dipping in garlicky yogurt sauce. 


Searching for kibbeh recipes, it’s easy to get overwhelmed by the many varieties and options. Lamb is typical, but beef is a close second. Sometimes the bulgur wheat is mixed throughout the meat, as in my recipe below, and sometimes it’s mixed just with part of the meat. In that case, the bulgur mixture is used as a filling with seasoned meat on the outside of the kibbeh. Most are deep-fried. The baked kibbeh is often made in one big piece, then cut apart into slices like pie. The deep-fried ones are made into elongated balls (like mine) or into patties.

As with many recipes that are claimed by various cultures and countries, everyone thinks theirs is the most authentic, the most traditional, the most like mom used to make, in a word, the best. Since I come from none of those cultures or countries, I can do what I want without fear of elderly relatives scolding me. So I make individual kibbeh and bake them.

The soaked bulgur wheat adds moisture to the kibbeh so you can use lean ground beef, making them an even healthier option.

Baked Kibbeh with Yogurt Sauce

If you have a large iron skillet or another heavy baking pan, baked kibbeh gives you all the flavor and crunch of traditional kibbeh, without the oiliness of deep-frying. These can be served with sandwich fixings or simply with the yogurt sauce for dipping.

Ingredients
For the kibbeh:
1/2 cup or 105g medium coarse bulgur
Leaves from a small bunch fresh mint, picked off and washed
1 medium onion, chopped
1 teaspoon ground cumin
1 teaspoon ground allspice
 1 teaspoon salt
1/2 teaspoon ground black pepper
1 1/4 lbs or 575g lean ground beef
3 tablespoons olive oil

For the yogurt sauce:
1 cup or 245g Greek plain yogurt
1 teaspoon lemon juice
1 clove garlic, minced
1 teaspoon minced fresh mint leaves
1/4 teaspoon salt

Optional to serve:
Yogurt sauce
Sliced tomatoes
Sliced cucumbers
Flat bread

Method
Pour the bulgur wheat in a big coffee mug. Pour enough boiling water to cover the bulgur by about one inch or 2cm. Cover the mug with a saucer and set aside until the water is absorbed. Fluff it with a fork into a large mixing bowl.

To make the yogurt sauce, add the lemon juice, garlic, mint and salt to the yogurt. Mix well and refrigerate. This is best done early in the process to allow time for the flavors to meld and develop.


Use a food processor to mince the mint leaves with the chopped onion.


Preheat your oven to 410°F or 210°C with a large iron skillet or heavy baking pan inside.

Add the mint and onion to the bulgur, along with the cumin, allspice, salt and black pepper. Mix well.


Tip in the lean ground beef. Use your clean hands to mix and knead the seasoned bulgur into the beef.


Wet your hands and form the mixture into 20 balls, slightly fatter in the center and kind of pointy on the ends, like an American football. Keep wetting your hands to keep the meat from sticking to them.


Once the oven is preheated, remove the iron skillet and pour in half of the olive oil. Put the kibbeh in the skillet and put it back in the oven.


Set your timer for 18 minutes. When it rings, take the skillet out and drizzle the rest of the olive oil over the kibbeh. Put it back in the oven and turn the dial from bake to broil (or grill, for my British readers). To clarify, turn your oven's upper element on so the top of the kibbeh will brown.

Keep an eye on it and remove the kibbeh from the oven when it’s golden, about 5-7 minutes.


Serve with the yogurt sauce to dip. You can also set out flatbread, sliced tomatoes and sliced cucumber for those who would like to build a small sandwich. This makes a great appetizer or starter at a cocktail party.

Enjoy!


Today is National Sunday Supper Day – the second Sunday of January! We should be eating cake to celebrate but since we love you all so much, we decided that we wouldn’t sabotage your (and our own!) efforts to eat more nutritious meals in the New Year. Instead, we are bringing you lots of lean beef recipes! Many thanks to our host today, Sarah of The Chef Next Door and our event manager Cricket of Cricket’s Confections for their behind the scenes work.

Check out all the lovely lean beef recipes we are sharing!

Appetizers, Soups, and Salads

Ground Beef Recipes

Mains

Sandwiches and Wraps

Steaks


Join the #SundaySupper conversation on twitter on Sunday!
We tweet throughout the day and share recipes from all over the world. Our weekly chat starts at 7:00 pm ET. Follow the #SundaySupper hashtag and remember to include

Pin it!

Baked Kibbeh: Lean beef seasoned with mint, onion, cumin and allspice is mixed with bulgur wheat then baked in small balls till golden. Perfect for dipping in garlicky yogurt sauce. #SundaySupper

Friday, November 18, 2016

Mediterranean Eggplant Poppers #FishFridayFoodies

Mediterranean eggplant poppers combine the lovely flavors of za’atar, roasted eggplant, mozzarella and tomatoes for a great appetizer your guests will love. They are even more special topped with shrimp.


When I have the time, I like to head to the big hypermarket not too far from my house and wander around the fresh produce section looking for inspiration. They carry an amazing selection of fruit and vegetables from near and far, all shiny, bright, colorful and clearly full of nutrition and vitamins.

Just a couple of days ago, I came across the loveliest little eggplants there. I shifted through them looking for the smallest ones, trying to select ones of similar size, with good stems still attached. Right there, in my head, I made up this recipe. Like this: What goes with eggplant? Garlic and tomatoes. What goes with garlic and tomatoes? Mozzarella, of course. And because today I am joining the Fish Friday Foodies in sharing appetizers, I decided to top the whole lot with some seasoned shrimp.

And that is the weird and wonderful way my brain works.

Ingredients
8 small eggplants
2 cloves garlic
Generous handful parsley, plus more to garnish, if desired
olive oil
salt
pepper
2 teaspoons za’atar
1 ball fresh mozzarella (about 4.4 oz or 125g)
4-5 grape tomatoes
16 cooked medium-sized shrimp

Method
Preheat your oven to 400°F or 200°C.

Scrub the little eggplants clean then cut them in half, trying to split the stem as well. Scoop out the insides, chop and set aside. I use a melon baller for the scooping. Put them in a baking pan.


Mince the garlic cloves and chop the parsley finely.

Cook the eggplant insides in a small pan with a good drizzle olive oil, sprinkle of salt and pepper plus one teaspoon of the za’atar. When all of the water has cooked out of the eggplant and it’s browning, add in the garlic and cook for a couple more minutes.


Tip in the parsley and cook for another 30 seconds or so, until the parsley wilts. Taste the filling and add more salt, if necessary. Remove from the heat.


Cut the mozzarella ball into thin circles. Fit them into the eggplant halves. Add the filling, dividing it between the eggplants.


Slice the grape tomatoes and put one slice on top of the filling. Drizzle on some olive oil.


Roast in your preheated oven for about 15 minutes or until the eggplants start to slump a little and are browned around the edges. Some leakage happens but when you scrape those bits up with a metal spatula, you get to eat them. Score! Make sure you are in the kitchen alone when these come out of the oven and you won't even have to share that bonus.

Meanwhile, dry your shrimp and put them in a small bowl. Drizzle them with a little olive oil and toss them around to coat. Add the last teaspoon of za’atar and toss again.

Note: There are various za'atar recipes. I prefer what's known as Lebanese za'atar but you can use your favorite.

Ignore the little tails on the shrimp. I did remove those before I put the shrimp on the eggplant poppers.


Remove the baking pan from the oven and top each eggplant with one shrimp. Pop the pan back in the oven for another five minutes to warm the shrimp through.


Serve warm, sprinkled with a little more chopped parsley, if desired.

For a vegetarian option, skip the shrimp step. We love shrimp but these Mediterranean Eggplant Poppers are fabulous even without them. And they are just as pretty. Here they are pre-shrimp.


Update: Just ate a leftover eggplant popper straight out of the refrigerator. They are even good cold.

Enjoy!


Many thanks to this month’s Fish Friday Foodie host, Wendy from A Day in the Life on the Farm. If you are looking for creative holiday appetizers or first courses with seafood, you’ve come to the right place!


Pin it! 

 .

Sunday, April 10, 2016

Beef Wellington Bites

A traditional Beef Wellington is made with whole tenderloin wrapped in puff pastry along with mushrooms duxelles and foie gras. These beef Wellington bites are the finger food version made with choux pastry puffs.

Let me start by saying that this dish was the result of leftovers of the very best kind. I made duxelles for a different dish and ended up sharing it for a group post celebrating mushrooms. And I had frozen choux pastry from a croquembouche challenge. When a weekend barbecue left me with a couple of grilled filet mignon steaks, it suddenly came to me that I had the makings of beef Wellington of a sort and just needed some foie gras or liver paté. Oh, we dined richly that night! I'd been waiting for the ideal time to share them when Sunday Supper announced a Finger Food for Dinner theme. Perfect!

Make sure you scroll down to see all the wonderful fork-free dishes we are sharing today, from appetizers through desserts. Many thanks to our host Christie from A Kitchen Hoor's Adventures and her guiding light, Marion from Life Tastes Good.

Ingredients
For the duxelles:
3 oz or 85g shallots
1/3 cup or 75g butter
12 oz or 340g mushrooms
1 cup or 240ml dry white wine
1 cup or 240ml whipping cream
Sea salt
Black pepper
Instructions here  You may not use the whole recipe. Stir the rest through some pasta. Or eat it with a spoon.

For the choux pastry:
1 cup or 125g plain flour
1 pinch salt
7 tablespoons or 100g butter
1 cup or 240ml water
4 eggs, at room temperature
- The dough makes about 50 small choux buns. They freeze well before baking!

For assembly: Makes 18 Beef Wellington Bites
6 oz or 170g grilled tenderloin steak
6 oz or 170g smooth duck or pork paté, at room temperature

Method
Make your duxelles ahead of time and store the bowl in the refrigerator. Do not leave it out as you work, because its volume will greatly decrease, spoon by spoon, if it's handy. That stuff is GOOD.

Now we'll make the choux pastry. Preheat your oven to 445°F or 230°C and prepare your baking sheet by lining it with parchment paper stuck down with a little non-stick spray. If you are feeling particularly anal, as I usually am, you can draw some circles to guide you on the underside of the parchment paper.

Sift together your flour and a pinch of salt and put the bowl right next to the stove in readiness.

In a medium pot, combine the butter and water and bring to the boil.


Pour the flour/salt mixture into the boiling water/butter all at once. Stir vigorously until the mixture forms a ball and pulls right away from the sides. This takes just a minute or two.


Now take the pot off of the stove and add the eggs, one at a time, beating well with your wooden spoon in between. With each addition, it looks like the egg won’t mix in and the dough starts to fall apart but keep mixing and after a couple of minutes of hard labor, the dough comes together again in one big lump and it’s time to add the next egg.


After the fourth egg has been thoroughly incorporated, put the dough into a piping bag with a large tip, about 1/2 in or 1 cm wide.

Pipe the soft dough on the parchment paper in 1 inch or 2.5cm circles about an equal measure apart from each other.


Poke down any pointy tops with a damp finger.


Bake in your preheated oven for 10 minutes then turn the temperature down to 400°F or 200°C and bake for a further 25 minutes. (OR you can now pop them in the freezer if you want to keep some for later.  You only need 18 for the Beef Wellington Bites. Once frozen, slip them off the parchment and into a Ziploc bag for storage. They are perfect for sweet or savory fillings and can be taken out of the freezer and baked as you need them.)

Remove from the oven and allow to cool completely.

Once they are completely cooled, store them in an airtight container until you are ready to serve.

When you are ready to serve, warm your duxelles and your tenderloin steaks. Slice the steaks thinly.


Split the choux buns open horizontally. Add a good spoon of the duxelles to the bottom. Top with sliced steak and finally, add a small slice of paté.


Put the top of the choux bun back on and repeat the process until all the Beef Wellington Bites are assembled.

Enjoy!


Do you enjoy Finger Foods for Dinner? I think they are great for movie nights but in our house we also always do all appetizers for Christmas Eve and New Year's Eve as well.

I want everything on this list!

Pinky Appetizers
Manual Mains
Digit Desserts


 .

Wednesday, January 6, 2016

Coronation Chicken Filled Croissant Horns #FoodieExtravaganza


Curry powder and fruit chutney spice up the creamy sauce for coronation chicken, classic British picnic fare. Serve it stuffed in croissants for a pretty party dish.

I was sitting, nay, lounging (because it was New Year’s Day and there was Champagne!) in the Emirates Airlines lounge in London Gatwick airport just a few days ago, when I decided to check out the cold buffet. If you’ve ever had the pleasure of being in an Emirates lounge, you know that the dishes on offer are always tasty as well as presented in a most beautiful manner. But for once, I was disappointed. Oh, the coronation chicken was beautiful, spooned as it was onto a crispy green lettuce leaf, surrounded by fanned out slices of fresh apple and mango. But it was missing the zip of curry and chutney I’ve come to expect with this dish, which is one of my favorites. All in all, it was rather bland. When I expressed my dismay, my husband smiled, “Now you’ll have to make your own, right?” That man does know me.

So here I am with my coronation chicken, a recipe compiled from several found in my cookbooks and on the internet. The unifying theme of each seems to be the sauce, made with varying proportions of cream or mayonnaise and yogurt or even just mayo, with the addition of curry powder and chutney, usually with some lime or lemon juice. Some had apples, some celery. Tomato paste and no tomato paste. Others added blueberries, mango, dried apricots or sultanas to the mix. Some started with roast chicken, pulled off the bones; others with chopped poached breasts and yet others didn’t specify how the chicken should be cooked. Only that it should be. SO MANY RECIPES.

I’m sharing it today stuffed into disemboweled croissants. Yes, I just used disemboweled on a food blog. It’s one of those lovely English words that sounds exactly as it should, don’t you think? This month’s Foodie Extravaganza theme is croissants so I briefly considered making some puff pastry horns in which to serve my coronation chicken. I even own the little metal forms around which to bake the pastry. But it’s been a busy week and, frankly, it’s way easier for all of us to hollow out some fresh croissants from a nearby bakery and fill them.

And don’t they look pretty? Best part of all, of course, is the spicy coronation chicken inside.


With many thanks to Rosemary Hume, the original creator of the recipe for the 1953 coronation of Queen Elizabeth II plus Delia Smith, Hugh Fearnley-Whittingstall, Nigella Lawson, Jamie Oliver and all the other innovators who have come along since, this is my rendition.

Ingredients
For the sauce:
3/4 cup or 170g mayonnaise
1/2 cup or 125g plain thick Greek yoghurt
1 tablespoon hot curry powder, or to taste
2 tablespoons spicy fruity chutney (I used my own habanero nectarine kumquat chutney.)
2 teaspoons fresh lemon juice
Optional but recommended: 1/4-1/2 teaspoon cayenne
1/2 teaspoon sea salt, plus more to taste
Freshly ground black pepper

For the salad:
1.1 lbs or 500g chicken breasts (Just two large breasts in my packet.)
1/4 cup or 45g pomegranate arils, plus extra to garnish, if desired
1/2 medium-sized tart apple (I used a Jazz weighing about 170g whole.)
Generous squeeze lemon juice (to keep the apple from browning)

To serve:
7-8 fresh croissants
Optional: some small lettuce leaves (They keep your plate clean, if that even matters to you. Otherwise, give your guests a fork as well.)

Method
Slice the chicken breasts in half lengthwise through their middles so they will cook faster.

Poach them in lightly salted water to cover, until just cooked through. This shouldn't take more than about 10-12 minutes, depending on the thickness.

Still slightly pink in the middle. 
Drain and set aside to cool. You can pop them into the refrigerator to speed up the process.

Mix all of your sauce ingredients in a large bowl, big enough to hold your chicken and other ingredients later, with room for stirring.


Add a good squeeze of lemon juice to a small bowl. Peel, core and dice your apple, sliding the pieces off of the chopping board and into the lemon juice, stirring to mix the apple with the lemon juice, as you go.


Once the chicken is cool, chop it into small pieces. Tip it into the sauce with the pomegranate arils and chopped apple.


Stir well. Taste the mixture and add more salt if necessary. This can be used immediately but will taste better if allowed to hang out in the refrigerator for a few hours, covered with cling film.

When you are ready to serve, cut your croissants in half and use a sharp knife to cut all around the inside to remove the middle. Once you’ve gotten as much as you can out, use your index finger to press around inside the half croissant to expand the space.

I was surprised to find that my croissants had herbs inside. But it was a pleasant surprise. 


Fill the croissant horn with coronation chicken, pushing it right to the bottom with a small spoon. Lay the horn on a leaf of lettuce, if using, or straight on a serving plate, if not.


Garnish with a few pomegranate arils for color.


Enjoy!

Many thanks to this month's Foodie Extravaganza host, Kathleen from Fearlessly Creative Mammas. Check out all the great croissant and crescent roll recipes we've got for you!


Foodie Extravaganza celebrates obscure food holidays or shares recipes with the same ingredient or theme every month.

Posting day is always the first Wednesday of each month. If you are a blogger and would like to join our group and blog along with us, come join our Facebook group Foodie Extravaganza. We would love to have you!

If you're a reader looking for delicious recipes, check out our Foodie Extravaganza Pinterest Board! Looking for our previous parties? Check them out here.

.