Showing posts with label bacon. Show all posts

Monday, October 20, 2014

Spicy Cheesy Bacon Ranch Muffins #MuffinMonday


Extra sharp cheddar cheese, crispy bacon and ranch dressing seasonings are combined in these flavorful savory muffins, making them perfect brunch fare for game day or tailgating picnics. 

Ranch trumps plans
I had a complete different muffin planned for today. I had bought the ingredients and it was going to be sweet and fabulous. But then, I saw this. This, my dear readers, is the even more fabulous Cheesy Bacon Ranch Dip from my friend, Carla, over at Chocolate Moosey. 

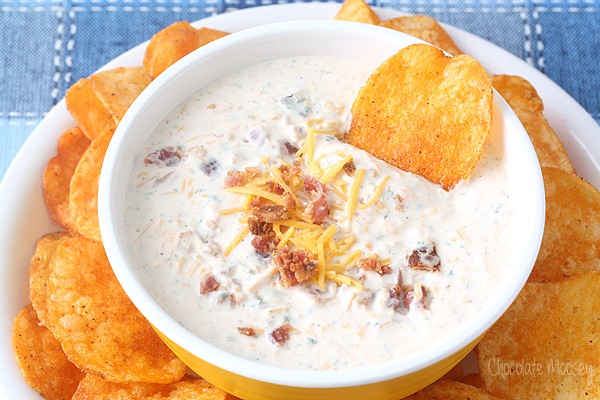
© Carla Cardello at Chocolate Moosey. Used by permission.

I am a huge fan of ranch dressing and ranch dip and ranch pretty much everything. My suitcase returning from the US to whichever country we are living is regularly stocked with packets of Hidden Valley Ranch Dressing, unless it’s available where I am. I hate to be without it. I also stock up on the buttermilk ranch seasonings from Penzey's. One cannot ever have too much ranch. It’s great for dipping carrot sticks or potato chips and there's hardly anything that makes me happier than cutting an avocado in half, removing the pit and filling the holes with ranch dressing so I can eat it with a spoon. Unless it’s being home alone when I do it so that I don’t have to give someone else one of my avocado halves. Dang moochers. 

The upshot of it was that when I saw Carla’s spicy cheesy bacon ranch dip, I knew all those flavors – that bacon, the cheese, that hot sauce, the ranch seasonings! - would also make a fabulous muffin. And I wasn’t willing to wait. As I sit here typing this, I have just polished off my second muffin. Then I licked my finger and picked up the crumbs from the saucer and cleaned them off too so, unless someone is counting muffins, it looks like I haven’t even started yet. And that, friends, would be the truth. Two down, just 10 to go. Don't bother to knock. I'm not answering. 

Ingredients
2 cups or 250g flour
5 oz or 140g extra sharp cheddar cheese, grated
2 tablespoons ranch seasoning (About half of a ranch dip packet. I used my Penzey's for this.)
2 teaspoons baking powder
1 teaspoon baking soda
1/4 teaspoon salt
2 eggs
1 cup or 240ml sour cream
1/3 cup or 80ml milk
5-6 slices bacon, fried and chopped – approx. weight after frying and draining: 1 3/4 oz or 50g
2-4 tablespoons hot sauce, depending on your taste and how spicy your chosen hot sauce is. Know thyself, as the ancient Greeks said. 

Method
Preheat your oven to 350°F or 180°C and prepare your 12-cup muffin pan by greasing it or lining it with paper muffin cups. 

Separate out small handfuls of both your grated cheese and your bacon for decorating the muffins before baking.

In a large bowl, mix together your flour, the bigger of the grated cheddar, ranch seasoning, baking powder, baking soda and salt, making sure that the cheese is well coated in flour and is not sticking together in clumps.


In a smaller bowl, whisk together your eggs, sour cream, milk and hot sauce.


Pour your wet ingredients into your dry ingredients stir until just mixed.  Then fold in the larger pile of bacon pieces.


Divide the batter between the muffin cups.


Top each with the reserved smaller piles of grated cheddar and bacon.


Bake in your preheated oven for 20-25 minutes or until the muffins are golden and a toothpick comes out clean. Cool in the pan for a few minutes and then remove to a wire rack to cool completely.


Enjoy!


And, just a side note that I found amusing. Muffins are not a stable building material. I was stacking them like this.


And then this happened. One went off the left and one went off the right. And that is the story of how my helper got a muffin. Three down, nine to go.


Thursday, September 11, 2014

Pea and Bacon Risotto

As author Stephanie Le says, once you have the technique down, risotto is quick and easy to make. Best of all, a good basic risotto recipe can be customized to suit your own taste. This version with crispy bacon and peas, from her recently released cookbook, Easy Gourmet, is an ideal starting point.


As a cookbook junkie, it’s hard to resist the offer of a new cookbook, especially when it’s gorgeous and written by a fellow blogger who I am half in love with. I say only half because the awe gets in the way. I mean, really! Have you met Stephanie Le of I am a Food Blog yet? Her dishes are gorgeous! The flavors, the textures, the styling, the props! It’s no wonder that she won the Editors’ Choice Award and Blog of the Year (!) from Saveur magazine this year. So I love her like some people love famous movie stars. It’s love tinged with the sad and certain knowledge that it will no doubt remain unrequited. But that’s okay, because I can still stalk her online and in the pages of her beautiful book with its easy to follow, deliciously different recipes.

Stephanie’s lovely book is called Easy Gourmet – Awesome Recipes Anyone Can Cook. < That there is an Amazon affiliate link in case you can’t wait and want to order your own, but go have a look at the book on Stephanie’s site as well right here. Isn’t it beautiful? Even more awe-inspiring is that she designed every part of it as well! I am in full on food blogger crush mode.


The hardest part about cookbook blog tours for me is making the recipe as it is written because I am not a very good recipe follower. But how can I tell you a recipe is wonderful if I haven’t actually made it properly? So I have to discipline myself and follow the instructions. In the case of this risotto, I changed only two things.

I couldn’t find thick cut bacon here so I used six slices of the normal stuff, hoping the weight would be about the same. And since I had to start by frying my bacon till crispy, and I was going to use the same saucepan to cook the risotto, I used an equal amount of bacon fat in place of the butter and oil to sauté the onions and toast the rice. That said, I’m going to leave the ingredient list and recipe exactly as it is in the book, so you can do it Stephanie’s way. I recommend you use the weights if possible as they are the most accurate way to make sure you have the right proportion of rice to peas and cheese.

Recipe printed with permission from Page Street Publishing. Any adaptations are in parentheses.


Ingredients
4 1⁄2 cups or 1L chicken stock
1 tablespoon or 15g butter
1 teaspoon or 5ml oil
1 cup or 228g Arborio rice
1⁄2 small onion, diced
1⁄2 cup or 64g frozen peas, thawed
4 slices cooked thick-cut bacon, cut in 1-inch or 2 1/2cm pieces
1⁄4 cup or 45g freshly grated Parmesan

Method
In a medium stockpot, heat the stock to a gentle simmer. (Stephanie advises that warming the stock first is essential to making great risotto.)

Melt the butter with the oil in a medium saucepan over medium heat. Add the diced onions and cook until translucent, 1-2 minutes.


Turn the heat up to medium-high and add the rice.


Toast the rice, about 3-4 minutes, until slightly translucent.

Turn the heat down to medium and add a ladle of hot stock.


Stir into the rice until the liquid is mostly absorbed.

Continue stirring and adding hot stock as the rice absorbs it.

Taste after about 15 minutes.


If the rice is soft but with a bit of bite, it’s ready. (Mine took quite a bit longer but I think I had my fire lower than medium.)

If still uncooked, continue adding stock a ladle at a time. (You might not use all the stock.)


When done, remove from the heat and stir in the peas, bacon and cheese.


Taste and season with salt and pepper. Enjoy immediately. (We added our own pepper sauce, because we love things spicy but, with the saltiness of the Parmesan, a special wedge my husband brought back from Italy, additional salt was not necessary.)

Enjoy!


If you’d like to try out a few more recipes from this amazing book, here’s a list of the links so far on the blog book tour. That cod is next on my list to try, followed closely by the hot wings. Or maybe the mushrooms. Seriously, you all, everything looks so good!


*Disclaimer: This post contains affiliate links to the book, Easy Gourmet – Awesome Recipes Anyone Can Cook.  If you buy after clicking on my link, I make some small change from the sale and you are still charged the normal price. I received a copy of this book for review purposes, with no other personal compensation. All opinions are entirely my own.


Wednesday, September 3, 2014

Loaded Baked Potato Waffles #FoodieExtravaganza


Take all the lovely ingredients of a fully loaded baked potato, stir them into waffle batter and bake till golden in a Belgian waffle iron. Perfection squared. 

Last month my Foodie Extravanza group celebrated peaches and I missed the whole thing because of traveling. It made me a little sad, but with the choice of London or cooking peaches, I had to go with London! But it did make me doubly determined to participate this month, especially when I heard that we were celebrating waffles. Waffles can be sweet or savory so, if you know me at all, you know which way I was sure to go. And since my mother, well documented on this site as being a lover of all things potato, was visiting, a waffle with all the fixings of a loaded baked potato seemed perfect. And indeed it was. Serve them plain with extra sour cream, chives and cheese. Or pop a fried egg on top.

Make sure you scroll down to the bottom to see all the lovely waffles we are sharing. Many thanks to Summer from Summer Scraps who is hosting this month!

Ingredients for six or seven square Belgian waffles
5-6 slices streaky smoked bacon (just less than 4 1/2 oz or 125g)
1 cup or 125g flour
1/2 teaspoon salt
1 teaspoon sugar
Fresh black pepper
1/2 teaspoon baking powder
1/2 teaspoon baking soda
1/2 cup or 120ml sour cream plus more to serve, if desired
3/4 cup or 180ml milk
1 egg
1 potato (about 7 1/2 oz or 210g)
1/2 oz or 15g green onions, plus more to serve, if desired
1/2 cup or 45g grated extra sharp cheddar cheese, plus more to serve, if desired

Method
Cut the bacon into small pieces and fry it until crispy. Remove it from the skillet with a slotted spoon and drain on some paper towels. Put a little of the bacon fat in a small bowl and set it aside. Yep, we are going to grease the waffle iron with it for extra flavor.

Combine the flour, salt, sugar, baking powder, baking soda and a few generous grinds of fresh black pepper in a large mixing bowl. Add in the grated cheese, crispy bacon and green onion tops and stir well.


Whisk the egg, sour cream and milk together in a smaller mixing bowl.  Peel and grate the potato and add it immediately to the egg bowl and stir to stop the potato from oxidizing and turning brown.

Looks like the grated cheese, doesn't it?


Preheat your waffle maker as per manufacturer’s instructions.

Now fold the wet ingredients into the dry ingredients.


Using a pastry brush, grease your waffle maker with a little of the reserved bacon fat.


Pour the manufacturer’s recommended amount of  batter into the center of the lower half of the waffle maker, being careful to leave room for when the batter spreads out as you lower the lid and also for when the waffle starts to rise when baking.


Close the lid and watch for the signal that your waffle is cooking.  On my waffle maker, the light goes green when it is ready for batter, red when it is cooking and then green again when the waffle is ready.  I leave the waffle in just a little bit longer after the light turns green the second time so the waffles are nice and crispy.  But if you like them less crunchy, by all means take them out earlier.


Serve topped with a little extra sour cream, green onions and even grated cheese, if desired.


If you have any batter left over, go ahead and baked the waffles and store them, wrapped in cling film, in the refrigerator or freezer. They reheat beautifully in the toaster. A couple of days after making these, I toasted one and served it with a couple sunny-side up eggs on top, more bacon on the side. Sadly, I didn’t take a photo but it was wonderful. The runny egg yolk nicely filled many of the waffle holes. Soooo much better than plain toast!

Enjoy!

My helper is always right there, on clean up duty, just in case I drop something. Hope springs eternal.


We are a group of bloggers who love to blog about food! And each month we all incorporate one main ingredient into a recipe or choose to celebrate a certain dish and put our own twist on it. This month that dish is waffles! We hope you all enjoy our delicious waffles this and come see what next month's new ingredient or dish will be. If you would like to join our group and blog along with us, come join our bloggers Facebook group Foodie Extravaganza. We would love to have you!

Check out all the fabulous waffles we've made this month!

Savory Waffles


Sweet Waffles


Ambidextrous Waffles


Tuesday, August 26, 2014

Bacon Dark Chocolate Bourbon Cookies #BaconMonth


Sweet, salty and smoky flavors combine gorgeously in these completely unhealthy but divine cookies baked with bacon and dark chocolate and dark brown sugar. 

I’ve said it before in this space but new readers would be fooled into believing the opposite: I am not much of a sweet eater. I love making them for others and I’ll try some, just to make sure the mix is right, but I am not tempted by cookies or cakes or even ice cream unless they have something salty or bitter or strong about them. They can’t be just sweet. These cookies have it all! Dark chocolate for just a little hint of bitterness, bacon and bacon fat for the salty component and, of course, dark brown sugar and bourbon for the sweet and strong. I took them along to a dinner party the other night and even the reluctant cookie eaters were sold. To save myself from temptation, I took my empty plate home and left behind the few cookies that remained. Now I am regretting that.

Next time I am going to add some toasted pecans as well. And keep them all to myself. :) Let me just warn you that if you don't have a problem with eating raw cookie dough, this one is trouble with a capital T.

Welcome to Week Four of Bacon Month!
Many thanks, once again, to Julie of White Lights on Wednesday for organizing this celebration of my favorite food and sponsoring the giveaway of The Bacon Cookbook* this week.

These cookies are an adaptation from this recipe on Recipe Girl. I figured, why use that much butter when you can use more bacon fat? Can I get a hell yeah?


Ingredients for two dozen cookies
6 slices thick cut smoked streaky bacon (about 8 oz or 225g)
Rendered bacon fat from the bacon, topped up with butter to 1/2 cup or 120ml
1 1/2 cups 190g flour
1/2 teaspoon baking soda
1/2 teaspoon baking powder
1/2 teaspoon salt
3/4 cup packed or 150g dark brown sugar
3 tablespoons bourbon
1 large egg
3 1/2 oz or 100g dark chocolate – I used a Lindt bar. So much better than cooking chocolate!

Method
Chop the chocolate up into little chunks and set aside.

Cut your bacon into small pieces and fry in a skillet until crispy. Scoop the bacon out with a slotted spoon, leaving behind as much bacon grease as you can in the skillet.


Drain the bacon bits on paper towels. Separate out a small handful for decorating the cookies before they bake.

Pour the warm bacon fat into a 1/2 cup or 120ml measuring cup and top up with butter until it is full. Allow to cool.

I'm guessing I had to add two to three tablespoons of butter to reach
my level as there was more than one-third a cup of rendered bacon fat from the fried bacon.


Combine the flour, baking soda and baking powder in a small bowl and set aside.


Chop your chocolate into small chunks. Separate out a small handful for decorating the cookies before they bake.

With electric beaters or in your stand mixer, beat the bacon fat/butter with the brown sugar, bourbon and salt until the mixture turns light brown.


Add in the egg and beat again.

Isn't it amazing how light the brown sugar mixture becomes? Like magic.


Now tip in the flour mixture and beat again until well combined. Add the larger piles of bacon pieces and chocolate chunks to the dough and stir until combined.


Refrigerate the dough for at least 30 minutes.

When you are almost ready to bake, preheat your oven to 350°F or 180°C and prepare a baking pan by greasing it or lining it with parchment or a silicone baking mat.

Drop the dough by spoonfuls on the prepared pan and press slightly with a wet spoon to flatten. I like to use a little scoop.


Top with a few of the reserved pieces of bacon and chocolate.


Bake for eight to 10 minutes or until golden brown on the bottom.


Remove from the oven and allow to cool briefly. Place cookies on a wire rack to finish cooling completely.

If you can resist eating these warm, you are a better person than I! 

Enjoy!


Are you ready for more bacon deliciousness?!


Now for the The Bacon Cookbook* giveaway! Please be aware that the book will only be shipped to US addresses. Canadian winners will receive an Amazon egift card for the price of the book. Full disclosure details can be found by clicking on Terms and Conditions on the Rafflecopter. This cookbook prize is sponsored by Julie of White Lights on Wednesday.

a Rafflecopter giveaway


*This is an Amazon affiliate link. If you buy after clicking on the link, I earn some small change for referring you to Amazon, at no extra cost to you.


Friday, August 8, 2014

Candied Habanero Bacon

Smoky bacon, topped with brown sugar and ground habanero then baked to a lovely crunchy sweet and salty crispiness, could well be a great snack for cocktail hour. I may never know. My advice: Don’t make it too early in the day because there won’t be any left before the sun sets. It’s irresistible. 


If you are a lover of bacon and hot chilies, there is only one downside to this recipe: It only makes eight slices. As I researched candied bacon on the internet, I came across various recipes and techniques but almost all of them called for about eight slices of bacon, either thin or thick cut, so weights varied. I snorted at them to myself and thought, where are you going with only eight slices?

Then I tried to fit more than eight on my wire rack and I realized why. “Oh, curse you, small wire rack!” I cried, making my helper tilt his head sideways with concern. I either needed to suck it up and leave the oven on for a double batch or settle for only eight. Summer temperatures being what they are in Dubai, I gave in. But I vow to do this again, and in greater quantities, once the scorching stops! It’s too good not to.

Ingredients
8 slices of streaky bacon
1/3 cup packed or 65g dark brown sugar
1 teaspoon ground habanero or to taste

Method
Preheat your oven to 350°F or 180°C. and line your baking pan – with sides to catch the rendering fat! - with foil. This is just to make cleanup easier. Place your wire rack on top of the baking pan. Just for the record, my pan is 11x16 inches or 28x40cm.

Arrange bacon in single layer on top of rack.


Bake in the preheated oven for about seven minutes.

Meanwhile, mix your brown sugar and ground habanero together in a small bowl.

Isn't the ground habanero a most wonderful deep red?!


Sprinkle the bacon with half the brown sugar/habanero mixture.


Bake 5-7 minutes longer. Turn the bacon over and sprinkle it with the remaining brown sugar and pepper.


Bake 3-4 minutes longer or until the sugar is melted and bubbly.


Remove from oven. Cool completely, about 15 minutes.


Enjoy!