Showing posts with label savory. Show all posts

Thursday, November 16, 2017

Chili Cheese Corn Dog Bundt #BundtBakers

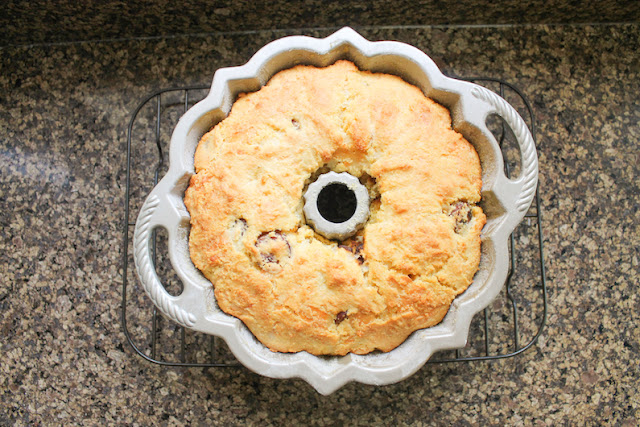
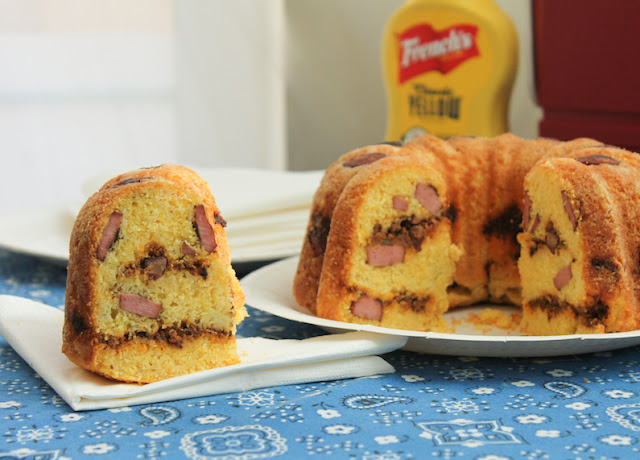
Hot dogs and spicy beef chili are baked up in a cheesy cornbread batter to create a savory chili cheese corn dog Bundt you can slice up and serve at your next party.

Food Lust People Love: Hot dogs and spicy beef chili are baked up in a cheesy cornbread batter to create a savory chili cheese corn dog Bundt you can slice up and serve at your next party.

One special treat I loved as a child were the fried corn dogs only sold at ball games in the concession stand. They vied for favorite status with Frito Pie, that is, Fritos served covered in chili, and nachos, crispy tortillas smothered with melted cheese food product. I have no idea if any actual cheese is involved in the making of that sauce but it is fabulous. I would go to a football or baseball game just for the food.

When our host of this month’s Bundt Bakers event decided on tailgating Bundts as our theme, I knew I wanted to create a Bundt that had elements of my favorite ballpark snacks. I started with my mom’s homemade cornbread recipe – it’s the best and I really should share that sometime soon – then I added the rest. Talk about good!


Chili Cheese Corn Dog Bundt


This would be great to take along to any tailgating party or neighborhood potluck.

Ingredients for a 6-cup Bundt pan
1 cup or 180g yellow cornmeal , plus extra for the Bundt pan
1 cup or 125g all-purpose flour, plus extra for the Bundt pan
2 tablespoons sugar
4 teaspoons baking powder
1/2 teaspoon salt
3/4 cup or 180ml milk
3/4 cup or 200g chili - homemade or otherwise. Mine was from this recipe.
3 1/2 oz or 100g extra sharp mature cheddar
3 hot dogs (I used Oscar Meyer because that’s what I can buy here. Use your favorite brand.)
1 large egg
1/4 cup or 60ml canola oil, plus extra for greasing the pan

Method
Preheat oven to 350°F or 180°C and liberally grease and flour your 6-cup Bundt pan. I used a combination of flour and cornmeal for mine.

Slice the hot dogs into thick circles and fry them gently for a few minutes in a nonstick skillet. This removes some of their moisture. Set aside to cool.


In a large bowl, combine cornmeal, flour, sugar, baking powder and salt. Add in the cheddar cheese and sliced hot dogs, stirring well. I set aside 8 slices to put on the bottom of the Bundt pan before adding the batter. They came out pretty cute so you might want to do the same.


In another bowl, beat together the milk, egg and oil. Beat until fairly smooth, about one minute.

Fold the dry ingredients into the wet and stir until they are well combine.


If desired, put slices of hot dog around the bottom of your greased and floured Bundt pan. Spoon one third of the batter into the Bundt pan. Spoon half of the chili on top.


Top with the second third of the batter. Add the rest of the chili. Top with the last of the batter. In other words, it goes 1. batter 2. chili 3. batter 4. chili 5. batter.


Bake in the preheated oven for 30-35 minutes or until it's lightly browned on top and pulling away from the sides slightly.

Food Lust People Love: Hot dogs and spicy beef chili are baked up in a cheesy cornbread batter to create a savory chili cheese corn dog Bundt you can slice up and serve at your next party.


Remove from the oven and let to cool for a few minutes. Turn the Bundt out onto a rack to cool for another 15 minutes before slicing to serve.

Food Lust People Love: Hot dogs and spicy beef chili are baked up in a cheesy cornbread batter to create a savory chili cheese corn dog Bundt you can slice up and serve at your next party.

Enjoy!

Food Lust People Love: Hot dogs and spicy beef chili are baked up in a cheesy cornbread batter to create a savory chili cheese corn dog Bundt you can slice up and serve at your next party.


Every month my Bundt Bakers group gets together to bring you creative treats baked in Bundt pans. Sometimes they are savory, most times they are sweet, but they are always delicious. Check out this month’s list below. Many thanks to our host Sue of Palatable Pastime for coming up with this fun theme and all her behind the scene work.

BundtBakers  

#BundtBakers is a group of Bundt loving bakers who get together once a month to bake Bundts with a common ingredient or theme. Follow our Pinterest board right here. Links are also updated each month on the BundtBakers home page.

Pin it!

Food Lust People Love: Hot dogs and spicy beef chili are baked up in a cheesy cornbread batter to create a savory chili cheese corn dog Bundt you can slice up and serve at your next party.
.

Monday, November 13, 2017

Stuffed Plum Tomato Tart #BakingBloggers

For a Christmas brunch or a Sunday lunch, this stuffed plum tomato tart with a savory black olive shortcrust is pretty enough to be the star of the meal.

Food Lust People Love: In this Stuffed Plum Tomato Tart with Black Olive Shortcrust, the flavors are Mediterranean, from the red ripe plum tomatoes and the mozzarella and anchovy stuffing, to the black olive shortcrust.

Do you ever come across a new ingredient in the grocery store that you just have to buy, even if you have no idea what you will make with it? I do! My most recent purchase was a container of mini plum tomatoes. Talk about cute!

Well, I couldn’t just cut them up and put them into a salad because then, how would you know how cute they were? Right? I decided that the best way to showcase them would be to stuff and bake them. And the best way to get them to stay upright would be to make them part of a tart.

This is a bit fiddly to make since you have to empty the tomatoes in order to fill them, but look at how pretty it turned out? Totally worth the time and, really, not a lot of effort.


Stuffed Plum Tomato Tart with Black Olive Shortcrust

The flavors are Mediterranean, from the red ripe plum tomatoes and the mozzarella and anchovy stuffing, to the black olive shortcrust.

Ingredients
For the black olive shortcrust:
1 1/2 cups or 190g flour
1/2 teaspoon salt
1/3 cup or 60g shortening
1/2 cup or 40g minced black olives, well drained
3-4 tablespoons cold water

For the plum tomato tart filling:
16 baby plum tomatoes (mine weighed about 1 lb 2 oz or 500g)
1/2 cup or 28g fresh breadcrumbs
1 clove garlic
Small bunch chives (about 15g)
3.5 oz or 100g mozzarella, grated
5-6 small anchovies fillets, drained (for a vegetarian tart, replace these with salty Kalamata olives)
3 large eggs
1/4 cup or 60ml milk
1/2 cup or 50g finely grated Parmesan
Freshly ground black pepper
Olive oil

Method
Make the pastry dough by lightly combining the shortening with the salt and flour, until you have crumbles. Fork through the minced black olives.


Add the cold water a little at time, mixing it in with a fork, until the pastry can form a ball. You can see my method, without the olives, in detail here: How to make a flaky pie crust.


Wrap the dough in cling film. Chill.


Halve and empty the plum tomatoes, reserving the liquid and flesh you have removed. I used a melon ball scoop, which made this part really easy. Leave the tomato halves to drain cut side down on paper towels.


Preheat oven to 350°F or 180°C. Lightly grease and line your 8 3/4 in or 22cm spring-form tart pan with baking parchment.

To make the stuffed plum tomato filling, mince the garlic, chives and anchovies. Mix them with the grated mozzarella, breadcrumbs and enough of the tomato insides to moisten.


Roll out the chilled olive pastry crust and ease it into the prepared tart pan. Trim the pastry to fit or fold it over and make a decorative edge.


Top with another piece of parchment and baking beads.

Bake in your preheated oven for about 10 minutes. Remove the beads and parchment and bake another five. Remove the tart case from the oven and brush the bottom with a little olive oil.

Stuff the tomato halves with the filling and put them cut side up in the tart case, close together so they support each other to stay upright. I piled them all in and then held one at a time to fill, then replaced it in the crust.


Beat your eggs with the milk. Add the Parmesan and a good few grinds of fresh black pepper and mix well.

Carefully pour the egg mixture around the stuffed tomatoes. Give the whole tart another couple of grinds of fresh black pepper.

Food Lust People Love: In this Stuffed Plum Tomato Tart with Black Olive Shortcrust, the flavors are Mediterranean, from the red ripe plum tomatoes and the mozzarella and anchovy stuffing, to the black olive shortcrust.


Bake for 35-40 or until the egg is set and the tomatoes are slumping.

Food Lust People Love: In this Stuffed Plum Tomato Tart with Black Olive Shortcrust, the flavors are Mediterranean, from the red ripe plum tomatoes and the mozzarella and anchovy stuffing, to the black olive shortcrust.


Cut into slices. Enjoy!

Food Lust People Love: In this Stuffed Plum Tomato Tart with Black Olive Shortcrust, the flavors are Mediterranean, from the red ripe plum tomatoes and the mozzarella and anchovy stuffing, to the black olive shortcrust.

Today I am joining a group of avid bakers in a new group called Baking Bloggers. Our organizer is Sue from Palatable Pastime and for our inaugural post, she has chosen PIE as the theme. Check out all the other lovely pies and tarts, both sweet and savory, that we are sharing.

Pin it! 

Food Lust People Love: In this Stuffed Plum Tomato Tart with Black Olive Shortcrust, the flavors are Mediterranean, from the red ripe plum tomatoes and the mozzarella and anchovy stuffing, to the black olive shortcrust.
 .

Monday, May 29, 2017

Crawfish Pie Muffins #MuffinMonday


Crawfish pie muffins are not for the faint of heart. They have a half cup of melted butter, a full cup of peeled crawfish with fat included, and a little cayenne for zip. On the other hand, I've also included one cup of iron-fortified quick grits and some fresh green onions.


Every year when I come home for a visit in the spring, boiled crawfish are at the top of my list of Things I Want to Eat. We like to buy them live and cook them ourselves because we can season them to our taste but most importantly, because they are substantially cheaper that way. They are sold by the sack and you have to buy the whole thing (usually between 30-40 pounds) because stores won't divide them. This year the price is $1.97/lb, which is pretty darn good. Deliveries are only made on Friday, Saturday and sometimes Sunday so I plan my trips accordingly. I need at least one weekend here to take advantage.

Last Friday, I bought a 35 lb sack and boiled them in three batches. It was just my elder daughter, my mother and me so we ate till we couldn’t eat any more and, of course, there were plenty, I mean PLENTY, of leftovers. I ate cold boiled crawfish (delicious!) on Saturday. And on Sunday my mom came over and we both ate lots more. Then I peeled a bunch and made these tasty crawfish pie muffins. And there are still crawfish in my refrigerator! I don’t think I could ever get tired of eating boiled crawfish but this is going to be the test.

Meanwhile, the muffins turned out perfectly. The cooked grits add great flavor and texture, kind of a little like cornbread but with a much softer crumb.

Ingredients 
2 cups or 250g all-purpose flour
1 cup or 170g cooked, peeled crawfish, with fat
Small bunch green onions, just the green parts, chopped
1 1/2 teaspoons baking powder
1 teaspoon fine sea salt
1/4 teaspoon cayenne
2 large eggs
3/4 cup or 360ml milk
1/2 cup or 113g butter, melted and cooled, plus extra for greasing pan
1 cup or 242g cooked grits, cooled

Method
Preheat your oven to 350°F or 180°C. Lightly grease 12-cup muffin pan with butter.

Measure your flour, baking powder, salt and cayenne into a large mixing bowl, along with the green onions and peeled crawfish. Mix well to combine and coat the crawfish with the seasoned flour.


Whisk the eggs together with the cooled grits. Add in the butter and milk and whisk again.


Pour the liquid ingredients into the dry ones and stir until just mixed together.


Spoon the batter into the prepared muffin pan and bake for 25-30 minutes or until the muffins are baked through and golden on the outside.

Enjoy!


Check out all the lovely muffins my Muffin Monday bakers have for you today!


#MuffinMonday is a group of muffin loving bakers who get together once a month to bake muffins. You can see all our of lovely muffins by following our Pinterest board.

Updated links for all of our past events and more information about Muffin Monday, can be found on our home page.

.

Monday, November 28, 2016

Shrimp Scampi Muffins #MuffinMonday

Garlicky, spicy and full of shrimp! Savory shrimp scampi muffins are perfect lunch box food. They are great cold or you can rewarm them briefly in a microwave. Or make them in mini muffin pans for a quick and easy appetizer for your holiday party.


First, my apologies for the lack of photos for the steps where we cook the shrimp. The truth is, we had shrimp scampi for dinner on Saturday night so I actually cooked about three times the amounts below, with way more butter.

It was a simple meal with crusty French bread for sopping up all the lovely garlickly sauce and a fresh salad to counterbalance the rich shrimp dish. The treble amount was a deliberate choice because I knew I wanted to make muffins with the leftovers. Savory muffins are my favorites and it has been a couple of months since I made some. Hope you like them too!

Ingredients
For the shrimp:
1 tablespoon butter
2-3 cloves garlic, minced
1 fresh red chili, minced
1/8 cup or 30ml dry white wine
8 large shrimp (After cooking, about 1 cup, chopped roughly or 150g)
Good handful flat leaf parsley, chopped finely
Salt to taste

For the muffins:
3/4 cup or 180ml milk
1/3 cup or 80ml canola or other light oil
1 egg
2 cups or 250g flour
1 tablespoon baking powder
1/2 teaspoon coarsely ground black pepper
1/2 teaspoon salt

Method
Preheat oven to 350°F or 180°C and prepare your 12-cup muffin pan by greasing it or lining it with paper baking cups.

Heat the butter in a heavy bottomed pan and add the garlic and chopped chili. Sauté them gently until the garlic just starts to color and add in the white wine.

Now add the shrimp. Cook for a few minutes, covered, until the shrimp are cooked though. Add the parsley, stir and remove from the heat. Sprinkle with salt to taste. Set aside to cool.

In a small mixing bowl, whisk together your milk, egg and oil.

In a larger bowl, combine flour, baking powder, pepper and salt.

Chop your shrimp in big pieces and mix them into the dry ingredients.


Fold the liquid ingredients into the dry ingredients until just mixed.


Divide the batter between your 12 muffin cups.

Bake in your preheated oven for 20-25 minutes or until light golden brown and toothpick inserted in center comes out clean.


Enjoy!


Check out all the great muffins my Muffin Monday group is sharing today!


#MuffinMonday is a group of muffin loving bakers who get together once a month to bake muffins. You can see all our of lovely muffins by following our Pinterest board.

Updated links for all of our past events and more information about Muffin Monday, can be found on our home page.

Pin it!

 .

Tuesday, July 19, 2016

Cheddar Chive Shortbread #CreativeCookieExchange

Cheddar chive shortbread is buttery, savory and crisp when first out of the oven, the perfect accompaniment to your afternoon tea or evening cocktail time. 

Shortbread is a traditionally sweet treat but since the main ingredients are flour and butter, I figure there’s no good reason it can’t be savory as well. This month’s Creative Cookie Exchange theme is cheese so I thought it was a great time to test my theory. I am pleased to report that while it feels funny calling these cookies, shortbread is definitely considered a cookie, so here we are. And they are delicious! They are rich and buttery, with a lovely hint of heat from the black pepper and cayenne. They can stand up to a strong drink as well a good cup of tea.

Ingredients
1/2 cup or 113g unsalted butter, at room temperature
1/2 teaspoon salt
1/4 teaspoon freshly ground black pepper
1/4 teaspoon cayenne pepper
8 oz or 225g extra-sharp cheddar cheese, grated
2 tablespoons finely minced chives or green onion tops
1 cup unbleached all-purpose flour
Pinches paprika to decorate, optional

Method
In your electric mixer, beat together your butter, salt, black pepper and cayenne until you have a smooth paste.


Add in the cheese, flour and chives and mix at low speed until they form a soft dough.


Shape the dough into roll, wrap in plastic wrap or waxed paper, and chill 30 minutes.


Preheat the oven to 350°F or 180°C and line your baking sheet with parchment or a silicone mat.

Unwrap the roll and slice the shortbread into circles about 1/4 in or 1/2cm thick. Place on your prepared baking sheets leaving space around for them to spread. I put mine a bit close together thinking I might fit them all on one pan and ended up needing a second pan for the balance of six cookies. Learn from my errors and just space them more evenly on two pans to start with.


Sprinkle on a little paprika to decorate, if desired. You can use cayenne or black pepper instead but I was afraid mine might be too spicy for my taste testers.


Bake the shortbread until lightly golden and beginning to brown on edges, about 10-12 mins.

I decided that I didn’t like the rough edges for a civilized teatime treat with Manzanilla sherry so I cut them out with a glass to even the edges. This is a totally unnecessarily step, but they do look nicer, don’t they? And we loved the little toasted crumbs that were left behind.


Enjoy!


Check out all the other lovely cheesy cookies my Creative Cookie Exchange friends have made. Many thanks to Renee of Magnolia Days for doing all the behind the scenes work this month!


Creative Cookie Exchange is hosted by Laura of The Spiced Life. We get together once a month to bake cookies with a common theme or ingredient so Creative Cookie Exchange is a great resource for cookie recipes. Be sure to check out our Pinterest Board and our monthly posts at The Spiced Life). We post the first Tuesday after the 15th of each month!

Pin it! 

.

Thursday, June 16, 2016

Savory Zucchini Cheesecake #BundtBakers


A cheesecake with a difference, this savory zucchini version is perfect sliced up and served on toasted bread or crackers. 

The best part of belonging to groups like Bread Bakers and Bundt Bakers is the challenge of creating a recipe to fit each month’s theme. We have a lot of talented bakers in both groups and sometimes it seems like they are trying to outdo each other when they host! The rule is that the host gets to choose the theme. If you’ve been reading along, you know that just in the last couple of months, we've baked Bundts inspired by the tales of Scheherazade and retro desserts, just to name two creative themes.

This month our host is Padmajha from Seduce Your Tastebuds and she has gone in an unusual direction for baking in a Bundt pan: Savory! I immediately thought of the little savory shrimp cheesecakes I baked a couple of years ago for Sunday Supper and I knew a larger Bundt would be delicious. Since summer is the season of an overload of zucchinis (courgettes to my Australian/British readers), I decided to incorporate them to help those gardeners with the surplus. You are welcome!


Ingredients
Drizzle of olive oil, for oiling the Bundt pan
2 cups or 230g zucchini, unpeeled & grated
1 teaspoon fine grain sea salt
2 large eggs
leaves from few sprigs fresh thyme
Freshly ground black pepper
1/4 cup or 35g minced onion
1 clove garlic, minced
1 fresh jalapeño, minced
2 tablespoons fresh lemon juice
2 tablespoons flour
2 cups or 485g whole milk ricotta cheese
1/2 cup or 50g freshly grated Parmesan cheese

Optional, to garnish:
Zest of one lemon
Thyme leaves

Tip: Use a microplane to zest the lemon onto a paper towel and set it aside early in the process. When it's time to sprinkle the lemon zest on your savory Bundt, it will be quite dry and sprinkle-able. Damp zest tends to clump together. 

Method
Preheat oven to 325°F or 163°C. Drizzle about a teaspoon or so of olive oil in your 10-cup Bundt pan. I used this square one from Nordic Ware. (<affiliate link) The square design makes cutting slices to top bread or crackers much tidier. Use a pastry brush to get the oil in all the little corners and crevices of your chosen pan.

In a colander, toss the grated zucchini with the salt and set it aside to drain either in the sink or with a bowl underneath. It’s amazing how much liquid comes out.


Whisk your eggs with the thyme leaves and a good sprinkling of freshly ground black pepper in a large bowl.

Add in the onion, garlic and jalapeño and mix again.


Squeeze the grated zucchini to get out as much liquid as you possible can, then add it to the bowl.

Add the lemon juice and the flour and mix well.


Now fold in the ricotta and the Parmesan. Give the whole thing another good few grinds of black pepper. Can you tell I am a fan?


Spoon the cheese mixture into the pan and smooth out the top.


Bake in your preheated oven for 35-40 minutes or until the cheesecake is still just set. It will set more as it cools.


Leave it on a wire rack for about half an hour or until it looks fairly firm. Now here’s the tricky bit. You need to put your serving plate on top of the pan and turn the whole thing over in one swift but steady movement. You do not want one side of the cheesecake to fall out before the other. I ran a toothpick around the edges and tipped mine from side to side to loosen it first. (Don’t use a knife or you might mar the non-stick finish of a Nordic Ware pan.)

Mix your thyme leaves and lemon zest together and sprinkle them both on the cheesecake.


Serve with sliced baguette or crackers. And perhaps a celebratory beverage.


Enjoy!

Many thanks this month to our host, Padmajha. Making a savory Bundt was a great challenge! Many thanks also to Renee of Magnolia Days who made sure this all ran smoothly.

Check out all the wonderful ways my fellow Bundt Bakers met the challenge.

BundtBakers

#BundtBakers is a group of Bundt loving bakers who get together once a month to bake Bundts with a common ingredient or theme.  Follow our Pinterest board right here. Links are also updated each month on the Bundt Bakers home page.


 .