A classic from
Joy of Cooking, this oatmeal chocolate chip cookie recipe makes the best chewy cookies around.
We arrived in the sweltering heat and were met at the rustic terminal building by a man named Pup Joint. Back then, we meant me, my husband and one large Boxer dog.
 |
| So young! What the heck happened? |
The seaside oilfield town of Balikpapan, carved out of the jungle on the southeast corner of Borneo, was as about as far as you could get, in distance and modernity to Bandar Seri Begawan, Brunei, where we had met six years before, in the northwest corner of the same enormous island. Of course, compared to Balikpapan, most cities were developed.
We didn’t really have a grocery store to speak of. And, back then, there was only one decent hotel in town. Other options to eat out included the local
warung – small holes in the wall serving Indonesian fare – or Chinese food. So we made our own fun. We hosted game nights and potlucks and barbecues around the pool. We played card games and did needlework. There might have even been some drinking games, possibly Quarters.

I took Indonesian lessons and traveled around the region, practicing my language skills. We went SCUBA diving and I enjoyed baking and cooking,
despite the limited supplies. And then the dog got a baby sister, which suddenly gave me all kinds of necessary jobs!
.
Telephone lines were poor and satellite television was our only real link to the outside world. The complex we lived in had one immense satellite dish with one receiver so everyone watched whatever it was tuned to and the guardhouse controlled it. We received the live feed so there were no commercials but we got to see the news anchors sipping their coffee or combing their hair or checking their teeth for lipstick between segments. It was all rather amusing. Until the time when we had a houseful of guests watching a rugby game and the guards decided to change the channel. A persuasive emissary was sent to convince them to change it back immediately.
But the single most important thing that made that little town one of our favorite places to live were the friends we made. All we had were each other. We became family. And without an English bookstore or internet, we depended on each other to share books and recipes and magazines. If you’d read something, you passed it on. And there were no secret recipes. If you made something delicious, you shared.
And that is the very long story of how I came by this recipe for oatmeal chocolate chip cookies. My friend, Valorie, made these for us one day back in 1990 and I have been making them ever since. Her original recipe comes from the
Joy of Cooking, and you can see from my well-worn hand-copied version that it is used often.
I am sharing it with you today, because it became a favorite with my daughters as well and was probably the one cookie I made most often for after school snacks when they lived at home. I would make a double batch of dough and bake a few that first day, then freeze the rest of the dough and they would get freshly baked cookies with minimal time and effort on many other days as well.
Today I am joining a group of avid cookie bakers called Creative Cookie Exchange started by Laura of
The Spiced Life and Rebecka of
At Home with Rebecka. Our theme this month is Back to School – cookies that would be great packed in lunch boxes or for an after school snack. Make sure to scroll down to see the other delicious cookies my fellow bloggers have made!
Ingredients
1/2 cup (firmly packed) or 100g brown sugar
1/2 cup or 115g granulated sugar
1/2 cup or 115g butter, softened
1 egg
1 teaspoon vanilla essence
1 tablespoon milk
1 cup or 125g all purpose flour
1/2 teaspoon baking soda (bicarbonate of soda)
1/2 teaspoon double-acting baking powder
1/2 teaspoon salt
1 cup or 95g uncooked quick rolled oats
3/4 cup or 125g semi-sweet chocolate chips
Optional: 1/2 cup or 50g chopped pecans (I leave them out most of the time.)
Method
Preheat oven to 350°F or 180°C and grease a cookie sheet.
Cream your butter with the two sugars.
Add in the egg, vanilla and milk. As you can see, I've doubled the recipe.
Add in the flour, baking powder, baking soda and salt and beat until smooth.
Add in the oats and chocolate chips and beat until well mixed.
Drop 2 inches apart on well-greased cookie sheet.
Bake 8-10 minutes, or until light brown. For chewy cookies, do not over bake!
 |
| Yeah, I put them too close. Doesn't affect the taste though. |
A single batch will make about three dozen two-inch cookies per the ingredients list at the top. I highly recommend making a double batch of dough and freezing the balance as outlined below.
Freezing and baking instructions
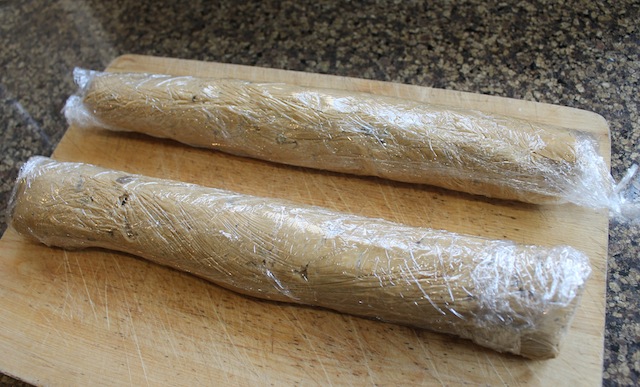
On a big sheet of cling film, spoon out your leftover cookie dough along the width of the film.
Fold it over and press the dough into a sausage shape.
Fold in the sides of the cling film and roll the sausage up to completely cover the dough.
Place on cutting board or baking pan and put into the freezer until firm. This keeps for a couple of months.
When you are ready to bake again, preheat the oven and cut off as many slices of dough as you want to bake.
Place them on a greased cookie sheet. By the time the oven is up to temperature, the dough slices will be thawed.
 |
| Once they soften, you can pat them round again, if you want. The shape does not affect the taste though. :) |
Bake as per initial instructions. Now you can have fresh baked cookies anytime! And the best part is that you know exactly what has gone into these, unlike the store-bought dough.
Enjoy!
Also, if you are looking for inspiration for this
month’s theme, check out what all of the hosting bloggers have made so far:
.