Showing posts with label #BakingBloggers. Show all posts

Monday, September 13, 2021

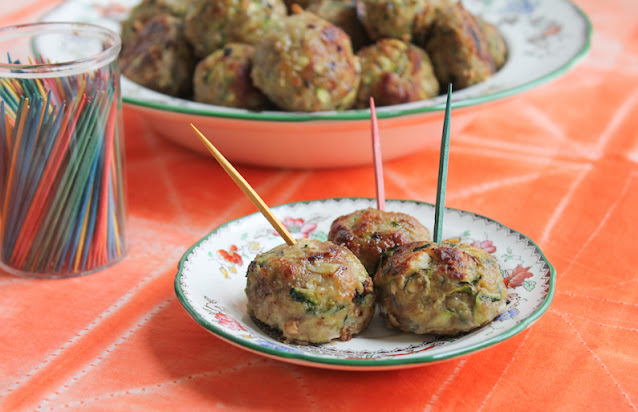
Turkey Zucchini Feta Meatballs

These Turkey Zucchini Feta Meatballs are delicious just as they are, baked till golden, as an appetizer or add them to a sauce to serve with pasta. It's kind of magical how the zucchini seems to disappear as they bake so objectors likely won't even notice it. 

Food Lust People Love: These Turkey Zucchini Feta Meatballs are delicious just as they are, baked till golden, as an appetizer or add them to a sauce to serve with pasta. It's kind of magical how the zucchini seems to disappear as they bake so objectors likely won't even notice it.

I know that summer is the time when zucchini is meant to grow in abundance and people complain when neighbors leave baskets of it on their porches. Or supposedly that happens. It has never actually happened to me! 

But I got a bit of a giggle out of the sign at my nearby Sprouts Farmers Market that declared the produce I know as zucchini was Italian squash. Is this like rebranding prunes to dried plums? I have to admit, Italian squash sounds just a bit nicer and certainly more sophisticated than zucchini. (Or we could go all British and call them courgettes.) 

The results of multiple web searches seem to agree they are the same vegetable. Let’s take a poll in the comments. Do you call them zucchini or Italian squash? Or courgettes?

Turkey Zucchini Feta Meatballs 

This recipe is adapted from one in the New York Times Cooking section.  If you don’t have ground turkey, substitute chicken or pork. 

Ingredients
2 medium Italian squash or zucchini (approx. weight 11 oz or 312g)
1/2 large shallot
1/2 cup or 40g panko bread crumbs
1 1/2 teaspoons ground cumin
1/2 teaspoon red pepper flakes
1/2 teaspoon fine sea salt
2 oz or 57g feta, crumbled
1 lb or 450g ground turkey
1 large egg
Olive oil

Method
Preheat your oven to 425°F or 218°C and line a baking pan with baking parchment or a silicone liner. 

Cut the stem ends off of the zucchini and discard. Line a plate or cutting board with two paper towels and grate the zucchini onto the paper towels with the large holes of your grater. 


Push the zucchini around till it covers the paper towels completely to allow as much moisture as possible to be absorbed. Roll the zucchini up in the paper towels and set aside. 


Add the panko, cumin, red-pepper flakes, salt and feta to a large mixing bowl. Peel then grate the shallot and add it in as well.


Gently use the tines of a fork to toss until combined. Tip in the grated zucchini and mix again. 


Add the turkey and stir gently until combined. 


Pop the egg in the middle and break it up with the tines of your fork. Now mix it in with the fork until thoroughly combined. 


Use a spoon or small cookie dough scoop to divide the mixture into about 32 pieces, around 2 tablespoons each. Use wet hands to form them into round meatballs and place them on the prepared baking sheet. I use a two-tablespoon scoop which makes short work of this part of the job.

Rolled smooth at the top and right, merely scooped for the rest of them

Drizzle the meatballs with olive oil and bake for 20-25 minutes or until the meatballs are cooked through. 


For more browned meatballs, broil (grill) for a few minutes at the end, if desired. It's not necessary for cookedness (I wasn't sure that was a word but spellcheck is on board!) but they do look nicer, especially as we are using turkey, a lighter colored meat. 

Food Lust People Love: These Turkey Zucchini Feta Meatballs are delicious just as they are, baked till golden, as an appetizer or add them to a sauce to serve with pasta. It's kind of magical how the zucchini seems to disappear as they bake so objectors likely won't even notice it.

Enjoy! 

Food Lust People Love: These Turkey Zucchini Feta Meatballs are delicious just as they are, baked till golden, as an appetizer or add them to a sauce to serve with pasta. It's kind of magical how the zucchini seems to disappear as they bake so objectors likely won't even notice it.

It’s time for my Baking Bloggers to share recipes again! This month’s theme is ground meats aka mince to the Brits among us. Many thanks to our host and organizer, Sue of Palatable Pastime. Check out all the recipe links below. 


Baking Bloggers is a friendly group of food bloggers who vote on a shared theme and then post recipes to fit that theme one the second Monday of each month. If you are a food blogger interested in joining in, inquire at our Baking Bloggers Facebook group. We'd be honored if you would join us in our baking adventures.

Pin these Turkey Zucchini Feta Meatballs!

Food Lust People Love: These Turkey Zucchini Feta Meatballs are delicious just as they are, baked till golden, as an appetizer or add them to a sauce to serve with pasta. It's kind of magical how the zucchini seems to disappear as they bake so objectors likely won't even notice it.

.

Monday, August 9, 2021

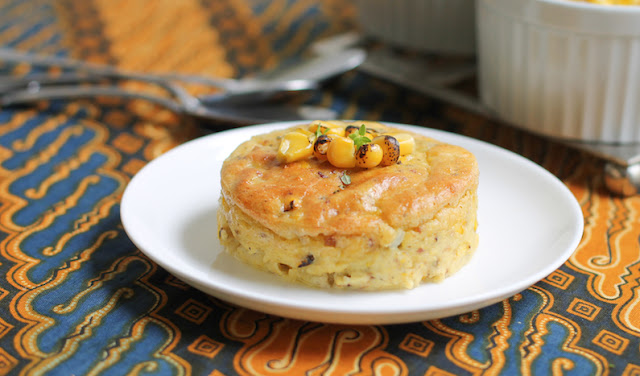
Bacon Corn Puddings

These individual bacon corn puddings are made with roasted corn and cornmeal to add a lot of extra corn flavor, along with the bacon and thyme. Delicious and light as a side dish or small main. 

Food Lust People Love: These individual bacon corn puddings are made with roasted corn and cornmeal to add a lot of extra corn flavor, along with the bacon and thyme. Delicious and light as a side dish or main.

When I first arrived back in the States a couple of years ago, I was excited to finally get a chance to shop at Trader Joe’s. I posted on Facebook that I’d love to hear about what my friends buy there so I could make a list of good things to try. 

My friend, Glenys, was the very first to respond: chargrilled corn, found in the freezer section. So much easier than doing it yourself, she said. I must say, she is absolutely right. The Trader Joe’s roasted corn is delightful and since it’s frozen, it's easy to keep on hand. If you want to use fresh corn for this and roast your own for this recipe though, go for it! 

(I know not everyone reading this will be able to see the post but for those of you who can, here’s the link: What Stacy’s friends buy at Trader Joe’s. My apologies to the rest of you.)

Bacon Corn Puddings

The original recipe that I adapted to make these lovely little puddings continued past the initial baking to decanting and then rebaking them with some cream poured on top. It also called for creamed corn so that wasn’t happening either. I have no idea how that would have tasted but I can tell you that these are lovely and light and delicious, despite falling a bit after they poofed up in the oven. 

Ingredients – for 4 individual puddings
1/2 small onion, diced
2 tablespoons butter, plus extra for buttering the ramekins
1 teaspoon sugar
1 1/2 cups or 200g roasted corn kernels (drained if canned)
1/4 cup or 30g bacon crumbles
2 tablespoons cornmeal
2 tablespoons cornstarch
2/3 cup or 160ml milk
1/3 or 80ml cup heavy cream
1 sprig fresh thyme, leaves picked
salt & pepper to taste
2 large eggs

Optional garnish:
2 tablespoons roasted corn, thawed
fresh thyme leaves


Method
Combine onion and butter and cook over medium heat until the onion is translucent, about 4 minutes.

Add the cornmeal, roasted corn, bacon crumbles and a pinch of salt and a couple of grinds of black pepper. Cook 2-3 minutes while stirring.


Whisk the cornstarch into the milk till its dissolved. 

Add the milk, cream, sugar and thyme to the pot. Cook over medium heat, stirring often, until mixture comes to a low boil and thickens. When you drag a spoon through it, it should be thick enough not to run back together. 


Remove 3/4 cup (187.5g) of the corn mixture and blend with a hand mixer until smooth. 


Stir back into the corn mixture in the pot. Taste and season with salt and pepper. Set aside to cool. 

I put mine in a bowl at this point because as much as I love my little Le Creuset pots, they take ages to cool down. If your cooking pot is more cooperative, please don’t dirty another vessel. 


Meanwhile preheat your oven to 400°F or 200°C and butter four ramekins. To give you an idea of size, mine hold just shy of 1 1/4 cups or 295ml when filled to the top. 

Once the corn mixture is cool, whisk the eggs well and mix them into it. 


Place the ramekins in a deep baking pan then divide the corn mixture between them. 


Fill the pan with hot water halfway up the sides of the ramekins.

Bake in your preheated oven for about 30 minutes or until puffy and golden on top. 

Food Lust People Love: These individual bacon corn puddings are made with roasted corn and cornmeal to add a lot of extra corn flavor, along with the bacon and thyme. Delicious and light as a side dish or main.

Top with some extra kernels of roasted corn and a few fresh thyme leaves for garnish. 

Food Lust People Love: These individual bacon corn puddings are made with roasted corn and cornmeal to add a lot of extra corn flavor, along with the bacon and thyme. Delicious and light as a side dish or main.

Serve warm. I decanted one for the photos but we ate the others straight out of the ramekins with a tomato and mozzarella salad on the side. Side dish or main? These bacon corn puddings work as either. 

Food Lust People Love: These individual bacon corn puddings are made with roasted corn and cornmeal to add a lot of extra corn flavor, along with the bacon and thyme. Delicious and light as a side dish or main.

Enjoy!  

It’s the second Monday of the month so that means my Baking Blogger friends are sharing recipes as well. Our theme, as you might guess from most of the titles below, is CORN. Many thanks to our organizer and host, Sue of Palatable Pastime


Baking Bloggers is a friendly group of food bloggers who vote on a shared theme and then post recipes to fit that theme one the second Monday of each month. If you are a food blogger interested in joining in, inquire at our Baking Bloggers Facebook group. We'd be honored if you would join us in our baking adventures.

Pin these Bacon Corn Puddings!

Food Lust People Love: These individual bacon corn puddings are made with roasted corn and cornmeal to add a lot of extra corn flavor, along with the bacon and thyme. Delicious and light as a side dish or main.
 .

Monday, July 12, 2021

Toasted Eggplant Crust Mini Pizzas

These Toasted Eggplant Crust Mini Pizzas are as delicious as they are adorable with quick tomato sauce and toppings baked on toasted eggplant slices.

Food Lust People Love: These Toasted Eggplant Crust Mini Pizzas are as delicious as they are adorable with quick tomato sauce and toppings baked on toasted eggplant slices.

We went through a phase a while back of attempting to eat keto, that is to say, without carbs or very low carb. It did not go well. I didn’t lose any weight, for one, and I can’t imagine the increased fat in the cheese, meat and bacon I consumed did my cholesterol any good. Nevertheless, I did create a couple of recipes we loved so I’ll call that part of the experiment a win. 

The first used leftover pork roast slices and eggplant to make stuffed cheesy rolls covered in a rich tomato sauce then baked. Seriously, so good! Most canned tomatoes are not considered keto because of the added sugar so the secret appears to be making your sauce from scratch with fresh tomatoes. 

The second recipe was for rice-free cabbage rolls made with both beef and smoked sausage. I don't know that I'll ever make traditional cabbage rolls again because the smoked sausage adds so much flavor and who needs the rice really?

These toasted eggplant mini pizzas were the third keeper. They kind of remind us of our favorite eggplant Parmigiana but with a lot less trouble. Also: pepperoni - always a welcome addition in my book. 

Toasted Eggplant Crust Mini Pizzas

These would be a great appetizer for any crowd, with the added bonus of being naturally gluten free and keto-friendly.

Ingredients
1 large eggplant (about 19 oz or 535g, but a little bigger or smaller won't matter too much.)
fine sea salt

For the fresh tomato sauce:
2 ripe medium sized tomatoes
2 cloves garlic, minced
1 teaspoon dried oregano
1/4 teaspoon baking soda
1/8 teaspoon fine sea salt 

Suggested toppings:
Mozzarella or your favorite pizza cheese, shredded
Pepperoni (get the mini ones if you can, so cute!)
Black olives, pitted and sliced
Sliced jalapeños
Anchovies
Crushed red pepper 

To garnish after baking: fresh basil

Method
Trim the stem of your eggplant and cut it into 1/2 in or 1 cm slices (I got 16.) If you look closely, you'll see the little pokes of the knife I made at the appropriate intervals using a measuring tape because I'm anal like that. Eyeball it if you want to. 


Sprinkle the eggplant slices lightly with salt and stack them in a colander and set aside in your sink or on a plate to catch any liquid that drips out so it doesn't make a big mess.


Peel your tomatoes. I find the easiest way to peel tomatoes is to cut a cross in the skin with a sharp knife and then use a fork to dip the tomato into just boiled water for about 10-15 seconds. The skin will then slip off easily. 


Core and finely chop the peeled tomatoes.


Combine them in a pan with the minced garlic, oregano, baking soda and salt. 


Cook over medium heat for about 17-20 minutes, or until the tomatoes and garlic are softened and most of the liquid has evaporated. Set aside to cool. 


By this time, your eggplant should have released some juice. Dry the slices off with a tea cloth or paper towels. 

Toast them on a non-stick griddle pan over a medium high heat until they are browned on both sides. This takes just 4-5 minutes a side. Unless you’ve got a really large pan, this is going to have to be done in batches. 

Keep a careful eye on the eggplant slices so they don’t burn, especially if you’ve cut some of them a bit unevenly and some edges are thinner than others. I use a spatula to press them down occasionally, to make sure the eggplant and the pan are making a good connection and shift them around the griddle so they brown evenly. 

When one batch is golden on both sides, remove it to a dry tea cloth or layer of paper towels on a clean work surface. The slices should be laid on in a single layer. If you stack the eggplant slices, they’ll continue cooking and steaming. We want them to cool off once they are toasted. 


At this point, if you are ready to bake the mini pizzas, preheat your oven to 400°F or 200°C.

Place your toasted eggplant circles on a baking pan lined with baking parchment or a silicone liner and top them with a small spoon of the tomato sauce, cheese and your favorite other toppings. I made one pan of 12 and the other of four.

Food Lust People Love: These Toasted Eggplant Crust Mini Pizzas are as delicious as they are adorable with quick tomato sauce and toppings baked on toasted eggplant slices.

Bake in the preheated oven until the cheese is melted and bubbling, just 6 -7 minutes. 

Food Lust People Love: These Toasted Eggplant Crust Mini Pizzas are as delicious as they are adorable with quick tomato sauce and toppings baked on toasted eggplant slices.

Garnish with fresh basil leaves and serve with extra crushed red pepper, if desired. Enjoy!

Food Lust People Love: These Toasted Eggplant Crust Mini Pizzas are as delicious as they are adorable with quick tomato sauce and toppings baked on toasted eggplant slices.

It’s high summer now in the northern hemisphere so tomatoes and basil are flourishing in gardens everywhere. To celebrate the season, my Baking Blogger group has chosen to showcase tomatoes and basil for today’s theme. Check out all the recipes below. Many thanks to our organizer and host, Sue of Palatable Pastime

Baking Bloggers is a friendly group of food bloggers who vote on a shared theme and then post recipes to fit that theme one the second Monday of each month. If you are a food blogger interested in joining in, inquire at our Baking Bloggers Facebook group. We'd be honored if you would join us in our baking adventures.

Pin these Toasted Eggplant Crust Mini Pizzas!

Food Lust People Love: These Toasted Eggplant Crust Mini Pizzas are as delicious as they are adorable with quick tomato sauce and toppings baked on toasted eggplant slices.
 .


Monday, June 14, 2021

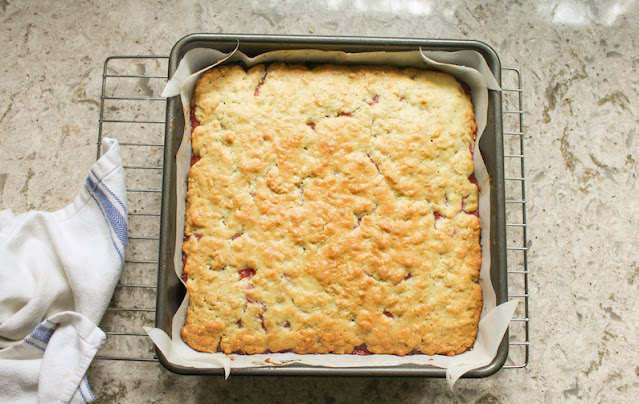
Icelandic Happy Marriage Cake - Hjónabandssæla

Icelandic Happy Marriage Cake is traditionally made with a rhubarb jam filling – purists take note – everyone else can use their favorite jam in the middle. 

Food Lust People Love" Icelandic Happy Marriage Cake is traditionally made with a rhubarb jam filling – purists take note – everyone else can use their favorite jam in the middle.

It seems like there are as many recipes for Happy Marriage Cake as there are happy marriages but the three ingredients they all seem to include are sugar, butter and oats. They also pretty much agree on how the bottom is pressed or smoothed into the pan. After that, it’s a big free-for-all. 

Some recipes want you to crumble the balance of the “cake” on top of the rhubarb. Others suggest you try to spread it (impossible!) or even roll it into thin sausages to be put on top lattice-like before baking. I wish I could tell you my source for this pat-the-dough method but I saved this recipe ages ago and didn’t save the link. 

The origins of this recipe are likewise fraught. Some say it is from the 1950s. Others claim their grandmothers and their mothers before them made this. One blogger said the only proper time to eat/serve Happy Marriage Cake is at a wedding reception while another claimed that it got its name because it is an inexpensive treat a newlywed wife can make her husband the day after.

Here’s what I can tell you. It’s buttery. It's oaty. Love the rhubarb in the middle. It’s good! 

Icelandic Happy Marriage Cake - Hjónabandssæla

You can use store-bought jam in place of the rhubarb but choose something with a bit of sharpness. If your jam is quite thick, consider loosening it with the addition of some lemon or lime juice. This is not meant to be super sweet but a just right blend of sweet and tart. I used frozen rhubarb since fresh is ridiculously expensive where I am right now. Check your supermarket's frozen section. You might be as pleasantly surprised as I was by how affordable rhubarb can be. 

Ingredients
For the rhubarb jam:
3 cups or 325g chopped fresh or frozen rhubarb
1/4 cup or 50g granulated sugar
1 teaspoon vanilla extract

For the cake:
1 3/4 cups or 158g rolled oats
1 3/4 cups or 220g all-purpose flour
1/2 cup or 100g granulated sugar
1 teaspoon baking soda
1/2 teaspoon fine sea salt
3/4 cup + 2 tablespoons or 200g butter, softened
2 eggs, lightly beaten
1 cup or 240ml rhubarb jam

For serving: cream or vanilla ice cream, for serving (optional)

Method
First we’ll make the rhubarb jam, which is very much like a very thick rhubarb sauce. Combine the rhubarb, sugar, and vanilla in a medium pot. 


Cook over medium heat, stirring occasionally, until rhubarb has completely broken down and thickened, about 25 minutes. If you can pull a spoon through it and it doesn't run back together, you are good to go. 


Remove the jam from the heat and cool completely.

Preheat your oven to 400°F or 200°C. 

To make the cake dough: Combine the oats, flour, sugar, and baking soda in a large bowl.  


Mix in the softened butter until evenly incorporated.


Add the beaten eggs and mix until a stiff dough forms.


Lightly grease a 9 x 9 in or 23 x 23cm baking pan. Line it with baking parchment. You can skip the greasing step if you'd like but I find just a little butter helps keep the baking parchment in place. 

Evenly press about 2/3 of the dough into the prepared dish. My dough weighed 776g (27 oz by weight) so I used 517g (18 oz by weight) for the bottom. 


Spread with the rhubarb jam. 


Using the remaining 1/3 of dough, dampen your hands with water and take a small piece of dough and flatten it between your hands. Place the piece of flattened dough on top of rhubarb.  


Continue in this manner, using smaller pieces of flattened dough to fill in the gaps between the larger pieces, until the rhubarb is almost completely covered.


Bake for 20 minutes, or until the top of the cake is lightly browned.

Food Lust People Love" Icelandic Happy Marriage Cake is traditionally made with a rhubarb jam filling – purists take note – everyone else can use their favorite jam in the middle.

Cool on wire rack. 

Food Lust People Love" Icelandic Happy Marriage Cake is traditionally made with a rhubarb jam filling – purists take note – everyone else can use their favorite jam in the middle.

Cut into squares to serve.

Food Lust People Love" Icelandic Happy Marriage Cake is traditionally made with a rhubarb jam filling – purists take note – everyone else can use their favorite jam in the middle.

Serve with cream or vanilla ice cream, if desired.

Food Lust People Love" Icelandic Happy Marriage Cake is traditionally made with a rhubarb jam filling – purists take note – everyone else can use their favorite jam in the middle.

Enjoy!

Today my fellow Baking Bloggers are all sharing recipes made with oats. Check them out below! Many thanks to our host and organizer, Sue of Palatable Pastime


Baking Bloggers is a friendly group of food bloggers who vote on a shared theme and then post recipes to fit that theme one the second Monday of each month. If you are a food blogger interested in joining in, inquire at our Baking Bloggers Facebook group. We'd be honored if you would join us in our baking adventures.


Pin this Icelandic Happy Marriage Cake 

- Hjónabandssæla!

Food Lust People Love" Icelandic Happy Marriage Cake is traditionally made with a rhubarb jam filling – purists take note – everyone else can use their favorite jam in the middle.

 . 

Monday, April 12, 2021

Chicken Chili Tortilla Casserole

This chicken chili tortilla casserole is like enchiladas made easier by layering the “filling” with corn tortillas and topping each layer with cheese. It is assembled, with apologies to all Italians: lasagna style. 

Food Lust People Love: This chicken chili tortilla casserole is like enchiladas made easier by layering the “filling” with corn tortillas and topping each layer with cheese. It is assembled, with apologies to all Italians: lasagna style.

We love enchiladas at our house so I’ve been known to make ones with beef, chicken with chorizo and even a mix of chicken and black beans. If you need a vegetarian version, I can highly recommend my cheesy bean enchilada recipe made with pintos and vegetarian refried beans. Topped with jalapeños and black olives it is as pretty as it is tasty. You won’t even miss the meat, I promise. 

The only reason I don’t make enchiladas more is the messy hassle of saucing the tortillas to soften and then filling them. This casserole avoids that whole palaver.

That said, the chicken chili is also delicious on its own. :) 

Chicken Chili Tortilla Casserole

In the US, unlike in most of the world where chili powder is literally just ground chili peppers, chili powder is a spice mix made with (at least in the McCormick brand powder) toasted whole ripe chili peppers, cumin, oregano, garlic and salt. To make it clear, I’m going to call it chili (seasoning) powder in the ingredients list below. 

Ingredients
1 lb or 450g trimmed chicken breasts
fine sea salt
freshly ground black pepper
2 tablespoons canola or other light oil, plus extra for the baking dish
1/2 small onion, finely chopped
1/2 green pepper, finely chopped
1-2 fresh jalapeños, finely chopped
3 tablespoons chili (seasoning) powder (see note above)
1 1/2 teaspoons ground cumin
1/2 teaspoon smoked paprika
1 can (14.5 oz or 411g) small dice tomatoes with green chili peppers
1 tablespoon tomato paste
14 fresh corn tortillas
8 oz or 225g extra sharp cheddar or a blend of cheeses, grated

Optional garnish:
sliced fresh jalapeños

Method
Cut the chicken into small pieces. I like to put my hand on the breasts and cut them in two through the middle so the pieces are thinner, then cut them into small cubes. You can just kinda chop it up with a sharp knife, if you prefer. 


Season the chicken pieces with a good sprinkle of salt and a few generous grinds of black pepper. 

Warm the oil in a large pot and then sautéed the chopped vegetables in the oil until softened, about five minutes. 


Add in the chili powder, cumin and paprika and give the whole thing a good stir. Cook for another two minutes, then add in the chicken. Stir well to coat the chicken with the seasonings. 


Cook for another few minutes then add in the canned tomatoes and the tomato paste then using the tomato can as a measuring vessel, add a full can of water. 


Bring to a slow boil then reduce the heat and simmer for 30 minutes, covered. 

Preheat your oven to 350°F or 180°C. 

Grease the bottom of a casserole dish with a little oil and cover it with a layer of corn tortillas, cutting them to make them fit. I chose this ridiculously shaped pan so it got a little more complicated than necessary. (Another wedding gift from 25 years ago, it matches the quiche dish.) 


Spoon over 1/3 third of the chicken chili and sprinkle on 1/3 of the cheese. 


Cover this with another layer of corn tortillas, another 1/3 of the chicken chili and 1/3 of the cheese. 

Repeat with another layer of tortillas, the balance of the chicken and the balance of the cheese. Rip a couple of tortillas into pieces and strew them decoratively over the casserole. (This step is not strictly necessary but I like the crunch that they add to the top.)


Cover with foil and bake in your preheated oven for 30 minutes. Remove the foil and cook for an additional 10-15 minutes or until the top is browned. 

Leave to cool for about 10 minutes before garnishing with sliced fresh jalapeños, if using, and cutting the casserole into squares to serve. 

Food Lust People Love: This chicken chili tortilla casserole is like enchiladas made easier by layering the “filling” with corn tortillas and topping each layer with cheese. It is assembled, with apologies to all Italians: lasagna style.

Enjoy!

Food Lust People Love: This chicken chili tortilla casserole is like enchiladas made easier by layering the “filling” with corn tortillas and topping each layer with cheese. It is assembled, with apologies to all Italians: lasagna style.

Today I’m joining my Baking Blogger friends who are sharing Mexican recipes. Check them out below. I know mine isn’t in any way authentically Mexican but I hope it is close enough to qualify. Many thanks to our host and organizer, Sue from Palatable Pastime
Baking Bloggers is a friendly group of food bloggers who vote on a shared theme and then post recipes to fit that theme one the second Monday of each month. If you are a food blogger interested in joining in, inquire at our Baking Bloggers Facebook group. We'd be honored if you would join us in our baking adventures.

Pin this Chicken Chili Tortilla Casserole!

Food Lust People Love: This chicken chili tortilla casserole is like enchiladas made easier by layering the “filling” with corn tortillas and topping each layer with cheese. It is assembled, with apologies to all Italians: lasagna style.

 .

Monday, February 8, 2021

Potato Salad Bites

These Potato Salad Bites combine my favorite baked potato skins with my beloved potato salad recipe. They are perfect for your picnics or parties. 

Food Lust People Love: These Potato Salad Bites combine my favorite baked potato skins with my beloved potato salad recipe. They are perfect for your picnics or parties.

Potato salad is one of my favorite things to make for a picnic because it goes so great with fried chicken and/or sandwiches but then you need utensils and plates or bowls to serve it which unnecessarily complicates a simple picnic. 

When the leader of our Baking Blogger group announced the theme of this month’s challenge, bite-size baking, I put my thinking cap on to solve that problem. Not that we've been enjoying many picnics since it's still pretty chilly but I do like to plan ahead. 

So here you go, finally, potato salad that’s finger food! I hope you enjoy them as much as we did. I put some in a single layer in a plastic container to bring them to my Mom and I hope you'll be as pleased as I was to know that they arrived in perfect form. 

Potato Salad Bites

I used baby red potatoes but you can use whichever small potatoes are available to you. As you can see, mine fit in my deviled egg plate so that gives you an idea of their size. 

Ingredients
For the potato salad:
1 lb 7 oz or 652g small red potatoes (about 10-11)
1 tablespoon olive oil
Fine sea salt
Freshly ground black pepper
2 eggs, hardboiled
1/4 small Spanish onion 
1/4 cup or 60ml mayonnaise
1/4 cup or 60ml sour cream
2 teaspoons whole grain mustard

For garnish: 
green onion tops
sprinkle of paprika or cayenne

Method
Preheat your oven to 375°F or 190°C. Place the potatoes in a small baking pan and drizzle them with olive oil. Shake them around to coat them with the oil. 


Bake for about 30 minutes or until they are cooked through. I stabbed mine with a pointy knife all the way to the middle to check.

Remove the potatoes from oven, and cool 15 minutes on a wire rack. Don’t turn the oven off but do lower the temperature to 350°F or 180°C.

Meanwhile, finely grate the onion into a mixing bowl. I used a microplane so the onion is super fine. If you don't mind little onion bits in your salad, feel free to use a grater with larger holes. Cut the two hard-boiled eggs into slices into the bowl.


Use the tines of a dinner fork to mash them into smaller bits.


Add in the mayonnaise, sour cream and mustard, as well as a couple of generous grinds of black pepper. Mix well. Set aside.


As soon as the potatoes are cool enough to handle (Despite photos to the contrary, I held mine in a clean towel.) cut each potato in half crosswise. Carefully scoop out the insides of the potatoes, leaving a skin shell about 1/4 in or 1/2 cm thick. Try to keep the scooped potato pieces as large as possible so they don’t turn into mashed potato when we make the potato salad with them. 


Place the shells, cut side up, on a baking sheet.  Sprinkle them with salt and freshly ground black pepper.   


Bake in your still hot oven until dry, about 10 more minutes. Cool completely, about 30 minutes.

When the potato innards are cool, add them to your mixing bowl and fold to combine. Again, trying not to mash the potato pieces completely but you can break up any really large pieces. Taste for salt and add more if needed, plus a couple of generous grinds of black pepper.  Depending on the saltiness of your mayo and whole grain mustard, you might not need much, if any, salt. 


Spoon or scoop the mixture generously into each potato shell. 


Top with some chopped green onion and a sprinkle of cayenne or paprika for color. I use cayenne because we like spicy but my mom and grandmothers always sprinkled a little paprika on a bowl of potato salad so either is good. Chill the potato salad bites until you are ready to serve them.  

Food Lust People Love: These Potato Salad Bites combine my favorite baked potato skins with my beloved potato salad recipe. They are perfect for your picnics or parties.

Enjoy! 

Food Lust People Love: These Potato Salad Bites combine my favorite baked potato skins with my beloved potato salad recipe. They are perfect for your picnics or parties.

It's Baking Blogger Monday and we are sharing bite-sized food, which is super fun! Many thanks to our organizer and host, Sue of Palatable Pastime. Check out the link list below. 


Baking Bloggers is a friendly group of food bloggers who vote on a shared theme and then post recipes to fit that theme one the second Monday of each month. If you are a food blogger interested in joining in, inquire at our Baking Bloggers Facebook group. We'd be honored if you would join us in our baking adventures.

Pin these Potato Salad Bites! 

Food Lust People Love: These Potato Salad Bites combine my favorite baked potato skins with my beloved potato salad recipe. They are perfect for your picnics or parties.

 .