Showing posts with label easy. Show all posts

Sunday, February 26, 2017

Piquant Shrimp Balls

Made with spicy seasoned shrimp and no fillers, piquant shrimp balls are the perfect Mardi Gras or party appetizer. A little dipping sauce with pickled okra completes the dish.


I feel sorry for folks who don’t grow up near an ocean. It’s not just that they seldom, or sometimes never, felt the sand between their toes or built dribble castles as children, but they also often missed out on seafood as a normal, typical dinner option. It’s saved for special occasions and restaurant meals. Which is a shame.

At our house, we eat a lot of seafood! Everything from fancy-ish main course recipes like Trout en Croute, Fennel Orange Cod en Papillote and Meyer Lemon Butter Sauce Prawns to appetizers like Mini Party Crab Cakes and Squid with Garlic Chili Oil, to down home favorites like Pan-Fried Fresh Sardines, Ceviche and Spicy Salmon Shrimp Burgers. Oh, and since it's Mardi Gras time, I should mention my Louisiana Barbecued Shrimp and Shrimp Creole! Those are just a drop in the bucket. I could go on but I think you get the point. These piquant shrimp balls are one of my favorites.

Making piquant shrimp balls is super easy! The secret to making balls with no fillers or egg is to use a food processor on half of the shrimp, then stir in the remaining shrimp, roughly chopped. Pan-fry the balls with a little olive oil for a golden exterior and your family and friends will be asking you to double the recipe next time. I promise.

Ingredients - for 2 dozen piquant shrimp balls
Good handful flat leaf parsley leaves and tender stems (pinch off hard stems and discard)
1 teaspoon fine sea salt
1-2 red hot chili peppers
2 medium cloves garlic
1 lb 2oz or 510g peeled, cleaned fresh shrimp
Olive oil for pan frying

For the dipping sauce:
3 tablespoons mayonnaise
1 tablespoon ketchup
1 teaspoon whole grained mustard
1/4 teaspoon ground cayenne
1 small clove garlic, finely minced
1 hot pickled okra, stem end removed, finely minced (sub small cornichons or capers, if desired)

Method
Make the dipping sauce by combining all ingredients. Store covered in the refrigerator until ready to serve.

Cut the peppers and garlic into pieces then process with the parsley and salt until finely minced.


Add in half of the shrimp and process until chopped fairly finely. You are looking for a chunky paste.


Use a sharp knife to cut the rest of the shrimp into four or five pieces, depending on size.


Tip the seasoned mixture out into a mixing bowl. Mix the cut shrimp well with the seasoned chunky shrimp paste.


Cover a plate snugly with cling film (this makes it easier to get the shrimp balls off the plate) and use a tablespoon to divide the mixture into about 24 pieces.

Dampen your hands with water and roll the pieces into balls and place them in a non-stick pan with a drizzle of olive oil.


Cook over a medium high heat with a splatter guard on top. Once the shrimp balls are cooked enough to be firm, turn them over and keep cooking, shaking the pan occasionally, until all sides are golden and the shrimp balls are cooked through. This takes just a few minutes.


Serve hot with toothpicks and the dipping sauce. Sprinkle on a little extra chopped parsley for color, if desired.


Enjoy!

This week my Sunday Supper tastemakers are sharing their favorite easy Mardi Gras recipes. Whether you are hosting or attending a potluck, we’ve got you covered!

Sunday Supper Easy Mardi Gras Recipes

Appetizers

Main Dishes

Sides

Desserts


Pin these Piquant Shrimp Balls!


  .

Sunday, February 12, 2017

Ham and Mustard Spirals

Flavorful ham and sharp whole grained mustard bake up crispy in puff pastry to create these lovely ham and mustard spirals. They are a quick and easy appetizer for your red carpet party.

Food Lust People Love: Ham and Mustard Spirals. Flavorful ham and sharp whole grained mustard bake up crispy in puff pastry to create these lovely ham and mustard spirals. They are a quick and easy appetizer for your red carpet party.


As I mentioned last Sunday, I love puff pastry. It’s such a versatile ingredient! If you have puff pastry in your freezer, you can make a quick appetizer out of just about anything in your cupboard or refrigerator.

A number of weeks ago, I bought some very finely sliced French ham from the deli counter of my nearby supermarket to make ham and cheese baguettes. The following Monday morning, I was going to a Christmas get-together with friends and wanted to bring a treat to share. I had four or five slices of ham leftover and a package of puff pastry in the refrigerator.

Ham and mustard are a classic combination so you can see how I got here, but you could use chutney or pesto or whatever other sauce you’ve got on hand. The important things to keep in mind is that 1. you don't use ham that is too thickly sliced and 2. that you don’t add too much of your chosen sauce, both of which might make your spirals soggy.

Ingredients
4-5 slices of French ham, thinly sliced
2 tablespoons whole grain mustard
1 package ready rolled puff pastry - 8 oz or 230g
1 oz or 28g Parmesan, freshly grated

Method
Preheat the oven to 400°F or 200°C and line a baking pan with parchment or a silicone liner.

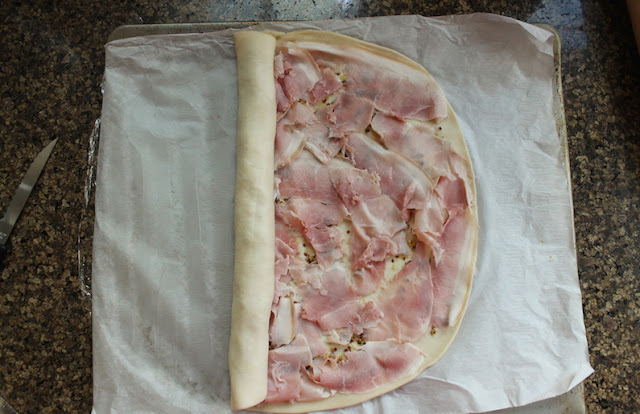
Unroll your puff pastry and spread it evenly with the mustard. Lay the ham out in single layer, covering the whole pastry. Start rolling on one side, all the way to the middle.

Food Lust People Love: Ham and Mustard Spirals. Flavorful ham and sharp whole grained mustard bake up crispy in puff pastry to create these lovely ham and mustard spirals. They are a quick and easy appetizer for your red carpet party.


Repeat with the other side. If you are working in a warm kitchen, roll the whole thing in cling film and pop it in the freezer for five minutes before slicing it.

Food Lust People Love: Ham and Mustard Spirals. Flavorful ham and sharp whole grained mustard bake up crispy in puff pastry to create these lovely ham and mustard spirals. They are a quick and easy appetizer for your red carpet party.


Use a sharp knife to cut the roll into 1/2 inch or 1 cm slices. Place the slices on your prepared pan.

Food Lust People Love: Ham and Mustard Spirals. Flavorful ham and sharp whole grained mustard bake up crispy in puff pastry to create these lovely ham and mustard spirals. They are a quick and easy appetizer for your red carpet party.


Bake for about 12-15 minutes or until lightly golden. Remove from the oven and sprinkle on the Parmesan.

Food Lust People Love: Ham and Mustard Spirals. Flavorful ham and sharp whole grained mustard bake up crispy in puff pastry to create these lovely ham and mustard spirals. They are a quick and easy appetizer for your red carpet party.

Bake for an additional 5-7 minutes or until they are golden all over and the cheese has melted.

Food Lust People Love: Ham and Mustard Spirals. Flavorful ham and sharp whole grained mustard bake up crispy in puff pastry to create these lovely ham and mustard spirals. They are a quick and easy appetizer for your red carpet party.


Enjoy!

This week my Sunday Supper group is sharing fancy appetizers for your red carpet award-watching party. Dress up, make a cocktail and get some of these ham and mustard spirals in the oven!

Or make one of these other fancy appetizers. Many thanks to our host Wendy of Wholistic Woman and our event manager, Cricket of Cricket’s Confections.

Finger Foods

Hors d'oeuvres

Seafood

Veggies

Sweets


Pin these Ham and Mustard Spirals! 

Food Lust People Love: Ham and Mustard Spirals. Flavorful ham and sharp whole grained mustard bake up crispy in puff pastry to create these lovely ham and mustard spirals. They are a quick and easy appetizer for your red carpet party.
 .


Wednesday, February 1, 2017

Black-eyed Pea Salad - Saladu Ñebbe #FoodieExtravaganza

This hearty black-eyed pea salad is full of good stuff but what makes it so tasty is the fresh lime juice and the hit of heat from the habanero pepper. I cautiously only put one pepper in this time. Next time I’m adding more!


Last weekend my husband and I did a massive clear out of all three of our freezers. The normal-size kitchen one, the even smaller one on top the beer fridge and the more capacious deep freezer. We hauled everything out and put it back in some sort of order. Frozen homemade sauces together. Poultry and beef on another shelf. Seafood on one side and the bottom drawer? It’s filled with pork products. The Great Freezer Cleaning also revealed a bag of dried black-eyes peas. It seemed like an omen.

This month my Foodie Extravaganza group is sharing heart healthy recipes. Beans and vegetables are probably two of the most heart healthy things you can eat, unless you are cooking those beans with smoked sausage. (My favorite way!) Even so, I like to think that the fiber and nutrition in beans outweighs the fat in the sausage. After all, sausage is also seasoning and you wouldn’t necessarily get a piece in each bite.

But beans are also great in salad, like this one of Senegalese origin, called Saladu Ñebbe or Salatu Ñebbe in the original language. There are several recipes in English online but they all seem to come from the same source, an article in Saveur magazine. Switching to French for my search, salade niébé, did turn up a few more. Whatever you call it, I’ll be making it again. I served it with seared tuna steaks, a delicious accompaniment.

Depending on which website or cookbook you consult black-eyed peas either don’t need to be soaked or they do. I treat them as I do all other beans. If I am not cooking them in a pressure cooker, I soak them overnight, if I have the time, or I quick soak them in boiling water for one hour, before cooking. Whichever method you choose, you are going to need about 2 1/2 cups or 400g cooked black-eyed peas for this recipe. One cup of dried peas should yield about that right amount.

Ingredients
2 1/2 cups or 400g cooked black-eyed peas (1 cup or 200g dried black-eyed peas, boiled and drained – you can substitute canned peas. Rinse and drain them well.)
1 habanero or Scotch bonnet chile
3 large green onions
2 small cloves garlic
3 tablespoons fresh lime juice
1 yellow bell pepper
250g cherry or grape tomatoes
1 medium cucumber
1 small bunch parsley
6 tablespoons olive oil
Sea salt and freshly ground black pepper, to taste
Optional for serving: salad greens

Method
Mince your habanero pepper and the garlic. Trim off the roots and slice the white part of your onion tops. In a large bowl, mix the three with the lime juice and set aside to marinate, with about a half teaspoon of salt.

This has a two-fold effect. First of all, it takes mellows the flavors of the raw garlic, onion and the habanero. Secondly, it makes sure that those flavors will be infused in the dressing.

Cut your cherry tomatoes into quarters. Seed, stem and chop the bell pepper.

Chop the green part of the onion tops and the parsley.

Cut the cucumber in half lengthwise then in half again. Use a sharp knife to remove the seeds, then cut the cucumber into small pieces.


Add the olive oil into the salad bowl and mix well with a fork.


Pile in the black-eyed peas. Stir well to coat.


Add in the chopped vegetables and herbs. Mix well.


Season with salt and pepper to taste. This salad can, of course, be eaten immediately but, unlike most salads, it gets better and better as it hangs out in the refrigerator.


If not serving right away cover with cling film and refrigerate. Remove from the fridge about 20 minutes before you are ready to serve to it’s not super chilled. Stir well.

Enjoy!


Many thanks to our Foodie Extravaganza host this month, Wendy of A Day in the Life on the Farm. Do check out the link list of all of our other heart-healthy recipes!


Foodie Extravaganza celebrates obscure food holidays or shares recipes with the same ingredient or theme every month.

Posting day is always the first Wednesday of each month. If you are a blogger and would like to join our group and blog along with us, come join our Facebook group Foodie Extravaganza. We would love to have you!

If you're a reader looking for delicious recipes, check out our Foodie Extravaganza Pinterest Board! Looking for our previous parties? Check them out here.

Pin it!

.

Tuesday, January 10, 2017

Honey Oatmeal Bread #BreadBakers

This honey oatmeal bread is baked with all-purpose flour, wholemeal flour and oats, with just enough honey to slightly sweeten it. It has a tender crumb and a crunchy golden crust.


This month my Bread Bakers are here to support your efforts to eat healthier, if indeed, you are making an effort. I know there are a lot of people who make resolutions of such things this time of year. You might well be one of them. Here’s what I can promise you, even if you are not: The Bread Bakers are a talented, creative group. The breads they bake will be delicious, whatever the theme.

Our host today is Pavani from Cook’s Hideout and so "healthy breads" for January is her chosen theme. Since my co-creator of Bread Bakers stepped down a few months ago, Pavani has been a big help behind the scenes and I am grateful to her for stepping forward to take the first month of 2017. In fact, thanks to lots of members volunteering to host, we’ve got some great themes coming up for you this year! Stay tuned for February when we will take on pancakes.

Perhaps this could be the year you start baking homemade bread! Think about it. This may be a much easier resolution to keep than most. You can start with this easy honey oatmeal bread.

Ingredients
1/4 cup or 60ml warm water
2 teaspoons active dried yeast
1/4 cup or 60ml honey
1 cup or 240ml milk
2 tablespoons unsalted butter, plus extra for greasing the bowl/pan
2 - 2 1/2 cups or 250- 312g flour
1 cup or 120g wholemeal bread flour
3/4 cups or 70g oats - quick cooking, but not instant
1 1/2 teaspoons salt

Optional - to decorate before baking:
2 tablespoons runny honey
2 tablespoons rolled oats

Method
Honey has antibacterial properties and, depending on how the honey was processed, these might kill your yeast. So we start this bread by proofing our yeast in a bowl with the warm water and a generous heaping teaspoon of the honey. If it bubbles and foams after a few minutes, you are good to go. (And you don’t have to do this step with that particular jar of honey again. It’s safe for future baking.)


Note: This recipe can be made by hand, however, the dough is fairly slack so kneading it will be a sticky challenge.

In a microwave-proof measuring jug, heat your milk and butter until the butter just melts. Allow to cool until warm. Pour in the rest of the honey. It will sink to the bottom so stir until the honey has dissolved into the milk.

In the bowl of your stand mixer, add the yeast mixture to 2 cups or 250g of the all-purpose flour, the wholemeal flour, the oatmeal and salt.


Pour in the milk/butter/honey liquid and mix until it comes together as a soft dough.


Switch to the bread hook and knead for about 5-7 minutes or until the dough becomes smooth and elastic. Add the extra flour, as needed, by the teaspoonful as it kneads. I ended up using about half of the additional flour for this particular loaf.

Form the dough into a ball. Use a little butter to grease the bowl, moving the dough ball around the bowl as you butter. Cover, put in a warm place and leave to rise until doubled, about 45 minutes or one hour.


Line a standard bread pan with parchment paper or grease it liberally with more butter. My pan is not in the best condition so I always choose the parchment paper route.

Punch the dough down and give it a few more turns of kneading. Form it into a log and put it in your prepared loaf pan.


Leave to rise in a warm place until doubled again, another 45 minutes or 1 hour. Towards the end of the rising time, preheat your oven to 350°F or 180°C, placing an iron skillet or other heavy cooking pan on the bottom shelf.

Boil your kettle with about 2 cups or 480ml water.

Once the dough has risen sufficiently, drizzle it with the extra honey and sprinkle on the rolled oats.


Put the loaf pan on the middle shelf in the oven and pour the hot water into the heated skillet or baking pan on the bottom shelf. Quickly close the oven so the steam does not escape.

Bake the loaf for about 40-45 minutes or until it’s brown all over and cooked through. If you have a instant read thermometer, the internal temperature should be 200°F or 93°C for an enriched bread made with milk and butter. If your loaf is browning too fast, cover it lightly with a tent of foil.


Remove from the oven and allow to cool before slicing.


Enjoy!


Check out the Healthy Breads that our fellow Bread Bakers have baked this month:
#BreadBakers is a group of bread loving bakers who get together once a month to bake bread with a common ingredient or theme. You can see all our of lovely bread by following our Pinterest board right here. Links are also updated after each event on the #BreadBakers home page.
We take turns hosting each month and choosing the theme/ingredient.


BreadBakers

Pin it! 


 .

Monday, December 26, 2016

Maque Choux Cornbread Muffins #MuffinMonday

Maque choux is a spicy Cajun corn dish that makes an appearance at every holiday meal at my house. I am quite happy to eat leftovers from a bowl with a spoon but maque choux cornbread muffins are another delightful choice.


Welcome to the final Muffin Monday for 2016! It's been a year of change and challenge for many of us, but coming together once a month to bake and share muffins is therapeutic, at least for me. I hope you all have enjoyed the variety of muffins as much as I do.

I created this little group because muffins are one of the easiest things to bake. I wanted to motivate readers who are intimidated by baking to give muffins a try. You don't need electric beaters for mixing, just two bowls and a spoon or spatula. All the wet ingredients in one bowl. All the dry ingredients in the other. Fold them together and bake in a greased muffin pan. What could be simpler?

Ingredients
1 cup or 200g fine cornmeal or polenta
1 cup or 125g flour
2 teaspoons baking powder
1/2 teaspoon baking soda
1/2 teaspoon salt
1 cup or 235g leftover maque choux from this recipe
1/2 cup or 113g butter, melted and cooled
1/3 cup or 80g thick sour cream
2 large eggs

Method
Preheat your oven to 350°F or 180°C and prepare your 12-cup muffin pan by lining it with paper muffin cups or greasing it.

In a large mixing bowl, combine your cornmeal and flour with the baking powder, baking soda and salt

In another mixing bowl, combine your maque choux, eggs, sour cream and melted butter.


Pour the wet ingredients into dry mixture and stir until well combined. Spoon the thick batter evenly into the muffin cups.


Bake for about 20 minutes in your preheated oven or until a toothpick inserted comes out clean.


These make a great addition to any brunch or luncheon menu.


Enjoy!


Have any of our Muffin Monday posts motivated you to get in the kitchen and bake? I'd love to hear from you if they have.  After all, with recipes as delicious as the ones the Muffin Monday bakers share, you have a great selection of both savory and sweet recipes to try.

Check out this month's tasty links.


#MuffinMonday is a group of muffin loving bakers who get together once a month to bake muffins. You can see all our of lovely muffins by following our Pinterest board.

Updated links for all of our past events and more information about Muffin Monday, can be found on our home page.


Pin it! 


.

Sunday, December 18, 2016

Tuna Salad Stuffed Deviled Eggs

Mix all the ingredients that make you love tuna salad with egg yolks and pile them in your egg whites to make tasty tuna salad deviled eggs. These are great for a party or a picnic.


For many of the years we lived in Malaysia I held multiple roles at the American Association of Malaysia or AAM. As publications director, I was a voting member of the board of governance for the organization and responsible for our three major publications, the A-Z Directory – a sort of Yellow Pages, the Selamat Datang – our resource book of cultural/educational information for newcomers, and our monthly magazine, the KL American. My other roles were editor of all three and webmaster for our website KLAmerican.com. Busy but productive times!

The board of directors met each month and since the meeting was often scheduled through lunchtime, we’d bring dishes to share. Once, early on, I brought some party sandwiches, the kind without crusts, cut into fancy triangles. The president of the board took her first bite, stopped short and said, “What did you put in your egg salad? Is that tuna?” My response was an incredulous look. “Egg salad? That’s tuna salad! Do you not put eggs in your tuna salad?”

Where I come from tuna salad always has chopped boiled eggs in it. But after an informal poll of the other board members, there seemed to be a cultural divide between northern and southern states. Up north, or so they told me, tuna salad does not have eggs. The funny thing is, they all loved my sandwiches and declared that from then on, they’d be adding eggs. Score one for the southern home team!

A couple of weeks ago I was home alone, busy working, and I decided to make some tuna salad for lunch. I put eggs on to boil. For once, they peeled beautifully. Much too beautifully to be chopped for tuna salad. That’s when the idea struck me. Tuna Salad Deviled Eggs! It’s tuna salad for the low carb crowd. And while those little triangle sandwiches are also great for parties, I have never returned from a potluck with even one deviled egg left on my plate. People love deviled eggs and that's a fact.

I am not a big believer in pickles or celery or other extraneous chopped things in my tuna salad, but if you are, feel free to make this your own by adding some. Sometimes I’ll put a little grated onion but that’s the limit for me. It’s a textural thing.

Ingredients
6 large eggs
1 can tuna chunks in water, drained (drained weight 4.25 oz or 120g)
6 tablespoons mayonnaise
1 tablespoon yellow mustard
Hot sauce, to taste – optional (in other kitchens, not in ours)

To garnish:
Slices of onion
Sprinkle of cayenne pepper or paprika

Method
Hard boil and peel six large eggs. Cut them in half.
Scoop the yolks out and into a small mixing bowl. Dry the whites with a paper towel and arrange them on a decorative platter.
Mash the yolks together with the tuna, mayonnaise, mustard and hot sauce of your choice, if using. I make my own habanero sauce which must go in any tuna, chicken or egg salad. (By the way, my chicken salad also has eggs, as does my potato salad. Just so you know.)


Spoon the tuna mixture into the egg whites. Garnish with some onion and a sprinkle of cayenne or paprika, if desired.


Enjoy!

Whether you are hosting your own holiday party or just need recipes for dishes to take along to a potluck holiday dinner, Sunday Supper is here to help. Many thanks to our host this week, Caroline of Caroline's Cooking and our event manager, Cricket of Cricket's Confections.

Appetizers

Beverages

Finger Foods

Mains

Desserts


Pin it!

.

Friday, November 18, 2016

Mediterranean Eggplant Poppers #FishFridayFoodies

Mediterranean eggplant poppers combine the lovely flavors of za’atar, roasted eggplant, mozzarella and tomatoes for a great appetizer your guests will love. They are even more special topped with shrimp.


When I have the time, I like to head to the big hypermarket not too far from my house and wander around the fresh produce section looking for inspiration. They carry an amazing selection of fruit and vegetables from near and far, all shiny, bright, colorful and clearly full of nutrition and vitamins.

Just a couple of days ago, I came across the loveliest little eggplants there. I shifted through them looking for the smallest ones, trying to select ones of similar size, with good stems still attached. Right there, in my head, I made up this recipe. Like this: What goes with eggplant? Garlic and tomatoes. What goes with garlic and tomatoes? Mozzarella, of course. And because today I am joining the Fish Friday Foodies in sharing appetizers, I decided to top the whole lot with some seasoned shrimp.

And that is the weird and wonderful way my brain works.

Ingredients
8 small eggplants
2 cloves garlic
Generous handful parsley, plus more to garnish, if desired
olive oil
salt
pepper
2 teaspoons za’atar
1 ball fresh mozzarella (about 4.4 oz or 125g)
4-5 grape tomatoes
16 cooked medium-sized shrimp

Method
Preheat your oven to 400°F or 200°C.

Scrub the little eggplants clean then cut them in half, trying to split the stem as well. Scoop out the insides, chop and set aside. I use a melon baller for the scooping. Put them in a baking pan.


Mince the garlic cloves and chop the parsley finely.

Cook the eggplant insides in a small pan with a good drizzle olive oil, sprinkle of salt and pepper plus one teaspoon of the za’atar. When all of the water has cooked out of the eggplant and it’s browning, add in the garlic and cook for a couple more minutes.


Tip in the parsley and cook for another 30 seconds or so, until the parsley wilts. Taste the filling and add more salt, if necessary. Remove from the heat.


Cut the mozzarella ball into thin circles. Fit them into the eggplant halves. Add the filling, dividing it between the eggplants.


Slice the grape tomatoes and put one slice on top of the filling. Drizzle on some olive oil.


Roast in your preheated oven for about 15 minutes or until the eggplants start to slump a little and are browned around the edges. Some leakage happens but when you scrape those bits up with a metal spatula, you get to eat them. Score! Make sure you are in the kitchen alone when these come out of the oven and you won't even have to share that bonus.

Meanwhile, dry your shrimp and put them in a small bowl. Drizzle them with a little olive oil and toss them around to coat. Add the last teaspoon of za’atar and toss again.

Note: There are various za'atar recipes. I prefer what's known as Lebanese za'atar but you can use your favorite.

Ignore the little tails on the shrimp. I did remove those before I put the shrimp on the eggplant poppers.


Remove the baking pan from the oven and top each eggplant with one shrimp. Pop the pan back in the oven for another five minutes to warm the shrimp through.


Serve warm, sprinkled with a little more chopped parsley, if desired.

For a vegetarian option, skip the shrimp step. We love shrimp but these Mediterranean Eggplant Poppers are fabulous even without them. And they are just as pretty. Here they are pre-shrimp.


Update: Just ate a leftover eggplant popper straight out of the refrigerator. They are even good cold.

Enjoy!


Many thanks to this month’s Fish Friday Foodie host, Wendy from A Day in the Life on the Farm. If you are looking for creative holiday appetizers or first courses with seafood, you’ve come to the right place!


Pin it! 

 .