Showing posts with label puff pastry. Show all posts

Friday, December 25, 2015

Easy Cheesy Salami Tomato Tart #FridayPieDay

Easy to throw together, this tart starts with puff pastry, topped with pesto, salami, fresh tomatoes and semi-soft cheese, for a savory slice of deliciousness that’s perfect for lunch or dinner. Or enjoy it cold the next day for breakfast. I did!

Merry Christmas, everyone!

It is my pleasure to join my friend, Heather, today for another edition of Friday Pie Day. Make sure to scroll on down to the bottom for the link to her take on classic mince pies.

One of the standard items in my freezer is pre-rolled puff pastry. It thaws fairly quickly and I find it can be ready to unroll by the time my oven preheats, which makes tart making a breeze. The filling is easily adapted to whatever you have on hand - as long as you make sure to include some melty cheese! - so it’s perfect for busy days when you want a special meal but are short on time. Like during the holidays.

This tart is adapted from a recipe at cuisineAZ.

Ingredients
8 oz or 225g all butter puff pastry dough
3 1/2 oz or 100g salami
3 medium tomatoes (Mine weighed about 9 oz or 260g.)
8 3/4 oz or 250g semi-soft cheese (I used Morbier.)
3 tablespoons fresh pesto (Mine was made with wild rocket or arugula.)
Freshly ground black pepper

Optional garnish: chopped green onions

Method
Preheat your oven to 400°F or 200°C and line your tart pan with baking parchment.

Unroll your puff pastry dough circle (or roll it out with a rolling pin if it’s in a block) and fit it into your tart pan.

Dock the dough with a fork and bake in your preheated oven for about 8-10 minutes.

Remove from the oven and then turn the temperature down to 350°F or 180°C.

Spread the base of the tart with the pesto.


Top with salami.


Slice your tomatoes very thinly. Cut the hard rinds off of your cheese and slice it as thinly as possible, which frankly is a little tricky with a semi-soft cheese. Do your best.


Top the salami with the tomato slices.


Then top the tomatoes with the cheese slices and give the whole tart a good few grinds of black pepper.


Bake in your preheated oven for about 25-30 minutes or until the cheese is all melted and golden.

Sprinkle with chopped green onions, if desired.


Allow to cool slightly before cutting and serving. You can also serve it at room temperature.


Enjoy!

This easy cheesy salami tomato tart is my contribution to this month's Friday Pie Day, the brilliant creation of Heather from All Roads Lead to the Kitchen. (Formerly girlichef.)


I am pleased to join her on the last Friday of each month for pie and crust recipes, techniques, tools of the trade, and other inspiration.

This month Heather has baked mini cranberry mince pies, an essential for Christmas!

For more information and recipes, please check out her #FridayPieDay page!


.

Friday, August 28, 2015

Brown Sugar Nectarine Tart #FridayPieDay

Sprinkling fresh nectarines with brown sugar and a little sea salt enhances their summery sweetness in this baked tart that is easy enough to make any day of the week.

Sometimes fresh nectarines can be a disappointment. They smell all nectarine-y in the stores so you take them home with great anticipation of that first juicy bite and the inevitably sweetness dripping down your chin. And then the sadness hits. The nectarines are juicy enough, even somewhat sweet, but they just don’t taste as strongly of nectarine as their aroma promised. That, my friends, is when I figure I have a couple of choices: make jam or tarts. Either will use sugar and heat to concentrate the flavors of the fruit and restore your good temper with deliciousness to share.

This is my contribution for this month's Friday Pie Day! Scroll down to the bottom to see what my fellow baker, Heather, is sharing today.

Ingredients
1 frozen puff pastry sheet, 8 3/4 oz or 250g, thawed – preferably all butter
2 teaspoons cornstarch
2 nectarines (about 10 1/2 oz or 300g, whole)
3 tablespoons dark brown sugar
Generous pinch fine sea salt
2 teaspoons butter
2 tablespoons apricot (or peach or nectarine) jam

To serve: thick cream or vanilla ice cream - optional

Method
Preheat oven to 425°F or 218°C and line your baking tray with parchment or a silicone baking mat.

Unroll your puff pastry onto the prepared baking sheet. Sprinkle a circle in the middle with the cornstarch.

Cut your nectarines in half and remove the pits. Slice the halves thinly.


Starting in the middle of the circle, lay your nectarines slices out, overlapping them slightly. Keep going until the entire circle of cornstarch is covered, using all of the nectarine slices.


Fold the sides of the pastry in about 1/2 an inch or 1cm and sprinkle the tops of the nectarines with brown sugar and the generous pinch of salt.


Now fold the pastry over again to cover about one quarter of the fruit, all the way around.

Dot the top with butter.


Bake in your preheated oven for about minutes or until the pastry is puffed up and golden all over.

Remove from the oven and allow to cool.


Loosen the jam by adding a little water to it and warming it gently in the microwave or in a small pot on the stove.

Brush it on the top of the nectarines when the tart has cooled. I used some homemade caramel apricot lime jam but you can use whatever jam you have open in the refrigerator.


Cut into four equal pieces and serve with thick pouring cream or a scoop of vanilla ice cream. Or perhaps a complementary slice of buttermilk pie. (See Heather's link below!)


Enjoy!


FridayPieDay is the brilliant invention of Heather from girlichef and I am pleased to join her on the last Friday of each month for pie and crust recipes, techniques, tools of the trade, and other inspiration.

This month Heather went traditional southern with a creamy buttermilk pie, and it looks delicious!

For more information and recipes, please check out her #FridayPieDay page!


.

Sunday, July 19, 2015

Chaussons aux Pommes


Crisp apples, with lemon or lime juice and zest and just a bit of sugar, cook down into the best chunky applesauce, the perfect filling for puff pastry chaussons or slippers. 

Le Marché du Petit Robinson  – the twice-weekly market - was but a block and a half away from our house just south of Paris in the ville of L'Haÿ-les-Roses. Every Wednesday and Saturday morning, starting just before 8 a.m., the neighbors would start to filter past, the elderly pulling their two-wheeled shopping carts, the younger set pushing their children in strollers, all on their way to the market. Some days the girls and I would join them, even if we didn’t really need anything because 1. It was an outing and moms with toddlers can always use an outing, especially when the weather is grey and 2. There were always tasty items to snack on and fresh produce to peruse once we got there.

We drooled over shiny fruit and the soft cheeses, often helping ourselves to the little chunks of artisan saucisson or spicy olives that were proffered for tasting but our favorite stall was always the baked goods. There were hefty seeded loaves as big as your head and almost as heavy; rustic baguettes with their crunchy exteriors and chewy interiors full of holes and flavor; pain aux raisins, spirals of buttery pastry filled with raisins and brushed to a high gloss with a sticky sweet glaze and last but never least, little puff pastry “slippers” which had been filled with chunky applesauce and baked till fluffy and golden. If you arrived early enough some were still warm!

When I read that the theme for this week’s Sunday Supper was Farmstand Foods, I couldn’t resist trying to recreate the little chaussons or slippers. Just the aroma of them baking in the oven brought me back! Isn’t it funny how smells can evoke such strong memories, perhaps even more than photos will do?

Two years ago for a similar Sunday Supper theme, we celebrated farmer's markets and I posted a number photos from a French market for those who wanted to drool a little. This seems like a good time to share them again, along with my cherry clafoutis.

In the wee hours of tomorrow morning, I’ll be headed back to France for a visit and you can be certain that I’ll be browsing as many markets as I can find along my road trip route from Nantes to Chinon and down to Bordeaux!

Follow along with me on Instagram

My recipe was adapted from this one on Meilleur du Chef.

Ingredients
For about 1 1/2 cups or 395g applesauce or compote, as it is called in French:
1 lb 4 oz or 560 g apples – three large apples
Zest plus 2 tablespoons juice from fresh lemon or lime
1 rounded tablespoon or 15g butter
1/4 cup or 50g sugar (plus more to taste)
1 teaspoon vanilla extract
1/4 teaspoon fine sea salt

You may not use it all of the applesauce in the chaussons, but it is also delicious eaten straight from the bowl with a spoon.

For the chausson crusts:
11 1/3 oz or 320g readymade puff pastry dough

To brush on before baking:
2 tablespoons milk

Method
Zest and juice your lemon or lime and put the zest and juice in a bowl that will be large enough to hold your apples, once peeled and chopped.

Peel, core and chop your apples into chunks. Add them to the juice bowl, as each one is done and stir well. This will stop the apples from turning brown.


Pour the apples into a small pot that has a lid and add in the sugar, butter, vanilla and salt. Stir well.

Cook over a medium flame, covered for the first 15-20 minutes, stirring occasionally. There is no need to add liquid, as the apples will release their juice.


After the apples start to soften, you can remove the lid and lower the flame. Let the apples cook until the liquid is just about gone and you have a thick, chunky applesauce. You can mash gently with a fork but make sure to leave some chunks.

Allow to cool and taste to see if you need a little more sugar. I didn’t add any but I like things tart.

Preheat your oven to 350°F or 180°C and prepare a baking sheet by lining it with baking parchment or a silicone mat.

Meanwhile, line your clean work surface with cling film and make a template out of paper. I used a very large coffee mug and traced the two halves of the base about an inch and a half or three centimeters apart, then connected the halves to create an elongated shape that is not quite oval, but rather a circle that’s been stretched in the middle. (Actual dimensions: 10 x 14cm or 4 x 5.5 in) You can make a simple circle, instead of the traditional “slipper” shape, but you won’t have as much room for filling.

Roll out your puff pastry on the cling film big enough to accommodate at least six of your template.

Lay the template on the puff pastry and cut around it with a sharp knife, taking care not to cut all the way through the cling film.


Remove the excess puff pastry from around the cut pieces. (You can bake these bits after the chaussons, rolled in a little cinnamon sugar for a sweet snack.)

Brush the puff pastry that remains with a little water around the edges and add a healthy spoon of applesauce in the middle of each.


Fold one side over and gently try to remove all of the air inside as you seal the edges together.


Transfer the chaussons to your prepared baking sheet. If they are stuck down, lift the cling film from under them to help them release.

If you have a pastry cutter, you can make a decorative edge but this is completely optional.


Lightly score the tops of the chaussons with a sharp knife, making sure not to cut all the way through. I use my negi cutter for this job but any very sharp knife or a lame will do.

Brush the tops with a little milk and bake in your preheated oven for about 20-25 minutes or until golden and puffy. They are super puffy when they first come out.


Then they deflate a little.


Allow the chaussons to cool somewhat before biting into one. That applesauce is going to be hot!


Enjoy!

Many thanks to our Sunday Supper host for the Farmstand Food event, Colleen of FoodieTots, ably assisted by veteran host, DB of Crazy Foodie Stunts.

Appetizers, Sides and Salads
Entreés
Desserts


.

Wednesday, November 26, 2014

Slow Cooker Beef and Guinness Stew - or Pie

When weather turns chilly, my thoughts turn to my slow cooker and a nice beefy stew with Guinness. Serve the warming bowls of deliciousness as is or top the stew with puff pastry and bake for a beautiful beef and Guinness pie. 

Whenever we are traveling and have the chance to eat a pub lunch, my husband almost invariably orders the beef and Guinness pie, if there is one on the menu. He loves the filling and the flaky puff pastry top. When decent pub grub is not available, I make my own. For stew beef to become tender, slow cooking is the way to go, so I like to use my crockpot to make the filling. After browning the meat, everything goes in the pot and I can get on with other projects like baking his favorite apple rhubarb strawberry pie. Pie for dinner and pie for dessert and he’s a happy man.

Ingredients
For the stew:
5 slices streaky smoked bacon
2 lbs or 950g braising or stew meat
1.1 lb or 500g marrow bones (optional)
1 1/2 tablespoons or 15g flour
1⁄2 teaspoon salt
1⁄4 teaspoon freshly ground pepper
1 large onion (about 7 oz or 200g)
1 large carrot (about 5 1/2 oz or 155g)
1 large parsnip (about 5 1/2 oz or 155g)
1 can (14 oz or 400g) chopped tomatoes with their juice
1 can (12 oz or 355 ml) Guinness stout
2 sprigs fresh thyme
1 bay leaf
Salt
Freshly ground pepper

For the pie:
1 sheet puff pastry (8 oz or 230g)

Method
Cut your meat into bite-sized pieces, removing any gristle you can see.


Lay it out in a single layer on your cutting board and season it with sea salt and freshly ground black pepper. Sprinkle it with the tablespoon and a half of plain flour and toss it around with your clean hands until well mixed.


Peel and cut the parsnip and carrot into pieces. Cover the parsnip with water in a small bowl until ready to use, to stop it from turning brown. Chop your onion roughly.


Cut the bacon into small pieces and fry until crispy in a non-stick pan. Remove the crispy bits from the rendered bacon fat and set aside.


Fry the meat in the bacon fat until browned on all sides, in two or three lots so that the pan doesn’t get crowded.

If you put too many pieces in at once, it will just steam instead of browning. As the batches get browned, remove them to a bowl.


Now you are ready to put everything in the slow cooker.

Start with the meat, then add the onion, parsnip and carrot. Top with the bacon, thyme and bay leaf. Pour the canned tomatoes in and then the can of Guinness.


Tuck the marrow bones down into the vegetables, if using.


Cook on high for three to four hours or until the beef is tender. Check the seasoning and add more salt and pepper to taste.

This can be served exactly as is or it can be baked as pie topped with puff pastry.

If you cooked your stew with the optional marrow bones, these can be put under the broiler or grill in the oven to brown. They are lovely served as an appetizer with toast on which to spread the marrow.

To make the pie, preheat your oven to 400°F or 200°C.

Spoon your beef and Guinness stew into a baking pan and allow it to cool a little while your oven preheats. I like to use a small pan that holds the beef and vegetables with a good amount of the broth that is created while the stew slow cooks. Then I thicken the rest of the broth with a little flour and serve it as extra gravy with the pie.


Slice the outside edges off of your puff pastry sheet and cut a few slits in the middle.


When your oven is up to temperature, cover the filled baking pan with your puff pastry. Fold the sides up so they don't hang over the edges. Press down all around the edges to seal the crust to the pan. You can use the trimmed pieces to decorate the top, if you want.


Pop it in the oven and bake for 20-25 minutes or until the puff pastry is golden.


To serve, cut a piece of the puff pastry off the top and fold it back. Scoop the stew into your bowl and top with the puff pastry.


Enjoy!


Wednesday, December 11, 2013

Artichoke Dip Puff Pastry Tarts

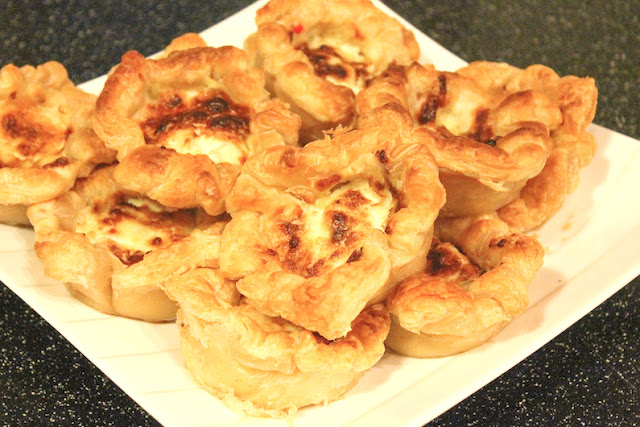
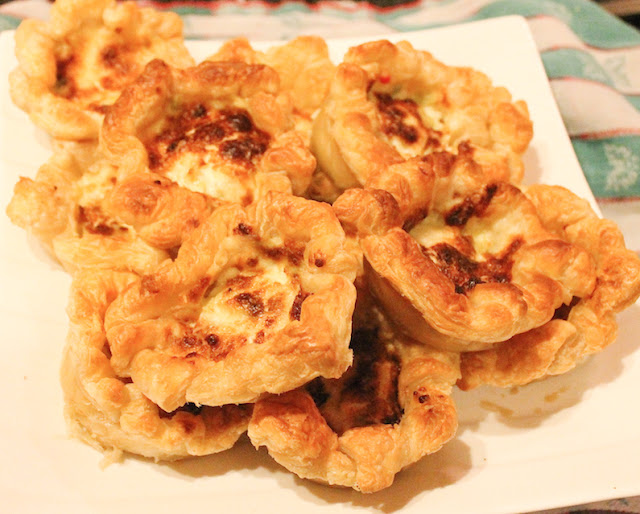
Bubbly cheesy artichoke dip makes a wonderful filling for a puff pastry tart. Artichoke Dip Puff Pastry Tarts are the perfect, easy appetizer for your Christmas party.

Food Lust People Love: Artichoke Dip Puff Pastry Tarts are a quick and easy way to transform artichoke dip into little handheld tarts, perfect for parties!


Artichoke dip is a staple at our house for Christmas Eve, when we eat only appetizers and drink Champagne. The tradition started many, many years ago when my older sister would come to visit and somehow we all got busy and many gifts remained unwrapped the night before Christmas. So preparing a big dinner was out of the question but nibbles would be perfect.

Early in the evening we sit around the heavily laden coffee table, sip Champagne and eat our appetizers while staking out a good position to wrap gifts with a little bit of privacy. Behind the bar is always a popular spot, which allows someone to be in front of the bar. Another person might be behind the couch and yet another behind the living room chair or over in the open plan dining room, when we have one. We can hear each other, if we talk loudly, but most importantly, everyone can hear the Christmas music. And everyone can take an extra little plate with them as well, for sustenance.

Artichoke Dip Puff Pastry Tarts

I have no idea where the classic artichoke dip recipe came from, although for us, it was always Tanya’s artichoke dip since my sister brought it with her originally. In the years since, I’ve also heard it referred to as Lizann’s dip, after another friend who introduced it to the school parents in Malaysia. I’d love to know who created it in the first place and thank them. Some years we add crabmeat, other years cooked shrimp or crispy bacon before baking the dip to bubbling richness. We usually serve it with crackers or sliced baguette. This year, making it for a completely different event, I had a brainstorm. And artichoke dip puff pastry tarts were born!

Ingredients
For the dip aka filling:
1 cup or 240g mayonnaise (NOT Miracle Whip or salad cream – they are too sweet.)
1 1/2 cups or about 190g finely grated Parmesan
1 can (14oz or 400g) artichoke hearts, drained weight 8 1/2oz or 240g
1 small hot red chili, optional but highly recommended (I think the original recipe called for a small can of mild green chilies.)

For the tart crust:
3 sheets already rolled puff pastry (about 8in x 8in or 20cm x 20cm each)

Method
Preheat your oven to 410°F or 210°C and cut the puff pastry into 12 reasonably even squares.


Tuck each piece into a muffin pan cup, folding in the edges to make them fit so the squares don’t touch between the muffin cups. Remember, they are going to puff up.


Chop the artichoke hearts roughly and the chili very finely and mix all the filling ingredients together thoroughly.


Spoon the filling into the prepared puff pastry crusts.


Bake in your preheated oven for 20-25 minutes or until the filling is golden and bubbling and the puff pastry is golden and puffy.

Food Lust People Love: Artichoke Dip Puff Pastry Tarts are a quick and easy way to transform artichoke dip into little handheld tarts, perfect for parties!


Allow the tarts to cool for about 10 minutes and then run a knife around the outside of the tarts to loosen them and then remove them to a serving plate.

Serve warm if possible but they are delicious even at room temperature.

Enjoy!

Food Lust People Love: Artichoke Dip Puff Pastry Tarts are a quick and easy way to transform artichoke dip into little handheld tarts, perfect for parties!


Visit all the other Christmas Week Peeps for more Holiday Baking Goodness:

Pin it!

Food Lust People Love: Artichoke Dip Puff Pastry Tarts are a quick and easy way to transform artichoke dip into little handheld tarts, perfect for parties!
 .