Showing posts with label side dish. Show all posts

Thursday, April 30, 2015

Pattypan Edamame Parmesan Pasta

Pan-roasted pattypan squash and edamame tossed with tiny pasta, olive oil and freshly grated Parmesan make a deliciously filling and nutritious main course or side dish.

My baby is having a big event tonight. The biggest since her graduation from high school and the biggest until exactly one month from today when she will graduate from university.

And I’m not there.

I was just with her last month when we spent her last spring break working and cooking and shopping and laughing and just hanging out. And I’ll be there next month for her graduation. I struggled, really struggled with the decision to miss her senior show, the culmination of four years of learning and one long, sleepless semester of laborious efforts on her clever design project.

So today I’m feeling guilty and tearful.

It comes over me, unbidden and at inopportune times. At the grocery store check out. While I toss a ball in our backyard for her furry brother. As I typed the blog post I was supposed to be writing. Because I want to be there and am not. But also, because in this place that I live, there are workers who haven’t been home for two years or, often, more. They’ve left children behind to be raised in their home countries by their wives who live as single mothers or with aged grandmothers who have already raised families of their own. They send every extra cent home to pay for food and schooling. What right have I to well up with tears over missing one big event when I’ve been there for most every other landmark over the last almost 22 years? When they have missed most of them. And don’t even mention the parents who are mourning the loss of their children from recent catastrophic events. I cannot go there. I give myself a firm talking to. “Graduation is one month away. It’ll be fine. Her sister will be there. It'll be fine. Suck it up!”

This post is me, sucking it up, by sharing.

My younger daughter loves to bake brownies and lately has added her roommate’s mother’s banana bread to her repertoire but she isn’t as fond of cooking. (I know, I know. Where did I go wrong?) Her meal planning is generally predicated on the question, will it go with pasta? She makes a lovely dish with Brussels sprouts that have been halved and roasted in a skillet until they are caramelized and golden. Then she tosses them with hot cooked pasta and an avocado scooped from its peel. If there’s Parmesan, some of that might get hummed in. But it’s not essential.

A couple of weeks ago, I was pan-roasting some pattypan squash and thought, “Will it go with pasta?” So I browsed around in the cupboard for a recently discovered pasta shape called pallettoni, which translates to buckshot, a name that amuses me and describes the pasta perfectly. Although she’d probably want me to trade in the squash for Brussels sprouts, she is a fan of edamame so I think my daughter would like this.

I may not be there, sweet thing, but you may rest assured that you and your sister are never far from my mind. And graduation is just a month away. And it will be fine. It will be fine. By which I mean, I will be fine. I never had any doubts about you.

Ingredients
9 1/2 oz or 270g pattypan squash
Olive oil
2/3 cup or 115g dried pallettoni pasta or another small pasta of your choice
1/2 cup or 80g frozen already peeled edamame, thawed
1⁄2 cup or 90g freshly grated Parmesan
Sea salt
Freshly ground black pepper

Method
Cut the stem ends off of your pattypan squash and then slice them into two or three pieces.


Pop them in a skillet drizzled with a little olive oil, over a high fire, and cook until they have little brown spots all over.


On another burner of your stove, boil the pasta in well-salted water, according to manufacturer’s instructions. Add in the thawed edamame during the last minute or so.


Drain the pasta and edamame and add them to the squash pan, along with another drizzle of olive oil.


Sprinkle on most of the grated Parmesan, reserving about 1/4 of it to add to the top of the finished dish. Stir in the Parmesan and then taste and season with salt and pepper.


Sprinkle the balance of the Parmesan on top of the finished dish. Add a little more freshly ground black pepper, if you'd like.


Enjoy!


Ever miss an important event in someone special's life? Tell me the tale and we can commiserate.


Wednesday, March 11, 2015

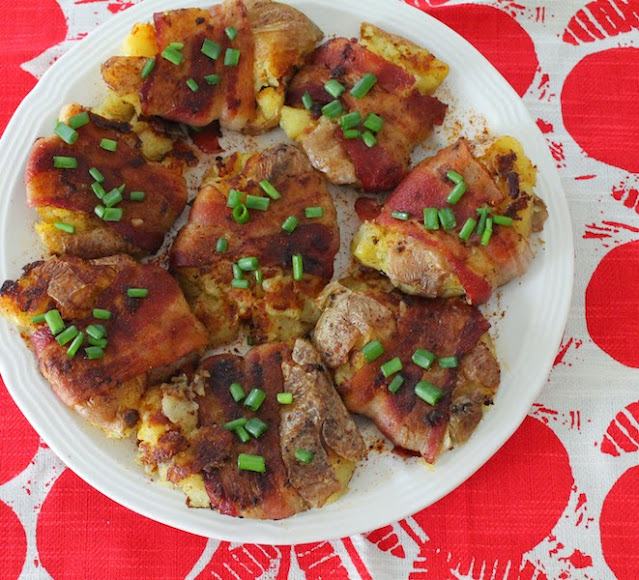
Bacon-wrapped Smashed Redskin Puffs

Small red potatoes, cooked to tenderness then smashed flattish, covered with bacon and fried till crispy. You can serve these as a side dish but they also make a fabulous main course alongside a big salad or vegetables.

 Food Lust People Love: Small red potatoes, cooked to tenderness then smashed flattish, covered with bacon and fried till crispy. You can serve these as a side dish but they also make a fabulous main course alongside a big salad or vegetables.

It’s Blogger C.L.U.E. Society time again, where I am assigned a blog to poke around in and find a recipe to make which fits our “clue” or theme. Which, this month, is potatoes. While I’m not the diehard fan my mother is – her last meal on earth would be potatoes and more potatoes of every recipe and description – I am quite a fan. I was also delighted to be assigned the blog A Day in the Life on the Farm, written by my friend, Wendy, a retired police officer who has taken up the life of a leisurely farmer. HA! Yeah, that was a joke. What she does do, between chores, is cook some pretty tasty dishes.

As I poked around in Wendy’s potato posts, it became apparent to me that my eyesight is failing. I have an annual checkup each summer but here we are in only March, and these contacts just aren’t quite working for me anymore. When I saw the first photo of her smashed redskin potato puffs crisping up in the frying pan, I thought, “Oh, my goodness, brilliant, she has wrapped the smashed potato with bacon!” Upon enlarging the picture, I realized that was just the red of the potatoes. But then I HAD to wrap them in bacon. There wasn’t any other choice. 

Let me say that if you are not a bacon person, I’m not sure we can be friends. Wendy’s original potatoes are still brilliant. The smashing opens the skins so the fluffy insides can fry up crunchy and crispy and more-ish. They would be an excellent addition to any meal!

I intended to serve these as a side dish, just as Wendy did, but with the addition of the bacon, I changed my mind and made them the main course, with a lovely mixed salad on the side, perfect for a meal when meat doesn’t have to be the center of attention. Since the salad was so big, we still only each ate two of the potatoes.

Ingredients
Small redskin potatoes – about 2 per person
1 slice of normal smoked streaky bacon per potato (Not thick cut.)
Handful chopped green onions to serve
Cayenne pepper – optional

Method
Boil your potatoes in a large pot of water until tender, testing with a pointy knife at about 20 minutes. Cook a little longer if you still feel resistance in the middle.

Yeah, I know I said two per person and we are only two people at home but who boils only four potatoes?
Exactly no one.


Drain the water from the pot and leave the potatoes to air dry, and cool a little, uncovered in the hot pot.

When your potatoes are cool enough to handle, but are still quite warm, heat a non-stick skillet on the stove over a medium flame.

Lay one piece of cold bacon on a plate and top with a potato. Use the potato masher to smash the potato till it is kind of flattish and about the same size as the masher.


Fold the ends of the bacon over to cover the smashed potato. With a spatula, lift the bacon-wrapped potato and place it - overlapped bacon-end side down - in the heated pan.


Continue until all the potatoes are smashed and wrapped with bacon, adding as many as you can comfortably fit to the pan and leaving the rest to wait on the plate.

Overlapped bacon end side down to start.


You don’t want to crowd your pan too much because these need room around them so everything can get crispy, instead of just steaming. Also, room to maneuver makes turning them over easier.

When the overlapped bacon on the bottoms are sufficiently browned and sticking together, use a spatula to gently turn the smashed potatoes over. If little pieces of potato try to detach, just push them back where they belong with the spatula.

Push down gently on the smashed potatoes with your spatula to reflatten them occasionally.


Cook until both sides are crispy then remove the smashed potatoes to a warm plate to keep warm. Sprinkle with a little cayenne, if desired.  Continue cooking until all your potatoes are done.

Sprinkle with the chopped green onions to serve.

Food Lust People Love: Small red potatoes, cooked to tenderness then smashed flattish, covered with bacon and fried till crispy. You can serve these as a side dish but they also make a fabulous main course alongside a big salad or vegetables.


Enjoy!


Many thanks to this month’s host and organizer, Liz of That Skinny Chick Can Bake.


One potato, two potato,
Three potato, four,
Five potato, six potato,
Seven potato, MORE!

Here’s the list of this month’s Blogger C.L.U.E. participants. Follow the links to see which blog they were assigned and which great potato or starch recipe they have recreated.


Pin these Bacon-wrapped Smashed Redskin Puffs!

Food Lust People Love: Small red potatoes, cooked to tenderness then smashed flattish, covered with bacon and fried till crispy. You can serve these as a side dish but they also make a fabulous main course alongside a big salad or vegetables.
.

Sunday, February 15, 2015

Piperies Yemistes me Pligouri - Bulgur Stuffed Peppers

These colorful roasted peppers are stuffed with a hearty filling of nutty bulgur wheat and tomatoes, seasoned with onion, parsley and cilantro, perfect as a side dish or main course.

Food Lust People Love: These colorful roasted peppers are stuffed with a hearty filling of nutty bulgur wheat and tomatoes, seasoned with onion, parsley and cilantro, perfect as a side dish or main course.


Growing up in a Catholic family, I understood about not eating meat on Fridays, especially during Lent – those 40 days before Easter Sunday – but I never thought of it as fasting. Fasting was when you didn’t eat at all. Perhaps it was just my ignorance but, turns out, in the Orthodox church, it’s considered fasting when you abstain from meat as well and there are certain sects that will eat no meat, fish, dairy or eggs for the whole of Lent. 

How did I learn this? Well, about five years ago a girlfriend had to go into the hospital for treatment, nothing too serious – I think it was gallstones perhaps, but it meant being away from home for several days and leaving her husband and daughter to fend for themselves.

So a group of us decided we should make and deliver meals to help out. I asked if there were any dietary restrictions and she said her husband was fasting. Her husband is Greek Orthodox and, since it was Lent, that meant no meat, no poultry, no fish, no dairy, no eggs! There went my plans for several cheesy casseroles that travel and reheat well. Thank God for the internet! A search for Greek Orthodox Lent recipes led me to several very useful sites, which I shared with the other ladies who were cooking.

Note: If you are actually cooking for a strict Greek Orthodox friend, double check whether they also abstain from olive oil during Lent, and substitute canola or the like.

These stuffed peppers were so good that after I had made a batch for my friend’s family, I made a batch for us. And, still do, every once in a while. When this week’s Sunday Supper theme of Heart Healthy was announced, I knew these would be perfect. Meatless, cheese-less but, oh, so tasty! And I think they are quite pretty as well.

I adapted this recipe and serve them as a main course, with a salad on the side.

Ingredients
6 large bell peppers (Any color will do but the red and yellow are sweeter than the green.)
1/4 cup or 60ml olive oil, plus more for sautéing the onion and drizzling on the peppers before roasting
1 large onion (Mine weighed 7 oz or almost 200g)
1 cup or 210g bulgur wheat
1 can (14.5 oz or 400g) tomatoes (crushed or chopped)
1 teaspoon of sea salt or to taste
1 vegetable stock cube
1/4 teaspoon of freshly ground pepper
Small bunch fresh parsley
Large bunch fresh cilantro
Optional: 1 teaspoon crushed red pepper

Method
Cut the caps off the top of the peppers and remove the seeds and any lighter colored fibers from inside. Set the caps aside for later.

The original recipe says to put them in a tight-fitting baking pan and to add crunched up parchment paper to fill any gaps but I like to use foil instead. Wedge them tightly together so they stand upright.


Peel and quarter your onion and put it in a food processor with the 1/4 cup or 60ml olive oil. Process until very finely minced or pureed. (If you don’t have a food processor, you can grate the onion for almost the same effect.)

In a large skillet, add a drizzle of olive oil and sauté the onion for a minute or two.

Add in the bulgur wheat and stir well to coat it with oil and onions.


Stir in the canned tomatoes along with the salt, vegetable cube, black pepper and 1 1/4 cups or 300ml water.

Bring to boil over a medium heat then turn the fire down to simmer and cover the pan loosely with a lid.

Preheat your oven to 350°F or 180°C and chop your parsley and cilantro roughly.

Cook the bulgur for about 10 minutes and then taste to see if it needs more salt. I don’t usually have to add more salt, but I do add some crushed red pepper for a little spice.

Remove from the heat and stir in the chopped parsley and cilantro. Allow to cool for about five minutes.


Fill your peppers with the stuffing and top with the reserved pepper caps. If you have a little stuffing left over, consider that the cook’s treat and eat it straight from the pan with a spoon. Delicious!

Food Lust People Love: These colorful roasted peppers are stuffed with a hearty filling of nutty bulgur wheat and tomatoes, seasoned with onion, parsley and cilantro, perfect as a side dish or main course.

Drizzle on a little olive oil and roast the stuffed peppers in your preheated oven for about one hour or until the peppers are softened enough for your liking. Check part way through and cover the tops with foil if they are browning too much.


The original recipe said to allow the peppers to cool and serve them at room temperature but we prefer them warm.

Food Lust People Love: These colorful roasted peppers are stuffed with a hearty filling of nutty bulgur wheat and tomatoes, seasoned with onion, parsley and cilantro, perfect as a side dish or main course.


Enjoy!

Please join my Sunday Supper group and today’s hosts, Lori from Foxes Love Lemons and Ethel from eating in instead, as we celebrate National Heart Month with loads of delicious heart healthy recipes!

Better for you breakfasts:
Jump start your health with these appetizers and snacks:
Soups that'll win your heart:
Veggies, Sides, & Salads your heart will thank you for:
Healthy is the center of attention in these main courses:
Staying healthy doesn't mean giving up desserts!
We heart wine.

Pin these Bulgur Stuffed Peppers! 

Food Lust People Love: These colorful roasted peppers are stuffed with a hearty filling of nutty bulgur wheat and tomatoes, seasoned with onion, parsley and cilantro, perfect as a side dish or main course.


Sunday, October 5, 2014

Baked Zucchini with Spicy Tomatoes

The application of a little caramelizing heat brings out the best in these tender baby zucchini making sure they can still compete with the spicy tomatoes and feta cheese baked on top.  This dish is great as a vegetarian main or as a side dish. 

What’s your weakness?
I love a Cheeto or Dorito as much as the next person. Okay, okay, you’ve got me. I probably love them more. I’m not a big sweet eater so fatty and salty are definitely my dietary weak spots. That said, if I can add cheese to a vegetable dish – everybody saw my Sunday Supper potato chard bake a couple of weeks ago, right? – then my needs are satisfied in a much healthier manner.

This dish of baby zucchini topped with spicy tomatoes, feta cheese and crunchy pumpkin seeds was so good that we had it as a main course one night and delighted in it as a side dish the very next night. I was sad when it was gone.

The “unprocessed” challenge
This week Sunday Supper is featuring recipes that forgo the weird chemical ingredients that no one can pronounce, using just whole foods in their mostly natural state, if you don’t count things like pasteurizing milk to kill the harmful bacteria or making cheese out of it. I guess technically those are “processed” but, as far as I’m concerned, that’s in a good way. Our host this week is DB from Crazy Foodie Stunts and he got his inspiration for this theme from Andrew Wilder’s October Unprocessed Challenge. Whether you are willing to take the challenge or not, I'm sure we can all agree that if we can't say the ingredient or spell it, we probably shouldn't be eating very much of it!

These zucchini with spicy tomatoes, on the other hand, we will be eating more often.

Ingredients
1 lb 2 oz or 510g baby zucchini
1 lb 2 oz or 510g ripe tomatoes
1 small onion (about 3 oz or 85g)
2 red chilies
4 cloves garlic
2 tablespoons olive oil
1 teaspoon smoked paprika
1 teaspoon sugar
3 1/2 oz or 100g feta (I like one that is made with sheep’s milk but use your favorite.)
1/4 cup or 20g pumpkin seeds

Method
Cut the stems off of your little zucchini and then halve them lengthwise.


Chop your onions and tomatoes and mince the chilies and garlic.


Preheat your oven to 350°F or 180°C.

Heat one tablespoon of the olive oil in a non-stick skillet and fry the zucchini halves until they are browned nicely on both sides.


Put them in a baking dish in a single layer.

Add the other tablespoon of olive oil to the pan along with the onion, garlic and chilies. Sauté for a few minutes until they soften.


Add in the chopped tomatoes, the smoked paprika and the sugar. Cook for about seven or eight minutes over a medium heat until the tomatoes start breaking down.


Spoon the spicy tomatoes over the zucchini in the ovenproof dish.


Crumble the feta over the tomatoes and sprinkle everything with the pumpkin seeds.


Bake in your preheated oven for about half an hour.

It’s done with the feta is nicely browning and the dish is bubbling hot and brown all around the edges.


Enjoy!


Check out all the great “unprocessed” recipes we have for you today!

Alluring Appetizers and Snacks
Stunning Sides
Enticing Entreés
Decadent Desserts


Sunday, September 7, 2014

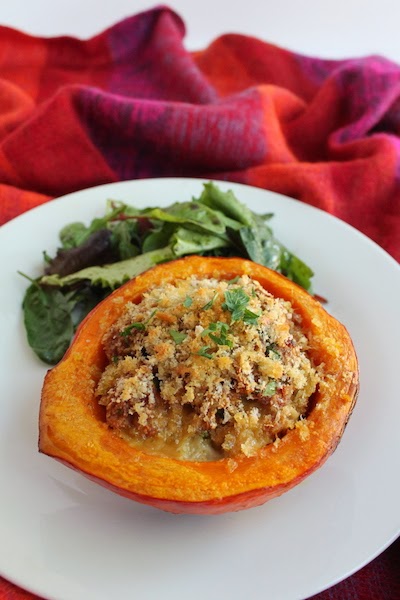
Stuffed Red Kuri Squash

Beautiful Kuri squash are perfect for stuffing and roasting. If you can’t find them though, a butternut or tender pumpkin would also work for this Stuffed Red Kuri Squash recipe made with spicy Italian sausage.

Food Lust People Love: Beautiful Kuri squash are perfect for stuffing and roasting. If you can’t find them though, a butternut or tender pumpkin would also work for this Stuffed Red Kuri Squash recipe made with spicy Italian sausage.


Last year I heard the news that a great new farmers’ market was set to open in Safa Park, a lovely green space not far from the coast here in Dubai. But weekend after weekend other plans got made (and brilliantly executed) and we never did seem to get to the park, until finally, in late May, it happened.

To the Market, finally!
Now the farmers’ market had gotten good press regularly since opening so I knew it had fabulous food trucks and loads of fresh vegetables. The gourmet butcher would be there along with folks with games for the children and shopping opportunities from select purveyors of sauces, baked goods, jams, all natural ice cream and many handmade crafts. So, as you can imagine, I was rubbing my hands together with glee as we made our way there. 

Due to a big construction project along one side of the park, the normal entrance had been changed so we circled the containing wall, looking for the right gate. Whew! Found it. And snagged the last parking place in the parking lot just outside! By this point, I was clutching my shopping bags and practically skipping through the gate, only to be brought up short by the sight of one lone booth with fresh vegetables. And that’s it. 
Turns out that the farmers’ market had closed for the summer the weekend before but the vegetable vendor, who is also the organizer, thought it would be a good idea to show up one last time, in case not everyone had gotten the word. Crestfallen does not even start to describe me. 

Fortunately, the vendor did have a decent selection of produce, including a few weird little round squashes with crook necks that I had never seen before. He didn’t know what they were called, beyond squash, but said that they were grown locally and were great when roasted. Sold!

My guy! Ooh, ooh, talking 'bout my guy! 


Do you have a farmers’ market near you? 
This year, when the sweltering heat has abated somewhat and sitting outdoors is no longer a health hazard, the farmers’ market will resume operations on 10 October at a different location in Zabeel Park and this time I’m going to try to get there long before next May. I know I have readers from around the world. I’m curious. When do your farmers’ markets open and close, if they aren’t year round?

Ingredients
4 links fresh Italian sausage (My four weighed about 7 3/4 oz or 275g)
1 red Kuri squash (My guy weighed about 440g or almost 1 lb)
2 slices stale bread (about 1 3/4 - 2 oz or 50-55g)
1/2 cup or 120ml milk
2 cloves garlic
1 egg
Handful flatleaf or Italian parsley
1-2 teaspoons crushed red pepper (depending on your tolerance/love of spiciness)
Olive oil
Salt, to taste

Method
Preheat your oven to 375°F or 190°C and use a little olive oil to grease a small pan that will just fit the two halves of your squash side by side.

Make crumbs out of your stale bread in the food processor and divide them into two bowls, the smaller one with just a few heaping tablespoons full for topping, the balance in the larger bowl. Pour the milk over the crumbs in the larger bowl and leave to soak.


Mince your garlic and parsley and remove the sausage meat from the casing.

Meanwhile, cut your squash in half and remove the fibers and seeds. Slice just a tiny bit off of the bottom so the squash halves sit flat and place them in the oiled pan.


Drain your breadcrumbs in a small sieve and press down lightly with your hands or the back of a spoon to get most of the milk out.


In a large mixing bowl, put the sausage meat, drained bread crumbs, garlic, parsley and crushed red pepper in with the egg and mix well.


My locally made Italian sausage is plenty salty so I don’t add more salt to this mixture. If yours is not, or if you are not sure, I encourage you to cook just a teaspoon of the mixture in a small frying pan to check. Add a little salt to the mixture, if necessary.

Stuff your mixture loosely in the squash halves.


Top with the reserved breadcrumbs and drizzle liberally with some olive oil.


Roast in your preheated oven for about 45-60 minutes, or until a fork can easily pierce the squash and it is cooked through. If it’s getting too brown, you can cover it with foil and continue roasting until done. And, in case you are wondering, the peel is completely edible. In fact, it's my favorite part!

Food Lust People Love: Beautiful Kuri squash are perfect for stuffing and roasting. If you can’t find them though, a butternut or tender pumpkin would also work for this Stuffed Red Kuri Squash recipe made with spicy Italian sausage.


Enjoy!


Are you a fan of squash dishes? We've got everything you need for a festival of squash today!

Starters – Appetizers & Cocktails:
Pickles & Relish:
Soups & Salads:
Main Dishes
Side Dishes:
Sweets to Start or End the Day:

Sunday, July 20, 2014

Jacques’ Cucumber Salad (but) with Onions

Cucumber salad, made Jacques Pepin’s way, stays crunchy for several days, making it a great make-ahead contribution for your next potluck or barbecue party. You’ll want to double or even quadruple this recipe for a crowd. 

This week Sunday Supper is going to a barbecue party and bringing along everything you need from drinks to salads to ribs (You gotta have the ribs!) to make it just perfect. I love a fresh dish, but sometimes time does not allow for in-the-moment creations. That’s where Jacques Pépin and his cucumber salad come to the rescue. In the chef’s own words, “The salt, you will discover, draws the juices from the cucumbers, making them limp, and, paradoxically, very crisp at the same time. Prepared this way, the cucumbers will stay crisp for several days.” And so they do.

Many thanks to our hosts today, Jennie from The Messy Baker and Melanie from Melanie Makes! This recipe is adapted from Jacques Pépin's Complete Techniques.

Ingredients
4 cucumbers – weight 1 1/3 lbs or 585g
1 1/4 teaspoons coarse salt – I used sel gris.
1/2 small purple onion – about 2 oz or 55g
1 tablespoon fresh lemon juice
2 tablespoons sour cream
Freshly ground pepper
1 tablespoon peanut oil

Jacques’ ingredient list calls for three cucumbers, which he says will give you five cups sliced. I got two cups out of my four cucumbers so I don’t know where we went wrong but I reduced the rest of the ingredients proportionally to fit what I had. After all, you can’t salt two cups of cucumbers with the same salt that’s meant for five!

See? His aren't bigger than average. 


Method
Peel your cucumbers and cut them in half lengthwise. Scoop out the seeds with a spoon.


Cut them into slices about a 1/4 inch or 1/2cm wide.


Pop them into a colander, over a bowl to catch the juice. Sprinkle the cucumbers with salt and mix well. Allow to drain for at least an hour but preferably two, at room temperature.


Meanwhile, slice your half onion as thinly as you can manage and soak the slices in a small bowl in the lemon juice. Stir it occasionally as it sits.


When the time is up for the cucumbers, rinse them thoroughly under cold water and then press them lightly to get rid of excess water.


I laid them out briefly on some paper towels.


Mix the sour cream and the peanut oil into the lemon juice and onions, along with a good few grinds of fresh peppercorn.


Pour this mixture over the cucumbers and stir.

Jacques says more salt won’t be necessary and he is absolutely right. Because of the sour cream, refrigerate this salad if not eating immediately.


Enjoy!

Are you looking for more barbecue party recipes? Sunday Supper’s got you covered!

Beverages
Appetizers
Sides and Accompaniments
Main Dishes
Desserts