Showing posts with label snack. Show all posts

Monday, January 30, 2017

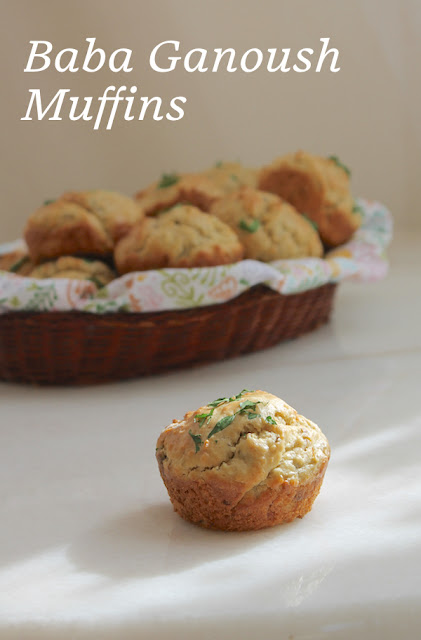
Baba Ganoush Muffins #MuffinMonday

Roasted eggplant, tahini, garlic and a little cumin give these baba ganoush muffins all the flavor of that wonderful dip, in small portable packages. They are perfect with a cold beer, red wine or even something sparkling.


I am a firm believer that you can make pretty much anything into a muffin. It just requires some imagination and the creation of a fusion recipe, taking the ingredients of one dish and turning it into something completely different, but just as delicious.

As we munched on these with a glass of Prosecco the other evening, I share my theory with my husband. He’s learned over the years not to doubt me on matters of the kitchen, but he cocked his head to one side and gave me that little smile where he turns up just one corner of his mouth. “How about banana cream pie?”

If you’ve been reading along here for a while, or follow me on social media, you might know that banana cream pie is his favorite dessert, his special request on his birthday or Father’s Day. Interesting idea. Banana cream pie muffins. I’m not even going to google it because, in all likelihood, someone’s already done one.

But check back next month to see if I succeed. Meanwhile, roast youself an eggplant and make some savory Baba Ganoush Muffins. They are really rather special too.

Ingredients
Butter, oil or baking spray for greasing muffin pan
1 small eggplant about 8 1/2 oz or 240g
1 1/2 cups or 190g flour
1 teaspoon salt
1 teaspoon baking soda
1/4 teaspoon ground cumin
Black pepper
1/2 cup or 130g tahini
1/2 cup or 120ml milk
1 egg
1 clove garlic, minced or crushed in a garlic press
Parsley for garnish, if desired

Method
Preheat your oven to 375°F or 190°C and grease a 12-cup muffin pan with a little butter or oil.

Poke the eggplant all over with the tines of a fork. Using a carving fork, hold the eggplant closely over the flame of your gas stove, turning it until it’s charred all over, about 5-7 minutes. (If you don’t have a gas stove, you can just to all the roasting in the oven - it may take up to 25-30 minutes.)


Put the charred eggplant on a baking sheet and put it into the oven for about 20-25 minutes or until it’s completely cooked through.

Remove the eggplant from the oven and set it aside to cool.

Meanwhile, you can be getting the rest of the muffin ingredients ready.

In a large mixing bowl, whisk together your flour, salt, baking powder, cumin and a few generous grinds of fresh black pepper.

In another bowl, measure out your tahini and milk and add in the egg.

When the eggplant is cool enough to handle, remove the peelings and discard.

Mash the flesh with a fork.

 Add it to the wet ingredient bowl along with the garlic. Stir well to combine.


Fold the wet ingredients into the dry ingredients until just mixed. Divide the thick batter between the 12 muffin cups. Top with a little chopped parsley for color, if desired.


Bake in your preheated oven about 20-23 minutes or until the tops and sides are golden.


Remove from the oven and leave to cool for a few minutes in the pan. Then removed them from the pan and leave to cool on a wire rack.


Enjoy!

Check out all the lovely muffins my Muffin Monday bakers have created for you:


#MuffinMonday is a group of muffin loving bakers who get together once a month to bake muffins. You can see all our of lovely muffins by following our Pinterest board.

Updated links for all of our past events and more information about Muffin Monday, can be found on our home page.

Pin it!

Baba Ganoush Muffins - Roasted eggplant, tahini, garlic and a little cumin give these baba ganoush muffins all the flavor of that wonderful dip, in small portable packages.
.

Tuesday, January 17, 2017

ANZAC Biscuits #CreativeCookieExchange

ANZAC biscuits are a traditional cookie Down Under made with oats, coconut and golden syrup. These biscuits – always biscuits and never cookies – can be baked chewy or crispy and that’s a point that divides families.


This month our Creative Cookie Exchange group theme is Healthy Cookies. My younger daughter and I were brainstorming ideas – I was pushing for a homemade Hobnob (a crispy oat cookie) when she suggested ANZAC biscuits. When we lived in Kuala Lumpur the first time, we enjoyed home baked ANZAC biscuits at least once a year, when one of our Australian friends made them for ANZAC Day. Happily, she also shared her recipe.

ANZAC stands for Australian and New Zealand Army Corps, a joint outfit that fought together during World War I. ANZAC Day, which falls on April 25th every year, is a national holiday in Australia that has grown from its original intent in 1916 to honor the more than 8,000 Australians who died in the campaign to take Gallipoli, to a day to honor all who have fallen in military and peacekeeping missions.

There are several stories about the origin of ANZAC biscuits. One says that they were baked to send overseas in care packages to soldiers. More likely, say historians, they were created and baked to sell at fundraisers to collect money for the war effort. Original ANZAC biscuits were made only of flour, oats, and butter with syrup as the binding agent. They had a long shelf life and were full of energy and nutrition. Coconut has become a popular, later addition.

First, a word about the units of measure. Australian cups and tablespoons are not the same volume as American cups and tablespoons.

1 Australian cup = 8.45 fl oz
1 US cup = 8 fl oz
1 Australian tablespoon = 4 teaspoons
1 US tablespoon = 3 teaspoons

Mercifully, the teaspoons are equal. To make this the least complicated as possible, I’m going to leave the cups the same, since they are 1:1 anyway, but add the gram measurements of an Australian cup of rolled oats, flour, sugar and butter, if you want to use a scale.

Ingredients
1 cup or 120g rolled oats (Don’t use the quick cook oats.)
1 cup or 132g plain flour
1 cup or 237g caster sugar
3/4 cup or 75g coconut
1/2 cup or 125g butter
8 teaspoons golden syrup
1/2 teaspoon bi-carbonate of soda (baking soda, not baking powder)
8 teaspoons boiling water

Method
Preheat your oven to 300°F or 150°C and line two cookie sheets with baking parchment or silicone liners.

Combine oats, flour, sugar and coconut in a large bowl.

Combine butter and golden syrup in a saucepan (or microwaveable bowl) and use your heat source to warm them gently until the butter is melted.


Mix the soda with the boiling water and add it to the butter mixture (it should froth up) and then add the whole lot to the oat mixture. Stir well.


Use a cookie dough scoop or a couple of spoons to divide the dough into about 24 pieces, placing them on your prepared pans.


Bake in your preheated oven for about 18-20 minutes or until golden brown. Rotate the pans mid way through baking time so they will brown evenly. If they are undercooked, they will be soft in the middle. If they’ve run together a little bit, just use a knife to gently separate them.


Remove the biscuits from the pan while warm and transfer them to a wire rack to cool completely.


Store in an airtight container for up to a week. If they last that long.

Enjoy!


Many thanks to my dear friend Glenys, for being the kind of friend who not only shares her recipes, but one whose friendship over the years has helped me stop questioning my sanity. Knowing she chose this same nomadic life means I must not be nuts, but if I’m crazy at least we are both crazy together. Everyone should be blessed with a friend like Glenys.

A big thank you also to Karen from Karen’s Kitchen Stories and Holly of A Baker’s House for stepping up to create and update the link list. Want to see the rest of our healthy cookies? Check out the list below.


Creative Cookie Exchange is hosted by Laura of The Spiced Life. We get together once a month to bake cookies with a common theme or ingredient so Creative Cookie Exchange is a great resource for cookie recipes. Be sure to check out our Pinterest Board and our monthly posts at The Spiced Life. We post the first Tuesday after the 15th of each month!

Pin it! 

 
.


Wednesday, January 4, 2017

Pepperoni Pizza Popcorn #FoodieExtravaganza

Pepperoni Pizza Popcorn is made with fresh popcorn kernels popped in the oil of fried pepperoni, plus ground sundried tomatoes, Parmesan and oregano. Perfect for your combo pizza/movie night.


You know what’s hard to eat and type at the same time? Pepperoni Pizza Popcorn. And yet, as I sit here eating and typing, shining up my MacBook keyboard with every muted clack, clack, clack, I can’t stop dipping my hands into that big bowl. I find myself typing with only my right hand, so the left hand can still reach into that bowl. It’s not easy – the A and E are so far to the left! - but here we are. And it’s worth the trouble, I assure you.

This month’s Foodie Extravaganza theme is popcorn in honor of National Popcorn Day on January 19th. Now you will be prepared to celebrate with plenty of fun recipes!

I gotta tell you about this pepperoni pizza popcorn. A lot of the pepperoni falls off and ends up at the bottom of the bowl. Which is not always a bad thing. You can eat it by licking a finger and coating it with pepperoni. Over and over. And over. Every once in a while, I’d use a spoon and scoop to the bottom of the bowl and sprinkle the pepperoni back over the remaining popcorn. That helps too. But the bottom line is that this stuff tastes so good, you won’t care.

Ingredients – for a huge, I mean huge, bowl of popcorn.
5 sun-dried tomatoes or about 10g, ground in a mortar and pestle or a coffee grinder reserved for spices
1/3 cup or 40g grated Parmesan
1/2 teaspoon (or more) dried oregano
6 oz or 170g sliced pepperoni
5-6 tablespoon canola
3/4 cup or 160g popcorn kernels


Method
Put your sun-dried tomato powder, Parmesan and oregano together in a bowl. Stir well to combine and set aside.


Chop your pepperoni in a food processor until it is in tiny bits.


Fry it in your very large popcorn pot along with 3 tablespoons canola oil. (Your popcorn pot should be wide enough to hold the popcorn kernels in one layer at the bottom and commensurately tall, with a good fitting lid.)

When the pepperoni is crispy, tip the pot to one side and leave it that way for a few minutes, so you can remove the pepperoni to a plate lined with paper towels and leave the oil behind.


Pour the popcorn kernels into the pot. Give the pot a shake so they lay in a single layer. Add the extra 2-3 tablespoons canola oil so that all the kernels are coated in oil.


Use an old dishcloth to cover the inside of your pot lid, tying the ends around the handle on top. This towel will absorb the steam and keep your popcorn from getting soggy.


Pop the corn, lid on, over a medium high heat until the kernels stop popping. Shake the pot occasionally to send the unpopped kernels back down to the bottom.

Remove from the heat and tip the popcorn into a large bowl. Sprinkle the popcorn with the sun-dried tomato powder, Parmesan, oregano and crispy pepperoni.


Enjoy!

Many thanks to our host this month, Camilla of Culinary Adventures with Camilla. Check out all the great popcorn recipes we have for you!


Foodie Extravaganza celebrates obscure food holidays or shares recipes with the same ingredient or theme every month.

Posting day is always the first Wednesday of each month. If you are a blogger and would like to join our group and blog along with us, come join our Facebook group Foodie Extravaganza. We would love to have you!

If you're a reader looking for delicious recipes, check out our Foodie Extravaganza Pinterest Board! Looking for our previous parties? Check them out here.

Pin it!


 .

Monday, December 26, 2016

Maque Choux Cornbread Muffins #MuffinMonday

Maque choux is a spicy Cajun corn dish that makes an appearance at every holiday meal at my house. I am quite happy to eat leftovers from a bowl with a spoon but maque choux cornbread muffins are another delightful choice.


Welcome to the final Muffin Monday for 2016! It's been a year of change and challenge for many of us, but coming together once a month to bake and share muffins is therapeutic, at least for me. I hope you all have enjoyed the variety of muffins as much as I do.

I created this little group because muffins are one of the easiest things to bake. I wanted to motivate readers who are intimidated by baking to give muffins a try. You don't need electric beaters for mixing, just two bowls and a spoon or spatula. All the wet ingredients in one bowl. All the dry ingredients in the other. Fold them together and bake in a greased muffin pan. What could be simpler?

Ingredients
1 cup or 200g fine cornmeal or polenta
1 cup or 125g flour
2 teaspoons baking powder
1/2 teaspoon baking soda
1/2 teaspoon salt
1 cup or 235g leftover maque choux from this recipe
1/2 cup or 113g butter, melted and cooled
1/3 cup or 80g thick sour cream
2 large eggs

Method
Preheat your oven to 350°F or 180°C and prepare your 12-cup muffin pan by lining it with paper muffin cups or greasing it.

In a large mixing bowl, combine your cornmeal and flour with the baking powder, baking soda and salt

In another mixing bowl, combine your maque choux, eggs, sour cream and melted butter.


Pour the wet ingredients into dry mixture and stir until well combined. Spoon the thick batter evenly into the muffin cups.


Bake for about 20 minutes in your preheated oven or until a toothpick inserted comes out clean.


These make a great addition to any brunch or luncheon menu.


Enjoy!


Have any of our Muffin Monday posts motivated you to get in the kitchen and bake? I'd love to hear from you if they have.  After all, with recipes as delicious as the ones the Muffin Monday bakers share, you have a great selection of both savory and sweet recipes to try.

Check out this month's tasty links.


#MuffinMonday is a group of muffin loving bakers who get together once a month to bake muffins. You can see all our of lovely muffins by following our Pinterest board.

Updated links for all of our past events and more information about Muffin Monday, can be found on our home page.


Pin it! 


.

Tuesday, December 13, 2016

Cranberry Sweet Rolls #BreadBakers

Cranberries are the darling of this season, showing up in savory and sweet recipes. (For those of us who can't get Florida Strawberries!) They add both sweetness and a welcome tart bite to these cranberry sweet rolls. Perfect for Christmas morning. Or any morning, really.


If you’ve been reading this space for a while, you might remember that I started Bread Bakers with my friend and fellow blogger Renee at Magnolia Days in September of 2014. As a group, we've been baking bread and growing like a good sourdough starter ever since. Twelve bakers took part in that first group event. This month, more than two years on, we have 16 delicious sweet yeast breads to share with you. Some months we’ve had 29 or 30 but I’m happy with 20 in a busy month like December.

Part of our Bread Bakers blurb talks about members taking turns choosing the theme or main ingredient and hosting the event each month. Because everyone is so willing to step forward, I haven’t actually hosted for ages, just played a supporting role to whoever was in charge. This month I’m stepping in to host! Our theme was chosen by Laura of Baking in Pyjamas who unfortunately had to drop out this month. I am delighted to fill in.

My cranberry sweet rolls are a seasonal take on cinnamon rolls, but with a buttery enriched dough and homemade cranberry filling. Make sure to follow my instructions to set aside a little of the filling for topping as well. That bright red on top makes them even more festive. If you want to enjoy these freshly baked for breakfast, follow the alternative instructions for the second proofing.

Don't forget to scroll down and check out all the other sweet yeast breads we’ve baked for you this month, perfect for the holiday season.

Ingredients
For the enriched dough:
1/2 cup or 120ml warm water
2 tablespoons sugar
1 envelope fast-acting yeast (1/4 oz or 7g)
1 1/2 cups or 190g all-purpose flour, plus extra for rolling out the dough
1/2 teaspoon salt
1/4 cup or 57g butter, very soft but not melted

For the filling:
3/4 cup or 150g sugar
1/4 cup or 60ml water
1/4 cup or 60ml fresh orange juice
Zest of 1/2 orange (save other half for decoration)
2 cups or 210g fresh or frozen cranberries

For the glaze:
3/4 cup or 95g powdered sugar, sifted
3-4 teaspoons milk

Method
Make the filling first so it has time to cool:
In a large saucepan, bring sugar, water, orange juice and cranberries to a boil. Cook, uncovered, until cranberries begin to pop, just a few minutes. Reduce heat; simmer 15 minutes longer or until thickened, stirring occasionally. Stir in orange zest; cover and set aside to cool.


Line the bottom of an 9 in or 23cm round baking pan with baking parchment.

To make the dough: Place the water, sugar, and yeast in the bowl of a stand mixer fitted with the paddle attachment. Let the mixture rest for a few minutes to activate the yeast.

Add in the flour and salt. Mix well until a soft dough forms. Keep your mixer on medium speed and add in the butter a tablespoon or so at a time, mixing until the butter is incorporated each time.


Cover the bowl with some cling film or a damp towel and set aside to rest for 15 minutes. With rapid rise yeast, this rest takes the place of the first full proofing. This quite a soft dough.


On a lightly floured work surface, roll out the dough to a rectangle about 12x15in or 31x38cm.


Spread all but about 1/4 cup or 75g of the filling on the dough rectangle, going all the way to the sides but leaving a bit empty at the end. Save the balance for decoration.


Roll the dough up as tightly as you can manage, jellyroll style, ending at the empty end so it can seal itself as you finish the roll. Cut the roll into six equal pieces.


Place the cut rolls into your prepared pan.

Cover with cling film and set in a warm place to rise for 45 minutes to 1 hour, or until doubled in size. (Alternatively, if you want to bake fresh for breakfast in the morning, you can now put the sweet rolls in the refrigerator to rise more slowly overnight. Take them out in the next day and put them in a warm place while you preheat your oven.)


When the last rise time is almost up, preheat your oven to 350°F or 180°C.

Bake for about 25-30 minutes or until the tops are golden.


Remove from the oven and leave to cool before adding the glaze.

To make the glaze, add the milk by teaspoons to the powdered sugar, stirring well in between, until you reach a good drizzling consistency.

Drizzle the glaze over the cooled cranberry sweet rolls. Add dollops of the reserved cranberry filling in between. Sprinkle with the remaining orange zest.


Enjoy!

Check out all the great sweet yeast breads!

BreadBakers
#BreadBakers is a group of bread loving bakers who get together once a month to bake bread with a common ingredient or theme. Follow our Pinterest board right here. Links are also updated each month on this home page.

We take turns hosting each month and choosing the theme/ingredient.

Pin it!

.

Monday, November 28, 2016

Shrimp Scampi Muffins #MuffinMonday

Garlicky, spicy and full of shrimp! Savory shrimp scampi muffins are perfect lunch box food. They are great cold or you can rewarm them briefly in a microwave. Or make them in mini muffin pans for a quick and easy appetizer for your holiday party.


First, my apologies for the lack of photos for the steps where we cook the shrimp. The truth is, we had shrimp scampi for dinner on Saturday night so I actually cooked about three times the amounts below, with way more butter.

It was a simple meal with crusty French bread for sopping up all the lovely garlickly sauce and a fresh salad to counterbalance the rich shrimp dish. The treble amount was a deliberate choice because I knew I wanted to make muffins with the leftovers. Savory muffins are my favorites and it has been a couple of months since I made some. Hope you like them too!

Ingredients
For the shrimp:
1 tablespoon butter
2-3 cloves garlic, minced
1 fresh red chili, minced
1/8 cup or 30ml dry white wine
8 large shrimp (After cooking, about 1 cup, chopped roughly or 150g)
Good handful flat leaf parsley, chopped finely
Salt to taste

For the muffins:
3/4 cup or 180ml milk
1/3 cup or 80ml canola or other light oil
1 egg
2 cups or 250g flour
1 tablespoon baking powder
1/2 teaspoon coarsely ground black pepper
1/2 teaspoon salt

Method
Preheat oven to 350°F or 180°C and prepare your 12-cup muffin pan by greasing it or lining it with paper baking cups.

Heat the butter in a heavy bottomed pan and add the garlic and chopped chili. Sauté them gently until the garlic just starts to color and add in the white wine.

Now add the shrimp. Cook for a few minutes, covered, until the shrimp are cooked though. Add the parsley, stir and remove from the heat. Sprinkle with salt to taste. Set aside to cool.

In a small mixing bowl, whisk together your milk, egg and oil.

In a larger bowl, combine flour, baking powder, pepper and salt.

Chop your shrimp in big pieces and mix them into the dry ingredients.


Fold the liquid ingredients into the dry ingredients until just mixed.


Divide the batter between your 12 muffin cups.

Bake in your preheated oven for 20-25 minutes or until light golden brown and toothpick inserted in center comes out clean.


Enjoy!


Check out all the great muffins my Muffin Monday group is sharing today!


#MuffinMonday is a group of muffin loving bakers who get together once a month to bake muffins. You can see all our of lovely muffins by following our Pinterest board.

Updated links for all of our past events and more information about Muffin Monday, can be found on our home page.

Pin it!

 .