Showing posts with label sweet bread recipes. Show all posts

Tuesday, February 13, 2024

Chocolate Chocolate Chip Mini Loaves #BreadBakers

These Chocolate Chocolate Chip Mini Loaves are baked with cocoa and chocolate chips. Applesauce adds moisture and nutrition - not that you’ll notice it’s there flavor-wise! It's all about the chocolate!

Food Lust People Love: These Chocolate Chocolate Chip Mini Loaves are baked with cocoa and chocolate chips. Applesauce adds moisture and nutrition - not that you’ll notice it’s there flavor-wise! It's all about the chocolate!

Like many of my friends who love cooking and baking, I have a lot of pans that I rarely use but still keep, you know, just in case. The little vintage loaf pans I used for this recipe are a good example. I inherited them, if memory serves, from my paternal grandmother who used them to make fruitcake to give away at Christmastime. 

I actually own six of these little pans but since there are just two of us at home, it seemed like a good idea just to make four mini loaves. If you don't have mini loaf pans, you can bake this batter as muffins.

Chocolate Chocolate Chip Mini Loaves

This recipe is for a small batch of just four mini loaves but it’s easily doubled if you need eight. Or even trebled. This batter is very forgiving like that. My mini loaf pans have a capacity of one cup or 240ml by volume.

Ingredients
1 cup or 125g flour
1/4 cup or 20g cocoa
1/4 cup or 50g white sugar
1/4 cup, packed, or 50g brown sugar
1 teaspoon baking powder
1/4 teaspoon salt
1/4 cup or 75g applesauce (I used homemade but store-bought works fine.)
1 egg
3 tablespoons milk
3 tablespoons canola oil, plus extra for the pans
1/4 cup or 50g semi-sweet chocolate chips plus a little extra for topping, if desired.

Method
Preheat your oven to 350°F or 180°C and prepare your four mini loaf pans by brushing or spraying the insides with oil.

In a large mixing bowl, whisk together your flour, sugars and baking powder. 


Mix in the chocolate chips and use your clean hands to separate any that are stuck together. 


In another smaller bowl, whisk together your applesauce, egg, milk and oil.


Pour your wet mixture into the dry ingredients and fold until they are just combined. 


Divide the batter evenly between the prepared mini loaf pans. Add a few more chocolate chips to the top, if desired.  


Bake in your preheated oven for about 20-25 minutes or until the mini loaves are puffed up and a toothpick comes out clean when inserted in the middle.


Remove from the oven and allow to cool for a few minutes.

Run a offset spatula or butter knife around the edges of the pans and gently turn the  loaves out of the pans and cool further on a wire rack.

Food Lust People Love: These Chocolate Chocolate Chip Mini Loaves are baked with cocoa and chocolate chips. Applesauce adds moisture and nutrition - not that you’ll notice it’s there flavor-wise! It's all about the chocolate!

Enjoy!

Food Lust People Love: These Chocolate Chocolate Chip Mini Loaves are baked with cocoa and chocolate chips. Applesauce adds moisture and nutrition - not that you’ll notice it’s there flavor-wise! It's all about the chocolate!

It's the second Tuesday of the month so that means it's time for my Bread Baker friends to share their recipes. Our theme is chocolate breads! Many thanks to our host Wendy of A Day in the Life on the Farm


#BreadBakers is a group of bread loving bakers who get together once a month to bake bread with a common ingredient or theme. Follow our Pinterest board right here. Links are also updated each month on this home page. We take turns hosting each month and choosing the theme/ingredient.


Pin these Chocolate Chocolate Chip Mini Loaves!

Food Lust People Love: These Chocolate Chocolate Chip Mini Loaves are baked with cocoa and chocolate chips. Applesauce adds moisture and nutrition - not that you’ll notice it’s there flavor-wise! It's all about the chocolate!

 .


Monday, June 8, 2020

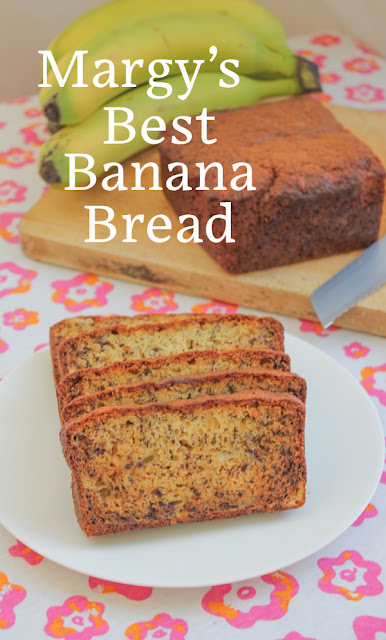
Margy's Best Banana Bread #BakingBloggers

Truly a recipe that has stood the test of time, Margy’s best banana bread is a tender, rich and flavorful loaf, made with butter as well as sour cream. Plain or toasted, it is the perfect snack at the office or at home.

Food Lust People Love: Truly a recipe that has stood the test of time, Margy’s best banana bread is tender, rich and flavorful loaf, made with butter as well as sour cream. Plain or toasted, it is the perfect snack at the office or at home. This one-bowl recipe makes clean up a breeze, easily done even as the loaf is baking in the oven. It goes great with both a hot cup of tea or coffee. And honestly, even a cold glass of milk.


Back before my mom retired, her boss used to bring this freshly baked banana bread into their office and everyone would clamor for a slice. They all insisted that she share the recipe as well. It was that good.

My mom raved to me about it as well, so of course, I needed the recipe too. I don’t often bake banana bread because of the problem I talked about when I shared my light and fluffy banana cake recipe. Didn't stop me from wanting a tried and tested recipe though. That's how I roll.

Bottom line, it took me years to get around to making this and now I regret all the wasted years in between.

Margy’s Best Banana Bread 
This one-bowl recipe makes clean up a breeze, easily done even as the loaf is baking in the oven. It goes great with both a hot cup of tea or coffee. And honestly, even a cold glass of milk. My mother loves it toasted and slathered with butter.

Ingredients
6 tablespoons or 85g butter, plus extra for greasing loaf pan
1 cup or 200g sugar
2 eggs
2 large ripe bananas, mashed with a fork
1 teaspoon vanilla
1/4 teaspoon salt
1 1/2 cups or 190g flour
1 teaspoon baking powder
1 teaspoon baking soda
1/4 cup or 60ml sour cream

Method
Grease and flour loaf pan (or line it with baking parchment) and preheat your oven to 350°F or 180°C.

Beat together butter and sugar until fluffy and light yellow. Add the eggs, bananas, vanilla and salt.


Combine the dry ingredients in a sieve and sift them into the butter mixture, alternating with sour cream, ending with the last of the dry ingredients.


Stir well in between each addition to combine.


Pour the batter into your prepared pan.


Bake in your preheated oven for 50-55 minutes or until the banana bread is golden and a toothpick comes out clean.

Cool completely before slicing to serve.

Food Lust People Love: Truly a recipe that has stood the test of time, Margy’s best banana bread is tender, rich and flavorful loaf, made with butter as well as sour cream. Plain or toasted, it is the perfect snack at the office or at home. This one-bowl recipe makes clean up a breeze, easily done even as the loaf is baking in the oven. It goes great with both a hot cup of tea or coffee. And honestly, even a cold glass of milk.


Enjoy!

Food Lust People Love: Truly a recipe that has stood the test of time, Margy’s best banana bread is tender, rich and flavorful loaf, made with butter as well as sour cream. Plain or toasted, it is the perfect snack at the office or at home. This one-bowl recipe makes clean up a breeze, easily done even as the loaf is baking in the oven. It goes great with both a hot cup of tea or coffee. And honestly, even a cold glass of milk.


This month my Baking Blogger friends have created a variety of delicious recipes for you. Check them out below. Many thanks to our group leader and host, Sue of Palatable Pastime

Baking Bloggers is a friendly group of food bloggers who vote on a shared theme and then post recipes to fit that theme one the second Monday of each month. If you are a food blogger interested in joining in, inquire at our Baking Bloggers Facebook group. We'd be honored if you would join us in our baking adventures.

Pin Margy's Best Banana Bread!

Food Lust People Love: Truly a recipe that has stood the test of time, Margy’s best banana bread is tender, rich and flavorful loaf, made with butter as well as sour cream. Plain or toasted, it is the perfect snack at the office or at home. This one-bowl recipe makes clean up a breeze, easily done even as the loaf is baking in the oven. It goes great with both a hot cup of tea or coffee. And honestly, even a cold glass of milk.
 .

Tuesday, April 14, 2020

Russian Kulich - Easter Bread #BreadBakers

The traditional Russian kulich is baked in multiplies for family gatherings to celebrate Easter and is often eaten on Easter Monday as picnic fare. It's a lovely sweet bread made with either raisins or chocolate chips.

Food Lust People Love: The traditional Russian kulich is baked in multiplies for family gatherings to celebrate Easter and is often eaten on Easter Monday as picnic fare. It's a lovely sweet bread with either raisins or chocolate chips.


This month our Bread Bakers host is Camilla from Culinary Adventures with Camilla and she chose international Easter breads for our theme. I must confess that I really didn’t pay attention to whether the second Tuesday fell before or after Easter because I loved the theme so much.

Turns out that it is after Easter for those of us who follow the Gregorian (new) calendar, which is much of the western world. For those who follow the Julian (old) calendar, we are right on time with Easter bread recipes, as they will celebrate next Sunday.

That said, as Camilla rightly pointed out, most of us all over the world are still staying home to stay safe so many family Easter celebrations have been postponed until we can all be together. If that’s you, dear reader, please bookmark or pin your favorite recipes from our list, found below my recipe.

Russian Kulich - Easter Bread

This recipe is adapted from several I found online. Traditionally, Russian kulich would be baked with raisins instead of chocolate chips, but I did find one recipe by an actual baker with a Russian grandma who added chocolate, so I am feeling pretty good about my choice. I’ll be honest. My daughter is home and she is not a fan of raisins. I wanted to bake sweet bread that she would eat!

Ingredients
For the kulich:
1/2 cup or 120ml warm milk (I used 2% milk)
1/2 cup or 100g sugar
1 teaspoon active dry yeast
1 whole egg, room temp
1 egg yolk
1/4 cup or 56g butter, melted and cooled
good pinch salt
2 tablespoons sour cream
1/4 teaspoon vanilla
2 1/4 cups or 281g all-purpose flour
3/4 cup or 140g raisins or for a less traditional bread, substitute chocolate chips (I used semi-sweet chocolate.)

To bake the kulich:
2 1-lb coffee cans
parchment paper
butter

For the glaze:
1/2 cup or g 62 icing sugar
2 teaspoons fresh lemon or orange juice

Optional to decorate: colored sprinkles

Method
In a large mixing bowl, whisk together the warm milk, sugar and yeast. Set aside to prove. The yeast should start to get a little foamy on top.

Whisk in the egg and egg yolk, melted butter, sour cream, salt and vanilla.


Whisk in half of the flour. Your batter will be very thick, mounding briefly when you let it drip off the whisk back into the bowl.


Cover the bowl with cling film and let it rise in a warm place, ideally 100°F or 39°C for about an hour. I achieve this by filling a larger bowl with hot water from the sink and set the batter bowl in it. Occasionally check the temperature and add more hot water as needed.


Using a wooden spoon or a stiff spatula, add the rest of the flour a little at a time.


The dough will be quite soft. Stir in the raisins or chocolate chips. Cover and let dough rise another hour in a warm place, again ideally at 100˚F or 38°C. Use the hot water bowl trick again for best results.


Butter your clean coffee cans then line them with baking parchment.

Spoon the dough into the two prepared coffee cans, trying not to mix it too much. We want to keep as many of the bubbles in the dough as possible. Mine were filled about halfway, which is hard to see in this photo. Trust me.


Again, leave the dough to rise uncovered in a warm place for an additional hour or until the coffee cans are almost full. I put my two cans back in the big bowl and added more hot tap water then covered the bowl with cling film and a folded towel.

If you do this, do be careful getting them out of the bowl when you are ready to bake. One of mine tipped over a bit as I tried to get them out and I lost some height on the rise.


Towards the end of the hour rising time, preheat your oven to 350˚F or 180°C.

Bake the kulich for 30-35 minutes until the top is golden brown. If they start browning too quickly, you can cover the tops with foil.


Cool for about 10 minutes on a wire rack then gently loosen the edges with a knife and turn the kulich out of the coffee cans. Leave them to cool completely, bottom side down on the wire rack.

Food Lust People Love: The traditional Russian kulich is baked in multiplies for family gatherings to celebrate Easter and is often eaten on Easter Monday as picnic fare. It's a lovely sweet bread with either raisins or chocolate chips.


To make the glaze, stir just enough of the lemon or orange juice into the powdered sugar to get a drizzling consistency. Pour the glaze over each cooled kulich. Top with sprinkles, if desired.


Food Lust People Love: The traditional Russian kulich is baked in multiplies for family gatherings to celebrate Easter and is often eaten on Easter Monday as picnic fare. It's a lovely sweet bread with either raisins or chocolate chips.


Enjoy!


Check all the lovely Easter breads from around the world! If you don't bake one this month, you'll be glad to have the recipes for another special occasion. Many thanks to Camilla of Culinary Adventures with Camilla for hosting this month!
BreadBakers
#BreadBakers is a group of bread loving bakers who get together once a month to bake bread with a common ingredient or theme. You can see all our of lovely bread by following our Pinterest board right here. Links are also updated after each event on the Bread Bakers home page.

We take turns hosting each month and choosing the theme/ingredient.

Pin this Russian Kulich Easter Bread!

Food Lust People Love: The traditional Russian kulich is baked in multiplies for family gatherings to celebrate Easter and is often eaten on Easter Monday as picnic fare. It's a lovely sweet bread with either raisins or chocolate chips.
.

Tuesday, October 8, 2019

Soft Potato Buns #BreadBakers

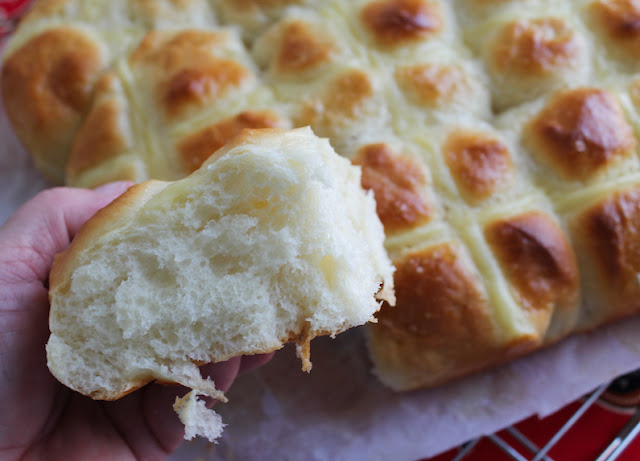
These soft potato buns are made with cooked mash potatoes. They are light, fluffy and just sweet enough to qualify as sweet bread, especially with the vanilla custard crosses.

Food Lust People Love: These soft potato buns are made with cooked mash potatoes. They are light, fluffy and just sweet enough to qualify as sweet bread, especially with the vanilla custard crosses.


Years ago, when we first moved to Kuala Lumpur, Malaysia, I was delighted to discover the hypermarket chain Carrefour there. I first fell in love with Carrefour’s clean, bright, well-stocked stores in their native France and again when a branch opened just outside of Rio de Janeiro, when we lived in Brazil. My friends and I would drop the kids at school, drive two and a half hours there for a big shopping trip, then turn around and drive back home. Good times!

One thing that Carrefour does very well wherever they do business is offer high quality local products and traditional flavors, as well as imported French specialties. The best of both worlds.

In KL and Singapore, the in-house bakery made sweet soft potato rolls very much like the ones I am sharing today. They were baked on enormous sheet pans, then divided into groups of nine and bagged up warm. Nothing made us happier than to arrive just as a fresh batch came out.

Often we’d buy two steamy bags because that first one didn’t even make it home; it was quickly devoured as soon as we got in the car.

Soft Potato Buns

This recipe was adapted from one in Singaporean Chef Agnes Chang’s book I Can Bake which I found on the blog Bake for Happy Kids and adapted further. My elder daughter has been making it for the last couple of years, always preparing the dough and leaving it to rise slowly overnight, because you want these buns for breakfast! If you don’t have time to cook homemade custard, you can certainly substitute store-bought or, as in Chef Chang's original recipe, custard made from powder.

Ingredients
For the dough:
5 1/3 oz or 150g peeled potato
2 3/4 cups or 350g bread flour
1/3 cup or 80ml water used to boil the potatoes
1/3 cup or 66g sugar
2 teaspoons active dry yeast
30g milk powder
1 large egg
1/3 cup or 75g butter, softened, plus a little extra for dough bowl

For the egg wash:
1 egg yolk
2 tablespoons milk
pinch of salt

For the custard:
1⁄4 cup or 55g fine (caster) sugar
1⁄3 cup or 42g all-purpose flour
1⁄8 teaspoon salt
1 cup or 240ml milk
2 egg yolks
2 teaspoons butter
1 teaspoons vanilla extract

Method
Boil your potato in enough water to cover. When the potato is tender, strain out the water, setting it aside to cool a little. Mash the potato until smooth and set aside to cool as well. You should end up with about 3/4 cup or 162g of mashed potatoes.

In the bowl of your stand mixer, proof the yeast with the sugar, the tepid potato water and 1 cup or 125g of the bread flour. When the yeast bubbles up, you know it’s good and can continue with the next steps.


Add in the rest of the bread flour, mashed potato, egg, powdered milk and salt.

Use the bread hook and mix all the ingredients until they form a soft dough. Continue with the bread hook, kneading the dough until it is smooth and stretchy. Add in the butter, a few slices at a time, and continue kneading until it is all incorporated into the dough.


Butter a mixing bowl with room for the dough to double that will fit comfortably in your refrigerator. Put the dough in the buttered bowl and cover with a damp towel or cling film. Put it in the refrigerator for the dough to rise overnight.


Meanwhile, make your custard. If you are doing homemade, I use the method on this post. With the ingredient amounts above, you will have much more than you need for the buns, but trust me, it will get eaten and quickly. You might even have enough for a small personal banana cream pie.

Take the dough out of the refrigerator, punch it down and give it another quick knead in the bowl. Divide the dough into 12 even pieces. My dough weighed 778g, so each ball was about 64g. Roll each into a ball and place in a baking pan lined with baking parchment.


If you are so lucky as to have a proofing bag, use it. If not, use a new plastic garbage bag and pop the baking pan inside. Keeping it full of air, pinch the opening closed and secure it with a clip. Leave the buns to rise for 45-60 minutes or until nearly doubled in size.


When the buns are almost fully risen, preheat your oven to 350°F or 180°C.

To make the egg wash, whisk the egg yolk with the milk and salt. Use a soft pastry brush to apply the wash to the tops of the buns. With a piping bag, make a cross with the custard across each bun. Bake in the preheated for about 18-22 minutes or until the buns are well risen and golden.

Food Lust People Love: These soft potato buns are made with cooked mash potatoes. They are light, fluffy and just sweet enough to qualify as sweet bread, especially with the vanilla custard crosses.


Remove from the oven and cool for about 10 minutes in the pan. Slide the buns and parchment out onto a wire rack to cool completely. Or eat the soft potato buns warm and in your car for the whole Southeast Asian Carrefour experience.

Enjoy!

Food Lust People Love: These soft potato buns are made with cooked mash potatoes. They are light, fluffy and just sweet enough to qualify as sweet bread, especially with the vanilla custard crosses.

Many thanks to our Bread Baker host this month, Karen of Karen Kitchen Stories, for our great theme of “make ahead bread” and all of her behind the scenes work. Check out all the other lovely breads we are sharing today:


#BreadBakers is a group of bread loving bakers who get together once a month to bake bread with a common ingredient or theme. You can see all our of lovely bread by following our Pinterest board right here.  Links are also updated after each event on the BreadBakers home page. We take turns hosting each month and choosing the theme/ingredient.
BreadBakers

Pin these Soft Potato Buns! 

Food Lust People Love: These soft potato buns are made with cooked mash potatoes. They are light, fluffy and just sweet enough to qualify as sweet bread, especially with the vanilla custard crosses.
 .

Tuesday, May 14, 2019

Blossom Tea Honey Buns #BreadBakers

Made with a fragrant tea mix of hibiscus, rose and orange blossoms, paired with ginger and apple, these blossom tea honey buns have a subtle floral note that goes excellently with a hot cup of tea.

Food Lust People Love: Made with a fragrant tea mix of hibiscus, rose and orange blossoms, paired with ginger and apple, these blossom tea honey buns have a subtle floral note that goes excellently with a hot cup of tea.  For these blossom tea honey buns, I used a Tiesta tea  that my grocery store called Ginger Sweet Peach, despite the complete lack of peaches in the mix. You can use your favorite fruit infusion to make these buns.

Yesterday for Mother’s Day we hosted a backyard cookout. The menu included chicken, sausage and pork ribs, along with two substantial salads, garlic bread and my world-famous lentil burgers for the vegetarian contingent. My lentil burger recipe calls for 1 cup or 210g of uncooked lentils, which usually means buying a box or bag and dealing with leftovers.

Now that I’m back in the States, I am discovering the joys of the self-serve  bulk food department of my neighborhood stores. Not that we didn’t have bulk foods in Dubai, but I wasn’t allowed to help myself. It’s such fun to use the little scoop and measure out just how much I need for a recipe. I was able to buy exactly 210g of French lentils and now I don’t have a box in the cupboard with leftovers that are never enough for another recipe.

Another bonus of the bulk foods is the fabulous mix of teas and infusions available. They all sound and smell wonderful but I especially love the ones with ginger.

Blossom Tea Honey Buns

For these blossom tea honey buns, I used a Tiesta tea that my grocery store called Ginger Sweet Peach, despite the complete lack of peaches in the mix. You can use your favorite fruit infusion to make these buns.

Ingredients
2 tablespoons blossom tea or your favorite mix
2 tablespoons butter, melted and cooled
1/4 cup or 60ml honey
1/4 cup or 50g white sugar
1 teaspoon salt
1 envelope (1/4 oz or 7g) active dry yeast
2 3/4 cup or 350g bread flour
1 cup or 110g whole grain rolled oats

1 egg, beaten, for brushing on buns before baking
Optional for decoration: honey and extra tea leaves

Method
First, brew your tea by adding 1 1/4 cups of boiling water to the tea mix. Steep for 5 minutes then strain and discard the tea mix. Check out that gorgeous color!

Add in the honey and butter and stir till the honey is dissolved.

Mix white sugar and yeast in a large bowl. When the liquid has cooled to a lukewarm temperature, add it to bowl containing the sugar and yeast. Leave to prove for a few minutes.

When the yeast starts to foam, mix in the flour, oats and salt.


Knead until you have a smooth dough ball. This is a soft dough but don’t be tempted to add more flour. The rolled oats will need that moisture as the dough is kneaded and then rises.

Place the dough ball in an oiled bowl and cover with cling film. Put it in a warm place to rise until doubled, about 45 minutes.


Divide and form the dough into 10 balls and place them on a baking pan lined with baking parchment. Make sure to leave some space for rising. Since our theme is flowers, I made a last minute decision to make a larger bun out of two balls of dough so I could lay them out in a flower shape. So, as you can see in the photos, I only made nine buns out of mine.

Cover the bun pan with a proofing bag or clean garbage bag. Leave to the buns to rise for 30 more minutes.

When dough has almost finished rising, preheat your oven to 350°F or 180°C. Brush the tops of the buns with beaten egg.


Bake for 17-20 minutes or until tops are golden brown, turning your pan around halfway through so they will brown evenly. Remove the buns from the oven.

Food Lust People Love: Made with a fragrant tea mix of hibiscus, rose and orange blossoms, paired with ginger and apple, these blossom tea honey buns have a subtle floral note that goes excellently with a hot cup of tea.  For these blossom tea honey buns, I used a Tiesta tea  that my grocery store called Ginger Sweet Peach, despite the complete lack of peaches in the mix. You can use your favorite fruit infusion to make these buns.


Optional: While the buns are still warm, brush them with some honey and sprinkle with a few tea leaves for decoration.

Food Lust People Love: Made with a fragrant tea mix of hibiscus, rose and orange blossoms, paired with ginger and apple, these blossom tea honey buns have a subtle floral note that goes excellently with a hot cup of tea.  For these blossom tea honey buns, I used a Tiesta tea  that my grocery store called Ginger Sweet Peach, despite the complete lack of peaches in the mix. You can use your favorite fruit infusion to make these buns.


Enjoy!

Food Lust People Love: Made with a fragrant tea mix of hibiscus, rose and orange blossoms, paired with ginger and apple, these blossom tea honey buns have a subtle floral note that goes excellently with a hot cup of tea.  For these blossom tea honey buns, I used a Tiesta tea  that my grocery store called Ginger Sweet Peach, despite the complete lack of peaches in the mix. You can use your favorite fruit infusion to make these buns.


Many thanks to this month’s Bread Bakers host is Mireille of Schizo Chef. She challenged us to bake with flowers. Check out all the lovely recipes:


Pin these Blossom Tea Honey Buns!

Food Lust People Love: Made with a fragrant tea mix of hibiscus, rose and orange blossoms, paired with ginger and apple, these blossom tea honey buns have a subtle floral note that goes excellently with a hot cup of tea.  For these blossom tea honey buns, I used a Tiesta tea  that my grocery store called Ginger Sweet Peach, despite the complete lack of peaches in the mix. You can use your favorite fruit infusion to make these buns.
 .


Tuesday, January 8, 2019

Golden Pineapple Buns #BreadBakers

A bakery staple in Chinatowns worldwide, golden pineapple buns are a real treat. The soft sweet bread features a topping that bakes up crisp and light. As an added bonus, some contain sweet fillings, like these made with my easy pineapple jam.

Food Lust People Love: A bakery staple in Chinatowns worldwide, golden pineapple buns are a real treat. The soft sweet bread features a topping that bakes up crisp and light. As an added bonus, some contain sweet fillings, like these made with my easy pineapple jam.

This month’s Bread Bakers host, my friend Felice from All That’s Left Are the Crumbs set us a theme of “good luck breads” and I knew I would find a few choices in typical Chinese or Lunar New Year menus online. Indeed, since gold is a color of prosperity, golden pineapple buns showed up in many.

Also known as bolo bao or bo lo baau, pineapple buns appear to originate from Hong Kong but they are also very popular in Malaysia, Singapore and Indonesia as well. For all the many years we lived in those three places – a combined 12 years! – I never actually tried a pineapple bun. I loved the Chinese bakeries but would typically opt for a sausage bun or another savory option.

Historically, the pineapple is also a symbol of wealth and hospitality. What is more welcoming than a warm bun that is named because it looks like a pineapple? I’ll tell you.

It’s one that is also filled with pineapple jam.

Several recipes said these buns could authentically be filled with red bead paste or custard but most are not filled at all. I, on the other hand, thought they cried out for pineapple jam. Why should they be pineapple in name and looks only? Beauty is more than skin deep and their outer beauty should be echoed and enhanced by an inner pineapple-y sweetness, don’t you think?

And when I checked it out, I got a mention in Wikipedia. Non-native speaker. That's me.

Golden Pineapple Buns

Like all good yeast breads, these guys take a while to make because of rising time. Also, there are three parts: the dough, the topping and the filling, if you choose to fill them. I suggest making my easy pineapple jam but you can also use your favorite store-bought jam of any flavor. Or don’t fill them at all. Either way, they are totally worth the time. My bun recipe is adapted from these two: The Woks of Life and China Sichuan Food. The pineapple jam is all me. I love making quick jam.

Ingredients for 6 large buns
For the bread dough:
1/3 cup or 78ml heavy cream
1/2 cup or 120ml milk
1/4 cup or 50g sugar
1 1/2 teaspoons active dry yeast
1 large egg (at room temperature)
2 1/2 cups or 317g strong white bread flour
3/4 teaspoon salt

For the topping paste:
2/3 cup or 83g all-purpose flour
1/3 cup or 66g caster sugar
2 tablespoons dry milk powder
1/4 teaspoon baking soda
1/4 teaspoon baking powder
2 tablespoons vegetable shortening
1 small egg yolk
⅛ teaspoon vanilla extract
4-6 teaspoons milk

For the filling:
6 generous tablespoons thick pineapple jam, homemade or store-bought
(It’s super easy to make. For homemade my instructions are here.)

For the egg wash:
1 egg yolk
1 teaspoon water

Method
Warm your cream and milk to between 105-110°F or 40.5-43°C in a small pot over a low fire or in the microwave. Add in 1 tablespoon of the sugar for the dough and the yeast. Set aside for a few minutes to make sure your yeast is active.


Pour the foamy liquid into the bowl of your mixer and add the rest of the sugar, egg, flour and salt.

Using your bread hook, combine the ingredients and continue mixing for about 15 minutes, scraping the bowl down occasionally to make sure all of the flour is being incorporated.


This is a very soft dough.

After 15 minutes, cover the bowl with a damp towel and place in a warm place for 1 hour.

If your kitchen is cold, set the bowl in your sink and fill it part way up with warm water. Leave to prove for about 1 hour by which time the dough should double in size.


When the initial rise time for the bread dough is up, put it back in the mixer and use your bread hook to knead it for 5 minutes to beat it back down to original size and make it more manageable and less sticky.

Lightly flour a clean work surface and tip your dough out of the bowl. With floury hands, knead it briefly. Cut it into 6 equal pieces (mine were about 100g each) and roll them into small balls.


If you aren’t filling your pineapple buns, transfer them to your baking pan, sprinkle with some flour and cover with a clean dry towel. Set aside to rise for 1 hour.

If you are filling them, use a floured rolling pin to roll each ball out into a 6 in or 15cm circle. Brush with water. Add 1 tablespoon of pineapple jam to the middle. (By the way, that gorgeous yellow is all natural!)

Pull the sides in, pinching gently to close the dough, making a ball again. Place pinched side down on your baking pan.


Continue until all buns are filled. Sprinkle with flour and cover with a clean dry towel. Set aside to rise for 1 hour.


While the buns are rising, use a food processor to make the topping.

Add the dry milk powder, flour, baking soda, baking powder, and superfine sugar to the food processor. Pulse to combine. Add the shortening, egg yolk, and vanilla.


Pulse till it looks like big grains.

Add the milk starting with just 1 tablespoon. Pulse until it just comes together as a dough, adding a teaspoon or two more milk as needed.


Give the crumbs a squeeze to see if they’ll hang together. If they do, no more milk is needed.

Tip the topping crumbs out on to a piece of cling film and push them together to create a dough. Cover tightly with the cling film. Place in refrigerator for around 30 minutes until slightly chilled.


When the buns are done rising, preheat your oven to 350°F or 180°C.

Form the topping dough into a rectangle in the cling film so that it’s easier to cut into six equal pieces.

Roll them into balls. Lay a large sheet of cling film out and place the ball on one half. Fold the other half over. Use a rolling pin to roll a topping ball into a circle the size of the tops of your risen buns.


Unfold the cling film and place the topping circle on a bun. Carefully remove the cling film.


Use the tip of a sharp knife to gently score the topping in a diamond pattern. Continue until the buns have been covered and scored.


Whisk the egg yolk with the water and brush the egg wash onto each bun. Bake in your preheated oven for 14-16 minutes or until puffed and golden.

Food Lust People Love: A bakery staple in Chinatowns worldwide, golden pineapple buns are a real treat. The soft sweet bread features a topping that bakes up crisp and light. As an added bonus, some contain sweet fillings, like these made with my easy pineapple jam.


Remove from the oven and leave to cool on the baking pan for a few minutes. Place on a wire rack to cool completely.

Enjoy!

Food Lust People Love: A bakery staple in Chinatowns worldwide, golden pineapple buns are a real treat. The soft sweet bread features a topping that bakes up crisp and light. As an added bonus, some contain sweet fillings, like these made with my easy pineapple jam.


Check out all the other lucky breads we have for you today! Many thanks to our Bread Bakers host, Felice from All That’s Left Are the Crumbs.

#BreadBakers is a group of bread loving bakers who get together once a month to bake bread with a common ingredient or theme. Follow our Pinterest board right here. Links are also updated each month on this home page.

We take turns hosting each month and choosing the theme/ingredient.

Pin these Golden Pineapple Buns!

Food Lust People Love: A bakery staple in Chinatown’s worldwide, golden pineapple buns are a real treat. The soft sweet bread features a topping that bakes up crisp and light. As an added bonus, some contain sweet fillings, like these made with my easy pineapple jam.
 .