Showing posts with label Spinach. Show all posts

Sunday, April 4, 2021

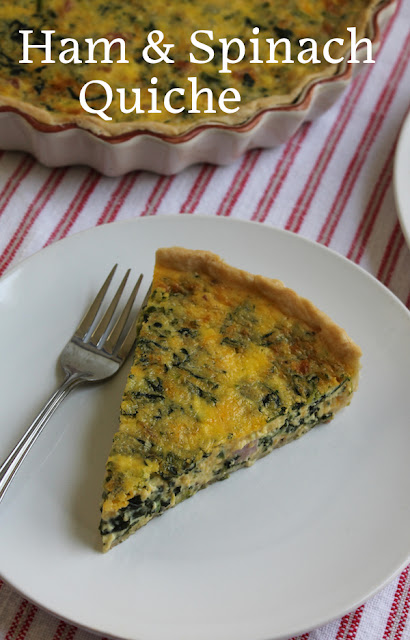
Ham and Spinach Quiche

This ham and spinach quiche is a lovely dish for brunch, lunch or dinner, with cubes of leftover ham, spinach and loads of extra sharp cheddar cheese. 

Food Lust People Love: his ham and spinach quiche is a lovely dish for brunch, lunch or dinner, with cubes of leftover ham, spinach and loads of extra sharp cheddar cheese.

If you are trying to use up leftovers, you can’t beat baking quiche. Quiche is like an omelet: You can put anything and everything in it. If you have lots of leftovers, you might also want to check out my Omelets with Super Powers post.

Creating a quiche in two or three easy steps:
1. Choose a cheese (Cheddar, blue, Brie, Camembert, Gouda, Emmental, Swiss, etc.)
2. Choose a vegetable (Broccoli, tomato, cauliflower, asparagus, potato, onion, etc. Quick cooking vegetables can be added raw, for instance, tomatoes. Others, like broccoli and asparagus, should be parboiled. Still others, like potatoes or carrots, should be fully cooked.)
3. (Optional) Choose a cooked “meat” (Ham, bacon, chicken, beef, lamb, fish, shrimp, etc.)

Then, of course, you will add eggs, milk and cream.  Your quantities of everything will depend on the width and depth of your pie plate or quiche pan. 

The pie crust recipe I use is here. It is versatile and works just as well with savory and sweet fillings. It is the pie crust of my quiches, as well as my banana cream pie and apple rhubarb strawberry pie and pecan pie and so on. I am asked for the recipe often, but I cannot take credit. I come by it honestly: The Good Housekeeping Illustrated Cookbook, 1980 edition, Zoe Coulson, ed.  

This cookbook was a gift from my mother-in-law on our first married Christmas in 1986 and it has been so well-used (read: falling apart) that I am on my THIRD copy now, purchased on Ebay. I had to have the same edition! Perhaps later editions have all the same recipes. I’ll never know. But in the 1980 edition, I know where everything is.  

I could wax eloquent about the Before You Cook section, amply used by my newlywed husband to cook wonderful meals for me upon his return from offshore, with its illustrations of kitchen tools and pots and pans and equipment, essential for a newbie. Or the Color Index with photographs of every one of the more than 900 recipes. Or the illustrated, step-by-step instructions.

Suffice to say, this book is one of only two we have taken in the luggage to every new overseas posting in 35 years of marriage. The second book is a binder of photocopied and handwritten recipes I have amassed over the years from friends and family.  

Ham and Spinach Quiche

My quiche pan was a wedding gift and I’ve used it more times than I can count over the last 35 years. It measures 10.5 in or 27cm across and is 1.5 in or 4cm deep. The ingredient amounts below fill it to perfection. You can also bake this in a normal pie plate. 

Ingredients
1 unbaked pie crust (I use this recipe.)
6 oz or 170g leftover baked ham 
4 1/2 ounces or 127g extra sharp cheddar, grated
3 1/2 oz or 100g frozen spinach (thawed, then drained)
4 eggs
3/4 cup or 180ml cream 
1/2 cup or 120ml milk
1/2 teaspoon fine sea salt
freshly ground black pepper  

Method
Preheat your oven to 400°F or 200°C and fit your pie crust into your pie plate or quiche pan. Dock it with the pointy end of a knife or the tines of a fork. 


If your ham is in one big piece, cut it into smaller pieces. I think cubes are always fun but you can just chop it up. 


In a large mixing bowl, whisk together the eggs, cream and milk. Fold in the ham, cheese and spinach along with the salt. 


Give the mixture a few good grinds of black pepper and stir again. 

Pour this mixture into your pie crust and bake for 10 minutes in your preheated oven. My oven doesn't heat evenly so I like to put my quiche pan on another larger pan to make rotating it in the oven easier. 

Food Lust People Love: his ham and spinach quiche is a lovely dish for brunch, lunch or dinner, with cubes of leftover ham, spinach and loads of extra sharp cheddar cheese.

After the initial 10 minutes, turn the temperature down to 350°F or 180°C and bake for an additional 25-30 minutes or until an inserted knife comes out clean. If your oven doesn't heat evenly, gently turn the pan around about three quarters of the way through the cooking time. 

Remove the pan from the oven and leave the quiche to cool for about 10 minutes before cutting it into slices to serve. 

Food Lust People Love: his ham and spinach quiche is a lovely dish for brunch, lunch or dinner, with cubes of leftover ham, spinach and loads of extra sharp cheddar cheese.

I usually serve each slice of quiche with a tomato salad or even a green salad on the side but truly, it is a meal all by itself. 

Food Lust People Love: his ham and spinach quiche is a lovely dish for brunch, lunch or dinner, with cubes of leftover ham, spinach and loads of extra sharp cheddar cheese.

Enjoy! 

Today is Easter Sunday and if you are reading this early in the day, you probably haven’t eaten your Easter dinner yet (I mean, if you do celebrate) but my Sunday FunDay friends and I are thinking ahead! At the instigation of our host, Wendy from A Day in the Life on the Farm, we are sharing recipes designed to use up your Easter dinner leftovers! Check out all the recipes below.


We are a group of food bloggers who believe that Sunday should be a family fun day, so every Sunday we share recipes that will help you to enjoy your day. If you're a blogger interested in joining us, just visit our Facebook group and request to join.


Pin this Ham and Spinach Quiche!

Food Lust People Love: his ham and spinach quiche is a lovely dish for brunch, lunch or dinner, with cubes of leftover ham, spinach and loads of extra sharp cheddar cheese.

 .

Friday, January 20, 2017

Cheesy Shrimp Spinach Filo Pie #FishFridayFoodies

Crispy outside and savory inside, a slice of this rich cheesy shrimp spinach filo pie makes a great main course or addition to a brunch table.


Traditional fish pie with a creamy sauce, topped with mashed potatoes or puff pastry is one of our favorite things to eat, especially in a cozy pub on a chilly day. So when our organizer, Wendy of A Day in the Life on a Farm asked for host volunteers, I stepped forward thinking January would be the perfect time for a rich fish pie.

And, indeed, we are experiencing a bit of a chill here in Dubai. But, I’ll be honest, it’s not that cold. Also, from another project, I had some leftover filo pastry in the freezer that needed using up. If you’ve ever worked with filo, you know it can crack and break. But what I’ve figured out is that if you use the relatively whole pieces to make the bottom of the crust, you can just keep layering the small pieces and brushing them with butter and they come together nicely to complete a crunchy top.

Note: Keep the filo pastry covered with a damp cloth, removing one piece at a time as you layer the crust.

Ingredients
Olive oil for pan
Filo (sometimes spelled phyllo) pastry sheets – about 4 oz or 113g
2-3 large handfuls baby leaf spinach - don’t get hung up on weight. Just toss it in.
Sea salt - I use the fine stuff
Black pepper
12 oz or 350g shrimp, already peeled and cleaned
5 eggs
7 oz or 200g feta, crumbled
2 oz or 57g extra sharp cheddar, grated
1/4 cup or 60g butter, melted and cooled
Zest 1 lemon
1 teaspoon dried herbs - I like a mix of thyme and marjoram
1 teaspoon cayenne pepper - optional

Method
Preheat your oven to 350°F or 180°C.

In a medium saucepan, heat a drizzle of olive oil and add in your spinach with a sprinkle of salt and a good couple of grinds of black pepper.

Cook for a few minutes, or until the spinach has wilted. Remove from the pan and drain in a colander.

Add another drizzle of oil to the pan and cook the shrimp until pink, again adding a sprinkle of salt and a good couple of grinds of black pepper. Remove from the heat and leave to cool.

In a large mixing bowl, add your eggs, feta, cheddar cheese, lemon zest, herbs and some black pepper. Whisk to combine.


Fold in the drained spinach and the shrimp and add some more black pepper and cayenne, if desired.


Brush the bottom of your baking pan with butter. Layer your filo sheets one at a time, into the pan, brushing them with the melted butter before adding the next sheet. I had about 3 relatively intact sheets and lots of bits. Leave the ends hanging over the sides.


Pour in the filling and smooth out the top. Start laying the bits of filo on top, brushing with butter as you go.

Just keep adding filo and buttering until the top is a few layers thick.

Finally fold the overhanging filo sheets over the filling, covering the top as best you can. Brush the top and around the sides with more butter and use any broken pieces of filo to cover any holes in the top.


Use a sharp knife to make a vent hole in the middle of the pie so steam can get out and your filo will get crispy.


Bake in your preheated oven for 35-40 minutes or until the top is golden brown. If it’s browning too quickly, you can cover the top with foil.

Remove from the oven and leave to rest for about 15-20 minutes before attempting to slice it.


Enjoy!


Are you a fan of fish or seafood pies too? Then you are going to love this linky list! Click on the photos to see the recipes.


Pin it!


.

Thursday, August 7, 2014

Homemade Spinach and Cheese Ravioli

Homemade spinach and cheese ravioli do take a little time but making your own pasta dough is right up there on the satisfaction scale with baking bread. You know what’s in it. It’s fresh and the taste is far superior to store-bought. Best of all, it’s surprisingly easy.

Food Lust People Love: Homemade spinach and cheese ravioli do take a little time but making your own pasta dough is right up there on the satisfaction scale with baking bread. You know what’s in it. It’s fresh and the taste is far superior to store-bought. Best of all, it’s surprisingly easy.

You might notice, if you stopped by earlier, that I am posting twice today. And that’s because, despite my prior Sunday Supper commitment (I’m hosting for the very first time, guys! So excited about this week’s theme: Saving Summer!) I couldn’t turn down a request from my fellow blogger Colleen from Souffle Bombay to talk about cookbooks and what they mean to me.

I am a card-carrying, silver-plated, officially stamped, internationally certified member of The Cookbook Junkies. And that’s the truth. But today, at Colleen’s request, I am going to tell you about one special cookbook, in my case, it’s the Good Housekeeping Illustrated Cookbook, 1980 edition. It was given to me and my husband for our very first married Christmas, back in 1986, by my mother-in-law.

My husband thumbed its pages more than I did that first year. He was working offshore so, on his time off, he was househusband, cooking meals and doing laundry while I was at work. I’d often get phone calls with random questions, like “What exactly is a Dutch oven and do we have one?” and I’d know he was planning dinner, hunched over that big book with its four-color photographs of Every Single Dish (no kidding) and making his shopping list. He made a pretty mean lasagna back in those days!

It was the only cookbook I took with me when we first moved overseas in 1987. In the days long before the internet and handy Google searches, it was my lifeline to classic recipes with tips on hostessing, how to fold fancy napkins or calculate food and drink amounts for party guests and, before too long, baby showers. With each move we have made over the years, and no matter how many cookbooks I’ve since collected, Old Faithful was the one cookbook that came in the suitcase. I didn’t dare put Good Housekeeping in the shipment! What if it went missing? And, of course, I’d need it before the shipment could arrive six weeks later anyway.

I have made recipes from its grease-stained leaves more times than I can count so it broke my heart when it started to fall apart. Its pages were spattered with dishes and desserts and gravies from family meals too numerous to count. Sticky baby fingerprints got ever increasingly bigger as our daughters grew into capable young women and became competent on their own in the kitchen. But far from outlasting its usefulness, and despite its own shattered spine, our Good Housekeeping still formed the backbone of the kitchen repertoire.

The great book was probably close to 20 years old when I first searched online for that same 1980 edition and bought a stranger’s less-used spare. I knew it was only a matter of time till the original would have to be retired.

And then it suddenly occurred to me that my daughters would need their own copies when they moved away from home! Otherwise, how would they make their daddy’s pancakes and waffles? Or our family’s apple pie? Not to mention the basic yellow cake that celebrated so many early birthdays! Boxed cake mix? Pfft. Couldn’t find those most places we’d lived, even if I'd wanted to. I found two more copies online and held them dear until it was time to write the inscriptions in the front covers and send them, and their girls, out into the world.

In due time, the original cookbook was indeed retired and is now up high in a safe cupboard, carefully inscribed newlywed Christmas message intact, its same edition stand-in doing the same remarkable job in my kitchen.

It’s still the only cookbook that comes in my suitcase when we move.

Homemade Spinach and Cheese Ravioli 

Whenever my daughters are home, we make ravioli with the fresh pasta recipe in our most dependable cookbook. If friends are around, everyone gets into the act. I took these photos a couple of years back and never have posted them or this recipe. But this seemed like the perfect time to share. Pasta making should be a group affair, dare I even say, celebration. Just try to ignore the cluttered counter, okay?

Ingredients
For the pasta dough:
2 1/4 to 2 1/2 cups or 280- 315g flour (plus extra for rolling out the pasta)
2 eggs
1 egg yolk
1 tablespoon olive oil or salad oil
1 teaspoon salt

For the ravioli filling:
3 oz or 85g grated mozzarella
3 oz or 85g cream cheese
1 3/4 oz or 50g freshly grated Parmesan
4 1/4 oz or 120g frozen spinach, thawed and drained
1 egg
Few grinds fresh black pepper

Method
In large bowl, combine 1 cup or 125g flour, 1/3 cup or 80ml water and remaining dough ingredients. With mixer at slow speed, beat for two minutes, occasionally scraping bowl with a rubber spatula.

Using a wooden spoon, stir in enough of remaining flour to make a soft dough.

Turn out onto floured surface and knead until smooth and elastic, about 10 minutes. Wrap in cling film and let stand 30 minutes.


While the dough rests, we can get on to the ravioli filling. It couldn’t be simpler. Mix all the ingredients together well in a mixing bowl. Set aside.


Once the dough has rested, cut off a small piece about the size of a tennis ball or perhaps just a little smaller. Wrap the dough again with the cling film.

Flour it well and use a rolling pin or a pasta roller to roll it out quite thinly to the size of your ravioli plaque.


Flour your ravioli plaque liberally and lay the sheet of pasta on top. Fill each hole with about a teaspoon of the filling.

Food Lust People Love: Homemade spinach and cheese ravioli do take a little time but making your own pasta dough is right up there on the satisfaction scale with baking bread. You know what’s in it. It’s fresh and the taste is far superior to store-bought. Best of all, it’s surprisingly easy.


Cut another piece of dough off of the big ball and, following the same instructions, roll it out to the size of your ravioli plaque.

Use a pastry brush to wet the pasta on the plaque between the spoons of filling.

Food Lust People Love: Homemade spinach and cheese ravioli do take a little time but making your own pasta dough is right up there on the satisfaction scale with baking bread. You know what’s in it. It’s fresh and the taste is far superior to store-bought. Best of all, it’s surprisingly easy.

Carefully, starting at one end, lay the second sheet of pasta on top of the filled one, sticking the two sheets together and pressing out the air as you go along.


Turn the ravioli plaque over and let the filled pasta drop out onto your countertop. If it sticks, just gently pry it off.


Trim the ravioli around the edges and cut them apart.

Food Lust People Love: Homemade spinach and cheese ravioli do take a little time but making your own pasta dough is right up there on the satisfaction scale with baking bread. You know what’s in it. It’s fresh and the taste is far superior to store-bought. Best of all, it’s surprisingly easy.


Set them aside on a plate lined with cling film and flour.

Food Lust People Love: Homemade spinach and cheese ravioli do take a little time but making your own pasta dough is right up there on the satisfaction scale with baking bread. You know what’s in it. It’s fresh and the taste is far superior to store-bought. Best of all, it’s surprisingly easy.


Continue the process until all the ravioli are rolled out, filled and cut apart. If you can get an assembly line going, it goes much faster. And it's much more fun!


Bribe the workers, if you must.

The ravioli can be stored in the refrigerator, covered with cling film or even frozen until you are ready to boil them.

To cook, boil water with salt and a little olive oil in a large pot, as you would for regular pasta and lower the ravioli in gently. Fresh pasta only takes a few minutes to cook.

Food Lust People Love: Homemade spinach and cheese ravioli do take a little time but making your own pasta dough is right up there on the satisfaction scale with baking bread. You know what’s in it. It’s fresh and the taste is far superior to store-bought. Best of all, it’s surprisingly easy.
See that? It's my biggest Calphalon pot.


Serve with the sauce of your choice.

It is my pleasure to introduce you to my fellow Cookbooks & Calphalon bloggers who have chosen recipes from or inspired by a cookbook that means a lot to them and are sharing their food stories.

Baking


Cooking


Drinks

Pin it!

Food Lust People Love: Homemade spinach and cheese ravioli do take a little time but making your own pasta dough is right up there on the satisfaction scale with baking bread. You know what’s in it. It’s fresh and the taste is far superior to store-bought. Best of all, it’s surprisingly easy.

.

Monday, April 22, 2013

Cheesy Spinach Muffins #MuffinMonday

A cheesy muffin with cheddar and feta and spinach, topped with thinly sliced tomatoes. There's thyme in there too! These guys are perfect for breakfast, brunch, lunch or a snack. 


There are a few staples I keep in my freezer, just in case.  Frozen spinach is one of them.  In a pinch, spinach can be thawed quickly and added into omelets or quiches or cheesy sauces for pasta.  It adds color and nutritional value without an overly strong or objectionable flavor.   It is also beautiful added into muffins.  (See exhibit A, above.)

I've got to tell you that this is my all-time most-visited on this entire blog. I published it originally almost four years ago and have made these muffins countless times since then. It is almost my most-pinned recipe. It give me great joy to know that folks are pinning and saving and making these!

Ingredients - for 12 muffins
3 1/2 oz or 100g frozen spinach
2 2/3 oz or 75g feta
3 1/2 oz or 100g extra sharp cheddar
2 tomatoes
2 cups or 250g flour
Sea salt flakes
2 teaspoons baking powder
2 eggs
1/4 cup or 60ml olive oil
1 cup or 240ml milk
Several sprigs fresh thyme
Black pepper

Method
Preheat your oven to 350°F or 180°C and grease your 12-cup muffin pan liberally with non-stick spray or butter.

Thaw your spinach with a few zaps in the microwave.  Or allow to thaw naturally, if you have time.  I never seem to.  Allow to cool, if you zapped it too long.

Buy the spinach that is frozen in cubes.  It's much easier then to thaw just what you need. 

Grate your cheddar cheese and crumble the feta.

Slice the tomatoes fairly thinly and leave to drain on some folded paper towels.  You need 12 slices so if you have any tomato left over, save it for a sandwich or share it with your helper.


Measure your flour, salt, baking powder, grated cheddar and some of the leaves off of your fresh thyme sprigs into a large mixing bowl and mix well.


Measure the milk and olive oil into a smaller bowl and whisk with the eggs and thawed spinach.   Just two eggs, pay no attention to that double yolk behind the curtain.  (Sorry, watched too much of The Wizard of Oz in my youth.)


Here’s something incredible, and I use that in the literal sense.  Hard to believe.  But true!  In the last week, I have opened SEVEN eggs that had double yolks.  I think I may have had one or two in the whole rest of my life!  And they weren’t all from the same batch of eggs, although they were the same brand.   Isn’t that something?!  Have you ever found a double yolked egg?

Fold your wet ingredients into your dry ones until just mixed.


Fold in the crumbled feta.


Divide the batter between the prepared muffin cups.


Pat the tomato slices really dry with another paper towel and top each cup of batter with one.


Sprinkle the tomato slices with a little more fresh thyme, sea salt and freshly ground black pepper.


Bake for 25-30 minutes or until you can see that the sides are turning golden brown.

Remove from the oven and allow to cool for a few minutes.  Remove from the pan, loosening gently with a knife if necessary, and cool further on a wire rack.


Enjoy!


For those who might need a gluten-free version, check out this post.  The author/baker saw this link on Pinterest and modified it for her family's needs.  Thank you, K!


Monday, November 14, 2011

Stuffed Whole Chicken Breast Roast


Once again, I’m trying to empty the freezer but this time I am actually making the dish I had in mind when I bought the chicken breasts.  It’s not often you find whole, by which I mean still attached to each other, boneless breasts, so when I saw these two, I scooped them up.  

I imagined them together, one on top, one on bottom with the stuffing in between, roasted so that the skin on the top and skin on the bottom of both turned a crispy, crunchy caramelized auburn.   When it comes to food, I have a very vivid imagination.

This summer I bought an entire roll of butchers’ roast netting and this seemed like a great opportunity to put it to good use.   I am a little older and wiser now though, so I figured out that I need a tube of some sort to wrap the netting around and then push the roast through.  If we could have filmed my mother and me this summer, struggling with an overstuffed pork roast and that netting, it would have been a YouTube sensation, titled Women Stuffing the Baby Back In, because that is what it looked like.  And the netting was just as unwilling as any new mother. Mercifully, we were home alone so no one caught us in the act.

Ingredients
2 whole boneless chicken breasts, still attached to each other – so four breasts in two pieces – a little more than a pound each – ask your butcher!
20g or 1 1/2 tablespoons butter
4 medium baby Portabella or Swiss Brown mushrooms
160g or almost 6oz frozen spinach, thawed
1 medium yellow onion
2 cloves of garlic
1 medium tomato
1/4 cup or 35-40g couscous – medium grain
1 egg
180g or 6.25oz ground or minced pork
Sea salt
Black pepper
Olive oil
Butchers’ netting or baking string

Method
Chop up your tomato, onion, garlic and mushrooms.


Melt the butter in a skillet and sauté the vegetables until they are soft.


Add a drizzle of olive oil, a couple of generous pinches of salt and a couple of good grinds of black pepper.  And then add the spinach.  Mix well.


Make a bowl out of your mixture and put in the couscous.  Add a 1/2 cup of boiling water to the couscous.  Don’t stress if your “bowl” breaks open.  Cover the pot with a lid and turn the heat off.   Let it rest for about 10 minutes.


Pour the stuffing into a large bowl and stir it around until it cools.  Add the egg and the ground pork.  Add a couple of more pinches of salt and grinds of black pepper. Mix well.


Meanwhile, pre-heat your oven to 400°F or 200°C.

Clean the fat off of your chicken breasts and then careful cut them from the middle almost to the outside with a sharp knife, horizontally.   Open the flap to flatten the breast.  Do this to the other side and then the other whole breast.


Put one double breast skin side down and pile the stuffing on top of it.  Use your judgment, if it looks like too much stuffing, just don’t put quite all on.  (Leftover stuffing can be fried up – remember you have raw egg and pork in there – and eaten with a spoon.  Delicious!)


Put the other double breast on top the opposite direction.    If you imagine the breasts as hearts – although I realize they aren’t so heart-like since you spread them out, work with me here – then the pointy end will be skin up on the wide end of the bottom heart.


Here comes the tricky part.  If you have string, here are some instructions.  If you are using the netting, cut the bottom half off of a  very large plastic cup.   Put the netting on the cup like you would a tight sock, leaving one end open and on end with netting hanging off. 

Start stuffing the roast in one end and gradually pull the netting over the roast as it comes out the other.  Unfortunately, I wasn’t able to take photos and do this as well.  I really need a staff photographer for shots like that. 


Poke any stuffing back in and try to straighten the skin out under the netting. 


Drizzle the roast with olive oil and pop in it the pre-heated oven.  Roast for 15 minutes, then turn the oven down to 375°F or 190°C.  Roast for 15 minutes more and then turn it over.


After half an hour in the oven.

The bottom after I turned it over. 
Roast for 1 hour and then check the internal temperature.  180°F or 82°C is done for poultry.   If your temperature is at least 170°F or 77°C, you can leave it out to rest.  It will reach the correct temperature on its own.  If it is more than 10°F under, pop it back in the oven for another 10 minutes and then test again.


Carefully cut the netting or string with scissors and gently lift it off.


After about 5-10 minutes of resting time, carve the roast into nice slices.   If gravy is your thing, make some with the pan juices.  You know I did. 

Enjoy!