Tuesday, February 14, 2017

Keralan Yeast Appam #BreadBakers

Keralan appam are easy to make, blending soaked rice with coconut milk to make a rich, thick batter. These delicious lacy pancakes taste fragrantly, inexplicably, of butter.


Appam is popular in certain regions of India, particularly the south and the state of Kerala. It’s made with raw and cooked rice, often fermented with toddy or kallu, an alcoholic drink made from palm or coconut sap. If you don’t have toddy, you can let the batter ferment naturally or add some yeast. Fresh grated coconut and/or coconut milk are frequently present in the ingredient list, as is flattened rice – a sort of rice flake.

This month our Bread Bakers are making pancakes. Our host Mayuri of Mayuri’s Jikon assured us that there were pancakes of all sorts and from every part of the world. I had never really thought about it but she is absolutely right. If you search “pancakes” the list is so loooooong and varied! Who knew?

Even if you just search for “appam,” the name I chose out of the main list, you will find countless recipes for naturally fermented, toddy fermented and yeast fermented versions. Everybody seems to think their family recipe is The One. Isn’t that always the way? I must confess to the same conceit about some of my Cajun dishes, even when my mom informs me later than my grandmother never made something the way I do. Clearly one of us remembering wrong. Yeah, I know it’s probably me, but here we are.

Some links to check out - these are just a drop in the immense Keralan appam bucket!
http://www.kothiyavunu.com/2016/02/kerala-appam-recipe-palappam-recipe.html 
http://www.kurryleaves.net/2014/07/kerala-appam-recipe-palappam-kerala.html
http://www.vegrecipesofindia.com/appam-recipe-kerala-appam/
http://mariasmenu.com/vegetarian/palappam
http://www.recipesaresimple.com/appam-palappam-traditional-riceflour-no-yeast-3methods/
http://www.cookingandme.com/blog/2014/05/29/how-to-make-spongy-appam-with-yeast/
http://www.archanaskitchen.com/no-yeast-kerala-style-appam-recipe

Anyway, I’ve taken several of those recipes and come up with this one. First of all, I didn’t have toddy. Secondly, I couldn’t find flattened rice. But some recipes called for neither one or the other so I figured I could mix and match. I do have freshly grated coconut but I know many of my readers will not, so I went with a coconut milk version. I used the stuff from the can.

Before we get started cooking appam, let me tell you how good these were. I served them with a Keralan pork chop recipe seasoned with cinnamon, cloves, coriander powder and cardamom. It had lots of onions and tomatoes that made a rich gravy for the pork chops and potatoes. Perfect for eating with appam! Even after my husband and I were full, we were picking up pieces of the appam and nibbling on them.

How is it that something that contains no butter at all, indeed were cooked on a non-stick skillet with just a little canola oil, can taste so buttery? It made no sense. But buttery they are. We both declared them delicious and worthy of the make-again-soon list.

Note: Start one day ahead of when you want to serve the appam.

Ingredients
1 cup or 190g raw rice – I used extra long grained basmati.
1/2 cup or 60g cooked rice
1 cup or 240ml thick coconut milk
½ teaspoon dry active yeast
2 tablespoons sugar
1 teaspoon salt
oil as required

Method
Rinse the raw rice in cool water until the water runs almost clear. Cover the rice with ample cool water and set aside to soak for 5 hours.

Drain the water off of the rice in a sieve or colander. Put it in the jug of your blender with the cooked rice, the coconut milk, the salt and all but 1 teaspoon of the sugar.

Mix that teaspoon of sugar with a couple of tablespoons of warm water in a small bowl. Add the yeast and set aside to proof. You are looking for foam to start forming. If it doesn’t, start again with new yeast.

Blend the rice and coconut milk on high until you have a smooth batter. Add in the yeast mixture and mix again briefly. The batter will have the consistency of crepe batter or thick cream.

Pour the batter into a large bowl and cover loosely with cling film.

Leave overnight to ferment. In the morning, if you are not cooking your appam immediately, you can put it in the refrigerator.

You can see that the fermented batter really thickens up.

At this point, I thinned mine with a little water because it wouldn’t spread out at all. You want to be able to pour it in the pan with a measuring cup or ladle, not just spoon it into the pan.

Heat your non-stick skillet over a medium flame and add just a drizzle of canola or other light oil.

Pour in about 1/4 cup or 60ml of the batter and shake the pan so it spreads around. Cover the pan with a lid and cook until the bottom is brown and the top is completely cooked. Do not flip the appam.


Continue until all the appam are cooked. These are traditionally served as a breakfast or snack with vegetable stew.


Enjoy!

Many thanks to this month’s host, Mayuri of Mayuri’s Jikoni. Check out the pancakes from different parts of the world that our fellow Bread Bakers have baked this month:
BreadBakers
#BreadBakers is a group of bread loving bakers who get together once a month to bake bread with a common ingredient or theme. You can see all our of lovely bread by following our Pinterest board right here. Links are also updated after each event on the #BreadBakers home page. We take turns hosting each month and choosing the theme/ingredient.

Pin it! 

.

Sunday, February 12, 2017

Ham and Mustard Spirals

Flavorful ham and sharp whole grained mustard bake up crispy in puff pastry to create these lovely ham and mustard spirals. They are a quick and easy appetizer for your red carpet party.

Food Lust People Love: Ham and Mustard Spirals. Flavorful ham and sharp whole grained mustard bake up crispy in puff pastry to create these lovely ham and mustard spirals. They are a quick and easy appetizer for your red carpet party.


As I mentioned last Sunday, I love puff pastry. It’s such a versatile ingredient! If you have puff pastry in your freezer, you can make a quick appetizer out of just about anything in your cupboard or refrigerator.

A number of weeks ago, I bought some very finely sliced French ham from the deli counter of my nearby supermarket to make ham and cheese baguettes. The following Monday morning, I was going to a Christmas get-together with friends and wanted to bring a treat to share. I had four or five slices of ham leftover and a package of puff pastry in the refrigerator.

Ham and mustard are a classic combination so you can see how I got here, but you could use chutney or pesto or whatever other sauce you’ve got on hand. The important things to keep in mind is that 1. you don't use ham that is too thickly sliced and 2. that you don’t add too much of your chosen sauce, both of which might make your spirals soggy.

Ingredients
4-5 slices of French ham, thinly sliced
2 tablespoons whole grain mustard
1 package ready rolled puff pastry - 8 oz or 230g
1 oz or 28g Parmesan, freshly grated

Method
Preheat the oven to 400°F or 200°C and line a baking pan with parchment or a silicone liner.

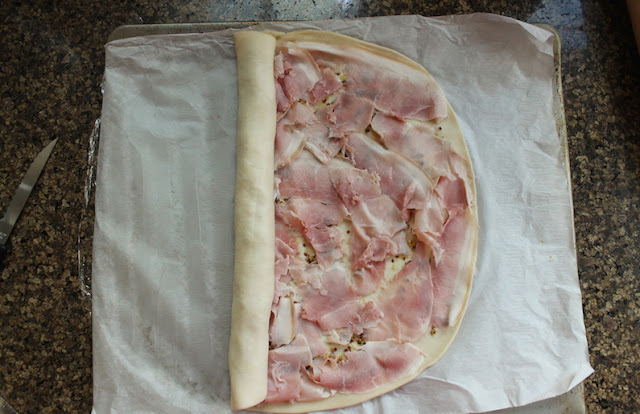
Unroll your puff pastry and spread it evenly with the mustard. Lay the ham out in single layer, covering the whole pastry. Start rolling on one side, all the way to the middle.

Food Lust People Love: Ham and Mustard Spirals. Flavorful ham and sharp whole grained mustard bake up crispy in puff pastry to create these lovely ham and mustard spirals. They are a quick and easy appetizer for your red carpet party.


Repeat with the other side. If you are working in a warm kitchen, roll the whole thing in cling film and pop it in the freezer for five minutes before slicing it.

Food Lust People Love: Ham and Mustard Spirals. Flavorful ham and sharp whole grained mustard bake up crispy in puff pastry to create these lovely ham and mustard spirals. They are a quick and easy appetizer for your red carpet party.


Use a sharp knife to cut the roll into 1/2 inch or 1 cm slices. Place the slices on your prepared pan.

Food Lust People Love: Ham and Mustard Spirals. Flavorful ham and sharp whole grained mustard bake up crispy in puff pastry to create these lovely ham and mustard spirals. They are a quick and easy appetizer for your red carpet party.


Bake for about 12-15 minutes or until lightly golden. Remove from the oven and sprinkle on the Parmesan.

Food Lust People Love: Ham and Mustard Spirals. Flavorful ham and sharp whole grained mustard bake up crispy in puff pastry to create these lovely ham and mustard spirals. They are a quick and easy appetizer for your red carpet party.

Bake for an additional 5-7 minutes or until they are golden all over and the cheese has melted.

Food Lust People Love: Ham and Mustard Spirals. Flavorful ham and sharp whole grained mustard bake up crispy in puff pastry to create these lovely ham and mustard spirals. They are a quick and easy appetizer for your red carpet party.


Enjoy!

This week my Sunday Supper group is sharing fancy appetizers for your red carpet award-watching party. Dress up, make a cocktail and get some of these ham and mustard spirals in the oven!

Or make one of these other fancy appetizers. Many thanks to our host Wendy of Wholistic Woman and our event manager, Cricket of Cricket’s Confections.

Finger Foods

Hors d'oeuvres

Seafood

Veggies

Sweets


Pin these Ham and Mustard Spirals! 

Food Lust People Love: Ham and Mustard Spirals. Flavorful ham and sharp whole grained mustard bake up crispy in puff pastry to create these lovely ham and mustard spirals. They are a quick and easy appetizer for your red carpet party.
 .


Sunday, February 5, 2017

Peppadew Trout en Croûte

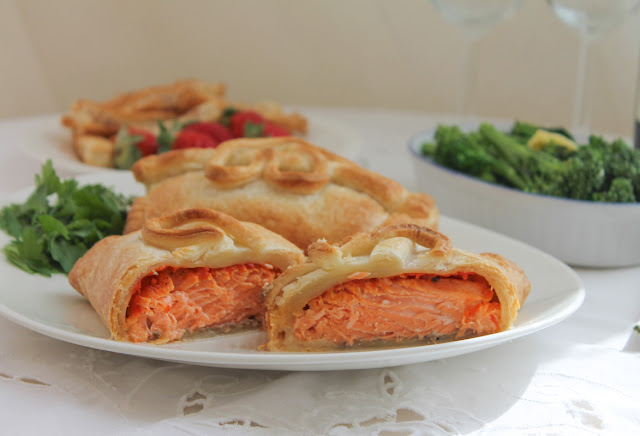
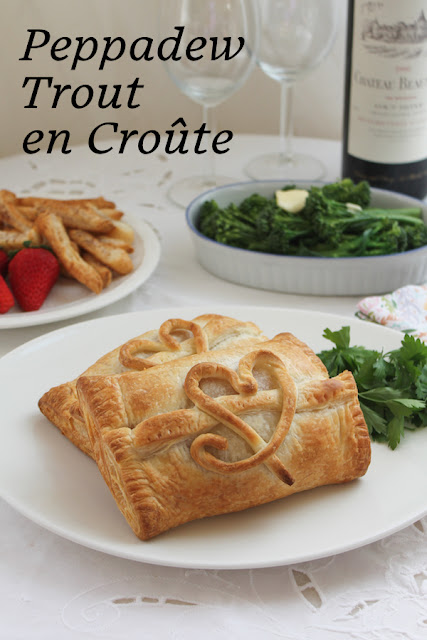
Peppadew Trout en Croûte looks fancy but it’s actually very easy, especially if you start with store-bought already rolled puff pastry. Peppadew peppers and garlic add a lovely fresh flavor that complements the richness of the trout and the flaky pastry.

Peppadew Trout en Croûte: Peppadew peppers and garlic add a lovely fresh flavor that complements the richness of the trout and the pastry. #SundaySupper


I went through a phase a few years ago where I fell in love with ready rolled puff pastry and used it to make so many things. It’s such a versatile ingredient that my freezer is rarely without a package. Whatever simple dish you want to fancy up can be kicked up several notches by the addition of some puff pastry, baked till flakey and golden. When the French wrap something in puff pastry, they call it en croûte – literally, in crust - which immediately makes it sound fancy too.

This week my Sunday Supper group is sharing easy dinners for two ahead of Valentine’s Day, with more than 30 meals you can make at home to celebrate. Individual peppadew trout en croûte is my contribution.

If you can't find trout, salmon is a great substitute.

Ingredients
2 trimmed trout steaks about 5 1/3 oz or 150g each (See note below.)
Salt
Pepper
8-9 peppers or 25g Peppadew peppers, drained
1 small clove garlic
13 1/4 oz or 375g sheet pre-rolled puff pastry (See note below.)

Method
Preheat oven to 400°F or 200°C. Line a baking pan with parchment. Pound the peppers and garlic together with a mortar and pestle or blend in a small food processor, till they form a thick paste.

To prepare the trout steaks, skin them and trim the thin side so that you are left with two thick steaks. Remove the pin bones with needle-nose pliers, if this has not already been done. (See note below for a quick, fresh appetizer recipe, using the trimmed bits.)


Season the trout steaks with salt and pepper. Fry the trout skin until crispy in a non-stick skillet. Remove to a piece of paper towel to drain and sprinkle with a little salt. These are the cook's treat and we fight over them at our house, but they also leave behind just enough oil for the next step.

Over a very high heat, brown both sides of the trout for about 1 minute on each side in that same pan. Remove from heat to a cool plate and leave to cool.


Unroll the puff pastry and trim all around the edges with a sharp knife, then cut it half. Place one trout steak on each half and top them with the Peppadew garlic paste.


Fold the first side of the puff pastry over the trout. Fold the second side up to the middle of the trout and make a little fold in the end of the puff pastry.

Gently press down on the puff pastry and remove all the air from inside, sealing the puff pastry on each side. Use the tines of a fork to seal the sides and a sharp knife to trim the excess off of the puff pastry. Decorate with some of the puff pastry scraps, if desired.

Left - ready to bake. Right - still needs trimming and decorating. 


Bake for about 15-17 minutes or until the puff pastry is golden brown, in the preheated oven.


Note: For a quick starter, toss some sliced purple onion with a couple of tablespoons fresh lime juice. Cut the trimmed pieces of trout into thin strips and add them to the sliced onion with a little cilantro, salt, black pepper. Stir well and refrigerate till ready to serve. For a quick and easy dessert, the puff pastry scraps can be baked in the oven once the trout comes out, sprinkled with sugar and cinnamon. Serve alongside some sweet strawberries. 

Remove the Peppadew trout en croûte from the oven and allow to rest for 5-7 minutes before serving with a salad or fresh steamed broccolini to complete your dinner for two.

Peppadew Trout en Croûte: Peppadew peppers and garlic add a lovely fresh flavor that complements the richness of the trout and the pastry. #SundaySupper


Enjoy!

Do you like to go out to eat for Valentine’s Day or stay in for a special meal? If you choose the latter, Sunday Supper’s got you covered this week! Many thanks to Candace from Authentically Candace, our host, and Cricket of Cricket's Confections for managing this event!

Chicken Recipes

Pasta Recipes

Pork Recipes

Red Meat Recipes

Seafood Recipes

Veggie Recipes


 Pin it! 

Food Lust People Love - Peppadew Trout en Croûte: Peppadew peppers and garlic add a lovely fresh flavor that complements the richness of the trout and the pastry. #SundaySupper

.

Wednesday, February 1, 2017

Black-eyed Pea Salad - Saladu Ñebbe #FoodieExtravaganza

This hearty black-eyed pea salad is full of good stuff but what makes it so tasty is the fresh lime juice and the hit of heat from the habanero pepper. I cautiously only put one pepper in this time. Next time I’m adding more!


Last weekend my husband and I did a massive clear out of all three of our freezers. The normal-size kitchen one, the even smaller one on top the beer fridge and the more capacious deep freezer. We hauled everything out and put it back in some sort of order. Frozen homemade sauces together. Poultry and beef on another shelf. Seafood on one side and the bottom drawer? It’s filled with pork products. The Great Freezer Cleaning also revealed a bag of dried black-eyes peas. It seemed like an omen.

This month my Foodie Extravaganza group is sharing heart healthy recipes. Beans and vegetables are probably two of the most heart healthy things you can eat, unless you are cooking those beans with smoked sausage. (My favorite way!) Even so, I like to think that the fiber and nutrition in beans outweighs the fat in the sausage. After all, sausage is also seasoning and you wouldn’t necessarily get a piece in each bite.

But beans are also great in salad, like this one of Senegalese origin, called Saladu Ñebbe or Salatu Ñebbe in the original language. There are several recipes in English online but they all seem to come from the same source, an article in Saveur magazine. Switching to French for my search, salade niébé, did turn up a few more. Whatever you call it, I’ll be making it again. I served it with seared tuna steaks, a delicious accompaniment.

Depending on which website or cookbook you consult black-eyed peas either don’t need to be soaked or they do. I treat them as I do all other beans. If I am not cooking them in a pressure cooker, I soak them overnight, if I have the time, or I quick soak them in boiling water for one hour, before cooking. Whichever method you choose, you are going to need about 2 1/2 cups or 400g cooked black-eyed peas for this recipe. One cup of dried peas should yield about that right amount.

Ingredients
2 1/2 cups or 400g cooked black-eyed peas (1 cup or 200g dried black-eyed peas, boiled and drained – you can substitute canned peas. Rinse and drain them well.)
1 habanero or Scotch bonnet chile
3 large green onions
2 small cloves garlic
3 tablespoons fresh lime juice
1 yellow bell pepper
250g cherry or grape tomatoes
1 medium cucumber
1 small bunch parsley
6 tablespoons olive oil
Sea salt and freshly ground black pepper, to taste
Optional for serving: salad greens

Method
Mince your habanero pepper and the garlic. Trim off the roots and slice the white part of your onion tops. In a large bowl, mix the three with the lime juice and set aside to marinate, with about a half teaspoon of salt.

This has a two-fold effect. First of all, it takes mellows the flavors of the raw garlic, onion and the habanero. Secondly, it makes sure that those flavors will be infused in the dressing.

Cut your cherry tomatoes into quarters. Seed, stem and chop the bell pepper.

Chop the green part of the onion tops and the parsley.

Cut the cucumber in half lengthwise then in half again. Use a sharp knife to remove the seeds, then cut the cucumber into small pieces.


Add the olive oil into the salad bowl and mix well with a fork.


Pile in the black-eyed peas. Stir well to coat.


Add in the chopped vegetables and herbs. Mix well.


Season with salt and pepper to taste. This salad can, of course, be eaten immediately but, unlike most salads, it gets better and better as it hangs out in the refrigerator.


If not serving right away cover with cling film and refrigerate. Remove from the fridge about 20 minutes before you are ready to serve to it’s not super chilled. Stir well.

Enjoy!


Many thanks to our Foodie Extravaganza host this month, Wendy of A Day in the Life on the Farm. Do check out the link list of all of our other heart-healthy recipes!


Foodie Extravaganza celebrates obscure food holidays or shares recipes with the same ingredient or theme every month.

Posting day is always the first Wednesday of each month. If you are a blogger and would like to join our group and blog along with us, come join our Facebook group Foodie Extravaganza. We would love to have you!

If you're a reader looking for delicious recipes, check out our Foodie Extravaganza Pinterest Board! Looking for our previous parties? Check them out here.

Pin it!

.

Monday, January 30, 2017

Baba Ganoush Muffins #MuffinMonday

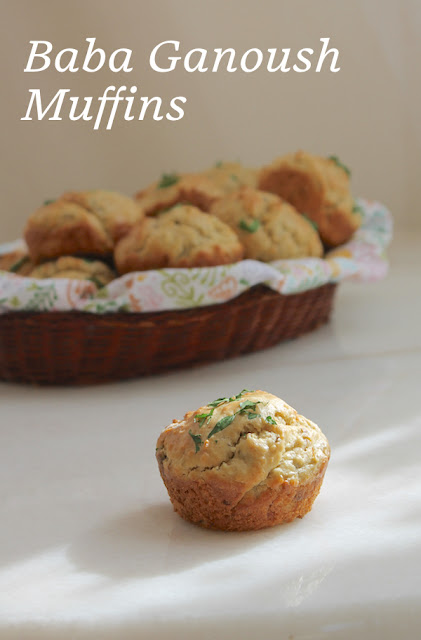
Roasted eggplant, tahini, garlic and a little cumin give these baba ganoush muffins all the flavor of that wonderful dip, in small portable packages. They are perfect with a cold beer, red wine or even something sparkling.


I am a firm believer that you can make pretty much anything into a muffin. It just requires some imagination and the creation of a fusion recipe, taking the ingredients of one dish and turning it into something completely different, but just as delicious.

As we munched on these with a glass of Prosecco the other evening, I share my theory with my husband. He’s learned over the years not to doubt me on matters of the kitchen, but he cocked his head to one side and gave me that little smile where he turns up just one corner of his mouth. “How about banana cream pie?”

If you’ve been reading along here for a while, or follow me on social media, you might know that banana cream pie is his favorite dessert, his special request on his birthday or Father’s Day. Interesting idea. Banana cream pie muffins. I’m not even going to google it because, in all likelihood, someone’s already done one.

But check back next month to see if I succeed. Meanwhile, roast youself an eggplant and make some savory Baba Ganoush Muffins. They are really rather special too.

Ingredients
Butter, oil or baking spray for greasing muffin pan
1 small eggplant about 8 1/2 oz or 240g
1 1/2 cups or 190g flour
1 teaspoon salt
1 teaspoon baking soda
1/4 teaspoon ground cumin
Black pepper
1/2 cup or 130g tahini
1/2 cup or 120ml milk
1 egg
1 clove garlic, minced or crushed in a garlic press
Parsley for garnish, if desired

Method
Preheat your oven to 375°F or 190°C and grease a 12-cup muffin pan with a little butter or oil.

Poke the eggplant all over with the tines of a fork. Using a carving fork, hold the eggplant closely over the flame of your gas stove, turning it until it’s charred all over, about 5-7 minutes. (If you don’t have a gas stove, you can just to all the roasting in the oven - it may take up to 25-30 minutes.)


Put the charred eggplant on a baking sheet and put it into the oven for about 20-25 minutes or until it’s completely cooked through.

Remove the eggplant from the oven and set it aside to cool.

Meanwhile, you can be getting the rest of the muffin ingredients ready.

In a large mixing bowl, whisk together your flour, salt, baking powder, cumin and a few generous grinds of fresh black pepper.

In another bowl, measure out your tahini and milk and add in the egg.

When the eggplant is cool enough to handle, remove the peelings and discard.

Mash the flesh with a fork.

 Add it to the wet ingredient bowl along with the garlic. Stir well to combine.


Fold the wet ingredients into the dry ingredients until just mixed. Divide the thick batter between the 12 muffin cups. Top with a little chopped parsley for color, if desired.


Bake in your preheated oven about 20-23 minutes or until the tops and sides are golden.


Remove from the oven and leave to cool for a few minutes in the pan. Then removed them from the pan and leave to cool on a wire rack.


Enjoy!

Check out all the lovely muffins my Muffin Monday bakers have created for you:


#MuffinMonday is a group of muffin loving bakers who get together once a month to bake muffins. You can see all our of lovely muffins by following our Pinterest board.

Updated links for all of our past events and more information about Muffin Monday, can be found on our home page.

Pin it!

Baba Ganoush Muffins - Roasted eggplant, tahini, garlic and a little cumin give these baba ganoush muffins all the flavor of that wonderful dip, in small portable packages.
.

Friday, January 20, 2017

Cheesy Shrimp Spinach Filo Pie #FishFridayFoodies

Crispy outside and savory inside, a slice of this rich cheesy shrimp spinach filo pie makes a great main course or addition to a brunch table.


Traditional fish pie with a creamy sauce, topped with mashed potatoes or puff pastry is one of our favorite things to eat, especially in a cozy pub on a chilly day. So when our organizer, Wendy of A Day in the Life on a Farm asked for host volunteers, I stepped forward thinking January would be the perfect time for a rich fish pie.

And, indeed, we are experiencing a bit of a chill here in Dubai. But, I’ll be honest, it’s not that cold. Also, from another project, I had some leftover filo pastry in the freezer that needed using up. If you’ve ever worked with filo, you know it can crack and break. But what I’ve figured out is that if you use the relatively whole pieces to make the bottom of the crust, you can just keep layering the small pieces and brushing them with butter and they come together nicely to complete a crunchy top.

Note: Keep the filo pastry covered with a damp cloth, removing one piece at a time as you layer the crust.

Ingredients
Olive oil for pan
Filo (sometimes spelled phyllo) pastry sheets – about 4 oz or 113g
2-3 large handfuls baby leaf spinach - don’t get hung up on weight. Just toss it in.
Sea salt - I use the fine stuff
Black pepper
12 oz or 350g shrimp, already peeled and cleaned
5 eggs
7 oz or 200g feta, crumbled
2 oz or 57g extra sharp cheddar, grated
1/4 cup or 60g butter, melted and cooled
Zest 1 lemon
1 teaspoon dried herbs - I like a mix of thyme and marjoram
1 teaspoon cayenne pepper - optional

Method
Preheat your oven to 350°F or 180°C.

In a medium saucepan, heat a drizzle of olive oil and add in your spinach with a sprinkle of salt and a good couple of grinds of black pepper.

Cook for a few minutes, or until the spinach has wilted. Remove from the pan and drain in a colander.

Add another drizzle of oil to the pan and cook the shrimp until pink, again adding a sprinkle of salt and a good couple of grinds of black pepper. Remove from the heat and leave to cool.

In a large mixing bowl, add your eggs, feta, cheddar cheese, lemon zest, herbs and some black pepper. Whisk to combine.


Fold in the drained spinach and the shrimp and add some more black pepper and cayenne, if desired.


Brush the bottom of your baking pan with butter. Layer your filo sheets one at a time, into the pan, brushing them with the melted butter before adding the next sheet. I had about 3 relatively intact sheets and lots of bits. Leave the ends hanging over the sides.


Pour in the filling and smooth out the top. Start laying the bits of filo on top, brushing with butter as you go.

Just keep adding filo and buttering until the top is a few layers thick.

Finally fold the overhanging filo sheets over the filling, covering the top as best you can. Brush the top and around the sides with more butter and use any broken pieces of filo to cover any holes in the top.


Use a sharp knife to make a vent hole in the middle of the pie so steam can get out and your filo will get crispy.


Bake in your preheated oven for 35-40 minutes or until the top is golden brown. If it’s browning too quickly, you can cover the top with foil.

Remove from the oven and leave to rest for about 15-20 minutes before attempting to slice it.


Enjoy!


Are you a fan of fish or seafood pies too? Then you are going to love this linky list! Click on the photos to see the recipes.


Pin it!


.

Thursday, January 19, 2017

Lemon and Prosecco Bundt #BundtBakers

This Lemon and Prosecco Bundt is perfect for any celebration where you want the guest of honor to feel special. After all, there is nothing like the pop of a cork to herald the beginning of a party.


The fact of the matter is that everyone has a birthday. That is part of the human condition. We are born. We have a birthday. So right here at the beginning of a new calendar year, our Bundt Bakers host Sue from Palatable Pastime proposed that we share birthday cakes to celebrate. Thanks, Sue! What an excellent idea!

I immediately put my thinking cap on. Birthday cake, birthday cake. I know I bake a lot but not being much of a sweet eater, it's never for me. (My birthday is four days from now. There will not be cake. If you wanna bake me something, make it something savory!)

I drew a blank. Then I thought, what makes a party more festive? Well, sparkling wine, of course. A quick Google search for Champagne cake recipes turned up 5,300,000 results! Clearly this was not a new idea.

To make it my own, I added a little lemon to the mix. And because a good Prosecco is usually cheaper than a good Champagne, I switched that up too. Despite the cheesy cut glass bottle, this one comes highly recommended and we usually buy a decent stock at an end of the year sale.

Today just happens to be the birthday of someone very special to me, my friend, Jane. She is sweet and kind and more generous than anyone I know. She also has a wickedly delightful sense of humor. But what I love most about her is her loyalty and faithfulness and courage. It's been a rough few years for her and her family and she has managed to keep the faith and make the rest of us still smile through her tears. If you happen to read this, Jane, I love you! I wish I could send you this cake, or better yet, be there to bake it for you for your special day. Happy Birthday!

Ingredients
For the cake batter:
1 cup or 200g granulated sugar
Zest of 1 lemon
1 1/2 cups or 190g all-purpose flour, plus more for pan
2 teaspoons baking powder
1/2 teaspoon baking soda
1/4 teaspoon salt
1/2 cup or 113g unsalted butter at room temperature, plus more for pan
1 tablespoon fresh lemon juice
2 large eggs at room temperature
1/2 cup or 120ml Prosecco

For the soaking syrup:
1/2 cup or 120ml Prosecco
2 tablespoons or 25g sugar

For the glaze:
1 cup or 125g powdered sugar
3-4 teaspoons Prosecco

To decorate - optional, but, hey, it's a birthday party!
Sparkling sugar
Tiny pearl sprinkles

Bundt pan: 10-cup or 2.4L Nordic Ware Blossom <affiliate link

Method
Preheat your oven to 350°F or 180°C. Grease the Bundt pan liberally with butter and shake in some flour to coat.

Zest your lemon into the sugar and mix it around thoroughly so the zest will flavor the sugar. Set the bowl aside.


Place the flour, baking powder, baking soda and salt in a bowl and whisk to combine. This aerates the flour and eliminates the need to sift.

Put the butter, lemon sugar and lemon juice into a mixing bowl or the bowl of your stand mixer and beat until light and fluffy, about 2 minutes.

Add the eggs, one at a time, beating until fully incorporated, scraping the bowl down in between additions.


Add half of your flour mixture and beat until incorporated. Scrape the side of the bowl down, then add half of the Prosecco. Beat again until thoroughly mixed.


Repeat with the rest of the flour and the rest of the Prosecco.


Spoon the batter into your prepared Bundt pan.


Bake on the middle rack of your preheated oven for about 30-35 minutes, or until golden on top and a wooden skewer inserted in the middle comes out clean.

While the cake bakes, make the soaking syrup by combining the sugar and the Prosecco. Stir till the sugar dissolves.


When you remove the cake from the oven, drizzle the bottom with a few teaspoons of the soaking syrup. Leave the cake to cool on a wire rack for 10-15 minutes then invert and remove the cake from the pan.


Gently brush or spoon the rest of the soaking syrup on the cake. Leave to cool completely before glazing.


To make the glaze, put your powdered sugar in a bowl and add Prosecco a teaspoon at a time, stirring with each addition, until you have a good drizzling consistency.

Use a piping bag or a Ziploc bag with a tiny corner cut off to make drizzling easier. If you are using sprinkles to decorate, have them at the ready because the surface of this glaze dries quickly. If you don’t sprinkle them on immediately, the sprinkles will just bounce off.


Pour everyone a glass of the Prosecco, cut the cake and enjoy!


What is your favorite birthday cake? Are you committed to the same one every year or do you mix it up? Perhaps you'll find a new favorite in the ones we are sharing today.

BundtBakers  

#BundtBakers is a group of Bundt loving bakers who get together once a month to bake Bundts with a common ingredient or theme. Follow our Pinterest board right here. Links are also updated each month on the BundtBakers home page.

Pin it! 

.