Showing posts with label Thanksgiving. Show all posts

Tuesday, November 21, 2017

Cinnamon Pumpkin Cookies #CreativeCookieExchange

Tender pumpkin insides and crunchy sugar outsides make these cinnamon pumpkin cookies perfect for your holiday table.

Food Lust People Love: Tender pumpkin insides and crunchy sugar outsides make these cinnamon pumpkin cookies perfect for your holiday table. Mix up a batch of these fabulous cookies for your next gathering.

I love the sparkle of demerara sugar. Rolling the cinnamon pumpkin cookie dough in those big sugar crystals is what makes these cookies special, plus it also makes the dough less sticky and easier to shape.

If you can’t find it in your local supermarket or bakery supply store, you can order it from Amazon.  <affiliate link*. I use it on all sorts of baked goods, when a little shine is welcome, like my chili maple bacon cookies and blueberry pie with polenta shortcake crust. It also makes a rich and wonderful simple syrup to use in cocktails like an Irish blackberry cobbler or pomelo margaritas.

But this month for our Creative Cookie Exchange, we are sharing cookies that make an easy, last minute Thanksgiving holiday dessert or treat so I made cinnamon pumpkin cookies. They can be made ahead, frozen, and baked when needed, so you are ready at a moment's notice when unexpected guests arrive. Or you can bake them ahead of time and freeze them after. They thaw almost instantly, always a plus for a busy holiday.

Mix up a batch of these fabulous cookies for your next gathering. I almost called these pumpkindoodles, you know, like snickerdoodles but pumpkin. But there is nothing absent-minded about that crunchy demerara sugar. It's all there.

Cinnamon Pumpkin Cookies


Ingredients for about 2 dozen cookies
1 1/2 cups or 190g flour
½ teaspoon salt
1 teaspoon baking powder
1 tablespoon ground cinnamon
1/2 cup or 100g soft dark brown sugar
1/2 cup or 113g butter, softened
2 tablespoons unsulphured molasses
1 large egg
3/4 cup or 150g canned pumpkin puree (not pumpkin pie filling) or steamed, mashed fresh pumpkin

For rolling the dough:
1 cup or 220g Demerara or other large grained sugar
1 teaspoon ground cinnamon

Method
Whisk together your flour, salt, baking powder and ground cinnamon in bowl. Set aside.

With your hand beaters or in the bowl of your stand mixer, cream together the brown sugar, butter and molasses.

Tip: The molasses will slide easily off of your measuring spoon if you give it a quick spray with Pam or your favorite non-stick spray first.

Add in the egg and pumpkin and beat for another minute or so, scraping down the bowl halfway through.


With the beaters on low, add in the flour mixture a little at a time, until it is fully incorporated.


Line a baking pan with parchment and use a scoop or a couple of tablespoons to divide the soft dough into about 24-26 portions. Pop the pan into the freezer and set a timer for about 45 minutes, if you are planning to bake the same day.


Meanwhile, mix the demerara sugar with the ground cinnamon in a large mixing bowl.

When the dough is almost finished chilling, preheat your oven to 350°F or 180°C and prepare your cookie pan by lining it with baking parchment or a silicone liner.

Remove only 12 (or however many cookies your pan can fit) pieces of dough from the freezer.

Roll each into a ball and pop it in the bowl of cinnamon sugar. Shake the bowl to coat. Use your hands to press each ball into a disk shape and press both sides of the disk back into the cinnamon sugar.

Food Lust People Love: Tender pumpkin insides and crunchy sugar outsides make these cinnamon pumpkin cookies perfect for your holiday table. Mix up a batch of these fabulous cookies for your next gathering.

Place them on the prepared pan.

Food Lust People Love: Tender pumpkin insides and crunchy sugar outsides make these cinnamon pumpkin cookies perfect for your holiday table. Mix up a batch of these fabulous cookies for your next gathering.

Bake in your preheated oven for about 12-14 minutes, or until the cinnamon pumpkin cookies are puffed and set. Remove from the oven and leave to cool completely before serving or storing in an airtight container.

Food Lust People Love: Tender pumpkin insides and crunchy sugar outsides make these cinnamon pumpkin cookies perfect for your holiday table. Mix up a batch of these fabulous cookies for your next gathering.

Repeat with the remaining dough, until all the cookies are baked.

Alternatively you can completely freeze the dough pieces so they won’t stick together, then transfer them to a Ziploc bag. Keep them frozen until you are ready to bake. Remove just the number you want to bake from the freezer. Let them thaw just enough so you can roll them into balls and continue with the instructions for rolling them in the sugar, shaping and baking.

I’ve tested it both ways and the cookies turn out great either baked the same day or after freezing the dough.

Enjoy!

Food Lust People Love: Tender pumpkin insides and crunchy sugar outsides make these cinnamon pumpkin cookies perfect for your holiday table. Mix up a batch of these fabulous cookies for your next gathering.

Are you needing last minute treat recipes for Thanksgiving? Check out all the cookies we’ve got for you today!

Creative Cookie Exchange is hosted by Laura of The Spiced Life. We get together once a month to bake cookies with a common theme or ingredient so Creative Cookie Exchange is a great resource for cookie recipes. Be sure to check out our Pinterest Board and our monthly posts at The Spiced Life. We post the first Tuesday after the 15th of each month!

*Disclaimer: Amazon affiliate links earn me a few pennies when you make a purchase by following one, even if you don't buy the item I've listed. Your cost remains the same.

Pin it! 

Food Lust People Love: Tender pumpkin insides and crunchy sugar outsides make these cinnamon pumpkin cookies perfect for your holiday table. Mix up a batch of these fabulous cookies for your next gathering.
.

Sunday, October 29, 2017

Sincere Pumpkin Patch Spicy Cheese Ball

Extra sharp cheddar and cream cheese can be flavored with a variety of herbs and spices and rolled up ball- or log-shaped for a savory appetizer that will be a welcome addition to any party table. For added interest, roll your cheese ball in chopped pecans or walnuts.

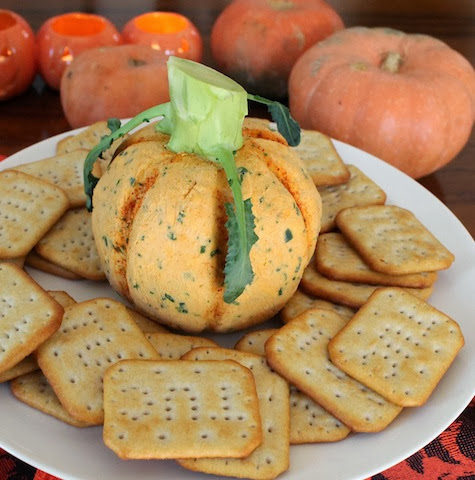
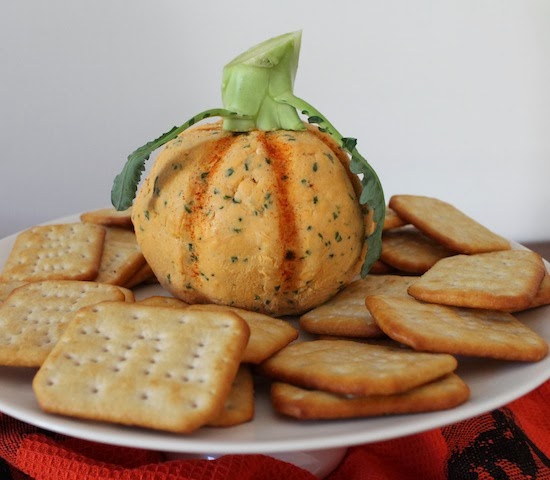
Food Lust People Love: This pumpkin-shaped spicy cheese ball is a great addition to any Halloween or Thanksgiving party table.


If you’ve been reading along for a while, you might have noticed something.  I didn’t have a single Halloween post until last week’s Muffin Monday.  It’s not that I don’t enjoy Halloween.  In fact, as I mentioned a few weeks ago, when my girls were little, I was chief organizer and instigator of Halloween celebrations in our little neighborhood in the small oilfield town of Macaé, Brazil.

When we lived in Kuala Lumpur, we took part in trick-or-treating by joining another neighborhood’s festivities since no one went door-to-door in our mostly local area.  We parked on the route, decorated the trunk of our car and gave out candy.  But since the girls left home for university and I started the blog, my Halloween decorating and baking has dropped off significantly, although I still join my friends to give out candy if I happen to be in KL for Halloween.  It’s such fun to see the children in costumes.

Trunk-or-Treat - Kuala Lumpur, Malaysia circa 2010


This week’s Sunday Supper theme is Halloween Finger Foods and since I don’t have little ones at home, I decided to go savory instead of sweet by making a spicy cheese ball that would be a great addition to any Halloween party table.  Goodness knows there will be enough candy already.

Like Linus from the comic strip Peanuts, I like to think that the Great Pumpkin will come to the most sincere pumpkin patch (or buffet table) and bring gifts for everyone.  He might even be tempted by this cheese ball.  It is most sincerely cheesy.

Ingredients
13 1/4 oz or 375g extra-sharp orange cheddar cheese
8 oz or about 225g cream cheese, at room temperature
1 small bunch chives (Mine was about 1/2 oz or 15g)
1 jalapeño (Mine was about 3/4 oz or 20g)
1 clove garlic
1 teaspoon smoked paprika plus extra for decorating, if desired
2 tablespoons plain yogurt

For decoration: One broccoli stalk - with leaves, if possible
To serve: Crackers of your choice or bread

Method
Grate your cheddar cheese into a large mixing bowl. Finely mince your chives and garlic. Cut the stem end off of the jalapeño and remove the seeds, if you want to add just a little spice. If you like spicy food, by all means, leave the seeds in. Mince the jalapeño finely.


Add the softened cream cheese, the chives, garlic, jalapeño, smoked paprika and plain yogurt to the cheddar cheese.


Mix thoroughly with a wooden spoon.


Line a small round bowl with cling film and heap the cheese mixture in it.  Press down with a spatula so the cheese fills the bottom of the lined bowl completely. Cover with the cling film and round out the top with your hands.  It’s like playing with Play-Do again.


Set the covered cheese ball in the refrigerator for several hours so it will stiffen back up.  I ended up leaving mine overnight because I got busy with other projects.

Remove the cheese ball from the bowl but leave it covered with the cling film.  Press the ball into a pumpkin-like shape.  Remember that pumpkins come in all shapes and sizes so don’t get too hung up on complete roundness or perfection.

Use your thumb to make grooves in the ball from top to bottom.


When you are satisfied that it looks like the best pumpkin you can manage, unwrap the cling film and use a soft paint brush to brush a little smoked paprika in the grooves to enhance the look.


Cut the stem off your broccoli, keeping a couple of leaves attached, if possible.  Cut what will be the top of your pumpkin stem at an angle.  Set the stem on top of your cheese pumpkin ball and push it in just a little.   Is that not the cutest thing!?


Serve with crackers or bread, and don’t forget to put out a knife so that folks can cut a piece off and spread the cheese ball.

Food Lust People Love: This pumpkin-shaped spicy cheese ball is a great addition to any Halloween or Thanksgiving party table.

Enjoy!


Still wondering what to make for your Halloween party? Sunday Supper is here to help with a great list of finger food recipes!

Spooky Snacks and Starters

Tasty Trick-or-Treats


Pin it! 

Food Lust People Love: This pumpkin-shaped spicy cheese ball is a great addition to any Halloween or Thanksgiving party table.
 .

Sunday, November 6, 2016

Cheesy Jalapeño Corn Casserole

If you are a fan of cheese and spice and corn, you are going to love this cheesy jalapeño corn casserole. The whole dish is great, but that golden top is the absolute best part.


I must confess that in my family we have a standard set of sides that must be made for Thanksgiving and Christmas and this cheesy jalapeño corn casserole isn't on that list. Not because it’s not perfectly spicy, cheesy and delicious. No, it's because that list was set in stone many years ago and no one is allowed to alter it. In fact. lest we forget, the list is kept at the front of my recipe binder, in a little pocket. Along with the turkey and stuffing, we must have rich creamed potatoes, sticky sweet potatoes, maque choux, green beans with baby new potatoes and, of course, my aunt's best pecan pie for dessert. Is it only my family that is so set in our ways?

If your family is not as persnickety about the holiday menu, you’ll want to add this casserole to your line up. Never mind, if they are. Just make it for a Sunday Supper.

Ingredients
2 tablespoons butter
1 fresh jalapeño or part thereof- depending on your heat tolerance - minced
2 tablespoons onion, minced
1 clove garlic, minced
2 tablespoons all-purpose flour
1 teaspoon dry mustard powder
3/4 teaspoon salt
1/2 teaspoon black pepper
3 cups grated sharp cheddar cheese, about 12 oz or 340g
4 cups or 540g fresh or frozen corn kernels
2 eggs
1 cup or 240ml milk

Method
Use one tablespoon of the butter to sauté the onion, garlic and jalapeño in a small saucepan, over a very low heat, just until softened, about 5-7 minutes. The onion doesn’t need to color, just soften. Remove from the heat and leave to cool.

Preheat oven to 350°F or 180°C and use the other tablespoon of butter to grease your casserole dish.

Toss together cheese, flour, mustard powder, salt and pepper in a medium bowl. Add in the corn and mix well. Set aside.


Beat the eggs and whisk in the milk and the sautéed vegetables.


Pour milk/egg mixture in the corn/cheese mixture; stir well to blend evenly.


Pour the combined mixture into your buttered casserole dish. It looks a bit dry on the top but don't worry, the egg and cheese will rise up and created a beautiful almost soufflé like texture throughout.


Bake in your preheated oven for about 35-40 minutes or until puffy and golden on top. The middle should be ever so slightly jiggly when you take it out and will firm up as it cools.


Enjoy!


Check out all the other special tasty side dishes our Sunday Supper tastemakers are sharing today! Many thanks to this week's host, Caroline of Caroline's Cooking and our event manager, Renee of Renee's Kitchen Adventures for all of their hard word.

Fruity Side Dishes

Other Side Dishes

Potato Side Dishes

Vegetable Side Dishes


.

Wednesday, November 25, 2015

Fresh Orange Cranberry Sauce

Fresh cranberry sauce with a kick of citrus. This is no-cook sauce is easy to make and pairs well with your Thanksgiving or Christmas turkey dinner.

I must confess that in our family, we are fans of the jellied cranberry sauce and take a certain amount of pride in sliding it straight out of the can whole and slicing it up to serve just as is. None of this mashing it around to pretend it’s homemade in any way, shape or form. It’s completely different from this fresh orange cranberry sauce so I think there is a place for both in my life. Neither requires any cooking. Both are ready at a moment’s notice. I’m not going to pick a favorite but if you turn your nose up at the jellied stuff, give this a try.

I could have sworn I watched Paul Hollywood make his version of this on a Great British Bake Off Christmas master class but I’ll be danged it I can find it online to give you the link. If anyone out there has it, I'd be happy to hear from you.

UPDATE: I am much obliged to my friend, Nicky, with whom I watched that episode. She has just informed me that it was Mary Berry who made the fresh cranberry sauce, not Paul. Turns out it wasn't from the GBBO master class at all but Mary Berry's Absolute Favorite Christmas Favorites, which we watched that same day. Mystery solved!

For those who celebrate, may you enjoy a happy Thanksgiving tomorrow full of good food, family and bountiful blessings!

Ingredients
1 1/2 cups or 170g fresh clean cranberries
1/4 cup or 60ml vanilla wine syrup or rich (double sugar) simple syrup with a small splash each of sherry and vanilla
Pinch fine sea salt
1 orange

Method
Peel and seed your orange, making sure you remove all the pith and the hard bits in the middle with a sharp knife.


Put everything in a food processor and chop till finely ground.


Enjoy!


Need a little inspiration for the Thanksgiving feast still? Here are some of our Cajun family favorites.

Nanny's pecan pie


My grandmother's maque choux or spicy Cajun corn


My grandmother's green beans and new potatoes


Extra rich creamed potatoes


And for Friday when you have leftover turkey and gravy? Make my easy turkey potpie with store-bought puff pastry.

.

Tuesday, November 10, 2015

Cheesy Garlic Pull-Apart Buns #BreadBakers


Loads of garlic, tons of butter and a heaping helping of salty grated Parmesan cheese make these soft yeast buns the perfect addition to any family dinner table.

Garlic bread has always been a standard addition when I consider the meal “Italian,” serving, for instance, spaghetti with meatballs or fettuccine Alfredo. But when we lived in Brazil, I discovered that garlic bread was served there with pretty much every party meal, including the famous Brazilian churrasco, a grilled meat extravaganza. It made me reconsider how we limit ourselves by our narrow experience of what goes with what and I’ve since made garlic bread the Brazilian way* to serve along with many meals. To carry that attitude one step farther, I served these cheesy garlic rolls along with some Parma-wrapped pan-fried cod and crunchy, spicy green beans. They were perfect for sopping up the buttery, lemony fish juices on our plates.
*Bonus recipe: Brazilian garlic bread
Stir together equal parts softened butter and mayonnaise (Sounds weird, but trust me. It adds just the right amount of salt.) with lots of crushed garlic and spread inside a French loaf opened down the middle. Turn the loaf on its uncut side and slice it into pieces, but don't cut quite all the way through so they are still hooked together. Wrap the whole thing tightly with foil and bake for 15-20 minutes in a moderate oven till the bread is a little crunchy outside and the garlic spread has melted into the bread on the inside. Open the foil and serve, allowing folks to pull the almost-cut-through slices off themselves.
Back to our regularly scheduled buns
This month’s Bread Bakers theme is Family Feast Breads where we are sharing breads perfect for a celebration table. This particular bun recipe is adapted from Jamie Oliver’s Comfort Foods.* (<Amazon affiliate link) Along with some modifications in ingredient amounts, I added Parmesan cheese because, according to my husband who is only allowed to help himself to grated Parmesan after everyone at the table has had a fair turn, Parmesan makes everything better. I wholeheartedly concur.

Ingredients
For the bread:
3 1/4 cups or 410g strong bread flour, plus extra for dusting
1 teaspoon active dry yeast (5g)
1 teaspoon sugar
1/2 teaspoon fine sea salt
9 1/4 oz or 275ml tepid water (That works out to be 1 1/6 cups, rather an awkward cup measure, but there you go.)
1/3 cup or 50g stale breadcrumbs

For the compound butter:
1/2 bulb garlic*
1 cup or 225gunsalted butter (at room temperature)
3 oz or 85g finely grated Parmesan (heaping 3/4 cup) plus extra for sprinkling
Zest 1/2 lemon
1 small bunch fresh flat-leaf parsley (15g)
1/2 teaspoon cayenne pepper

*Garlic bulbs vary as do the size of garlic cloves so use your judgment on the amount, depending on your love of garlic. But to give you an idea, my cloves weighed 30g after peeling.

Method
Put the flour in a large bowl and make a well in the middle. Measure your yeast, sugar and sea salt into the well.

Pour in the tepid water and stir from the middle to combine the flour with the water, until you have a rough dough.


Knead the dough on a clean floured surface for about 10 minutes or until the dough is smooth and stretchy. Sprinkle on a little more flour if necessary but try not to add very much.


Place the dough back in the bowl and cover it with a damp cloth. Leave to prove in a warm place for about 1 hour or until it has doubled in size.


Now you can get on with the butter. I cut back on Jamie’s recipe but this still makes twice as much as you need for these garlic buns, especially once I added the cheese. But trust me that having this compound butter in your refrigerator or freezer is a good thing. It’s beautiful spread on bread to make a more traditional garlic bread out of a French loaf as well as melted on top of a grilled steak or pan-fried fish. It makes a mean slice of garlic Texas toast as well.

The Compound Butter
Put the softened butter in a medium-sized bowl and add in the cayenne. Use a garlic press to crush the garlic into the butter bowl. Finely mince your parsley, stems and all.


Add the minced parsley, then finely grate the zest of the half lemon into the bowl and stir well to combine. My bowl was a little snug for stirring. Choose a bigger bowl than I did!


Add in the Parmesan and mix well.


Divide the garlic butter into two equal portions and roll one half up in the bottom of a baggie and refrigerate. If you are keeping it for a while, it can even be frozen and sliced as needed.


Use one third of the other half of the garlic butter to grease your baking pan.

Sprinkle it with the breadcrumbs, making sure to cover the bottom and sides of the pan. Put the rest of the garlic butter in a plastic baggie but do not refrigerate. We want it soft enough to squeeze out.

When the dough has finished its first rise, divide it first into six smaller pieces and then divide each smaller piece into three, creating 18 pieces of dough in all.


Roll each of the 18 pieces of dough into balls and then place them in the prepared baking pan.


Cut the very corner off of your baggie of soft garlic butter and squeeze about half out onto and around the buns.


Cover loosely with cling film and leave to rise for the second time in a warm place for about one and a half hours or until doubled in size.

One half hour before the rising time is up, start preheating your oven to 375°F or 190°C.

Remove the cling film and sprinkle the buns with some extra grated Parmesan.


Bake them in your preheated oven for about 30 minutes or until they are golden and springy.

Squeeze the remaining soft garlic butter over the buns and, as it melts, quickly spread it around with a pastry brush.


The outsides are crunchy from the toasted garlicky buttery cheesy breadcrumbs and your guests will be fighting over the corners. Or you could eat them in the kitchen before you put the tray out. Not that I would do such a thing.

Enjoy!


Many thanks to our host this month, Pavani from Cook’s Hideout. Have a look at all the beautiful Family Feast breads our bakers are sharing today!


BreadBakers
#BreadBakers is a group of bread loving bakers who get together once a month to bake bread with a common ingredient or theme. Follow our Pinterest board right here. Links are also updated each month on this home page.

We take turns hosting each month and choosing the theme/ingredient.

If you are a food blogger and would like to join us, just send me an email with your blog URL to foodlustpeoplelove@gmail.com.

*Items purchased through an Amazon affiliate link cost no extra to the buyer but earn me a few pennies to buy more bacon. Thanks for the support.